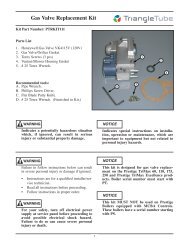
Venturi Replacement Kit PSRKIT80 thru 83 - Triangle Tube
Venturi Replacement Kit PSRKIT80 thru 83 - Triangle Tube
Venturi Replacement Kit PSRKIT80 thru 83 - Triangle Tube

You also want an ePaper? Increase the reach of your titles
YUMPU automatically turns print PDFs into web optimized ePapers that Google loves.
PRESTIGE <strong>Venturi</strong><br />
<strong>Replacement</strong> <strong>Kit</strong><br />
Trimax Instuctions<br />
Installer<br />
Button<br />
Fig. 5: Trimax Navigation Buttons<br />
1. Press the round INSTALLER button. See Fig. 5.<br />
2. Enter the installer access code “054” by using<br />
the LEFT and RIGHT buttons to select a digit<br />
and the UP and DOWN buttons to change the<br />
digit. Press the OK button to enter the access<br />
code.<br />
3. Press the RIGHT button to highlight the<br />
Manual Operation icon then press the OK<br />
button.<br />
4. Press the OK button while the FAN icon is<br />
highlighted to manually fire the burner and<br />
power the CH circulator.<br />
NOTICE<br />
An adequate CH load must be present to dissipate<br />
the heat generated during the combustion<br />
test. If an adequate CH load is not available, an<br />
indirect water heater can be used to dissipate the<br />
heat by creating a DHW call which will enable<br />
the DHW circulator.<br />
Revised Date: 5/30/12<br />
Manual Operation<br />
FAN<br />
CH<br />
CH1<br />
DHW<br />
SYS<br />
CH2<br />
Released<br />
Off<br />
Off<br />
Off<br />
5<br />
5. Press the RIGHT button to adjust the firing rate<br />
to 100%. Hold down the RIGHT button to<br />
rapidly increase the firing rate.<br />
6. If the combustion levels during High fire are<br />
outside the recommended combustion settings<br />
adjust the THROTTLE SCREW (see Fig. 4) as<br />
follows:<br />
Counter-clockwise adjustment of the THROT-<br />
TLE SCREW at high fire:<br />
O 2 decreases and C0 2 increases<br />
Clockwise adjustment of the THROTTLE<br />
SCREW at high fire:<br />
O 2 increases and CO 2 decreases<br />
7. Once the combustion level is set at High fire,<br />
manually place the boiler into Low fire mode by<br />
pressing the LEFT button to adjust firing rate<br />
down to 0%.<br />
8. If the combustion level during Low fire is not<br />
within +/-0.2 of the combustion level measured<br />
at High fire, remove the offset cover screw and<br />
adjust the plastic OFFSET SCREW (see Fig. 4)<br />
using a T-40 Torx wrench as follows:<br />
Counter-clockwise adjustment of OFFSET<br />
SCREW at low fire (0% firing rate):<br />
O 2 increases and CO 2 decreases<br />
Clockwise adjustment of OFFSET SCREW at<br />
low fire (0% firing rate):<br />
O 2 decreases and CO 2 increases<br />
9. Press the OK button while the fan icon is highlighted<br />
to shutdown the burner.<br />
10. Press the LEFT or RIGHT button to highlight<br />
the home screen icon to exit the service<br />
mode.<br />
2011-51 Prestige <strong>Venturi</strong> <strong>Replacement</strong> <strong>Kit</strong>_1111