Create successful ePaper yourself
Turn your PDF publications into a flip-book with our unique Google optimized e-Paper software.
OPERATION<br />
The electronically controlled pressure switches turn the lamp’s operation on and off (control<br />
switch ”A” in the front of the handle) as well as change the light source between the halogen<br />
bulb and the signal LEDs (selector switch ”B” situated below). The charge state of the battery<br />
is indicated by a small bar beneath the handle of the lamp. When only one of the four indicator<br />
lights is illuminated and the halogen bulb of the lamp and/or the signal LEDs start to flash at<br />
intervals of 15 seconds the battery of the lamp becomes flat (then approx. 10-20 min of time is<br />
left). The lamp’s control electronics switches the power off automatically before deep discharge<br />
danger. The lamp can still be used for a short time in case of an emergency but this reduces the<br />
battery’s lifetime. The full operating time of the battery varies depending on the bulb, the used<br />
light output and the capacity of the battery. The overall operating time of the lamp is extended if<br />
it is used over short periods.<br />
IMPORTANT FOR OPERATION<br />
To gain a maximum lifetime of the battery the lamp should be discharged now and then by leaving<br />
the lamp switched on until it switches off automatically. Especially NiCd batteries should be<br />
discharged approx. once a month. Then a memory effect of the battery is avoided which reduces<br />
the operating time of the lamp. The operating time of the lamp decreases also with an ageing<br />
battery. If the operating time according to graphic values is reduced significantly despite a fully<br />
charged battery the battery of the lamp needs to be changed. Please note that no NiMH batteries<br />
are to be placed into the NiCd lamp!<br />
CHARGING and KEEPING<br />
The lamps are charged in a MICA <strong>IL</strong>C charging holder. On the equipment identification plate of the<br />
lamp it is marked which battery is in the lamp. All <strong>IL</strong> lamps are kept in the holder when not used.<br />
The MICA charging holders keep the battery always ready to use. Become acquainted with the<br />
manual of the charging holder as well! Please note that charging of NIMH batteries equipped lamps<br />
in old MICA <strong>IL</strong>-35 charging holders is strictly prohibited!<br />
MAINTENANCE<br />
Handle bulb and reflector with care as impurities inside diminish the light output and bulbs’ lifetime.<br />
The contaminated reflector or bulb can be cleaned with a piece of cloth and with a suitable solution.<br />
When dismounting the lamp pay attention to the cable positions and the right polarity. During the<br />
warranty period only a representative of MICA-Service may replace parts and as interchangeable<br />
items only original MICA spare parts may be used.<br />
Bulb replacement: First switch off the electricity (operating switch A) and make sure that the<br />
battery charge level indicator lights are off. To replace the bulb twist off the lock ring and loosen<br />
the glass lens by holding it at the rim. Use a clean piece of cloth to protect your fingers, when<br />
you open the lock ring of the bulb and loosen/change the bulb. If you still touch the bulb with your<br />
hands, clean it with a solution.<br />
Dismounting the lamp: After removal of the bulb unscrew the clamping bolt of the reflector<br />
using a wide screw driver and remove the reflector. Loosen the contacts by unscrewing the phillips<br />
screws on the bottom of the lamp in order to get the carrier unit out of the housing. If the carrier<br />
is stuck, tap the lamp slightly against the table edge. Pull the carrier half way out of the housing<br />
and disconnect the operation switch miniature connector (black wires). Disconnect also the three<br />
wires of the selector switch from the terminals. Pull out the carrier entirely from the housing.<br />
Battery package: Disconnect the battery connectors (wires red and black). The battery package<br />
can now be taken out of the carrier.<br />
Electronic module: Unscrew the fastening screws inside the charging contacts. Afterwards remove<br />
the rear fastening screw of the electronic module. The electronic module can now be released from<br />
the carrier.<br />
Push-on/off switches: The push switch (on/off) detachment starts from the outside of the<br />
housing by unscrewing the four switch cover plate screws. Remove the switch cover and the rubber<br />
cap and remove the switch from the inside of the housing. The selector switch rubber cap is<br />
removed and the switch is just pushed into the housing. At the same time make sure that the<br />
switch rubber caps are intact as their condition affect the lamp ingress protection substantially.<br />
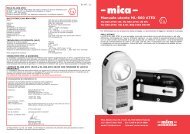
Assembly: The lamp is assembled in the reverse order. Refer to picture "PIC 1" for correct<br />
connection of the switch terminals. The three selector switch connectors are connected as follows:<br />
the white wire to the circuit card, the red wire to the red line and the black wire from the switch<br />
to the blue line.<br />
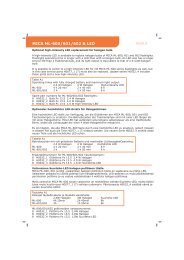
A<br />
B<br />
5<br />
7 8<br />
6<br />
10<br />
14<br />
12<br />
1 H0051_1 Battery 8,5 Ah NiMH, battery wire<br />
abiko<br />
1 H0051_2 Battery 5,5 Ah NiCd, battery wire<br />
abiko<br />
2 H0056_1 Charging contacts (i.e. screws and<br />
seals)<br />
3 H0100_5 <strong>IL</strong>-<strong>61</strong> lamp’s housing orange<br />
3 H0100_6 <strong>IL</strong>-<strong>61</strong> lamp’s housing red<br />
4 H0101_1 <strong>IL</strong>-lamp’s switch fitting grey<br />
4 H0101_2 <strong>IL</strong>-lamp’s switch fitting black<br />
5 H0102_1 <strong>IL</strong>-lamp switch’s new terminal block<br />
6 H0104_1 <strong>IL</strong>-lamp’s lock ring grey<br />
6 H0104_2 <strong>IL</strong>-lamp’s lock ring black<br />
7 H0105_1 <strong>IL</strong> lamp’s glass lens<br />
7 H0105_2 <strong>IL</strong> square light lens<br />
8 H0106_1 <strong>IL</strong> lamp o-ring seal<br />
9 H0107_5 <strong>IL</strong>-<strong>61</strong> lamp’s circuit card<br />
10 H0108_3 <strong>IL</strong> lamp’s bulb base Px 13.5,<br />
4<br />
16<br />
3<br />
2<br />
1<br />
15<br />
9<br />
11<br />
13<br />
11 H0109_2 <strong>IL</strong> lamp’s bulb fitting<br />
12 H0111_7 <strong>IL</strong> lamp’s 12 LED reflector wedge<br />
12 H0111_8 <strong>IL</strong> lamp’s 12 LED reflector medium<br />
12 H0111_9 <strong>IL</strong> lamp’s 12 LED reflector orange<br />
13 H0112_1 <strong>IL</strong> inner carrier whole set<br />
14 H0032_1 Bulb Px 13,5 2,4W<br />
14 H0032_2 Bulb Px 13,5 4W<br />
14 H0032_3 Bulb Px 13,5 6W<br />
H0118_1 Gas discharge valve NiMH battery<br />
15 H0119_1 <strong>IL</strong>-<strong>61</strong> 12 red Led card<br />
16 H0120_1 <strong>IL</strong>-<strong>61</strong> selector switch and rubber cap<br />
All parts of your handlamp are available as spare<br />
parts through <strong>Mica</strong> <strong>Elektro</strong> Oy <strong>Ltd</strong>. NOTICE:<br />
When ordering spare parts please tell the type<br />
and serial number of your lamp/charger.