Scholarship on the Web: Editing EngravingsâMatting Photoshop
Scholarship on the Web: Editing EngravingsâMatting Photoshop
Scholarship on the Web: Editing EngravingsâMatting Photoshop

You also want an ePaper? Increase the reach of your titles
YUMPU automatically turns print PDFs into web optimized ePapers that Google loves.
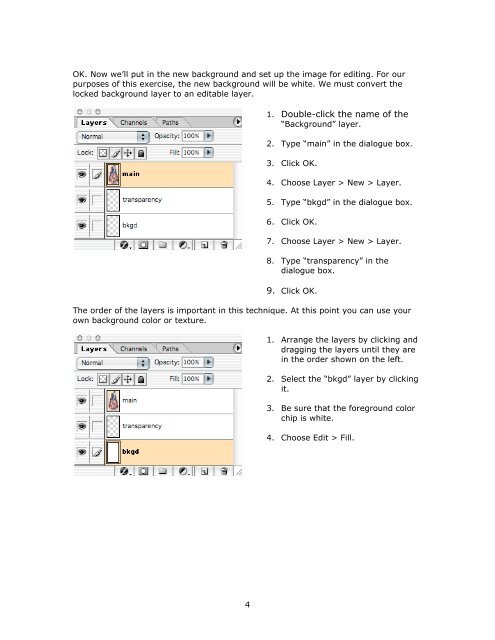
OK. Now we’ll put in <strong>the</strong> new background and set up <strong>the</strong> image for editing. For our<br />
purposes of this exercise, <strong>the</strong> new background will be white. We must c<strong>on</strong>vert <strong>the</strong><br />
locked background layer to an editable layer.<br />
1. Double-click <strong>the</strong> name of <strong>the</strong><br />
“Background” layer.<br />
2. Type “main” in <strong>the</strong> dialogue box.<br />
3. Click OK.<br />
4. Choose Layer > New > Layer.<br />
5. Type “bkgd” in <strong>the</strong> dialogue box.<br />
6. Click OK.<br />
7. Choose Layer > New > Layer.<br />
8. Type “transparency” in <strong>the</strong><br />
dialogue box.<br />
9. Click OK.<br />
The order of <strong>the</strong> layers is important in this technique. At this point you can use your<br />
own background color or texture.<br />
1. Arrange <strong>the</strong> layers by clicking and<br />
dragging <strong>the</strong> layers until <strong>the</strong>y are<br />
in <strong>the</strong> order shown <strong>on</strong> <strong>the</strong> left.<br />
2. Select <strong>the</strong> “bkgd” layer by clicking<br />
it.<br />
3. Be sure that <strong>the</strong> foreground color<br />
chip is white.<br />
4. Choose Edit > Fill.<br />
4