7. Istruzioni per una saldatura di tasca corretta
7. Istruzioni per una saldatura di tasca corretta
7. Istruzioni per una saldatura di tasca corretta

You also want an ePaper? Increase the reach of your titles
YUMPU automatically turns print PDFs into web optimized ePapers that Google loves.
<strong>7.</strong> <strong>Istruzioni</strong> <strong>per</strong> <strong>una</strong> <strong>saldatura</strong> <strong>di</strong> <strong>tasca</strong> <strong>corretta</strong><br />
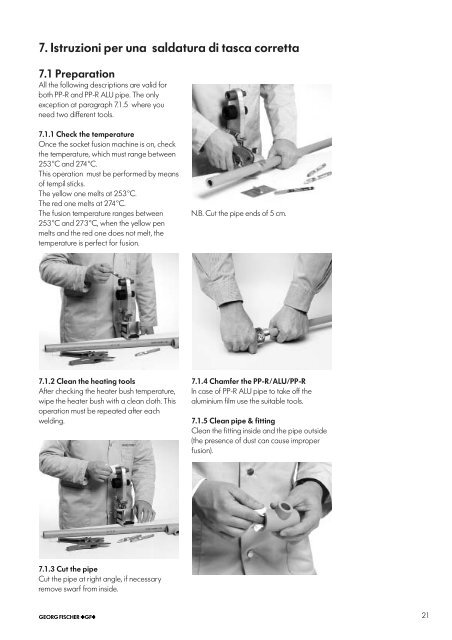
<strong>7.</strong>1 Preparation<br />
All the following descriptions are valid for<br />
both PP-R and PP-R ALU pipe. The only<br />
exception at paragraph <strong>7.</strong>1.5 where you<br />
need two <strong>di</strong>fferent tools.<br />
<strong>7.</strong>1.1 Check the tem<strong>per</strong>ature<br />
Once the socket fusion machine is on, check<br />
the tem<strong>per</strong>ature, which must range between<br />
253°C and 274°C.<br />
This o<strong>per</strong>ation must be <strong>per</strong>formed by means<br />
of tempil sticks.<br />
The yellow one melts at 253°C.<br />
The red one melts at 274°C.<br />
The fusion tem<strong>per</strong>ature ranges between<br />
253°C and 273°C, when the yellow pen<br />
melts and the red one does not melt, the<br />
tem<strong>per</strong>ature is <strong>per</strong>fect for fusion.<br />
N.B. Cut the pipe ends of 5 cm.<br />
<strong>7.</strong>1.2 Clean the heating tools<br />
After checking the heater bush tem<strong>per</strong>ature,<br />
wipe the heater bush with a clean cloth. This<br />
o<strong>per</strong>ation must be repeated after each<br />
wel<strong>di</strong>ng.<br />
<strong>7.</strong>1.4 Chamfer the PP-R/ALU/PP-R<br />
In case of PP-R ALU pipe to take off the<br />
aluminium film use the suitable tools.<br />
<strong>7.</strong>1.5 Clean pipe & fitting<br />
Clean the fitting inside and the pipe outside<br />
(the presence of dust can cause impro<strong>per</strong><br />
fusion).<br />
<strong>7.</strong>1.3 Cut the pipe<br />
Cut the pipe at right angle, if necessary<br />
remove swarf from inside.<br />
21
<strong>7.</strong>2 Fusion<br />
<strong>7.</strong>2.1 Mark the pipe<br />
Mark the pipe for depth of penetration into<br />
the heater bush and fitting (see table).<br />
The mark must remain visible under heating<br />
and joining.<br />
<strong>7.</strong>2.3 Joint pipe & fitting<br />
Joint the pipe & the fitting and push the pipe<br />
until it reaches the mark (that has to stay<br />
outside).<br />
During the jointing time the welded part of<br />
pipe and fitting must remain fix, without any<br />
rotation.<br />
During the cooling time, the welded part of<br />
pipe and fitting can be adjusted until cold.<br />
<strong>7.</strong>2.2 Heat pipe & fitting<br />
Push the pipe and the fitting into the heating<br />
tools. Once pipe and fitting are hot (after the<br />
correct time), pull out pipe and fitting very<br />
slowly.<br />
<strong>7.</strong>2.4 Fusion inspection<br />
Fusion inspection.<br />
The outer fusion seam must be inspected.<br />
The seam must be present all around the<br />
pipe.<br />
Summary Value table<br />
pipe minimum wall insert heating jointing cooling<br />
<strong>di</strong>ameter thickness depth time time time<br />
(mm) (mm) (mm) (sec.) (sec.) (min.)<br />
20 3,4 14 6 4 2<br />
25 4,2 16 7 4 3<br />
32 5,4 18 8 6 4<br />
40 6,7 20 12 6 4<br />
50 8,4 23 18 6 5<br />
63 10,5 26 25 8 6<br />
75 12,5 28 30 8 8<br />
90 15,0 31 40 10 8<br />
110 18,4 33 50 10 8<br />
22
8. Electrofusion<br />
The wel<strong>di</strong>ng can also be made by means of the electrofusion machine. This machine is useful<br />
in the repair situation, where it is <strong>di</strong>fficult to use the standard machine and where there is a<br />
little space.<br />
Pay attention to the following instructions:<br />
1. Wipe the coupling area of the pipe with a<br />
clean cloth. Scrap the same area with a<br />
blade all around the pipe.<br />
Check the pipe ovalisation (
9. Hole reparing<br />
In case of accidental drilling it is possible to repair the pipe as follows:<br />
1. As first, adequate the hole to the hole<br />
memder <strong>di</strong>mension. They are available in 7<br />
mm and 11 mm, respectively repairing an<br />
hole of 6 mm and 10 mm. Take the hole to<br />
this <strong>di</strong>mensions.<br />
2. Proceed to the normal fusion, heating the<br />
two part for 5 sec. positioning in relation to<br />
the thickness of the pipe, the ogive in brass.<br />
This avoid to waste the pipe.<br />
3. Joint the two parts and keep the repairing<br />
part for a while until cool.<br />
4. Wait after the cooling time befor cutting<br />
the part in excess.<br />
24
10. Instruction for the wel<strong>di</strong>ng saddle<br />
Phase of preparation<br />
of wel<strong>di</strong>ng<br />
Mount the saddle wel<strong>di</strong>ng tool to the manual<br />
wel<strong>di</strong>ng machine. Once the tools are<br />
positioned, check the surface tem<strong>per</strong>ature,<br />
which must be in the range of 253°C and<br />
274 °C.<br />
This o<strong>per</strong>ation may be <strong>per</strong>formed with the<br />
tempil stick.<br />
Chek the surface to be welded, which have<br />
to be clean and dry .<br />
Scrap the same area with a blade (picture1)<br />
and just before wel<strong>di</strong>ng degrease by light<br />
solvent and lint free cloth.<br />
In case of PPR-ALU pipe proceed taking<br />
away the aluminium film.<br />
Wel<strong>di</strong>ng phase<br />
Heat up the pipe with the tools for 30<br />
seconds and then further 20 sec. heat up the<br />
saddle, for a total of 50 sec. for the pipe.<br />
Make a light pressure with the saddle on the<br />
tools.<br />
Make sure all the surface have to be in<br />
contact with the heating tool.<br />
Jointing process<br />
After finishing the heating phase remove the<br />
wel<strong>di</strong>ng unit, place the wel<strong>di</strong>ng saddle into<br />
the pipe. Fix under a light pressure avoi<strong>di</strong>ng<br />
rotation for an ad<strong>di</strong>tional 30 sec.<br />
Drill out the pipe at the wel<strong>di</strong>ng point with a<br />
commercial spiral drill bit (picture 4). If<br />
necessary clean the hole of chips which may<br />
remain.<br />
Caution is to be taken in drilling the correct<br />
depth and use the correct <strong>di</strong>ameter see<br />
table 1.<br />
The system may be exposed to full load after<br />
30 minutes the last wel<strong>di</strong>ng.<br />
<br />
<br />
<br />
<br />
<br />
Please find in page 26 the<br />
wel<strong>di</strong>ng parameters.<br />
25
Table 1. Wel<strong>di</strong>ng parameter<br />
Diameter Diameter Heating Heating hol<strong>di</strong>ng Cooling Hole<br />
Pipe derivation time pipe time saddle time time Diameter<br />
(mm) (mm) (sec) (sec) (sec) (min) (mm)<br />
40 20 30 20 30 30 15<br />
50 20 30 20 30 30 15<br />
63 20 30 20 30 30 15<br />
63 25 30 20 30 30 20<br />
75 20 30 20 30 30 15<br />
75 25 30 20 30 30 20<br />
90 20 30 20 30 30 15<br />
90 25 30 20 30 30 20<br />
40 1 /2” 30 20 30 30 12<br />
40 3 /4” 30 20 30 30 12<br />
50 1 /2” 30 20 30 30 12<br />
50 3 /4” 30 20 30 30 12<br />
63 1 /2” 30 20 30 30 12<br />
63 3 /4” 30 20 30 30 15<br />
75 1 /2” 30 20 30 30 12<br />
75 3 /4” 30 20 30 30 15<br />
90 1 /2” 30 20 30 30 12<br />
90 3 /4” 30 20 30 30 15<br />
26