CHERNE INDUSTRIES INC. - Oatey
CHERNE INDUSTRIES INC. - Oatey
CHERNE INDUSTRIES INC. - Oatey

Create successful ePaper yourself
Turn your PDF publications into a flip-book with our unique Google optimized e-Paper software.
66<br />
67<br />
Conversion • Testing<br />
Water Test:<br />
The DWV plumbing system is plugged leaving the top<br />
vent open. Water is then introduced to the system,<br />
purging any trapped air that may occur. The test<br />
passes if no water column is lost or no pressure drop is<br />
noted on a gauge.<br />
Air Test:<br />
The DWV plumbing system is plugged at all openings<br />
including traps and vents, leaving one opening<br />
as a point to both introduce and monitor the test<br />
pressure. Air is introduced, pressurizing the system<br />
(normally 5 PSI or less), making sure all are outside<br />
the danger zone. (See safety and usage instructions.)<br />
The test passes if the measurable loss of pressure is<br />
within the time and pressure allowances of the test<br />
specifications.<br />
Manometer (or U-Tube):<br />
Also known as a final test, the manometer test verifies<br />
trap tightness in a new plumbing system. All traps<br />
are filled with water and all vents are then plugged.<br />
The manometer tube is first filled with water so that it<br />
“zeroes" out. Then the lower tube of the manometer<br />
is placed through a trap. A second hose is then put<br />
through the same trap and a small amount of pressure<br />
is applied. A decrease in water column measured on<br />
the manometer scale indicates that there is a leak in<br />
the system.<br />
Scent Test:<br />
The DWV system is plugged at all openings except<br />
one. Liquid scent is applied in that opening, which is<br />
then plugged. Leaks are detected via smell.<br />
Measures Conversion Chart<br />
Unit = Conversion Factor x Unit<br />
Pounds per<br />
square inch<br />
= 14.5 x Bars<br />
Gallons = 7.48052 x Cubic feet<br />
Meters = .3048 x Feet<br />
Inches of<br />
mercury<br />
= .8825 x Feet of water<br />
Pounds per<br />
square inch<br />
= .4335 x Feet of water<br />
Millimeters = 25.4 x Inches<br />
Feet of water = 1.133 x Inches of mercury<br />
Pounds per<br />
square inch<br />
= .4912 x Inches of mercury<br />
Pounds = 2.2046 x Kilograms<br />
Feet = 3.281 x Meters<br />
Inches = .03937 x Millimeters<br />
Feet of water = 2.307 x Pounds per square inch (PSI)<br />
Inches of<br />
mercury<br />
= 2.036 x Pounds per square inch (PSI)<br />
Technical Data<br />
1.800.843.7584 | www.cherneind.com<br />
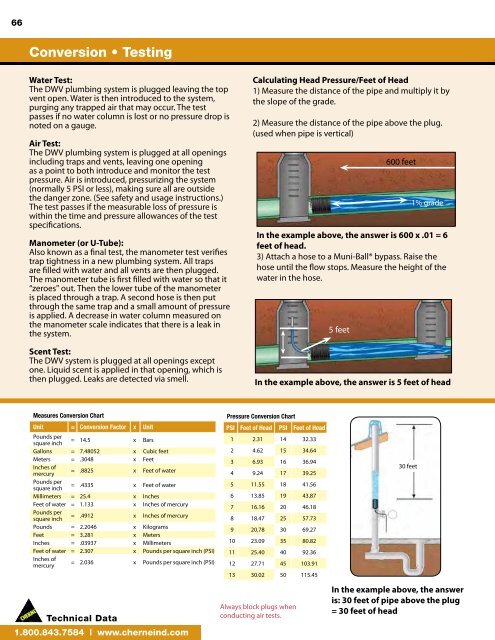
Calculating Head Pressure/Feet of Head<br />
1) Measure the distance of the pipe and multiply it by<br />
the slope of the grade.<br />
2) Measure the distance of the pipe above the plug.<br />
(used when pipe is vertical)<br />
In the example above, the answer is 600 x .01 = 6<br />
feet of head.<br />
3) Attach a hose to a Muni-Ball® bypass. Raise the<br />
hose until the flow stops. Measure the height of the<br />
water in the hose.<br />
In the example above, the answer is 5 feet of head<br />
Pressure Conversion Chart<br />
PSI Feet of Head PSI Feet of Head<br />
1 2.31 14 32.33<br />
2 4.62 15 34.64<br />
3 6.93 16 36.94<br />
4 9.24 17 39.25<br />
5 11.55 18 41.56<br />
6 13.85 19 43.87<br />
7 16.16 20 46.18<br />
8 18.47 25 57.73<br />
9 20.78 30 69.27<br />
10 23.09 35 80.82<br />
11 25.40 40 92.36<br />
12 27.71 45 103.91<br />
13 30.02 50 115.45<br />
Always block plugs when<br />
conducting air tests.<br />
5 feet<br />
600 feet<br />
30 feet<br />
1% grade<br />
In the example above, the answer<br />
is: 30 feet of pipe above the plug<br />
= 30 feet of head<br />
Calculating Pipeline Forces and Pressures*<br />
1) Determine the inside diameter of the pipeline in inches.<br />
2) Determine the maximum back pressure.<br />
3) Calculate the pipe area in square inches. (Pipe area = r )<br />
2<br />
4) Calculate the force the plug must withstand.<br />
(pounds of force = PSI X pepe area)<br />
* Calculating pounds of force aids in building blocking systems.<br />
It also illustrates the tremendous force generated by a sewer air test.<br />
Stand clear of the danger zone!<br />
Always block plugs when conducting air tests.<br />
Special Notes:<br />
• Pressures being exerted on a plug—regardless of<br />
the medium (liquid, water, or air)—are the same.<br />
Ten (10) PSI of water is the same as ten (10) PSI<br />
of air. However, air is a compressible media.<br />
Therefore when a plug dislodges under air backpressure,<br />
it is much more dangerous than water<br />
pressure as the air will expand to its original<br />
atmospheric volume. Use extreme caution when<br />
conducting air tests!<br />
General Safety and Usage Instructions:<br />
1) Death, bodily injury, and/or property damage may<br />
result if plug fails for any reason.<br />
2) Read and understand safety instruction sheet<br />
before using plug.<br />
3) Must wear safety glasses and a hard hat.<br />
4) Do not enter danger zone when plug is in use.<br />
5) Measure pipe diameter before selecting plug.<br />
6) Inspect plug for damage before and after use.<br />
7) Never use a plug in a pipe size different from<br />
recommended usage range.<br />
8) Always attach an inflation hose so plug can be<br />
inflated and deflated from outside the danger zone.<br />
Safety Instructions<br />
Formula: r 2 X PSI = POUNDS OF FORCE<br />
Example: 36" diameter pipe<br />
Radius = 18"<br />
= 3.14<br />
PSI = 5<br />
18" x 18" x 3.14 x 5 PSI = 5087 POUNDS OF FORCE<br />
• Air back-pressure ratings reflect absolute backpressure<br />
capabilities. Common engineering<br />
standards have been used to convert head<br />
pressure to PSI. It is imperative to block pipe<br />
plugs when performing air pressure tests and<br />
to ensure no one is in the danger zone when a<br />
plug is in use. Please see the Cherne Safety and<br />
Instruction Manual for complete details.<br />
9) Never remove the inflation hose until all back<br />
pressure is released and the plug is deflated.<br />
10) Must inflate plug to the pressure shown on plug.<br />
11) Always use properly-calibrated pressure gauges.<br />
12) Do not exceed recommended maximum<br />
allowable back pressure (refer to safety instruction<br />
sheet).<br />
13) Always release back pressure from the pipe first,<br />
before deflating plug.<br />
14) Check pneumatic plug inflation pressure at least<br />
every four hours.<br />
Technical Data<br />
1.800.843.7584 | www.cherneind.com