Download the Firestorm-Bagration terrain guide ... - Flames of War
Download the Firestorm-Bagration terrain guide ... - Flames of War
Download the Firestorm-Bagration terrain guide ... - Flames of War

Create successful ePaper yourself
Turn your PDF publications into a flip-book with our unique Google optimized e-Paper software.
Byelorussian Battlefields<br />
All <strong>Flames</strong> Of <strong>War</strong> battles need <strong>terrain</strong>! Battles in <strong>the</strong> Second World <strong>War</strong> were rarely fought over open plains with unobstructed<br />
lines <strong>of</strong> sight. In <strong>Flames</strong> Of <strong>War</strong>, wide open tables are extremely boring to play because <strong>the</strong>y inevitably turn into dull shooting<br />
matches. Adding just a little <strong>terrain</strong> will give your game all sorts <strong>of</strong> flavour as your troops manoeuvre across <strong>the</strong> table!<br />
<strong>Firestorm</strong> Areas<br />
The area types on <strong>the</strong> <strong>Firestorm</strong> campaign map help suggest<br />
how to set up your battlefield, but you are by no means<br />
limited by that suggestion when setting up your board. For<br />
example, a battle in an area with hills might mean that you<br />
place a few more hills than you would normally have on<br />
your table.<br />
Placing Terrain<br />
You don’t need lots <strong>of</strong> <strong>terrain</strong> to make your table an exciting<br />
battlefield! Covering about a third <strong>of</strong> your board with <strong>terrain</strong><br />
is usually enough to fight a <strong>Flames</strong> Of <strong>War</strong> battle. When<br />
placing <strong>terrain</strong>, group similar pieces toge<strong>the</strong>r, such as trees or<br />
buildings. This helps <strong>the</strong> landscape look more natural. Make<br />
your <strong>terrain</strong> <strong>the</strong> focus <strong>of</strong> your battles by placing pieces, such as<br />
villages or hills, at key locations on <strong>the</strong> table. Terrain should be<br />
something to fight over, not something to avoid!<br />
Also try using <strong>the</strong> same table setup to play different missions.<br />
Each separate mission will play differently on <strong>the</strong> same table.<br />
For example, playing an Encounter mission on a river table<br />
will pose a completely different set <strong>of</strong> challenges than playing<br />
a No Retreat mission on <strong>the</strong> same table.<br />
Always discuss <strong>the</strong> <strong>terrain</strong> with your opponent and agree on how to treat each<br />
feature before <strong>the</strong> game. Most <strong>of</strong> all, have fun and experiment with your <strong>terrain</strong>!<br />
Woods<br />
A common misconception about wooded tables is that <strong>the</strong>y must be crowded wall-to-wall with trees. However, that just<br />
would not be fun to play on. Place woods to give both players a challenge, but not so as <strong>the</strong>y close <strong>of</strong>f parts <strong>of</strong> <strong>the</strong> table. With a<br />
little thought, even a small amount <strong>of</strong> wooded <strong>terrain</strong> has a significant impact on <strong>the</strong> table, while still being fun to play on.<br />
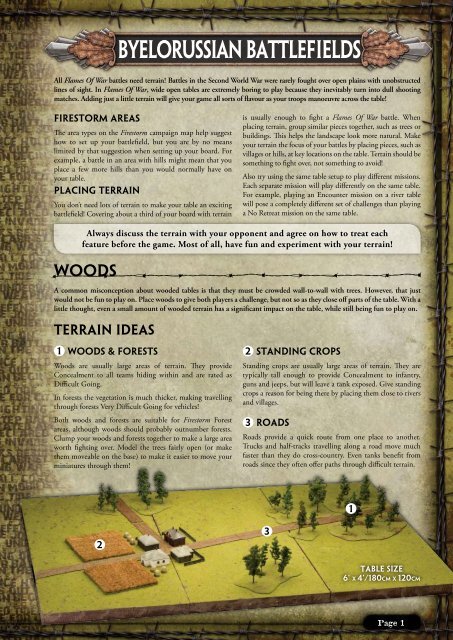
Terrain ideas<br />
1 Woods & Forests<br />
2<br />
Woods are usually large areas <strong>of</strong> <strong>terrain</strong>. They provide<br />
Concealment to all teams hiding within and are rated as<br />
Difficult Going.<br />
In forests <strong>the</strong> vegetation is much thicker, making travelling<br />
through forests Very Difficult Going for vehicles!<br />
Both woods and forests are suitable for <strong>Firestorm</strong> Forest<br />
areas, although woods should probably outnumber forests.<br />
Clump your woods and forests toge<strong>the</strong>r to make a large area<br />
worth fighting over. Model <strong>the</strong> trees fairly open (or make<br />
<strong>the</strong>m moveable on <strong>the</strong> base) to make it easier to move your<br />
miniatures through <strong>the</strong>m!<br />
3<br />
Standing Crops<br />
Standing crops are usually large areas <strong>of</strong> <strong>terrain</strong>. They are<br />
typically tall enough to provide Concealment to infantry,<br />
guns and jeeps, but will leave a tank exposed. Give standing<br />
crops a reason for being <strong>the</strong>re by placing <strong>the</strong>m close to rivers<br />
and villages.<br />
Roads<br />
Roads provide a quick route from one place to ano<strong>the</strong>r.<br />
Trucks and half-tracks travelling along a road move much<br />
faster than <strong>the</strong>y do cross-country. Even tanks benefit from<br />
roads since <strong>the</strong>y <strong>of</strong>ten <strong>of</strong>fer paths through difficult <strong>terrain</strong>.<br />
1<br />
2<br />
3<br />
Table size<br />
6’ x 4’/180cm x 120cm<br />
Page
Marsh & Swamp tables<br />
A large number <strong>of</strong> Soviet breakthroughs during Operation <strong>Bagration</strong> were made through wooded swamps and marshes.<br />
The German Army was simply not expecting large assaults through such inhospitable <strong>terrain</strong>! Marsh tables do not need to<br />
be open. By adding a little more cover such as trees and fields <strong>the</strong> table will produce more exciting action!<br />
Terrain ideas<br />
1 Marshes & Swamps<br />
2 Streams and Creeks<br />
Large areas <strong>of</strong> marshes look imposing on <strong>the</strong> table, but are<br />
not that scary. Marshes are rated as Difficult Going, so tanks<br />
can travel through <strong>the</strong>m slowly with only a slight chance <strong>of</strong><br />
bogging down.<br />
Swamps, on <strong>the</strong> o<strong>the</strong>r hand, are quite nasty places for<br />
tanks! The wet mud and mires makes swamps Very Difficult<br />
Going.<br />
In your games, use marshes to your advantage by setting up<br />
your infantry on <strong>the</strong>ir edge, so that any tank that decides<br />
to assault <strong>the</strong>m will have to risk bogging down when <strong>the</strong>y<br />
assault!<br />
When setting up your table, both marshes and swamps are<br />
appropriate for <strong>the</strong> marsh areas on <strong>the</strong> <strong>Firestorm</strong> campaign<br />
map. Decide with your opponent which (or both) you will<br />
use before <strong>the</strong> game begins!<br />
Drainage streams and small creeks connect marsh and swamp<br />
patches toge<strong>the</strong>r. Streams are typically ra<strong>the</strong>r large and rated<br />
Very Difficult Going while Creeks are much smaller and<br />
treated as Difficult Going.<br />
3<br />
Villages<br />
Villages are <strong>of</strong>ten built near marshes so that <strong>the</strong> inhabitants<br />
could cut peat for heating <strong>the</strong>ir homes during <strong>the</strong> cold winters.<br />
When placing your village, keep <strong>the</strong> buildings close toge<strong>the</strong>r. For<br />
example, an infantry platoon should remain within command<br />
distance if occupying all <strong>of</strong> <strong>the</strong> buildings in a village.<br />
4<br />
Woods<br />
As with <strong>the</strong> forest table, clump your forests or woods toge<strong>the</strong>r<br />
to form large areas to fight over and through, and to give<br />
areas to manoeuvre behind. On this table <strong>the</strong> woods provide<br />
a nice balance to <strong>the</strong> large area <strong>of</strong> swamp at <strong>the</strong> o<strong>the</strong>r end <strong>of</strong><br />
<strong>the</strong> table.<br />
4<br />
2<br />
3<br />
1<br />
Table size<br />
6’ x 4’/180cm x 120cm<br />
Page
Hill Tables<br />
As with wooded tables, hill tables are not required to have hills from one end <strong>of</strong> <strong>the</strong> table to <strong>the</strong> o<strong>the</strong>r. A hill table could<br />
simply have a couple more hills than your typical table. When modelling hills remember WYSIWYG, What You See Is What<br />
You Get, so treat each hill exactly as it is modelled! Experiment with more <strong>terrain</strong> to see how adding an extra field, hill or<br />
woods will affect <strong>the</strong> outcome <strong>of</strong> <strong>the</strong> game!<br />
Terrain ideas<br />
Hills<br />
Hills vary greatly in height and difficulty to cross, so like most<br />
o<strong>the</strong>r <strong>terrain</strong>, it pays to define your hills with your opponent<br />
before <strong>the</strong> start <strong>of</strong> each game.<br />
Hills provide excellent cover for your army to manoeuvre<br />
behind. Your anti-tank guns and machine-guns will have a<br />
better view <strong>of</strong> <strong>the</strong> advancing enemy from <strong>the</strong> top <strong>of</strong> a hill!<br />
1<br />
Gentle Hills<br />
Gentle hills should be modelled just high enough to conceal<br />
tanks positioned on <strong>the</strong> far side. Their long, gradual slopes<br />
make <strong>the</strong>m Cross-country <strong>terrain</strong>.<br />
2<br />
Rolling Hills<br />
Rolling hills are a bit more dramatic, and are rated Difficult<br />
Going. These hills should be made tall enough to block line<br />
<strong>of</strong> sight to troops positioned on <strong>the</strong> far side.<br />
3<br />
Steep Hills<br />
Steep hills are formidable obstacles and are Very Difficult<br />
Going. As you would expect, <strong>the</strong>se hills are tall enough to<br />
also block line <strong>of</strong> sight to troops positioned on <strong>the</strong> far side.<br />
4<br />
5<br />
Cliffs<br />
Cliffs are forbidding features on <strong>the</strong> battlefield. They are<br />
Impassable to all teams except troops with <strong>the</strong> Mountaineer<br />
special rule.<br />
Valleys<br />
The spaces between your hills are just as important. Valleys<br />
are dangerous fire alleys that players must advance through<br />
if <strong>the</strong>y are worried about <strong>the</strong>ir tanks bogging down on steep<br />
hills. Place your anti-tank guns and assault guns to take advantage<br />
<strong>of</strong> <strong>the</strong>se fire alleys and disrupt your enemy’s plan!<br />
2<br />
4<br />
3<br />
5<br />
1<br />
Table size<br />
6’ x 4’/180cm x 120cm<br />
Page
Cities, Villages and Farmsteads<br />
You could represent city fights in your <strong>Firestorm</strong> games using a village like <strong>the</strong> one shown in <strong>the</strong> picture below. You can also<br />
play on a table with several larger industrial buildings along with <strong>the</strong> o<strong>the</strong>r smaller buildings. You can even play a game using<br />
<strong>the</strong> city’s defences on a table with no buildings at all, representing <strong>the</strong> fight over <strong>the</strong> defences on <strong>the</strong> outskirts <strong>of</strong> a town.<br />
Villages and farmsteads were very common throughout Byelorussia and can appear in any sort <strong>of</strong> <strong>terrain</strong>.<br />
Terrain ideas<br />
1<br />
Villages<br />
When setting up your villages, make sure that your buildings<br />
are close toge<strong>the</strong>r. We recommend spacing buildings no<br />
fur<strong>the</strong>r apart than <strong>the</strong> width <strong>of</strong> a large artillery base. This<br />
allows guns and large tanks to move between <strong>the</strong> buildings,<br />
while still allowing platoons to deploy into multiple houses<br />
and remain in command distance.<br />
Villages are typically groups <strong>of</strong> buildings consisting <strong>of</strong><br />
between three to eight buildings and surrounding fences,<br />
vegetable gardens, and fields.<br />
Haystacks are a prominent feature in <strong>the</strong> small Byelorussian<br />
agricultural villages, especially during <strong>the</strong> late summer<br />
months <strong>of</strong> July and August. In your games use haystacks to<br />
conceal your troops and spring ambushes from <strong>the</strong>m!<br />
Cities<br />
Larger collections <strong>of</strong> buildings, such as towns and cities, are a<br />
bit more difficult to create. Adding a few more <strong>terrain</strong> pieces,<br />
such as paved roads, railroad depots and small factories helps<br />
turn a village into a proper town or city.<br />
Additions<br />
Also consider o<strong>the</strong>r <strong>terrain</strong> for your village. Settlements<br />
usually appear around major landmarks such as bridges and<br />
major road or rail intersections. Add extra <strong>terrain</strong> such as<br />
fields, streams and haystacks to give your village a reason for<br />
being <strong>the</strong>re. Always remember to focus your <strong>terrain</strong> so that it<br />
is something worth fighting over!<br />
The photograph below shows part <strong>of</strong> a table featuring a<br />
village using two Battlefield in a Box: Russian Village sets.<br />
1<br />
Board size<br />
4’ x 2’/120cm x 60cm<br />
Page
Rivers<br />
From large rivers such as <strong>the</strong> Dnepr and <strong>the</strong> Dvina to small ones that barely warrant a name on a map, rivers dominated <strong>the</strong><br />
lowland areas <strong>of</strong> <strong>the</strong> Byelorussian Front. Whatever <strong>the</strong> size, both <strong>the</strong> Germans and Soviets used <strong>the</strong>se formidable obstacles as<br />
natural fortifications because <strong>the</strong> crossings provided ideal choke points to stem <strong>the</strong> enemy advance.<br />
Terrain ideas<br />
1 Rivers<br />
2 Nearby Settlements<br />
Rivers were a significant obstacle in Byelorussia. Remember<br />
that in <strong>Flames</strong> Of <strong>War</strong>, a river approximately 4”/10cm to<br />
6”/15cm wide, uses <strong>the</strong> River Crossing rules (see pages 66<br />
and 67). You’ll want to place several crossing points to help<br />
your armies get across!<br />
Rivers <strong>of</strong>ten run through forests and woods. Place woods on<br />
both sides <strong>of</strong> a river. This adds ano<strong>the</strong>r dimension to river<br />
crossings with players using as much cover as possible. Rivers<br />
also have many bushes and light woods packed against <strong>the</strong><br />
river bank. Adding low-lying scrub and bushes to your river<br />
banks will give troops concealment as <strong>the</strong>y approach <strong>the</strong><br />
river.<br />
Rivers also cut through hills, creating a few cliffs and steep<br />
hill faces. You may wish to add some hills or cliff faces along<br />
your river.<br />
Bridges were key landmarks in <strong>the</strong> Byelorussian landscape.<br />
Wherever <strong>the</strong>re are bridges or fords over a river, <strong>the</strong>re is likely<br />
a settlement nearby. The size <strong>of</strong> <strong>the</strong> settlement depended<br />
largely on <strong>the</strong> significance <strong>of</strong> <strong>the</strong> river crossing. For example,<br />
a settlement near a crossing over <strong>the</strong> Dnepr would be much<br />
larger than ano<strong>the</strong>r by <strong>the</strong> ford <strong>of</strong> a smaller river. The river<br />
could even run through <strong>the</strong> middle <strong>of</strong> your village.<br />
You are likely to find <strong>the</strong> village’s crops near <strong>the</strong> river as well.<br />
You could place some crops near <strong>the</strong> river and treat <strong>the</strong>m as<br />
Difficult Going to represent <strong>the</strong> boggy ground.<br />
1<br />
2<br />
Table size<br />
6’ x 4’/180cm x 120cm<br />
Page
Page