MC-Showtime - EMPIRE Light & Sound
MC-Showtime - EMPIRE Light & Sound
MC-Showtime - EMPIRE Light & Sound

You also want an ePaper? Increase the reach of your titles
YUMPU automatically turns print PDFs into web optimized ePapers that Google loves.
<strong>MC</strong>-<strong>Showtime</strong><br />
user manual
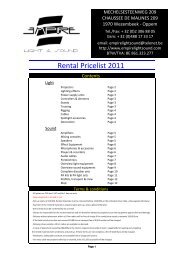
All measurements are in millimeters<br />
120<br />
50<br />
Blackout<br />
Special<br />
Fast<br />
Medium<br />
Slow<br />
Sequence<br />
8.8.<br />
Auto Music<br />
Trig Trig<br />
Lamp On<br />
Reset<br />
Manual<br />
Auto<br />
Music<br />
Enter<br />
Position<br />
Strobe<br />
For M4<br />
114<br />
78<br />
109<br />
143<br />
109<br />
P/N 35000097, Rev. A. © 2001 Martin Professional A/S, Denmark.
Introduction . . . . . . . . . . . . . . . . . . . . . . . . 4<br />
Safety precautions . . . . . . . . . . . . . . . . . . . . . . . . 4<br />
Unpacking . . . . . . . . . . . . . . . . . . . . . . . . . . . . . . 5<br />
<strong>MC</strong>-<strong>Showtime</strong> setup . . . . . . . . . . . . . . . . . 6<br />
AC power connection . . . . . . . . . . . . . . . . . . . . . . 6<br />
Data connection . . . . . . . . . . . . . . . . . . . . . . . . . . 7<br />
The console . . . . . . . . . . . . . . . . . . . . . . . . 8<br />
Button functions . . . . . . . . . . . . . . . . . . . . . . . . . . 9<br />
Fixture setup . . . . . . . . . . . . . . . . . . . . . . 11<br />
Supported fixtures . . . . . . . . . . . . . . . . . . . . . . . 11<br />
DMX addresses . . . . . . . . . . . . . . . . . . . . . . . . . 12<br />
Sample configurations . . . . . . . . . . . . . . . . . . . . 13<br />
Aligning MX-x fixtures . . . . . . . . . . . . . . . . . . . . 15<br />
Operation . . . . . . . . . . . . . . . . . . . . . . . . . 16<br />
Switching on the controller . . . . . . . . . . . . . . . . . 16<br />
Pre-programmed sequences . . . . . . . . . . . . . . . 17<br />
Trig rates . . . . . . . . . . . . . . . . . . . . . . . . . . . . . . 19<br />
Blackout . . . . . . . . . . . . . . . . . . . . . . . . . . . . . . . 21<br />
Strobe. . . . . . . . . . . . . . . . . . . . . . . . . . . . . . . . . 21<br />
Fixture control . . . . . . . . . . . . . . . . . . . . . . . . . . 22<br />
Troubleshooting . . . . . . . . . . . . . . . . . . . 23<br />
Specifications . . . . . . . . . . . . . . . . . . . . . 25<br />
3
INTRODUCTION<br />
<strong>MC</strong>-<strong>Showtime</strong> controls four or more MX-x scanners<br />
(MX-1 or MX-4, depending on the <strong>MC</strong>-<strong>Showtime</strong><br />
model you have) automatically, manually, or using any<br />
or all of the 30 supplied 6-scene sequences. <strong>MC</strong>-<br />
<strong>Showtime</strong> can also control CX-color changers, as well<br />
as Synchrozap QX250 and Acrobat intelligent effects.<br />
Note that when referring to MX-1, or MX-4 scanners<br />
in this manual, we refer to them generically as “MX-x”<br />
scanners. If you do not know which type of scanner<br />
your <strong>MC</strong>-<strong>Showtime</strong> supports, then check the label on<br />
the back of the unit.<br />
This user manual describes the features in, and how to<br />
use, the <strong>MC</strong>-<strong>Showtime</strong> controller.<br />
4<br />
SAFETY PRECAUTIONS<br />
The <strong>MC</strong>-<strong>Showtime</strong> controller is not for household use.<br />
For safe operation, read this manual before use and<br />
follow the safety precautions listed below. If you have<br />
questions about how to operate the controller safely,<br />
please contact your Martin distributor or dealer.<br />
• Disconnect the fixture from AC power when not in use.<br />
• Always ground (earth) the fixture electrically.
• Use only a source of AC power that complies with local<br />
building and electrical codes and has both overload and<br />
ground-fault protection.<br />
• Refer all service to a qualified technician.<br />
• Do not expose the device to rain or moisture.<br />
• Do not open the device or remove any part; there are no<br />
user-serviceable parts inside.<br />
UNPACKING<br />
The <strong>MC</strong>-<strong>Showtime</strong> controller comes with:<br />
• 1.5-meter IEC power cable<br />
• 5-meter 3-pin XLR data cable<br />
• 3-pin male XLR termination plug<br />
• User manual<br />
5
<strong>MC</strong>-SHOWTIME SETUP<br />
AC POWER CONNECTION<br />
Warning!<br />
For protection from electric shock, the<br />
fixture must be grounded (earthed).<br />
The AC mains supply shall have<br />
overload and ground-fault protection.<br />
The fixture’s mains lead must be fitted with a<br />
grounding-type cord cap that fits your power<br />
distribution cable or outlet. Consult a qualified<br />
electrician if you have any doubts about proper<br />
installation.<br />
Installing a plug on the mains lead<br />
Following the cord cap manufacturer’s instructions,<br />
connect the yellow and green wire to ground (earth),<br />
the brown wire to live, and the blue wire to neutral.<br />
The table shows some pin identification schemes.<br />
Wire Pin Marking Screw color<br />
brown live “L” yellow or brass<br />
blue neutral “N” silver<br />
yellow/green ground green<br />
6
DATA CONNECTION<br />
A reliable data connection begins with the right cable.<br />
Microphone cable cannot transmit data reliably over<br />
long distances or for long periods. For best results, use<br />
only cable designed for RS-485 applications. One<br />
cable for connecting the first fixture is included; you<br />
will need additional cables to connect additional<br />
fixtures. Your Martin dealer can supply suitable cable<br />
in various lengths.<br />
The <strong>MC</strong>-<strong>Showtime</strong> controller data output, which is<br />
wired pin 1 to ground, pin 2 to signal - (cold), and pin 3<br />
to signal + (hot), is configured for direct connection to<br />
all <strong>MC</strong>-<strong>Showtime</strong> compatible Martin fixtures (see<br />
“Supported fixtures” on page 11).<br />
Connecting the data link<br />
1 Connect a data cable to the <strong>MC</strong>-<strong>Showtime</strong> controller<br />
data output. Lead the cable to the first fixture and plug it<br />
into the data input.<br />
2 Connect the data output of the first fixture to the data<br />
input of the next fixture. Continue connecting fixtures<br />
output to input.<br />
3 Terminate the link by inserting the male termination plug,<br />
included, into the data output of the last fixture. A<br />
termination plug is an XLR connector with a 120 ohm<br />
resistor soldered across pins 2 and 3.<br />
7
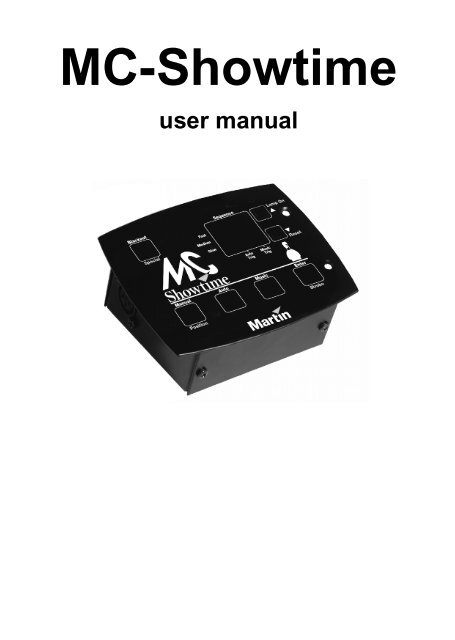
THE CONSOLE<br />
The console on the <strong>MC</strong>-<strong>Showtime</strong> controller consists<br />
of seven buttons and a two-digit LED display.<br />
Blackout<br />
2nd<br />
Fast<br />
Medium<br />
Slow<br />
Sequence<br />
8.8.<br />
Auto<br />
Trig<br />
Music<br />
Trig<br />
Lamp On<br />
Reset<br />
Manual<br />
Auto<br />
Music<br />
Enter<br />
Position<br />
(Strobe)<br />
Some buttons have two functions; second functions are<br />
indicated in yellow text. To activate these second<br />
functions, press and hold the QG button, and then<br />
press the button for the function. The QG button<br />
works like the shift key on a computer keyboard.<br />
8
BUTTON FUNCTIONS<br />
Button<br />
%ODFNRXW<br />
QG<br />
0DQXDO<br />
3RVLWLRQ<br />
$XWR<br />
Function<br />
Is used to blackout all the fixtures.<br />
To re-activate the fixtures, press %ODFNRXW<br />
again. If you press and hold this button then it<br />
operates as the QG button.<br />
When you press and hold QG, you can access<br />
the second functions on other buttons<br />
(indicated with yellow text). QG operates like<br />
the shift key on a computer keyboard.<br />
Each time 0DQXDO is pressed a trigger will be<br />
sent and the next scene in the pre-programmed<br />
sequence will start.<br />
3RVLWLRQ is used to align the MX-x scanners.<br />
See “Aligning MX-x fixtures” on page 15.<br />
To use this function, hold down the QG<br />
button, and then press 3RVLWLRQ.<br />
Tap $XWR a number of times to input a trigger<br />
rate manually. The rate at which you tap the<br />
button is used as the trigger rate.<br />
Alternatively, if you press $XWR once and hold<br />
it for a second, the default trigger rate for the<br />
pre-programmed sequence will be used.<br />
In auto trig mode the trig rate is not<br />
synchronized with the music.<br />
During auto trig mode, the associated<br />
indicator in the LED display will blink at the<br />
trig rate.<br />
9
Button<br />
0XVLF<br />
(QWHU<br />
6WUREH<br />
/DPSÃRQ<br />
ST<br />
5HVHW<br />
Function<br />
The 0XVLF button acts as a switch to turn<br />
music trig mode on and off. When music trig<br />
mode is activated, the built-in microphone is<br />
used to synchronize the trig rate with the<br />
music. The associated indicator in the LED<br />
display will blink at the trig rate.<br />
To deactivate music trig mode, press the<br />
0XVLF button, or the $XWR button. Note that if<br />
no trig mode is active then the fixtures will not<br />
change to the next scene.<br />
When selecting a sequence, or group of<br />
sequences, the current selection blinks in the<br />
LED display. Press (QWHU to start execution of<br />
the selection. See “Selecting sequences for<br />
execution” on page 18.<br />
Provided that a sequence number is not<br />
blinking in the LED display (see the<br />
description for (QWHU), this button will<br />
interrupt the current scene and strobe all the<br />
fixtures as long as it is held.<br />
/DPSÃRQ will activate all fixtures on the data<br />
link (provided that they are of a supported type<br />
and have the correct DMX address set).<br />
To use this function, hold down the QG<br />
button, and then press /DPSÃRQ.<br />
S and T are used to scroll up and down the<br />
list of available pre-programmed sequences,<br />
and sequence groups. See “Selecting<br />
sequences for execution” on page 18.<br />
5HVHW is used to reset all the fixtures on the<br />
data link (provided that they are of a supported<br />
type and have the correct DMX address set).<br />
To use this function, hold down the QG<br />
button, and then press 5HVHW.<br />
10
FIXTURE SETUP<br />
The <strong>MC</strong>-<strong>Showtime</strong> controller is designed to operate<br />
together with a minimum of four MX-x scanners, as<br />
well as a range of other fixture types. This section<br />
details these fixtures, their associated DMX addresses,<br />
as well as rigging considerations.<br />
SUPPORTED FIXTURES<br />
The following fixtures are supported by the <strong>MC</strong>-<br />
<strong>Showtime</strong> controller:<br />
• MX-x scanners (between four and eight fixtures)<br />
• Acrobat intelligent effect<br />
• CX-2 color changer<br />
• CX-4 color changer<br />
• SyncroZap QX250 intelligent effect<br />
The minimum configuration supported is four MX-x<br />
scanners, but we recommend a configuration of at least<br />
eight MX-x scanners and an Acrobat.<br />
11
DMX ADDRESSES<br />
Fixtures should be set to the following DMX<br />
addresses:<br />
Fixture type<br />
MX-x<br />
(for best results rig in DMX<br />
pairs where the two<br />
fixtures in each pair are<br />
directly across from each<br />
other.)<br />
DMX address<br />
1, 25<br />
7, 31<br />
13, 36<br />
19, 43<br />
Acrobat 49<br />
CX-4 55<br />
SyncroZap 61<br />
CX-2 67<br />
For information on how to set DMX addresses for the<br />
different fixture types, refer to the associated user<br />
manual for that fixture type. These are available on the<br />
Martin web site at: http://www.martin.dk.<br />
You can operate the <strong>MC</strong>-<strong>Showtime</strong> controller with up<br />
to 32 fixtures, but multiple fixtures of any type (except<br />
MX-x scanners) will have to share DMX addresses,<br />
and will mimic each others behavior.
SAMPLE CONFIGURATIONS<br />
The following are three sample rigging configurations.<br />
DMX addresses appear in parentheses.<br />
Recommended configuration<br />
We recommend that you rig at least eight MX-x<br />
scanners and an Acrobat:<br />
MX-x<br />
(1)<br />
MX-x<br />
(7)<br />
MX-x<br />
(13)<br />
MX-x<br />
(19)<br />
Acrobat<br />
(49)<br />
Effect area<br />
MX-x<br />
(25)<br />
MX-x<br />
(31)<br />
MX-x<br />
(37)<br />
MX-x<br />
(43)<br />
Minimum configuration<br />
You can effectively operate the <strong>MC</strong>-<strong>Showtime</strong><br />
controller with only four MX-x fixtures. These could<br />
be rigged in a line (DMX addresses 1, 7, 13, and 19), or<br />
in a square configuration (DMX addresses 1, 25, 19,<br />
and 43).<br />
13
Configuration using all supported fixture<br />
types<br />
The following schematic illustrates a sample rigging<br />
pattern that uses all of the supported fixture types:<br />
CX-4<br />
(55)<br />
CX-2<br />
(67)<br />
Acrobat<br />
(49)<br />
CX-2<br />
(67)<br />
CX-4<br />
(55)<br />
MX-x<br />
(1)<br />
MX-x<br />
(25)<br />
MX-x<br />
(7)<br />
MX-x<br />
(31)<br />
Effect area<br />
MX-x<br />
(13)<br />
MX-x<br />
(37)<br />
MX-x<br />
(19)<br />
MX-x<br />
(43)<br />
CX-4<br />
(55)<br />
CX-2<br />
(67)<br />
Synchro<br />
Zap<br />
(61)<br />
CX-2<br />
(67)<br />
CX-4<br />
(55)<br />
14
ALIGNING MX-X FIXTURES<br />
To achieve the best results the MX-x scanners are<br />
rigged opposite each other, divided into DMX pairs.<br />
For example an MX-x scanner with DMX address 1 is<br />
rigged directly opposite an MX-x scanner with a DMX<br />
address of 25. See “DMX addresses” on page 12 for a<br />
list of the DMX pairs, and refer to the rigging samples<br />
in the previous section. Note that this configuration is<br />
not required and you can also expect good results when<br />
the fixtures are rigged in a line.<br />
To align DMX paired MX-x scanners:<br />
1 Power on the <strong>MC</strong>-<strong>Showtime</strong> unit and activate the lamps.<br />
2 Activate the Position function, by pressing and holding<br />
QG and then pressing 3RVLWLRQ. When the Position<br />
function is activated each MX-x scanner should<br />
illuminate the scanner directly across from it. If the<br />
fixtures are correctly aligned, shadow outlines of the<br />
fixtures should appear in circles of light directly behind<br />
the rig. For example, the scanner at DMX address 1<br />
should illuminate the scanner at DMX address 25, and<br />
vice versa.<br />
3 If the fixtures are not in alignment then adjust their<br />
positions on the rig so that they are correctly aligned.<br />
4 Deactivate the Position function by pressing and holding<br />
QG and then pressing 3RVLWLRQ.<br />
15
OPERATION<br />
This section describes the operating features available<br />
with the <strong>MC</strong>-<strong>Showtime</strong> controller.<br />
SWITCHING ON THE<br />
CONTROLLER<br />
To switch on the <strong>MC</strong>-<strong>Showtime</strong> unit:<br />
1 Connect the data link to the <strong>MC</strong>-<strong>Showtime</strong> unit.<br />
2 Power-up the fixtures.<br />
3 Connect the power cable to the <strong>MC</strong>-<strong>Showtime</strong> unit. The<br />
<strong>MC</strong>-<strong>Showtime</strong> controller will go into lamp-on mode (LO<br />
will appear blinking in the LED display), and will send<br />
lamp-on commands to the fixtures for 60 seconds, or<br />
until you press Enter.<br />
16
PRE-PROGRAMMED<br />
SEQUENCES<br />
The <strong>MC</strong>-<strong>Showtime</strong> controller is delivered with 30 preprogrammed<br />
sequences, each containing six scenes.<br />
The sequences are numbered from 1-30.<br />
The effects in sequences:<br />
• 1-10 have relatively slow, smooth, rates of action and<br />
movement. These sequences could be more<br />
appropriate for slower music. The indicator on the<br />
console for these sequences is labelled 6ORZ.<br />
• 11-20 have rates of action and movement that are<br />
neither especially slow, nor fast, smooth, nor erratic. The<br />
indicator on the console for these sequences is labelled<br />
0HGLXP.<br />
• 21-30 have relatively fast, erratic, rates of<br />
action/movement. These sequences best suit fast,<br />
intense, dance music. The indicator on the console for<br />
these sequences is labelled )DVW.<br />
Note that the Fast, Medium and Slow indicators on the<br />
console do not directly refer to the trig rate, they indicate<br />
the “mood” (the type of movement and action).<br />
17
Selecting sequences for execution<br />
You can select any of the following sequence options<br />
using the S and T buttons next to the LED display on<br />
the console:<br />
Sequence<br />
Any individual sequence, from 1 to 30.<br />
Fast<br />
Medium<br />
Slow<br />
Auto<br />
Trig<br />
Music<br />
Trig<br />
Fast<br />
Medium<br />
Slow<br />
Sequence<br />
Auto<br />
Trig<br />
Music<br />
Trig<br />
Any appropriate sequence from the range of<br />
available sequences. If you select this option the<br />
<strong>MC</strong>-<strong>Showtime</strong> controller analyzes the trig rate and<br />
selects a sequence with corresponding rates of<br />
action, or movement. The type of scene selected is<br />
indicated by the corresponding bar blinking in the<br />
LED display ()DVW, 0HGLXP or 6ORZ).<br />
Fast<br />
Medium<br />
Slow<br />
Sequence<br />
All sequences with slow movement and action. Each<br />
of the ten slow sequences is played 12 times.<br />
Execution starts at sequence 1, runs through to<br />
sequence 10 (shown as 0), and then starts again.<br />
Auto<br />
Trig<br />
Music<br />
Trig<br />
18
Fast<br />
Medium<br />
Slow<br />
Sequence<br />
All sequences with medium movement and action.<br />
Each of the ten medium sequences is played 12<br />
times. Execution starts at sequence 1, runs through to<br />
sequence 10 (shown as 0), and then starts again.<br />
Auto<br />
Trig<br />
Music<br />
Trig<br />
Fast<br />
Medium<br />
Slow<br />
Sequence<br />
All sequences with fast movement and action. Each<br />
of the ten fast sequences is played 12 times.<br />
Execution starts at sequence 1, runs through to<br />
sequence 10 (shown as 0), and then starts again.<br />
Auto<br />
Trig<br />
Music<br />
Trig<br />
When you select a new sequence, or group of<br />
sequences, your selection blinks in the display,<br />
indicating that it is not yet executing. To start executing<br />
the selection press (QWHU. Whatever you have selected<br />
will run in a continuous loop.<br />
TRIG RATES<br />
Triggers are used to activate scene changes. The higher<br />
the trig rate then the faster the scenes change. There are<br />
a range of trigger options available with the <strong>MC</strong>-<br />
<strong>Showtime</strong> controller that are explained in this section.<br />
Note that if no trig mode is active then the fixtures will<br />
not change to the next scene at the end of executing the<br />
current scene. They will wait for a trigger signal.<br />
19
Synchronizing the trig rate to the music<br />
In music trig mode, which is the default mode when the<br />
<strong>MC</strong>-<strong>Showtime</strong> controller is activated, the built-in<br />
microphone is used to synchronize the trig rate with the<br />
music.<br />
The 0XVLF button acts as a switch to turn music trig<br />
mode on and off.<br />
When this mode is activated, the associated indicator in<br />
the LED display will blink at the trig rate.<br />
Auto<br />
Trig<br />
Music<br />
Trig<br />
20<br />
To deactivate music trig mode, press the 0XVLF button,<br />
or the $XWR button. Note that if no trig mode is active<br />
then the fixtures will not change to the next scene in<br />
the sequence.<br />
Setting your own trig rate<br />
To set your own trig rate, tap the $XWR button at that<br />
rate.<br />
Note that if you press $XWR only once and hold it for a<br />
second, then the default trigger rate for the preprogrammed<br />
sequence will be used.<br />
In auto trig mode the trig rate is not synchronized with<br />
the music.
During auto trig mode, the associated indicator in the<br />
LED display will blink at the trig rate.<br />
Auto<br />
Trig<br />
Music<br />
Trig<br />
Sending manual trig pulses<br />
To send a single trigger pulse press 0DQXDO. This may<br />
be used on its own, with no function selected, or to<br />
supplement sound-activated triggers.<br />
BLACKOUT<br />
Press %ODFNRXW to black out the fixtures.<br />
Press %ODFNRXW again to restore the light output.<br />
STROBE<br />
To interrupt the current scene and strobe all the<br />
fixtures, press and hold 6WUREH. Normal operation<br />
resumes when the key is released.<br />
Note that this function is not available if a selection is<br />
blinking in the LED display; in this state the button<br />
functions as (QWHU. For more information<br />
see“Selecting sequences for execution” on page 18.<br />
21
FIXTURE CONTROL<br />
Activating fixtures<br />
To activate all of the fixtures, press and hold the QG<br />
button, and then press /DPSRQ.<br />
Resetting fixtures<br />
To reset all of the fixtures, press and hold the QG<br />
button, and then press 5HVHW.<br />
22
TROUBLESHOOTING<br />
Problem Probable cause(s) Remedy<br />
LEDs fail to light.<br />
Fixtures fail to<br />
respond to controller.<br />
No power.<br />
Internal circuit<br />
breaker open.<br />
Bad data connection.<br />
The data link is not<br />
connected.<br />
Missing termination.<br />
Incorrect address or<br />
mode setting.<br />
<strong>Light</strong>s not powered<br />
on.<br />
<strong>Light</strong>s have failed in<br />
the protocol autodetection.<br />
Check that power is<br />
switched on and cables<br />
are plugged in.<br />
Disconnect the<br />
controller for several<br />
minutes to reset the<br />
circuit breaker. Consult<br />
service technician if<br />
problem reoccurs.<br />
Inspect data cables and<br />
connections, repair or<br />
replace damaged<br />
cables.<br />
Connect data link.<br />
Insert termination plug<br />
in output of last fixture.<br />
Check and correct DIPswitch<br />
settings.<br />
Power on lights.<br />
Switch off the lights<br />
and then back on again.<br />
In general, switch on<br />
the <strong>MC</strong>-<strong>Showtime</strong><br />
controller before the<br />
lights.<br />
23
Problem Probable cause(s) Remedy<br />
Fixtures respond to<br />
blackout and manual<br />
trig but not to music.<br />
Volume is too low.<br />
Damaged<br />
microphone or other<br />
component.<br />
Place speakers closer<br />
to fixtures or increase<br />
volume.<br />
Refer fixture for<br />
service if problem<br />
occurs in stand-alone<br />
modes. Refer <strong>MC</strong>-<br />
<strong>Showtime</strong> to service if<br />
it occurs in music trig<br />
mode.<br />
24
SPECIFICATIONS<br />
HARDWARE<br />
• Compact metal housing<br />
• 7-button 2-digit display<br />
• 3-pin female XLR data out connection<br />
• Built-in microphone<br />
PLAYBACK FACILITIES<br />
• Easy execution of shows<br />
• Slow, medium, fast and auto-selection of show<br />
• Blackout, strobe and manual override<br />
• 30 different 6-scene sequences<br />
TRIG SOURCES<br />
• <strong>Sound</strong><br />
• Manual<br />
• Automatic<br />
DIMENSIONS<br />
(L x W x H):<br />
• 143 x 114 x 78 mm<br />
• (5.6 x 4.5 x 3.1 in)<br />
WEIGHT<br />
1 kg (2.2 lb.)<br />
25
AC SUPPLY<br />
• Input: 3-prong IEC male socket<br />
• EU: 220 - 250 V / 50 Hz<br />
• US: 110 - 120 V / 60 Hz<br />
POWER & CURRENT CONSUMPTION<br />
• 3 W, 15 mA @ 230 V<br />
• 6 W, 30 mA @ 120 V<br />
INCLUDED ITEMS<br />
• 1.5-meter IEC power cable<br />
• 5-meter 3-pin XLR cable<br />
• 3-pin male XLR termination plug<br />
• User manual<br />
INSTALLATION<br />
• Table top<br />
• Flush mount<br />
• Rack mount<br />
ACCESSORIES<br />
• 19” rack mount plate for 1 controller<br />
• 19” rack mount plate for 2 controllers<br />
26