Setting Cart Preferences - eTapestry Help
Setting Cart Preferences - eTapestry Help
Setting Cart Preferences - eTapestry Help

You also want an ePaper? Increase the reach of your titles
YUMPU automatically turns print PDFs into web optimized ePapers that Google loves.
<strong>Setting</strong> <strong>Cart</strong> <strong>Preferences</strong> - <strong>eTapestry</strong> <strong>Help</strong><br />
<br />
Navigation<br />
Main Page<br />
Glossary<br />
Print as PDF<br />
Categories<br />
Account<br />
Best Practices<br />
Correspondence<br />
Database<br />
Management<br />
Defined Fields<br />
Getting Started<br />
Journal<br />
Mass Update<br />
Query<br />
Report<br />
Troubleshooting<br />
Print as PDF<br />
Other Information<br />
<strong>Setting</strong> <strong>Cart</strong> <strong>Preferences</strong><br />
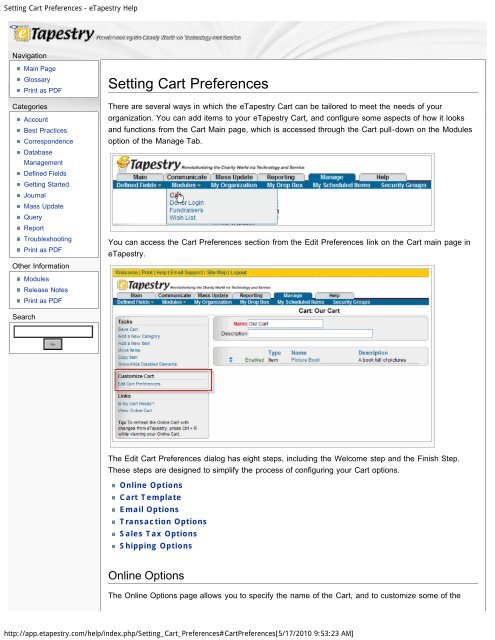
There are several ways in which the <strong>eTapestry</strong> <strong>Cart</strong> can be tailored to meet the needs of your<br />
organization. You can add items to your <strong>eTapestry</strong> <strong>Cart</strong>, and configure some aspects of how it looks<br />
and functions from the <strong>Cart</strong> Main page, which is accessed through the <strong>Cart</strong> pull-down on the Modules<br />
option of the Manage Tab.<br />
You can access the <strong>Cart</strong> <strong>Preferences</strong> section from the Edit <strong>Preferences</strong> link on the <strong>Cart</strong> main page in<br />
<strong>eTapestry</strong>.<br />
Modules<br />
Release Notes<br />
Print as PDF<br />
Search<br />
The Edit <strong>Cart</strong> <strong>Preferences</strong> dialog has eight steps, including the Welcome step and the Finish Step.<br />
These steps are designed to simplify the process of configuring your <strong>Cart</strong> options.<br />
Online Options<br />
<strong>Cart</strong> Template<br />
Email Options<br />
Transaction Options<br />
Sales Tax Options<br />
Shipping Options<br />
Online Options<br />
The Online Options page allows you to specify the name of the <strong>Cart</strong>, and to customize some of the<br />
http://app.etapestry.com/help/index.php/<strong>Setting</strong>_<strong>Cart</strong>_<strong>Preferences</strong>#<strong>Cart</strong><strong>Preferences</strong>[5/17/2010 9:53:23 AM]
<strong>Setting</strong> <strong>Cart</strong> <strong>Preferences</strong> - <strong>eTapestry</strong> <strong>Help</strong><br />
wording on the <strong>Cart</strong> Welcome page.<br />
The Order Success Message appears after a successful checkout.<br />
This page also allows you to specify the Time Zone and Transaction Processor for your <strong>Cart</strong>.<br />
The Time Zone comes into play when you set a Publication Start Date and End Date on an Item or<br />
Category in the <strong>Cart</strong>. The Transaction Processor selection allows you to select the processor to<br />
be used for <strong>Cart</strong> transactions when you have multiple Transaction Processors set up on your My<br />
Organization page. If you do not select the Transaction Processor here, your Default Transaction<br />
processor will be used for <strong>Cart</strong> transactions.<br />
http://app.etapestry.com/help/index.php/<strong>Setting</strong>_<strong>Cart</strong>_<strong>Preferences</strong>#<strong>Cart</strong><strong>Preferences</strong>[5/17/2010 9:53:23 AM]
<strong>Setting</strong> <strong>Cart</strong> <strong>Preferences</strong> - <strong>eTapestry</strong> <strong>Help</strong><br />
In the Checkout Questions section of this page, you can select user defined fields to be filled in by<br />
the purchaser at the time of checkout.<br />
Back to Top<br />
<strong>Cart</strong> Template<br />
The <strong>Cart</strong> Template page allows you to select a web template for your <strong>Cart</strong> pages. One of the options,<br />
called the Custom template, is very minimally formatted. You should select this template if you have<br />
arranged for <strong>eTapestry</strong> to customize the look and feel of your <strong>Cart</strong> pages to match the rest of your<br />
website.<br />
http://app.etapestry.com/help/index.php/<strong>Setting</strong>_<strong>Cart</strong>_<strong>Preferences</strong>#<strong>Cart</strong><strong>Preferences</strong>[5/17/2010 9:53:23 AM]
<strong>Setting</strong> <strong>Cart</strong> <strong>Preferences</strong> - <strong>eTapestry</strong> <strong>Help</strong><br />
Back to Top<br />
Email Options<br />
On the Email Options page, you can set up an Order Confirmation email that will be sent automatically<br />
to the purchaser when a purchase has been completed.<br />
The Notification Email specifies an email address that will receive a copy of the Order Confirmation<br />
email which is sent to the purchaser. Usually this contains the address of someone at your organization<br />
who will be monitoring <strong>Cart</strong> purchases. You can enter multiple email addresses in this field, if you<br />
separate them with a semi-colon. The address(es) specified in the Notification Email will also receive<br />
Zero Notification emails when the quantity of an Item that is being tracked in the <strong>Cart</strong> is reduced to<br />
zero by a <strong>Cart</strong> purchase. For more information on the Zero Notification email, click here.<br />
The Confirmation Sender specifies the From email address that will appear on the Order<br />
Confirmation email sent to the purchaser. If you do not specify a Confirmation Sender on<br />
this page, the Order Confirmation email will not be sent to the purchaser.<br />
You can select the Email Template to be used from the pull-down list. The list will include all of<br />
your Correspondence Templates that include the Order Details widget. If you do not select an<br />
Email Template on this page, no Order Confirmation email will be sent to the<br />
purchaser, or to anyone at your organization.<br />
For you to set up an Order Confirmation email, your database must contain a Correspondence<br />
Template for the email that contains the Order Details Correspondence widget. A default template was<br />
created for you automatically when your <strong>Cart</strong> license was turned on. You can modify this template, or<br />
create a new template to customize the content of your Order Confirmation email. If you try to set up<br />
your Email <strong>Preferences</strong> when no such template is available, you will see the following error message.<br />
http://app.etapestry.com/help/index.php/<strong>Setting</strong>_<strong>Cart</strong>_<strong>Preferences</strong>#<strong>Cart</strong><strong>Preferences</strong>[5/17/2010 9:53:23 AM]
<strong>Setting</strong> <strong>Cart</strong> <strong>Preferences</strong> - <strong>eTapestry</strong> <strong>Help</strong><br />
For information on how to set up an Order Confirmation email, click here.<br />
Back to Top<br />
Transaction Options<br />
On this page you can set the default Fund, Campaign, Approach and Letter for all Items sold on your<br />
<strong>Cart</strong>. The default values will be assigned to the purchase transaction for all Items that have not been<br />
assigned specific values on the Item page. You can override this default by setting a different Fund,<br />
Campaign, Approach or Letter on an individual Item, however, all Shipping and Tax segments will be<br />
created using the values set up on the Transaction Options page.<br />
If you do not specify the Fund values to be used for a transaction, <strong>eTapestry</strong> will create a new Fund in<br />
your database and will apply that fund to the transaction. <strong>eTapestry</strong> will create a separate Fund for<br />
Items, Shipping and Tax.<br />
<strong>eTapestry</strong> does not automatically create Campaign, Approach or Letter values, even if those are<br />
required fields in your database.<br />
For more information on setting up Funds, Campaigns and Approaches, click here.<br />
Back to Top<br />
Sales Tax Options<br />
If your organization is required to collect sales tax in any state, you will want to set up the particulars<br />
on the Sales Tax <strong>Preferences</strong> page. By default, your <strong>Cart</strong> is set up not to collect sales tax for any<br />
state.<br />
In the Sales Tax Identifier section, you specify whether your state requires you to collect sales tax for<br />
purchases that are billed to that state, or purchases that are shipped to that state.<br />
On the State Tax Rates section of the page, you can enter the percent of the purchase that you must<br />
collect for each state for which you are obligated to collect sales taxes. In the example below, the<br />
organization is required to collect 5% tax from Massachusetts, and 6% tax from Indiana. Leave the<br />
value blank for any state for which you do not have to collect sales tax.<br />
http://app.etapestry.com/help/index.php/<strong>Setting</strong>_<strong>Cart</strong>_<strong>Preferences</strong>#<strong>Cart</strong><strong>Preferences</strong>[5/17/2010 9:53:23 AM]
<strong>Setting</strong> <strong>Cart</strong> <strong>Preferences</strong> - <strong>eTapestry</strong> <strong>Help</strong><br />
Shipping fees are not taxable through the <strong>Cart</strong>. If you are required to collect taxes on Shipping Fees,<br />
you will need to roll those fees into the price of the product.<br />
Back to Top<br />
Shipping Options<br />
You can set up your <strong>Cart</strong> to calculate the shipping fee to be charged for an order. This shipping fee is<br />
based on a per-item fee that you set up when you create the Item in the <strong>Cart</strong>. In addition, you can set<br />
up a Base Fee which you would always charge for any order. This might be used to cover handling<br />
costs, the costs of packaging, etc. This Base Fee is set up as part of your Shipping <strong>Preferences</strong>. The<br />
Shipping <strong>Preferences</strong> also allow you to add a surcharge for Express or International Shipping.<br />
http://app.etapestry.com/help/index.php/<strong>Setting</strong>_<strong>Cart</strong>_<strong>Preferences</strong>#<strong>Cart</strong><strong>Preferences</strong>[5/17/2010 9:53:23 AM]
<strong>Setting</strong> <strong>Cart</strong> <strong>Preferences</strong> - <strong>eTapestry</strong> <strong>Help</strong><br />
The <strong>Help</strong> pane on the Shipping Options page explains how the <strong>Cart</strong> calculates the Shipping fee for an<br />
order.<br />
The International Surcharge is applied whenever the country in the Shipping Address is not the<br />
same as the Country set on the Shipping Fees page.<br />
The Free Order Base Fee takes the place of the Base Fee in the Shipping calculations when the<br />
total price of all Items in an order is $0.<br />
Back to Top<br />
Go to Putting Items on Your <strong>Cart</strong><br />
Return to <strong>Cart</strong><br />
Category: Modules<br />
© 2007 <strong>eTapestry</strong> Inc.<br />
Contact Us Suggestions About <strong>Help</strong><br />
http://app.etapestry.com/help/index.php/<strong>Setting</strong>_<strong>Cart</strong>_<strong>Preferences</strong>#<strong>Cart</strong><strong>Preferences</strong>[5/17/2010 9:53:23 AM]