
Create successful ePaper yourself
Turn your PDF publications into a flip-book with our unique Google optimized e-Paper software.
<strong>Retaining</strong> <strong>Wall</strong> - Miniwall®<br />
The easiest way...<br />
Miniwall® Bondi Blend® Miniwall® Sunstone Miniwall® Oatmeal<br />
etaining wall<br />
taining wall retaining wall retaining<br />
Simply the easiest way to create a small wall or garden edge the Miniwall® and Minicap systems <strong>com</strong>bine to give<br />
the professional and do-it-yourself landscaper a natural stone finish wall with the simplest of installations.<br />
Able to create concave and convex curves, the Miniwall® system requires minimal foundation preparation. Being one<br />
of the lightest walling blocks available and <strong>com</strong>ing pre-split and ready to use, the Miniwall® and Minicap systems<br />
are <strong>com</strong>pletely user friendly.<br />
Available in a range of colours, the Miniwall® system can form the basis of any garden construction, whether that<br />
be a whole garden development or a small planter box.
21<br />
Miniwall® Oatmeal<br />
etaining wall<br />
wall retaining wall retaining wall
Product Guide - Miniwall®<br />
22<br />
Products<br />
Type<br />
Size (mm)<br />
w x h x d<br />
No. per m 2<br />
No. per tonne<br />
No. per pallet<br />
Colours<br />
Oatmeal<br />
Bondi Blend®<br />
Sunstone<br />
Port Blend<br />
Charcoal<br />
Fossil<br />
Miniwall®<br />
H 125<br />
D 182<br />
Front W 182<br />
Back W 132<br />
Solid <strong>Wall</strong> 50<br />
Semi Solid <strong>Wall</strong> 44<br />
136 252<br />
• • • • • •<br />
Minicap<br />
H 125<br />
D 182<br />
Front W 182<br />
Back W 132<br />
Solid <strong>Wall</strong> 50<br />
Semi Solid <strong>Wall</strong> 44<br />
137<br />
252<br />
• • • • • •<br />
Colour Chart - Miniwall®<br />
Oatmeal Bondi Blend® Sunstone Port Blend<br />
Charcoal<br />
Fossil
23<br />
Curved Radius<br />
Minimum radius for inside curve is 435mm and 615mm for outside curves. As Miniwall®<br />
units can produce a tight radius, cumbersome corner units are not required - simply<br />
round the corner off. Half units, if required, can be split or cut from full units using<br />
a masonry cutter.<br />
Hint: 21 units form a circle.<br />
Maximum Heights<br />
The Miniwall® system is suitable for walls up to 500mm high (4 courses) where there is<br />
no surcharge loading. A surcharge loading applies when:<br />
• A wall is supporting a driveway or other load<br />
• There is greater than 3:1 slope above the wall<br />
• Another retaining wall above the wall which is less in distance behind the wall than<br />
double the height of the lower wall.<br />
Solid <strong>Wall</strong><br />
Larger faces on alternative sides<br />
Semi Solid <strong>Wall</strong><br />
Larger faces on visible side<br />
Laying Instructions<br />
Step 1<br />
Dig a shallow trench, level and place 100mm of crushed rock in the bottom and <strong>com</strong>pact.<br />
Step 2<br />
Spread and level 25mm of coarse sand as a bedding layer. Place the first layer of Miniwall®<br />
units onto the sand and tap into place with a mallet. A stringline is essential for building<br />
straight walls. Ensure that each unit is level from front to back and side to side.<br />
Step 3<br />
Stack Miniwall® units along the length of the wall to a maximum of 3 rows, ensuring that<br />
each row is offset to the one below. If the wall is acting as a small retainer, install 90mm<br />
agricultural pipe at the rear of the wall for drainage and fill 200mm behind the wall with<br />
drainage material.<br />
Step 4<br />
Before applying Minicap units, place some construction adhesive either side of the interlocking<br />
modules on the Miniwall®units. Position the Minicap units and press firmly into position.<br />
Freestanding <strong>Wall</strong>s<br />
As Miniwall® units are stacked vertically and both the front and back of each unit is finished<br />
with an attractive split stone texture, both sides of the wall may be left exposed.<br />
In this situation it is re<strong>com</strong>mended that construction adhesive be used between the upper<br />
courses of the wall.<br />
Outside Curve<br />
S-Curves<br />
To build a solid wall which changes from an inside curve to an outside curve, a half unit<br />
will be required every second course. Use a Minicap unit and perform the cut with<br />
either ºa masonry saw or splitter.<br />
Inside Curve
<strong>Retaining</strong> <strong>Wall</strong> - <strong>Wall</strong>stone®<br />
Garden Edge is a handy and versatile new garden edge and cladding product<br />
from Adbri Masonry. Garden Edge can be used to create a garden bed by<br />
installing it vertical onto a wet concrete base.<br />
Used to create a garden edge<br />
Garden Edge can also be used to conceal and improve unsightly old walls or to<br />
clad new walls up to 1.5 metres high. Simply apply the Garden Edge to the<br />
prepared surface (clean, dry and free of paint, dust and oil) with a waterproof<br />
construction adhesive in accordance with the manufacturer’s specifications.<br />
<strong>Wall</strong>stone® Suntone <strong>Wall</strong>stone® Bondi Blend® <strong>Wall</strong>stone® Charcoal<br />
etaining wall<br />
taining wall retaining wall retaining<br />
The <strong>Wall</strong>stone® system has many of the features of other systems but with the added advantage of choice between<br />
a vertical wall or a setback wall. The <strong>Wall</strong>stone® system gives a contemporary feel to an extremely flexible system,<br />
en<strong>com</strong>passing straight walls, convex or concave curves, right angle corners and formal stairs in 150mm step heights.<br />
The radius of convex walls can be as little as 2400mm and concave walls 2100mm, while the standard and tapered<br />
units can be mixed to achieve appealing designs. Pins, clips or mortar are not required. A <strong>com</strong>pacted gravel-leveling<br />
pad is sufficient in all <strong>Wall</strong>stone® applications.
Product Guide - <strong>Wall</strong>stone®<br />
25<br />
Products<br />
Type<br />
Size (mm)<br />
w x h x d<br />
No. per<br />
m 2<br />
No. per<br />
tonne<br />
No. per<br />
pallet<br />
Colours<br />
Oatmeal<br />
Bondi Blend®<br />
Sunstone<br />
Charcoal<br />
Standard Stacking Unit<br />
Tapered Stacking Unit*<br />
Tapered Rear Width - 180mm<br />
200 x 150 x 220<br />
200 x 150 x 220<br />
33<br />
103<br />
106<br />
140<br />
• • • •<br />
Split Capping<br />
Split Capper 300<br />
300 x 60 x 250 106 144<br />
• • • •<br />
Cornerstone<br />
90˚ External Corner<br />
Righthand<br />
300 x 150 x 220 49 75 • • • •<br />
Cornerstone<br />
90˚ External Corner<br />
Lefthand<br />
300 x 150 x 220 49 75<br />
• • • •<br />
*Tapered units are always supplied in equal quantities of left and right.<br />
Garden Edging - <strong>Wall</strong>stone®<br />
Products<br />
Type<br />
Size (mm)<br />
w x h x d<br />
No. per<br />
L/m 2<br />
No. per<br />
tonne<br />
No. per<br />
pallet<br />
Colours<br />
Oatmeal<br />
Bondi Blend®<br />
Sunstone<br />
Charcoal<br />
NEW<br />
Garden Edge<br />
200 x 150 x 65 5 320 326 • • • •<br />
NEW<br />
Garden Edge Grande 300 x 60 x 65 3.33 167 256<br />
• • • •
<strong>Retaining</strong> <strong>Wall</strong> - <strong>Wall</strong>stone® Grande<br />
New product.<br />
<strong>Wall</strong>stone® Grande Bondi Blend®<br />
<strong>Wall</strong>stone® Grande Charcoal<br />
etaining wall<br />
taining wall retaining wall retaining<br />
<strong>Wall</strong>stone® Grande blocks are available in a split face as shown and is a retaining wall system that <strong>com</strong>es <strong>com</strong>plete with<br />
matching cornerstones and capping units. <strong>Wall</strong>stone® Grande blocks are not only larger than the original <strong>Wall</strong>stone® but<br />
are made using Premium Sands for a superior finish. As a result the Grande range is slightly different in colour to the<br />
original <strong>Wall</strong>stone® range, therefore, all <strong>com</strong>ponents including corners, caps and wall units need to be ordered as<br />
‘Grande’ products.
27<br />
<strong>Wall</strong>stone® Grande Charcoal<br />
<strong>Wall</strong>stone® Grande Bondi Blend®<br />
etaining wall<br />
wall retaining wall retaining wall<br />
The <strong>Wall</strong>stone® and <strong>Wall</strong>stone® Grande systems are <strong>com</strong>prehensive yet easy to install and provide a solution to most<br />
retaining wall projects, and the range includes tapered units for curves. The ranges are <strong>com</strong>pleted with matching<br />
cornerstones and capping units for a stylish and professional finish which is why the <strong>Wall</strong>stone® system and now the<br />
<strong>Wall</strong>stone® Grande system are the first choice for retaining walls.
Product Guide - <strong>Wall</strong>stone® Grande<br />
28<br />
Products<br />
Type<br />
Size (mm)<br />
w x h x d<br />
No. per<br />
m 2<br />
No. per<br />
tonne<br />
No. per<br />
pallet<br />
Colours<br />
Oatmeal<br />
Bondi Blend®<br />
Sunstone<br />
Charcoal<br />
Fossil<br />
Hollow<br />
Standard Stacking Unit<br />
Tapered Stacking Unit*<br />
Tapered Rear Width - 285mm<br />
300 x 150 x 220<br />
300 x 150 x 220<br />
22.2<br />
66<br />
66<br />
105<br />
• • • •<br />
•<br />
Split Capping<br />
Split Capper 300<br />
300 x 60 x 250 106 144<br />
• • • •<br />
•<br />
Cornerstone<br />
90˚ External Corner<br />
Righthand<br />
300 x 150 x 220 40 75 • • • •<br />
•<br />
Cornerstone<br />
90˚ External Corner<br />
Lefthand<br />
300 x 150 x 220 40 75<br />
• • • •<br />
•<br />
*Tapered units are always supplied in equal quantities of left and right.<br />
Typical Cross Section -<br />
<strong>Wall</strong>stone® and <strong>Wall</strong>stone®<br />
Grande<br />
Maximum Heights (Before Capping):<br />
• <strong>Wall</strong>stone® and <strong>Wall</strong>stone® Grande:<br />
Setback <strong>Wall</strong> - 750mm + cap.<br />
• <strong>Wall</strong>stone® and <strong>Wall</strong>stone® Grande:<br />
Vertical <strong>Wall</strong> - 600mm + cap.<br />
These heights apply to all site soil types<br />
excluding clay or sandy/silty clays and are<br />
applicable for residential applications only.<br />
These conditions must be observed:<br />
• <strong>Wall</strong> designs are for level backfill<br />
or maximum 1 in 8 slope at rear of wall<br />
• The distance between terraced walls<br />
must exceed 2x the height of the lower wall<br />
• No static loads are to be applied to the wall<br />
• Water run-off must be diverted away<br />
from the wall.<br />
If any of these conditions cannot be met,<br />
or your wall exceeds the maximum design<br />
height, please ask Adbri Masonry for help<br />
or consult a suitably qualified engineer.
Colour Chart - <strong>Wall</strong>stone®, <strong>Wall</strong>stone®<br />
Grande, <strong>Wall</strong>stone® Edge<br />
29<br />
Oatmeal Bondi Blend® Sunstone Charcoal Fossil® (<strong>Wall</strong>stone Grande only)<br />
Laying Instructions<br />
Step 1<br />
Dig a shallow trench, level and place 100mm of crushed rock in the bottom. Level and <strong>com</strong>pact. Allow for 75mm embedment of the<br />
bottom course and 300mm behind the wall for drainage.<br />
Step 2<br />
Spread and level approximately 25mm of coarse sand as a bedding layer then place the first course of <strong>Wall</strong>stone® units. Use a stringline<br />
for creating a straight line, and level from side to side and front to back. Install a 90mm Agricultural Pipe (on grade) at the rear of the<br />
wall for drainage.<br />
Step 3<br />
Fill behind each course with granular rock for drainage and carefully <strong>com</strong>pact. Check each course is level before proceeding and stack<br />
each additional row offsetting from the block below.<br />
Step 4<br />
On the last course of stacking units, place a line of adhesive front and back and place the capping unit. Apply pressure to secure and<br />
use a stringline and level for the best result.<br />
Notes:<br />
• Slope the soil above and below the wall to ensure that water will flow away from and not accumulate near the wall<br />
• It is advisable to place a dob of adhesive between corner units<br />
• If a vertical wall is required then follow the same instructions but remove the narrow section at the top of each unit using a bolster chisel.<br />
1 2 3<br />
4<br />
Building Steps with <strong>Wall</strong>stone®<br />
and <strong>Wall</strong>stone® Grande<br />
The versatility of building steps is only limited<br />
by your imagination. Steps can be designed<br />
with flowing curves or with right angles.<br />
The simplest step design <strong>com</strong>bines<br />
<strong>Wall</strong>stone® standard units with corner<br />
units and <strong>Wall</strong>stone® capping as step<br />
treads.<br />
Alternatively, bullnose pavers may be<br />
used as step treads.<br />
Cross Section<br />
Landscape View
<strong>Retaining</strong> <strong>Wall</strong> - Allan Block<br />
Simple, strong and reliable.<br />
AB Classic Sunstone<br />
AB Classic Bondi Blend®<br />
etaining wall<br />
taining wall retaining wall retaining<br />
The unique features of Allan Block products make construction of retaining walls simple yet strong and reliable.<br />
Ideal for any domestic project or larger engineered <strong>com</strong>mercial structure.<br />
The Allan Block range is a totally versatile system allowing for convex or concave curves, straight walls, right angle<br />
corners, steps and terraced walls.
31<br />
etaining wall<br />
wall retaining wall retaining wall<br />
AB Aussie Vertical Bondi Blend®<br />
AB Classic Bondi Blend®
AB Junior Oatmeal<br />
etaining wall<br />
taining wall retaining wall retaining
<strong>Retaining</strong> <strong>Wall</strong> - Allan Block<br />
33<br />
AB Aussie Vertical<br />
Bondi Blend®<br />
Steps using Allan Block<br />
AB Aussie Vertical Charcoal<br />
etaining wall<br />
wall retaining wall retaining wall<br />
Allan Block units are now available vertical as well as with setbacks to suit any project. Allan Block retaining walls<br />
have a choice of setbacks and a maximum non-engineered height of 1200mm. Always check with your Council where<br />
a surcharge loading applies or for their maximum permitted height for non-engineered walls. For further information<br />
please refer to the AB Installation Guide or contact Adbri Masonry for assistance.
Product Guide - Allan Block<br />
34<br />
Products<br />
Type<br />
Size (mm)<br />
w x h x d<br />
Setback<br />
No. per<br />
m 2<br />
No. per<br />
tonne<br />
No. per<br />
pallet<br />
Firm to<br />
Silty Clay<br />
Silty<br />
Sand<br />
Clean<br />
Sand or<br />
Gravel<br />
Colours<br />
Oatmeal<br />
Bondi Blend®<br />
Sunstone<br />
Charcoal<br />
AB Junior<br />
Vertical<br />
216 x 200 x 240 1˚ 23 68 100 600mm 700mm 800mm • • • •<br />
AB Aussie<br />
Vertical<br />
435 x 200 x 240 1˚ 11.5 34<br />
50<br />
600mm<br />
700mm<br />
800mm<br />
• • • •<br />
AB<br />
Cornerstone<br />
Short<br />
Vertical<br />
Lefthand (shown)<br />
or Righthand<br />
300 x 200 x 196<br />
1˚<br />
N/A<br />
51<br />
60<br />
Specifically for AB Junior<br />
Vertical<br />
• • • •<br />
AB<br />
Cornerstone<br />
Long<br />
Vertical<br />
Lefthand or<br />
Righthand (shown)<br />
300 x 200 x 196<br />
1˚<br />
N/A<br />
45<br />
50<br />
Specifically for AB Aussie<br />
Vertical<br />
• • • •<br />
AB<br />
Cornerstone<br />
Long<br />
Setback<br />
Lefthand or<br />
Righthand (shown)<br />
400 x 200 x 196<br />
6˚<br />
N/A<br />
45<br />
50<br />
Specifically for AB Classic<br />
• • • •<br />
AB Split<br />
Capper<br />
Short<br />
216 x 80 x 245 N/A N/A 108<br />
120<br />
Specifically for AB Junior<br />
Vertical and AB Aussie Vertical<br />
• • • •<br />
AB Split<br />
Capper<br />
Long<br />
216 x 80 x 310 N/A N/A 86<br />
120<br />
Suitable for all AB products<br />
• • • •<br />
AB Classic 435 x 200 x 305 6˚ 11.5 32<br />
40 900mm 1100mm 1200mm<br />
• • • •<br />
Notes:<br />
• <strong>Wall</strong>s that exceed the maximum heights for gravity walls listed will need reinforcement<br />
• Refer to Adbri Masonry for guidelines on designing geogrid reinforced retaining walls<br />
• Special colours can be made for large projects.
Colour Chart - Allan Block<br />
35<br />
Oatmeal Bondi Blend® Sunstone Charcoal<br />
Installation Guide - Allan Block<br />
AB Installation Summary<br />
Step 1<br />
Excavate base trench at wall location and install Base Material (a well graded <strong>com</strong>pactable aggregate 5mm to 20mm diameter).<br />
Base Trench is typically 600mm wide by 100mm deep plus 25mm in depth for every 300mm of wall height. Begin excavation at the<br />
lowest point and dig a level trench into the slope until it is deep enough to ac<strong>com</strong>modate 100mm Base Material and the re<strong>com</strong>mended<br />
depth of embedment.<br />
Step 2<br />
Install base material and rake smooth and <strong>com</strong>pact, check the entire length for level and adjust as needed.<br />
Step 3<br />
Install basecourse starting at the lowest point. Place the first row of Allan Block unit on the base material with the raised front lip facing<br />
up and forward to the front of the wall. Check and adjust the level and alignment of all blocks with a stringline across the back of the<br />
blocks or the back of the lips. Make minor adjustments by tapping the block with a rubber mallet. Irregularities in the base course<br />
be<strong>com</strong>e larger as the wall stacks up!<br />
Step 4<br />
Install an Agricultural Pipe at the bottom rear of the drainage field with appropriate fall to designated drainage point. Fill Allan Block<br />
hollow cores and the minimum 300mm behind the wall with drainage material (not crushed rock or material containing ‘fines’).<br />
Using onsite soils, backfill behind drainage zone and in front of the base course.<br />
Step 5<br />
Brush off excess drainage material from top of blocks. Stack the next row of blocks with the vertical joints offset from the joints below.<br />
Blocks may be adjusted to form straight lines and smooth curves. Check it is level and adjust as needed before installing drainage and<br />
backfill materials as in Step 4.<br />
Step 6<br />
Using a vibrating plate <strong>com</strong>pactor, <strong>com</strong>pact over the top of the blocks running parallel to the wall. This will lock the blocks into<br />
position. Avoid hitting the front lip, as this will knock the blocks out of alignment. Next, <strong>com</strong>pact the drainage and then the backfill<br />
area, always running parallel to the wall.<br />
Step 7<br />
Install additional courses by repeating steps 5 and 6. Each lift of drainage and backfill materials should be installed in the same manner,<br />
<strong>com</strong>pact in lifts of 200mm (every course).<br />
This summary is intended as a general guide only. For more detailed information including creating curves, corners, steps,<br />
terraced walls or water management, please refer to the seperate Allan Block Installation Guide (available from Adbri Masonry<br />
or your local distributor) before constructing your wall.<br />
For walls that exceed the maximum heights in the table opposite please consult an engineer and check with your local<br />
Council for requirements.
Adbri Masonry<br />
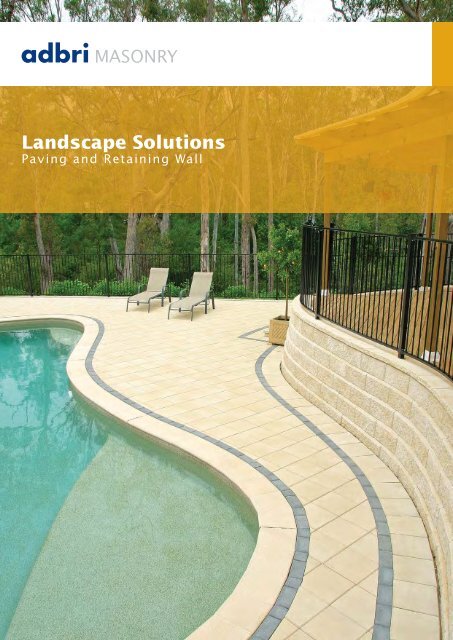
Paving and <strong>Retaining</strong> <strong>Wall</strong> Landscape Solutions<br />
1st Edition Victoria<br />
© Dec 2008 - Adbri Masonry Pty Ltd<br />
Please Note:<br />
• Product to be purchased by the unit<br />
as metre price is approximate only<br />
• Prices are delivered prices in normal<br />
delivery areas for two (2) pallets or more<br />
• An additional surcharge applies for all<br />
deliveries under two (2) pallets,<br />
please enquire at point of sale.<br />
• Payment is to be made in full at the<br />
time of order unless prior arrangements<br />
have been made<br />
• All coloured product should be ordered<br />
at the one time to reduce the risk<br />
of batch variation<br />
• No claims will be accepted for under<br />
or over estimation of quantities<br />
• No claims will be accepted once product<br />
has been installed<br />
• Pallet quantities may vary from time<br />
to time<br />
• We strongly advise customers to allow<br />
for wastage/cutting by ordering an<br />
additional 3 to 5%.<br />
Adbri Masonry Stock Returns Policy:<br />
Adbri Masonry will only accept product<br />
returns under the following guidelines:<br />
• Grey Brick or Block - only full pallets<br />
stacked in original configuration<br />
• Paving and <strong>Retaining</strong> <strong>Wall</strong>s - only full<br />
pallets stacked in original configuration<br />
• Coloured Brick and Block - no returns<br />
accepted<br />
• Made to Order (QC Orders) any<br />
product - no returns accepted.<br />
Landscape Solutions: AB.LSED0108<br />
Adbri Masonry logo, Atenstone®, Bondi Blend®, Havenbrick®, Havenpave®, Havenslab®,<br />
Miniwall®, Stradapave®, <strong>Wall</strong>stone®, Boulevard®, Fossilstone, Minicap, Stradastone,<br />
Sunstone and Oatmeal are trade marks of Adbri Masonry Pty Ltd or its related entities.<br />
The Allan Block logo and brand name AB Junior are trade marks of the Allan Block<br />
Corporation and are used under license.<br />
Patents:<br />
Allan Block <strong>Retaining</strong> <strong>Wall</strong> Systems are protected by Australian Patent No. 682394 and<br />
by Australian Registered Design No. 133306.<br />
Note: Printed material may differ from actual product colour.<br />
FREE PALLET COLLECTION SERVICE<br />
FREECALL: 1800 674 961<br />
OR DROP PALLETS BACK TO PLACE OF PURCHASE<br />
Please DO NOT dispose of Adbri Masonry pallets in any other way.<br />
Adbri Masonry pallets always remain the property of Adbri Masonry Pty Ltd.<br />
Pallets will be collected within 3 days in most cases.<br />
Pallets must be empty and stacked in a safe and accessible area during<br />
daylight hours.<br />
In all cases product must be untouched/clean<br />
of dirt and debris, on wooden pallets and<br />
accessible for collection by fork or crane<br />
truck.<br />
Fixed cost for product return must be<br />
supplied to you by the despatch department<br />
of origin prior to performance of the<br />
collection.<br />
Melbourne - Essendon<br />
264 Keilor Road North Essendon, VIC 3041<br />
phone: 03) 9375 8500 I fax: 03) 9374 4736<br />
Adelaide<br />
Cnr Grand Junction & Blakeney Rds Ottoway, SA 5013<br />
phone: 08) 8304 2323 I fax: 08) 8341 1101<br />
Melbourne - Campbellfield<br />
194 Northbourne Road Campbellfield, VIC 3061<br />
phone: 03) 9375 8500 I fax: 03) 9303 9035<br />
Sydney<br />
20 Kelso Crescent Moorebank, NSW 2170<br />
phone: 02) 9822 6822 I fax: 02) 9601 7446<br />
Adbri Masonry Pty Ltd<br />
ABN: 31 009 687 521<br />
www.adbrimasonry.<strong>com</strong>.au<br />
Bendigo<br />
69 Collins Street Kangaroo Flat, VIC 3555<br />
phone: 03) 5447 8866 I fax: 03) 5447 0399<br />
Canberra<br />
6 Tennant Street Fyshwick, ACT 2609<br />
phone: 02) 6239 1255 I fax: 02) 6280 7284<br />
Newcastle<br />
Old Maitland Road Sandgate, NSW 2304<br />
phone: 02) 4967 3611 I fax: 02) 4960 1187<br />
Nowra<br />
270-274 Princes Hwy South Nowra, NSW 2541<br />
phone: 02) 4421 3500 I fax: 02) 4421 3082<br />
ABM5040 01/09