Icon 8 User Manual
Icon 8 User Manual
Icon 8 User Manual

You also want an ePaper? Increase the reach of your titles
YUMPU automatically turns print PDFs into web optimized ePapers that Google loves.
Contents<br />
Contents 1<br />
Terms you may neeed to know 2<br />
Keypad Lights 3, 4<br />
Keypad Buttons 5<br />
<strong>User</strong> Functions<br />
Fully Arming the System - ON Mode 6<br />
Partially Arming the System - Partial Mode 6<br />
Isolate a section from being Armed 7<br />
System OFF - Disarming the System 7<br />
<strong>User</strong> Code - Programming 8<br />
Master Code - Programming 9<br />
Other Features<br />
Keypad panic 9<br />
Keypad Duress 9<br />
Test Functions 10<br />
Warranty 11<br />
Section List 12<br />
Important Information 13<br />
page 1
Terms .....you may need to know<br />
Alarm - The state of a security system when an armed sensor has been<br />
activated.<br />
Arming - To place a section or panel ready to accept an alarm.<br />
Central - A place where alarms are received and appropriate action<br />
Station taken in response to the Station alarm.<br />
Door - A sensor which detects the opening of a door.<br />
Contact<br />
EntryTimer-<br />
A timer that is used to delay the activation of an alarm<br />
Exit Timer -<br />
A timer used to delay the arming of an Exit / Entry section.<br />
Handover -<br />
Section<br />
A section that has Exit delay but only has Entry delay<br />
when an Exit and Entry Section has been activated first.<br />
Isolate - To inhibit or bypass one or more sections from arming.<br />
Microwave -<br />
Detector<br />
A detector which detects movement by the use of microwave<br />
energy.<br />
Partial - Only part of the security system is Armed.<br />
(Pre Programmed sections are isolated).<br />
PIR (Passive-<br />
Infra Red)<br />
Plug Pack -<br />
A detector which detects movement by sensing sudden<br />
changes in Infra Red temperature.(e.g. Body Heat)<br />
A transformer which converts the 240 VAC Mains Power to<br />
16 VAC to run the Security System.<br />
Sealed - When a section is Armed and has not been activated.<br />
Silent - A section may be programmed to be silent. i.e. does not trigger<br />
the siren or strobe when alarmed.<br />
Siren Timer- A timer used to limit the running time of the siren.<br />
System OFF-<br />
System ON-<br />
Security System is disarmed for all sections that are not<br />
programmed for 24 Hour.....Note: Fire, Panic and Tamper,<br />
if available, are still Armed.<br />
Security System is Armed for all sections that are not isolated.<br />
page 2
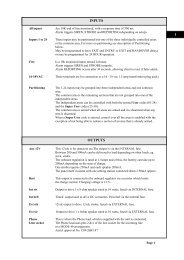
Keypad<br />
- Indicators<br />
Section Lights-<br />
There are 8 or 24 section lights on the command centre.<br />
- When the system is in the OFF mode all non 24 hour<br />
sections are not armed and the Section Lights indicate<br />
the condition of the sensor..When the Section Light is<br />
On the sensor is activated (e.g. door contact detecting<br />
door open or motion detector sensing movement).<br />
When the Section Light is OFF the sensor is not activated.<br />
- When the system is in the ON mode all non isolated sections<br />
are armed. If the section light is FLASHING the sensor is<br />
activated and triggers the siren and strobe light (if it is not<br />
silent).This alarm is transmitted to the central station. When<br />
the light is out the section is not activated.<br />
- When the system has been Armed, an exit timer starts and<br />
holds the sections that have been programmed for Exit or<br />
Entry delay disarmed. This allows the user to exit the premises<br />
without activating the alarm.<br />
- When the system is armed, and the Exit timer has finished,<br />
Entry into the premises can be made via a section that has<br />
Entry delay. This starts the Entrydelay and if the system is<br />
disarmed there will be no alarm.<br />
Power Light - This light is normally ON. This indicates that the Plug Pack<br />
power and backup battery are normal.<br />
- When the Plug Pack power is not good (i.e. the mains has<br />
failed) the power light will single flash.<br />
- When the Plug Pack power and battery are not good, the<br />
power light will double flash.<br />
Program Light -<br />
Flashing while in Program mode. Program mode is entered<br />
when a user code is entered and isolate or test modes are<br />
selected. Program mode is also selected when the master<br />
code is entered and the user codes are being viewed or<br />
changed.<br />
- When not in program mode the Program Light is Off<br />
page 3
Keypad<br />
- Indicators .....cont'd<br />
Partial Light - ON when the Partial mode has been selected and only<br />
some of the sections are armed.<br />
- Single flash when the system is Partially armed and Exit<br />
timer is running.<br />
- Double flash when the system is armed and the Entry<br />
timer is running. The Entry timer is started when an<br />
Exit / Entry is activated.<br />
- OFF indicates partial mode is not selected.<br />
On Light - Off when the system is Off<br />
- Single flash when the system is armed and Exit timer is<br />
running.<br />
- Double flash when the system is armed and the Entry<br />
timer is running. The Entry timer is started when an<br />
Exit / Entry is activated.<br />
Fire Light * - When the Fire input is triggered, the Fire Light will start to<br />
Flash. If after 30 seconds the alarm has not been ac<br />
knowledged (by entering a valid user code and ON or<br />
OFF buttons) then an alarm will be sent to the Central<br />
Station and the Fire Light will stay ON.<br />
Auxillary Light * - The Auxillary Light is used to indicate the state of the<br />
Panic and Tamper inputs.<br />
- When the Tamper input is activated the Auxillary Light<br />
will Single Flash.<br />
- When the Panic input is activated the Auxillary Light will<br />
Double Flash.<br />
* Not all panels have these indicators<br />
page 4
Keypad<br />
Keys<br />
0 - 9 Keys - Used to enter numeric Codes or Function Numbers.<br />
Test Key - Used when a valid <strong>User</strong> Code has been entered to<br />
enter Test mode.<br />
Isolate Key - Used when a valid <strong>User</strong> Code has been entered to<br />
Isolate a section, usually before Arming the System.<br />
Partial Key - Used when a valid <strong>User</strong> Code has been entered to Arm<br />
the System with Pre Programmed sections Isolated.<br />
Off Key - Used when a valid <strong>User</strong> Code has been entered to<br />
Disarm the System.<br />
On Key - Used when a valid <strong>User</strong> Code has been entered to Arm<br />
the System, it is also used as the code key when in<br />
programming mode.<br />
NOTE : Some keypads have a seperate code button to<br />
access program mode.<br />
page 5
Fully Arming the System - ON Mode<br />
Notes:<br />
1. The system will not change to ON mode unless all section lights are<br />
out or isolated.<br />
2. Power light should be ON and not flashing.<br />
3. Program, Fire and Auxillary lights,if fitted, should be out.<br />
4. Exit Timer starts as soon as ON light starts flashing and beeper gives<br />
exit warning.<br />
5. Exit via programmed Exit/Entry sections only.<br />
6. If the Exit / Entry sections are not sealed by the time the exit timer<br />
expires then the siren and strobe will give 2 seconds warning and<br />
the entry timer is started. If the system is not turned to OFF mode<br />
before the entry time expires a full siren / strobe and alarm<br />
transmission to the Central Station occurs.<br />
Key Sequence Operation<br />
Example shows a <strong>User</strong> Code 1 2 3 4<br />
1 2 3 4 on being used to change the system to<br />
ON mode<br />
Partially Arming the System - Partial Mode<br />
Notes:<br />
1. Only part of the system will be armed. Actual sections being<br />
armed depends on setup by technician during installation.<br />
2. The section lights of the sections which are being armed in Partial<br />
mode must be out otherwise the system will not change to Partial<br />
ON mode.<br />
3. Check Power light is on and not flashing.<br />
4. Program, Fire and Auxillary, if fitted, lights should be out.<br />
5. Exit Timer starts as soon as Partial light starts flashing and beeper<br />
gives exit warning.<br />
6. Exit via programmed Exit/Entry sections only.<br />
7. If the Exit / Entry sections are not sealed by the time the exit timer<br />
expires then the siren and strobe will give 2 seconds warning and<br />
the entry timer is started. If the system is not turned to OFF mode<br />
before the entry time expires a full siren / strobe and alarm<br />
transmission to the Central Station occurs.<br />
Key Sequence Operation<br />
Example shows a <strong>User</strong> Code 1 2 3 4<br />
1 2 3 4 part being used to change the system to<br />
Partial ON mode<br />
page 6
Isolate<br />
a Section from being Armed<br />
Notes:<br />
1. When entering section numbers a two digit number eg 01 or a single 1<br />
may be used. Single digit entry. i.e. the leading zero is ignored)<br />
2. Only valid section numbers may be entered.<br />
3. Sections are automatically de-isolated when the system is changed to<br />
OFF mode.<br />
4. Depending on technician setup, isolations may be reported to the<br />
Central station.<br />
Key Sequence<br />
Operation<br />
Example shows a <strong>User</strong> Code 1 2 3 4<br />
1 2 3 4 isolate being used to enter Isolation mode.<br />
0 4 Sections 4 and 7 are being Isolated.<br />
0 7<br />
ON or part When desired sections are isolated<br />
Disarming the System - OFF Mode<br />
Notes:<br />
1. Only a valid <strong>User</strong> Code can change the system between OFF, ON and<br />
Partial modes.<br />
2. Fire, Panic and Tamper inputs, if fitted, are always armed.<br />
3. This key sequence also acknowledges or silences the siren / strobe if a<br />
Fire, Panic or tamper alarm is actuated.<br />
Key Sequence<br />
Operation<br />
Example shows a <strong>User</strong> Code 1 2 3 4<br />
1 2 3 4 Off being used to change the system to<br />
OFF mode<br />
page 7
Changing <strong>User</strong> Codes<br />
Notes:<br />
1. <strong>User</strong> 01 default is 1111.<br />
2. <strong>User</strong> codes are 4 digits long.<br />
3. <strong>User</strong> codes are used to change the status of the panel, isolate sections or<br />
acknowledge alarms.<br />
4. <strong>User</strong> codes cannot be the same or within one count of another <strong>User</strong> code<br />
including the first 4 digits of the Master Code.<br />
5. To change <strong>User</strong> codes the system must be in the OFF mode.<br />
Key Sequence<br />
Operation<br />
Example shows a Master<br />
code eg 218572 used to<br />
2 1 8 5 7 2 On enter program mode.<br />
(Enter your own<br />
0 1 Select <strong>User</strong> code 01<br />
1 2 3 4 On Enter new code 1 2 3 4<br />
0 7 Select <strong>User</strong> code 07<br />
8 7 6 5 On Enter new code 8 7 6 5<br />
Off<br />
Exit program mode<br />
with the OFF key.<br />
page 8
Changing the Master Code<br />
Notes:<br />
1. Master code default is 218572.<br />
2. Master code is 6 digits long.<br />
3. The Master code is only used to program the user codes. It cannot<br />
change the status of the system.<br />
4. The system must be in OFF mode to enter the master code.<br />
Key Sequence<br />
Operation<br />
Enter existing Master<br />
2 1 8 5 7 2 ON code 218572 used to<br />
enter program mode.<br />
0 0 Select function 00<br />
2 4 6 8 1 2 ON Enter new master<br />
Code e.g. 2 4 6 8 1 2<br />
Off<br />
Exit program mode<br />
with the OFF key.<br />
Other Features<br />
Keypad<br />
Panic<br />
The keypad panic may be initiated by holding both the ON and<br />
the OFF keys depressed together for a period of 3 seconds. If<br />
the alarm aystem is monitored a duress report will be sent to<br />
the monitoring station and, if enabled by the installer, the sirens<br />
will sound.<br />
Keypad<br />
Duress<br />
Sirens enabled for Panic YES NO<br />
Keypad duress must be enabled by the installer at installation<br />
and is initiated by incrementing the last digit of a valid user<br />
code by 1. For example, if the users code was 1234, then a<br />
duress signal would be sent to the monitoring station if the user<br />
entered 1235 as their code. In all other respects the panel<br />
would react as if the normal code had been entered. For user<br />
codes ending in 9 then a 0 would be entered eg. normal code is<br />
1949, duress code would be 1940.<br />
Keypad duress enabled YES NO<br />
page 9
Test Functions<br />
Notes:<br />
1. Test your system regularly and this will keep you familiar with the<br />
system and confident in the system operation.<br />
2. Maximum testing time is 10 minutes.<br />
3. The system must be in OFF mode before entering test mode.<br />
4. Test mode may not be entered until all alarm messages have been<br />
transmitted.<br />
5. Some panels do not have all the test modes described below.<br />
Test 1<br />
Test 2<br />
Test 3<br />
Test 4<br />
- Walk test - Beeper operates and section light operates.<br />
This test enables the user to walk around and activate sensors<br />
and check correct operation of sensors.<br />
- Siren test - Siren sounds for 3 seconds.<br />
- Strobe test - Strobe operates unitl next key press.<br />
- All lights and beeper operate until next key press - used to<br />
check operation of lights and beeper.<br />
Test 5 - Recall Last Alarm - last alarm flashes until next key press.<br />
Test 6<br />
Test 9<br />
- Reset Smoke Detectors (if fitted) - removes power from<br />
the smoke detectors for 5 seconds .<br />
-Start a Test Report on Dialler (if fitted) - sends a test report<br />
to the Central station and synchronises the time for next<br />
test report. (Account number, and phone number must<br />
be programmed for this test to start.)<br />
Key Sequence<br />
Operation<br />
Example shows a <strong>User</strong> Code 1 2 3 4<br />
1 2 3 4 test being used to enter test mode.<br />
1 Test 1 started - walk test<br />
2 Test 2 started - siren test<br />
Off<br />
Exit test mode.<br />
page 10
War<br />
arranty<br />
anty<br />
Manufactured equipment is warranted to be free from defects in material and<br />
wokmanship for a period of 5 years (60) months from the date of manufacture as<br />
indicated by the date stamp and/or serial number on the product.<br />
Defective units returned by the buyer at his own expense during this period will<br />
be repaired (or replaced at the option of the manufacturer) with an equivalent<br />
piece of re-manufactured and tested equipment.<br />
The repaired or replaced equipment is then warranted for the balance of the initial<br />
warranty period or for thirty (30) days, whichever is longer.<br />
The repair or replacement will be without charge provided that the equipment has<br />
not been subjected to electrical of physical misuse or to unauthorised repair or<br />
modification.<br />
The foregoing warranty is in lieu of all other warranties, express or implied,<br />
including, but not limited to, merchantability or fitness for a particular purpose.<br />
The purchaser's exclusive remedy with respect to any and all losses or<br />
damages resulting from any cause whatsoever, shall be repair or replacement as<br />
specified above.<br />
Manufacturer shall in no event be liable for any consequential or incidental damages,<br />
however occasioned, whether by negligence or otherwise.<br />
No suit or action shall be brought against manufacturer more than one (1) year<br />
after the accrual of the cause of action therefore.<br />
No agent, employee or representative of the Manufacturer nor any other<br />
person is authorised to modify this warranty in any respect. This warranty gives<br />
you specific legal rights and you may also have other rights which vary from state<br />
to state.<br />
page 11
Section List<br />
ENTRY/EXIT<br />
PARTIAL<br />
24HR<br />
1<br />
2<br />
3<br />
4<br />
5<br />
6<br />
7<br />
8<br />
9<br />
10<br />
11<br />
12<br />
13<br />
14<br />
15<br />
16<br />
page 12
Important Information<br />
Control Panel Type<br />
Security Company<br />
Central Station Phone<br />
Date Installed<br />
Installed by<br />
Emergency Numbers<br />
Local Police<br />
Fire Brigade<br />
Ambulance<br />
Doctor<br />
page 13