Installing the Software - SPOT Imaging Solutions
Installing the Software - SPOT Imaging Solutions
Installing the Software - SPOT Imaging Solutions

Create successful ePaper yourself
Turn your PDF publications into a flip-book with our unique Google optimized e-Paper software.
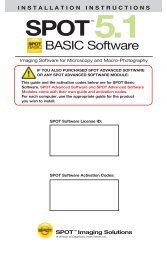
Installation Guidelines<br />
<strong>Installing</strong> <strong>the</strong> Hardware<br />
There are three simple steps to installing <strong>the</strong> hardware:<br />
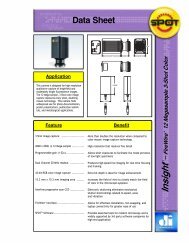
• Connect <strong>the</strong> camera to <strong>the</strong> microscope<br />
• Connect your camera to <strong>the</strong> computer using <strong>the</strong> 6 pin to 6 pin FireWire cable<br />
• Connect <strong>the</strong> power supply to <strong>the</strong> camera and to <strong>the</strong> appropriate electrical supply.<br />
<br />
Note: Although <strong>the</strong> <strong>SPOT</strong> software can be installed ei<strong>the</strong>r before or after installing <strong>the</strong> FireWire<br />
cable, Diagnostic Instruments recommends installing <strong>the</strong> software first.<br />
WARNING<br />
This (<strong>the</strong> <strong>SPOT</strong> camera) is a Class A Product. In a domestic environment this product may cause<br />
radio interference in which case <strong>the</strong> user may be required to take adequate measures.<br />
Connecting <strong>the</strong> Camera to <strong>the</strong> Microscope<br />
To attach <strong>the</strong> camera to <strong>the</strong> microscope, follow <strong>the</strong>se steps:<br />
1. Attach <strong>the</strong> bottom clamp to <strong>the</strong> coupler.<br />
2. Screw <strong>the</strong> Insight camera into <strong>the</strong> coupler/bottom clamp until it is tight.<br />
3. Insert <strong>the</strong> camera/coupler/bottom clamp combination into <strong>the</strong> microscope’s photoport or phototube.<br />
4. Tighten <strong>the</strong> thumbscrew on <strong>the</strong> microscope's phototube (or <strong>the</strong> coupler's bottom clamp) to lock <strong>the</strong><br />
combination to <strong>the</strong> microscope.<br />
5. Connect <strong>the</strong> camera to your computer as follows:<br />
a) Attach one end of <strong>the</strong> 6 pin (10 ft.) FireWire cable to <strong>the</strong> FireWire port on <strong>the</strong> computer, and<br />
attach <strong>the</strong> o<strong>the</strong>r end to <strong>the</strong> camera head.<br />
b) Attach <strong>the</strong> power supply/cable to <strong>the</strong> camera head.<br />
c) Plug one end of <strong>the</strong> power cord into <strong>the</strong> power supply and <strong>the</strong> o<strong>the</strong>r end into a surge protector.<br />
<strong>Installing</strong> FireWire Port Adapter Cards (Optional)<br />
If your computer is not equipped with a FireWire port, you may be able to add one using a FireWire-PCI<br />
Adapter Board for a desktop computer or a FireWire-PCMCIA Cardbus adapter for a laptop computer.<br />
Please consult your dealer or your computer manufacturer for assistance in selecting <strong>the</strong> appropriate<br />
hardware.<br />
To install <strong>the</strong> FireWire-PCI Adapter Board or <strong>the</strong> FireWire-PCMCIA Cardbus adapter, follow <strong>the</strong><br />
instructions included with <strong>the</strong> adapter manufacturer’s packaging.<br />
8 Spot Insight Hardware Guide