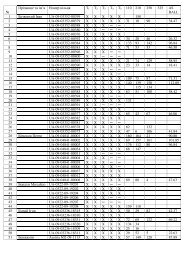
CLUB-MASTER User Guide - Bricon.be
CLUB-MASTER User Guide - Bricon.be
CLUB-MASTER User Guide - Bricon.be

Create successful ePaper yourself
Turn your PDF publications into a flip-book with our unique Google optimized e-Paper software.
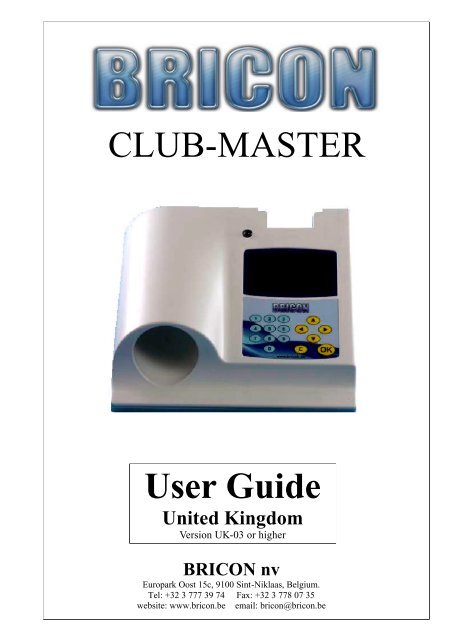
<strong>CLUB</strong>-<strong>MASTER</strong><br />
<strong>User</strong> <strong>Guide</strong><br />
United Kingdom<br />
Version UK-03 or higher<br />
BRICON nv<br />
Europark Oost 15c, 9100 Sint-Niklaas, Belgium.<br />
Tel: +32 3 777 39 74 Fax: +32 3 778 07 35<br />
website: www.bricon.<strong>be</strong> email: bricon@bricon.<strong>be</strong>
The BRICON <strong>CLUB</strong>-<strong>MASTER</strong> is intended for the electronic recording of racing pigeons.<br />
The BRICON <strong>CLUB</strong>-<strong>MASTER</strong> should only <strong>be</strong> used for the purpose that it is intended.<br />
Protect the BRICON <strong>CLUB</strong>-<strong>MASTER</strong> against water and extreme sunlight and temperatures.<br />
Modifications reserved.<br />
Important<br />
• Position the club-master at least 1 metre away<br />
from another master.<br />
• Maintain at least 0.5 metre distance <strong>be</strong>tween<br />
the clock and the club-master<br />
• Install the club-master at least 1 metre from<br />
a monitor.<br />
BRICON <strong>CLUB</strong>-<strong>MASTER</strong> 2
Contents:<br />
Page<br />
1. Installation. 4<br />
1.1. Foreword. 4<br />
1.2. Components of the BRICON <strong>CLUB</strong>-<strong>MASTER</strong> system. 4<br />
1.3. Schematic the BRICON <strong>CLUB</strong>-<strong>MASTER</strong>. 4<br />
2. Assembly of the BRICON <strong>CLUB</strong>-<strong>MASTER</strong>. 5<br />
2.1. The BRICON <strong>CLUB</strong>-<strong>MASTER</strong>. 5<br />
2.2. The BRICON UNIVES-BOX. 5<br />
2.3. UNIVES-BOX connection. 6<br />
2.4. Connecting the ETS clock. 6<br />
2.5. The Printer. 6<br />
2.6. The PC. 6<br />
2.7. The Radio-frequency mother clock. 6<br />
2.8. Gender. 6<br />
3. PC software. 6<br />
3.1. Starting the BRICON <strong>CLUB</strong> EDITOR (BCE). 7<br />
3.2. Fancier - List. 8<br />
3.3. Fancier- Details. 10<br />
3.4. Clubs. 12<br />
3.5. Races. 13<br />
3.6. Options. 14<br />
4. Exploring the menu of the Club-Master for the first time. 17<br />
4.1. The language of the display. 17<br />
4.2. Setting the contrast of the display. 17<br />
4.3. Connect the Club-Master to the PC. 17<br />
5. Linking chip rings. 17<br />
5.1. Connect master to the PC. 18<br />
5.2. Create Fancier. 19<br />
5.3. Linking official association life rings with chip rings. 20<br />
5.4. Send fancier to the ETS. 23<br />
6. Unives 1.7 24<br />
7. Basketing races. 24<br />
7.1. Making an emergency link. 26<br />
7.2. Cancel a basketed pigeon. 26<br />
8. Read Out races. 27<br />
8.1. Delete the closed race from the ETS clock. 28<br />
9. Progress Reading. 28<br />
10. Antenna options. 28<br />
11. Races. 29<br />
12. Set up. 29<br />
13. Printing. 29<br />
14. Set time/strike master timer 30<br />
15. Updating. 30<br />
16. Updating the ETS devices. 30<br />
17. Questions and solutions. 31<br />
18. Declaration of conformity. 32<br />
BRICON <strong>CLUB</strong><strong>MASTER</strong> 3
1. Installation.<br />
1.1. Foreword.<br />
Thank you for your confidence in BRICON.<br />
This manual will give a detailed explanation of the functions of the BRICON <strong>CLUB</strong>-<strong>MASTER</strong>.<br />
The <strong>CLUB</strong>-<strong>MASTER</strong> is to <strong>be</strong> permanently situated at the organisation. The ETS (clock) is the<br />
equipment of the fancier, which must <strong>be</strong> present at the basketing and read out of races.<br />
1.2. Components of the BRICON <strong>CLUB</strong>-<strong>MASTER</strong> System.<br />
1 2<br />
3<br />
4 5 and 6<br />
The system contains the following components :<br />
1 BRICON <strong>CLUB</strong>-<strong>MASTER</strong>.<br />
2 BRICON radio-frequency mother clock.<br />
3 The power supply (12 volt transformer).<br />
4 USB cable.<br />
5 Connection cable RS 232 (female/female).<br />
6 Connection cable (x2) (male/male) (optional).<br />
7 Unives-box (optional).<br />
8 Black Unives cable.<br />
NB: The Unives-box and the two connection cables (male/male) are optionally supplied.<br />
7<br />
8<br />
1.3. Schematic of the BRICON <strong>CLUB</strong>-<strong>MASTER</strong>.<br />
or<br />
for connecting<br />
other brands of ETS.<br />
BRICON <strong>CLUB</strong>-<strong>MASTER</strong> 4
2. Assembly of the <strong>CLUB</strong>-<strong>MASTER</strong>.<br />
2.1. The BRICON <strong>CLUB</strong>-<strong>MASTER</strong>.<br />
Speedy<br />
Speedy<br />
docking<br />
station<br />
Display<br />
Keyboard<br />
Unives/<strong>Bricon</strong><br />
connection<br />
SD Memory slot<br />
PS/2 keyboard<br />
USB-connection/<br />
PC connection<br />
Power supply<br />
Printer connection<br />
Radio-frequency mother clock<br />
Serial connection<br />
PC connection<br />
2.2 The BRICON UNIVES-BOX (Optional).<br />
The <strong>Bricon</strong> Unives-box allows other ETS brands to connect to the <strong>Bricon</strong> Club-Master, having<br />
connections for Benzing-Atis, Tipes and Unikon.<br />
It is possible to connect <strong>Bricon</strong> clocks directly to the Club-Master without using the Unives-box.<br />
Unives connection<br />
- Benzing-Atis (with cable)<br />
- Tipes (with cable)<br />
- Tauris (with box)<br />
- Mega (with standard)<br />
Unikon connection<br />
BRICON connection<br />
Club-Master connection<br />
BRICON connection<br />
A Black Unives cable may <strong>be</strong> supplied as an alternative to the Unives-box.<br />
BRICON <strong>CLUB</strong>-<strong>MASTER</strong> 5
2.3. The BRICON UNIVES-BOX connection (optional).<br />
A <strong>Bricon</strong> Unives-box is connected to the <strong>Bricon</strong> Club-Master using the cable (male/male) provided.<br />
This cable will provide the Unives-box with power, therefore it is not normally necessary to connect<br />
the Unives-box with a power supply. Under some circumstances however it may <strong>be</strong> necessary to<br />
connect a power supply to the Unives-box due to the high power consumption of some brands of ETS.<br />
2.4. Connecting the ETS clock.<br />
You can connect other brands of ETS clock to the <strong>Bricon</strong> Unives-box, using the necessary cables as<br />
supplied by each particular brand of ETS. For <strong>Bricon</strong> clocks all cables are provided and the Speedy<br />
clock also has its own docking station on the <strong>Bricon</strong> Club-Master.<br />
2.5. The Printer.<br />
A printer is necessary to print the basketing and clocking lists. You can use any DOS-compatible<br />
printer (with a language of PCL5 or 6) but please note that Windows/USB printers are not compatible.<br />
Use a standard parallel printer cable to connect the printer to the <strong>Bricon</strong> Club-Master.<br />
2.6. The PC.<br />
You can use any PC equipped with Windows XP or higher to communicate with the Club-Master.<br />
The PC is connected with the <strong>Bricon</strong> Club-Master by a serial RS-232 null-modem cable.<br />
The null-modem cable can <strong>be</strong> recognised by the 9-pins female connection on both sides.<br />
It is also possible to connect the <strong>Bricon</strong> Club-Master to the PC using the USB cable provided.<br />
2.7. The BRICON radio-frequency mother clock.<br />
The <strong>Bricon</strong> mother clock is a radio-frequency controlled clock that automatically synchronises with the<br />
radio-frequency time signal transmitted by the National Physical Laboratories in Cumbria.<br />
The master checks that the mother clock is synchronised with the time signal and if the clock has no<br />
reception from the time signal (no antenna mast showing on the display) it will not synchronise.<br />
Enclosed spaces such as armoured concrete and metal will disturb the signal. For this reason the mother<br />
clock should always <strong>be</strong> kept in a place where you can receive the signal, the most suitable <strong>be</strong>ing near to<br />
a window. By inserting an object into the reset button on the back of the mother clock, the clock will<br />
search for the time signal once again. You will see 3 or 4 lines and after a period 5 minutes the mother<br />
clock should have reset. Do not hold the mother clock in your hand during the synchronisation <strong>be</strong>cause<br />
this will cause disturbance to the signal. If possible it is recommended to check that a signal is <strong>be</strong>ing<br />
received by the mother clock, a num<strong>be</strong>r of hours <strong>be</strong>fore both the basketing and race checking..<br />
The mother clock is provided with 2 AAA batteries. Open the clock with a small screwdriver<br />
(2 screws) and place the batteries. Depending on the type of batteries, the life span is approximately 2y.<br />
2.8. The Gender.<br />
The gender cable is used to change a 9-pin female connector to a 9-pin male.<br />
There are three gender cables provided.<br />
3.0. PC-SOFTWARE.<br />
You must provide the clocks with a link table (a list of the association ring num<strong>be</strong>rs of the pigeons that<br />
are to <strong>be</strong> raced, each linked to a chip ring) <strong>be</strong>fore you can basket a pigeon. You can make a link table<br />
with the Club-Master using the PC-software. This software is free provided on a CD, but can also <strong>be</strong><br />
obtained free on the <strong>Bricon</strong> website at www.bricon.<strong>be</strong>.<br />
Install the BRICON <strong>CLUB</strong> EDITOR (BCE) link program, and the CD will start automatically after<br />
which the instructions should <strong>be</strong> followed. The program will operate under Windows 98/ME, but is<br />
designed for use with XP and Vista. If your computer is connected to the internet, you will automatically<br />
receive the latest version, but when operating under Windows 98/ME you must download the updates<br />
manually. After the installation a BCE icon will appear on the desktop of your computer. You can start<br />
the <strong>Bricon</strong> Club Editor software by double clicking on the icon.<br />
BRICON <strong>CLUB</strong>-<strong>MASTER</strong> 6
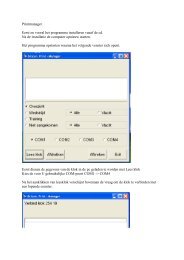
3.1. Starting the BRICON <strong>CLUB</strong> EDITOR (BCE).<br />
When you start the BCE programme, you will see the following screen (but without the info added).<br />
Connect the Club-Master with the USB or serial cable (see page 14). The software reads the language<br />
and country code from the master. This is important to avoid wrong input.<br />
- At the top of the screen you will see six main work sheet sections.<br />
- With the icons featured <strong>be</strong>low, you can perform the following functions:<br />
Move last<br />
Move next<br />
Send to ETS<br />
Read from ETS<br />
Read flight data<br />
Move first<br />
Move previous<br />
Add new<br />
Delete<br />
Send<br />
multiple<br />
fanciers<br />
Print<br />
Read flight data<br />
BRICON <strong>CLUB</strong>-<strong>MASTER</strong> 7
3.2. Fancier - List.<br />
-ID : Reference num<strong>be</strong>r in BCE.<br />
-Loft num<strong>be</strong>r : Loft num<strong>be</strong>r of the fancier.<br />
-Name : Name of the fancier.<br />
-Address, Postcode, City, Telephone, Fax/GSM, Email, Bank account : The data of the fancier.<br />
-Coord X, Coord Y: The loft co-ordinates of the fancier (latitude and longitude).<br />
The mem<strong>be</strong>rs of the club that have <strong>be</strong>en entered into the system will appear on the list.<br />
By clicking on the heading of a particular column you can sort the list into alpha<strong>be</strong>tical or numerical<br />
order according to the information in that column, ie the ID, licence, name, address, postcode, etc ...<br />
If you click on the column once again it will re-sort the list from high to low (or reversed)<br />
Read from ETS :<br />
Upon activation and reading the ETS clock,<br />
the BCE checks the serial num<strong>be</strong>r of the clock.<br />
If the num<strong>be</strong>r is not present BCE will ask for the fancier to <strong>be</strong> added.<br />
Select or enter a fancier.<br />
BCE automatically processes the<br />
received data.<br />
If the serial num<strong>be</strong>r exists, BCE will ask to overwrite the data with that received from the ETS clock.<br />
Here you can see the communication with<br />
the ETS. If you see such an announcement<br />
then the communication has <strong>be</strong>en achieved.<br />
BRICON <strong>CLUB</strong>-<strong>MASTER</strong> 8
Delete fancier :<br />
The selected fancier is erased if you confirm with .<br />
Add new fancier :<br />
Here you can add a fancier (see new fancier).<br />
Automatically load fancier data :<br />
Select no fancier. BCE automatically<br />
selects the right fancier from the ETS<br />
by the serial num<strong>be</strong>r.<br />
Send multiple fanciers to ETS :<br />
It is possible for up to 3 fanciers to fly with the same ETS clock, and for their data to <strong>be</strong> sent to the<br />
clock at the same time. Press send multiple fanciers and select the fanciers.<br />
Read flightdata :<br />
A club can read the fancier data for a certain flight.<br />
Fill in the clubID and the flight ID (fig 1), and press read flightdata and BCE will make a xml file.<br />
This xml file can then <strong>be</strong> viewed in previous read outs (see fig2).<br />
In options you can modify the file location. The xml file can <strong>be</strong> used to export to another<br />
programme.<br />
Print :<br />
Here you can print the lists.<br />
To get the necessary serial num<strong>be</strong>r onto the list, you must send the club ID<br />
whilst in the ‘Club’ section (see page 12) to the master.<br />
The serial num<strong>be</strong>r from the master is then filled in and saved in the field.<br />
BRICON <strong>CLUB</strong>-<strong>MASTER</strong> 9
3.3. Fancier - Detail .<br />
This screen shows the details of the selected fancier. The information that is to <strong>be</strong> sent to the ETS<br />
is located in the yellow fields. The other fields are for information purposes only for the club.<br />
On the right side of the screen you see the link table (list of ring num<strong>be</strong>rs linked with the chip ring).<br />
Delete fancier :<br />
The selected fancier will <strong>be</strong> erased if you confirm with <br />
Add new fancier :<br />
Here you can add a fancier (see new fancier).<br />
Read from ETS :<br />
When reading from the ETS clock, by choosing the ‘Yes’, the data stored on the BCE program<br />
will by overwritten. If you select ‘No’ a new fancier will <strong>be</strong> created for the data.<br />
BRICON <strong>CLUB</strong>-<strong>MASTER</strong> 10
Print list :<br />
Print fancier data with link table.<br />
Send To ETS :<br />
The selected fancier is sent to the ETS.<br />
Attention: When the link table is sent to the ETS, all of the old data on the clock will <strong>be</strong><br />
overwritten and will <strong>be</strong> permanently lost.<br />
Detail link table :<br />
Delete Ring<br />
Add new Ring<br />
Read Ring<br />
Generate Rings<br />
Check ring<br />
Colour<br />
Association life ring<br />
Electronic chip ring<br />
BRICON <strong>CLUB</strong>-<strong>MASTER</strong> 11
3.4. Clubs.<br />
Read from Master<br />
Send to Master<br />
The BCE programme has the ability to manage the records of fanciers from several different clubs.<br />
To distinguish <strong>be</strong>tween clubs, a different club ID (a four num<strong>be</strong>r code) must <strong>be</strong> entered for each club.<br />
It is recommended to use the club’s official num<strong>be</strong>r or a unique num<strong>be</strong>r (NB do not use 1234 !!)<br />
When basketing on the club-master, a unique identity is created for each race by the club-master,<br />
incorporating the club ID, race point and pin code.<br />
When fanciers clocks are downloaded to the BCE, they are added to the list of the active club, so if<br />
you want to edit a fancier, the club that contains this fanciers list has to <strong>be</strong> selected.<br />
By sending to the Club-Master, the serial num<strong>be</strong>r is filled in.<br />
The first time that you click onto the pin code dots, you will see following screen :<br />
The pin code is pre-set at 999999. You can change the code by entering the same num<strong>be</strong>r in the fields<br />
‘new pin code’ and ‘repeat new pin code’ (6 num<strong>be</strong>rs). Each time that you wish to make a change, you<br />
will need to enter the old pin code <strong>be</strong>fore <strong>be</strong>ing able to enter the new pin code.<br />
Name, address, city and pin code are needed.<br />
BRICON <strong>CLUB</strong>-<strong>MASTER</strong> 12
3.5. Races.<br />
Send To Master<br />
Clear selection<br />
Send to ETS<br />
Add Default Flights<br />
The first time that BCE is started up the li<strong>be</strong>ration race points are empty.<br />
- Add default flights :<br />
Press the button ‘add default flights’, and all default li<strong>be</strong>ration race points are added to the screen.<br />
Now you can select the race points in the ‘Sel’ column. Only the selected race points are sent to the<br />
master and replace those previously there.<br />
- Delete flights :<br />
To delete a race point, select the race point and press delete.<br />
- Add new flights :<br />
Most UK race points are present in the default flights, but it is also possible to add new points.<br />
Press add new flights and enter the correct data of the race point.<br />
Then send the race points to the master<br />
- Send to master :<br />
- Clear selection :<br />
- Send flights to the ETS :<br />
If you do not use a <strong>Bricon</strong> club-master, it is also possible to send the selected race points to your ETS.<br />
Connect your ETS clock with the dealer cable to your PC, and press send to the ETS.<br />
BRICON <strong>CLUB</strong>-<strong>MASTER</strong> 13
3.6. Options.<br />
Automatic Updates :<br />
The <strong>Bricon</strong> Club Editor (BCE) programme will automatically check for the latest version of the<br />
software. The PC on which the programme is running must <strong>be</strong> connected to the internet.<br />
If these ‘Automatic Updates’ settings disturb the normal workings you can turn them off, but where<br />
possible it is recommended to leave the settings on.<br />
If ‘Check for newer version’ is selected then the program will check for the latest version.<br />
If ‘Download automatically’ is selected, the latest version will <strong>be</strong> automatically downloaded to the PC.<br />
If ‘Install automatically’ is selected, the downloaded version will <strong>be</strong> installed automatically.<br />
It is very important that the PC is connected to the internet on a regular basis and the BCE started to<br />
<strong>be</strong> sure of having the latest version of the <strong>Bricon</strong> software.<br />
The latest version of the software will always <strong>be</strong> available from the <strong>Bricon</strong> website (www.bricon.<strong>be</strong>).<br />
Localisation :<br />
If you select automatically read the language and country from the master and you connect the master<br />
as descri<strong>be</strong>d, the program will read the language and country from the Club-Master. When you restart<br />
BCE the language and country from the master will <strong>be</strong> filled in.<br />
Attention. BCE will start this function the first time. This is necessary for the controls of the region.<br />
Port :<br />
The master is connected with a serial cable or a USB cable. When the program starts, the PC checks<br />
which port the master is connected to. You can also set the port manually.<br />
If you have a USB connection you must stop the communication <strong>be</strong>fore you unplug the master.<br />
Press ‘ReInit communication’ to start the communication.<br />
BRICON <strong>CLUB</strong>-<strong>MASTER</strong> 14
Database :<br />
To prevent data loss you can make a back-up of the system representing a precise moment in time.<br />
Make backup :<br />
<strong>Bricon</strong> advises that a back-up is taken on a regular basis.<br />
Press ‘Backup’ to make a back-up file:<br />
Give a name to the back-up and press save.<br />
Recommendation: Place the date in the<br />
name of the file.<br />
Restore Back-up :<br />
Press the button to restore.<br />
Select where the back-up is placed.<br />
Select the correct back-up and click open .<br />
The existing file will by replaced by the<br />
back-up.<br />
Attention !<br />
The next time you start BCE, the original<br />
file is opened.<br />
You must rename the files for permanent use.<br />
BRICON <strong>CLUB</strong>-<strong>MASTER</strong> 15
Import fanciers and data :<br />
Using ‘Import’ you can import old data from an earlier version of the club software (possible from<br />
version 4.1). To use this feature you must install BRICON PC-Communication programme (Upload95) .<br />
Press import.<br />
Choose to convert<br />
Press .<br />
Choose to import the fancier data.<br />
Attention : the database is replaced by the imported version.<br />
3.7. About.<br />
On a regular basis <strong>Bricon</strong> sends information to BCE. You will see this info in the yellow box.<br />
Attention: The PC must <strong>be</strong> connected to the internet to receive this information.<br />
BRICON <strong>CLUB</strong>-<strong>MASTER</strong> 16
4.0. Exploring the menu of the <strong>Bricon</strong> Club-Master for the first time.<br />
Display<br />
Time<br />
Selected choice<br />
Basketing<br />
Read out<br />
Progress Reading<br />
Delete BR+<br />
Setup<br />
Set time<br />
Keyboard<br />
Navigation Keys<br />
With the buttons “? ” and “? ” you can make your selection from the main menu. You can select other<br />
menus with “? ” and “? ”. For the selected line you see “>“ and by pressing you confirm your<br />
choice. To go a step backwards press . At the top of the screen you see the name of the sub-menu.<br />
4.1. The language of the display.<br />
Select menu option 13 (Language) and press .<br />
The master then shows a list of the available languages.<br />
With the keyboard you can select the correct language.<br />
Press to go back to the previous menu item.<br />
1 Nederlands<br />
2 Francais<br />
3 English<br />
4.2. Setting the contrast of the display.<br />
With menu option 7 (Set Contrast) you can regulate the<br />
contrast left “? ” and right “? ”.<br />
Confirm your choice with .<br />
The new contrast setting now apply.<br />
4.3. Connect the BRICON <strong>CLUB</strong>-<strong>MASTER</strong> to the PC.<br />
When you connect the serial cable or USB cable to the PC<br />
(see page 5) the master automatically makes communication<br />
with the PC. On the screen of the master you will see the<br />
message box ‘PC-communicat’.<br />
BRICON <strong>CLUB</strong>-<strong>MASTER</strong> 17
5.0. Linking chip rings.<br />
5.1. Connect the master to the PC.<br />
-Make the correct connections as descri<strong>be</strong>d in installation and assembling the <strong>CLUB</strong>-<strong>MASTER</strong><br />
(see pages 4, 5 and 6).<br />
Unives/<br />
<strong>Bricon</strong><br />
connection<br />
USB port<br />
Serial port<br />
- Start the BCE programme (refer to PC software and start BCE on pages 6 and 7).<br />
- Connect the power supply. In BCE you will see that the master is connected to the PC.<br />
- The first time that you start BCE you must connect the Club-Master. The master reads the<br />
language and the country code. BCE is then ready to read fanciers or create new fanciers .<br />
- Attention : If you connect a new master you must set the correct club-ID (default 9999). It is<br />
also necessary to connect the radio mother clock to set the correct date and time.<br />
- Connect the ETS clock to the <strong>Bricon</strong> Club-Master.<br />
- For <strong>Bricon</strong> ETS clocks, the Speedy can <strong>be</strong> connected directly into the docking station on the top<br />
of Club-Master, whilst the Little <strong>Bricon</strong> is to <strong>be</strong> connected with the cable (male/male) provided to<br />
the Unives-<strong>Bricon</strong> connection.<br />
- All other brands of ETS clock should <strong>be</strong> connected to the <strong>Bricon</strong> Club-Master by using the<br />
<strong>Bricon</strong> Unives-box or Black Unives cable with a connection cable supplied by its own brand.<br />
BRICON <strong>CLUB</strong>-<strong>MASTER</strong> 18
You can see which ETS clock is connected to the master in the BCE.<br />
5.2 Create fancier.<br />
Press ‘add new’ to create a new fancier:<br />
- Go to work sheet ‘Fancier - Detail’ and add the necessary information to the empty fields.<br />
Attention :<br />
The red fields are obligatory, and in<br />
the loft num<strong>be</strong>r field you must fill in<br />
the correct loft num<strong>be</strong>r.<br />
The data from the yellow fields are<br />
sent to the ETS.<br />
The other field are for information<br />
purposes only.<br />
The serial num<strong>be</strong>r from the ETS can<br />
not <strong>be</strong> modified<br />
BRICON <strong>CLUB</strong>-<strong>MASTER</strong> 19
5.3. Linking official association life rings with chip rings.<br />
Add ring num<strong>be</strong>r.<br />
The linking of official association life rings with chip rings must take place in ‘Fancier detail’.<br />
BRICON <strong>CLUB</strong>-<strong>MASTER</strong> 20
Add new:<br />
In the field FedB you enter the metal ring num<strong>be</strong>r.<br />
The ring num<strong>be</strong>r may <strong>be</strong> GB -07-<br />
(where GB is the country and 07 is the year)<br />
followed by up to nine characters<br />
(example GB -07- A 56789).<br />
It is recommended that the ring num<strong>be</strong>r of the bird is<br />
entered into the final character spaces of those available.<br />
For example : For GB rings use the following ring format<br />
GB(space)(space)-07-(space)(space)A(space)56789<br />
NB: The space can <strong>be</strong> found immediately after the letter Z.<br />
Where the bird is a hen, the box must <strong>be</strong> marked.<br />
Press < enter > or < ? >.<br />
To enter a second ring num<strong>be</strong>r you only need to<br />
press the characters that need to <strong>be</strong> modified.<br />
Press < enter > or < ? > to produce automatically.<br />
An exclamation mark appears <strong>be</strong>cause the data is not yet complete or is incorrect.<br />
This can <strong>be</strong> by missing the EleB, double input of a num<strong>be</strong>r or the wrong FedB.<br />
Select the exclamation mark and you will see the explanation.<br />
Automatically generate rings.<br />
Generate rings:<br />
You can enter the start and the end num<strong>be</strong>rs of a set of association life rings to <strong>be</strong> linked.<br />
Attention : The last 3 positions must <strong>be</strong> num<strong>be</strong>rs and are the only characters that will change.<br />
By pressing ‘Add Rings’, the generated rings are added to the linking table.<br />
BRICON <strong>CLUB</strong>-<strong>MASTER</strong> 21
Read Rings:<br />
To read rings BCE must by connected to the Club-Master<br />
(see 4.3 connection).<br />
Place the ring positioning plug in the basketing antenna<br />
to position the ring on.<br />
Reading the ring will take a few seconds so the exact<br />
positioning of the ring is very important.<br />
Go with the cursor to the first ring that you wish to link.<br />
Press read ring and on the master you see ‘Read ring’.<br />
The ring that is in the basketing antenna is read and<br />
appears on the screen.<br />
BCE will jump to the next ring in the list and you can<br />
link that ring by placing a new ring in the basketing<br />
antenna.<br />
If the cursor is <strong>be</strong>low the list, Read ring will stop.<br />
By pressing on the master, read ring will stop.<br />
TIP: You can select the ring to <strong>be</strong> linked with the cursor<br />
Important!!<br />
When the clock of a fancier who is already in the list is downloaded to the BCE, the<br />
existing data will <strong>be</strong> overwritten.<br />
If additional rings are to <strong>be</strong> added to a fanciers clock using the BCE programme, first of<br />
all download the data from the clock to the BCE. This ensures that it is the latest data that<br />
will <strong>be</strong> edited, as it is possible that amendments may have taken place to the data on the<br />
clock without these having <strong>be</strong>en downloaded to the BCE.<br />
After having added rings to the fanciers data on the BCE, the new data should <strong>be</strong> sent to<br />
the fanciers ETS clock, to overwrite the old data.<br />
Check Ring :<br />
Connect the master and press check ring.<br />
Hold the ring that you wish to check in the master<br />
antenna. BCE will then search for the ring in the<br />
selected link table.<br />
If the ring is present BCE will ask to delete or<br />
preserve the link.<br />
If the ring is not present, and the loft num<strong>be</strong>r and the<br />
year is correct it is possible to link the ring.<br />
BRICON <strong>CLUB</strong>-<strong>MASTER</strong> 22
5.4 Send Fancier data to the ETS.<br />
If you press the button ‘Send to ETS’, the data of the selected fancier is sent to the ETS clock.<br />
When a linking table is sent to the ETS, the old data on the clock is overwritten and is<br />
permanently deleted.<br />
If you see the announcement then the communication has <strong>be</strong>en established.<br />
The screen <strong>be</strong>comes red when there is an error.<br />
Race data not <strong>be</strong>ing deleted is the most frequent cause of an error. Fancier data can not <strong>be</strong> sent to a<br />
clock that still has an active race on the clock. Delete the race and data can then <strong>be</strong> sent to the clock.<br />
BRICON <strong>CLUB</strong>-<strong>MASTER</strong> 23
6. Unives 1.7<br />
The <strong>Bricon</strong> Club-Master fully supports « Unives 1.7 ».<br />
The “Unives 1.7” protocol makes it possible for any alternative brand of electronic timing system<br />
clock to basket birds and have clockings read out on the <strong>Bricon</strong> Club-Master.<br />
How to proceed ?<br />
Start the <strong>Bricon</strong> Club-Master and wait until the main menu is displayed.<br />
Ensure that the radio-clock and printer are connected <strong>be</strong>fore you proceed.<br />
Choose in the main menu Basketing or Read out. Follow the instructions on the screen, and a<br />
message box ‘UNIVES 1.7 Connect clock’ will appear.<br />
Connect the ETS clock to the <strong>Bricon</strong> Club-Master using the <strong>Bricon</strong> Unives-box or Black Unives<br />
cable, and wait until the Club-Master recognises the ETS Clock.<br />
The <strong>Bricon</strong> Club-Master continues to operate under Unives 1.7, and from then on all procedures<br />
should <strong>be</strong> carried out directly on the variant brand of ETS clock taking care to follow the exact<br />
instructions for marking and read out for that particular brand of clock.<br />
If a <strong>Bricon</strong> clock is connected, then the instructions on the master display should <strong>be</strong> followed.<br />
If the ETS clock doesn’t work properly you should contact the supplier of that particular system.<br />
7. Basketing Races.<br />
Prepare the <strong>Bricon</strong> Club-Master ready for Basketing:<br />
1. You must initially connect the radio-frequency mother clock (see page 6).<br />
2. Connect the printer, press 6 in the menu ’set time’ and choose 1 ’set time’.<br />
3. If you basket using any brand of ETS clock other than <strong>Bricon</strong>, you must also use the <strong>Bricon</strong><br />
Unives-box or the Black Unives cable.<br />
4. Connect the power into the <strong>Bricon</strong> Club-Master (and <strong>Bricon</strong> Unives-box if necessary).<br />
Some brands consume a lot of power while switching them on, therefore we recommend to<br />
connect the power to the Unives box if you also have non-bricon clocks in the club.<br />
5. The main menu appears on the display of the <strong>Bricon</strong> Club-Master.<br />
Basketing<br />
Read out<br />
Progress Reading<br />
Delete BR+<br />
Setup<br />
Set time<br />
Select menu option 1 ‘Basketing’.<br />
Press <br />
Wincanton<br />
Exeter<br />
Alencon<br />
Tar<strong>be</strong>s<br />
Saintes<br />
Select the race point with the<br />
? and ? keys.<br />
Press to confirm.<br />
Tar<strong>be</strong>s<br />
tarb4242<br />
Choose to print a Pool Sheet for<br />
each competitor in the race<br />
or if a Pool Sheet is not required.<br />
BRICON <strong>CLUB</strong>-<strong>MASTER</strong> 24
Unives 1.7<br />
Connect clock<br />
When ‘Unives 1.7’ appears on the display<br />
connect the ETS (clock).<br />
If you connect a <strong>Bricon</strong> ETS, the Unives 1.7<br />
screen will disappear and you should proceed to<br />
the next step. For other brands of ETS clock,<br />
follow the instructions issued with the clock.<br />
4242 Tar<strong>be</strong>s 09/06/08<br />
If there are races already in the ETS<br />
clock they can <strong>be</strong> viewed on the screen.<br />
Proceed by pressing to confirm.<br />
W. Smith WM 9876<br />
Tar<strong>be</strong>s<br />
TARB1234<br />
Birds Basketed 0<br />
If it is the first race, the ETS clock will<br />
synchronise and show the mem<strong>be</strong>rs name<br />
on the display.<br />
You can now commence the race marking<br />
of the first pigeon.<br />
W. Smith WM 9876<br />
Tar<strong>be</strong>s<br />
TARB1234<br />
Birds Basketed 0<br />
GB -07- A 56789<br />
C5A63D0F<br />
W. Smith WM 9876<br />
Tar<strong>be</strong>s<br />
TARB1234<br />
Birds Basketed 1<br />
Race mark the pigeon by placing the chip<br />
ring into the electronic ring reader and<br />
confirm that the correct association life ring<br />
num<strong>be</strong>r appears on the master display.<br />
Only if correct do you press and<br />
basket the pigeon for the race.<br />
Race mark the next pigeon and repeat the<br />
process for each pigeon.<br />
After the final pigeon has <strong>be</strong>en basketed<br />
press to close the marking for that<br />
mem<strong>be</strong>r loft.<br />
The basketing list is then printed out, and you can disconnect the ETS clock<br />
after confirmation by the Club-Master.<br />
NB : On the Speedy display will appear the message ‘Speedy Not Active Disconnect Clock’.<br />
Unives 1.7<br />
Connect Clock<br />
Connect the ETS clock of the next mem<strong>be</strong>r<br />
to <strong>be</strong> race marked and continue the process.<br />
BRICON <strong>CLUB</strong>-<strong>MASTER</strong> 25
7.1. Making an emergency link.<br />
.<br />
W. Smith WM 9876<br />
Tar<strong>be</strong>s<br />
TARB1234<br />
Birds Basketed 3<br />
Unknown Pigeon<br />
C5A0229D<br />
Choose to add an unknown pigeon.<br />
W. Smith WM 9876<br />
Tar<strong>be</strong>s<br />
TARB1234<br />
Birds Basketed 3<br />
GB -07- A 56789<br />
You can enter the year press enter the ring num<strong>be</strong>r, choose sex and colour.<br />
Press to add the ring and basket the pigeon.<br />
Press to delete the unknown pigeon and the ring is not added.<br />
7.2. Cancel a basketed pigeon.<br />
Place the pigeon back into the basketing antenna and you will see the following message :<br />
W. Smith WM 9876<br />
Tar<strong>be</strong>s<br />
TARB1234<br />
Birds Basketed 3<br />
Pigeon alr. Basketed<br />
Press to keep the pigeon in the race.<br />
Press to cancel the pigeon from the race.<br />
In circumstances where <strong>be</strong>cause of a distraction, the club officials are not sure whether a bird has<br />
already <strong>be</strong>en race marked, the bird can easily <strong>be</strong> re-presented to confirm its entry.<br />
If a bird has to <strong>be</strong> withdrawn from the race due to illness etc, after it has already <strong>be</strong>en race marked,<br />
simply re-present the bird into the chip reader and press to cancel its entry.<br />
BRICON <strong>CLUB</strong>-<strong>MASTER</strong> 26
8. Read Out Race.<br />
Prepare the <strong>Bricon</strong> Club-Master ready for read out:<br />
1. You must initially connect the radio-frequency mother clock (see page 6).<br />
2. Connect the printer, press 6 in the menu ’set time’ and choose 1 ’set time’.<br />
3. If you basket using any brand of ETS clock other than <strong>Bricon</strong>, you must also use the <strong>Bricon</strong><br />
Unives-box (see page 5) or Black Unives cable.<br />
4. Connect the power into the <strong>Bricon</strong> Club-Master (and Unives-box if necessary).<br />
Some brands consume a lot of power while switching them on, therefore we recommend to connect the<br />
power to the Unives box if you also have non-<strong>Bricon</strong> clocks in the club.<br />
5. The main menu appears on the display of the <strong>Bricon</strong> Club-Master.<br />
Basketing<br />
Read out<br />
Progress Reading<br />
Delete BR+<br />
Setup<br />
Set time<br />
Unives 1.7<br />
Connect clock<br />
Choose menu option 2 ‘Read out’<br />
and press to confirm.<br />
Connect the ETS clock.<br />
The Unives 1.7 screen disappear when a<br />
<strong>Bricon</strong> clock is connected and the next step<br />
should then <strong>be</strong> followed.<br />
If you connect another brand of ETS clock<br />
follow the instructions issued with that clock.<br />
W. Smith WM 9876<br />
Tar<strong>be</strong>s 09/06<br />
Alencon 10/06<br />
Exeter 10/06<br />
Select the race to <strong>be</strong> read out using the<br />
“? ” and “? ” keys.<br />
Press to confirm.<br />
The clocking list will then <strong>be</strong> printed.<br />
W. Smith WM 9876<br />
Tar<strong>be</strong>s 09/06<br />
Alencon 10/06<br />
Exeter 10/06<br />
To close the race press or<br />
to keep the race open press .<br />
If there is only one race active the ETS<br />
clock will deactivate immediately and can<br />
<strong>be</strong> disconnected from the docking station.<br />
W. Smith WM 9876<br />
Tar<strong>be</strong>s 09/06<br />
Alencon 10/06<br />
Exeter 10/06<br />
If there is more than one race active, select<br />
the race to <strong>be</strong> closed with “? ” and “? ”.<br />
To close the selected race press or<br />
press to keep the race open.<br />
The ETS clock can then <strong>be</strong> disconnected.<br />
BRICON <strong>CLUB</strong>-<strong>MASTER</strong> 27
8.1. Delete the closed race from the ETS clock.<br />
After the ETS clock has <strong>be</strong>en disconnected from the Club-Master, the race will need to <strong>be</strong><br />
deleted in order for the chip rings that have recorded in the races to <strong>be</strong> freed up so that they<br />
can <strong>be</strong> used in forthcoming races and training flights. (Follow the instructions of the ETS clock).<br />
To delete a race from a SPEEDY clock the following routine should <strong>be</strong> employed:<br />
1. Insert the power supply directly into the base of the Speedy clock.<br />
2. Proceed to the ‘Races’ icon and press to view the active races within the clock.<br />
The second line of each active race shows the club ID / race point and date/time opened.<br />
Each of the active races is given a status num<strong>be</strong>r.<br />
Status 1. The race has <strong>be</strong>en basketed.<br />
Status 3. The race has <strong>be</strong>en read out but not closed.<br />
Status 7. The race has <strong>be</strong>en read out and closed.<br />
3. Return to main menu by pressing and proceed to the ‘Delete’ icon.<br />
4. Press and all races having status 7 will then <strong>be</strong> deleted.<br />
NB : If an active race is showing as status 3 where it was intended that it should have <strong>be</strong>en<br />
showing as status 7 simply repeat the read out procedure and carry out the instructions correctly.<br />
Attention : If an active race can not <strong>be</strong> accessed through the Club-Master, check that the current<br />
club ID of the club-master is the same as that of the club ID of the active race.<br />
9. Progress Reading.<br />
Circumstances may arise where you need to take a clocking list, but also wish to <strong>be</strong> able to<br />
record further pigeons on the ETS clock at a later time. This may occur where an early pigeon<br />
needs registering at the club, but other potential prize winners or pooled pigeons have yet to<br />
return home from the race.<br />
In these circumstances you should select main menu option 3 (Progress reading).<br />
The Progress reading menu option operates under the same procedures as the read out<br />
(menu option 2) but does not allow for the race to <strong>be</strong> closed until later.<br />
10. Antenna Options.<br />
Here you can read rings or repair rings.<br />
Read rings<br />
Place the ring in the basketing antenna, and the chip num<strong>be</strong>r and loft num<strong>be</strong>r appears on the<br />
screen.<br />
By pressing it is possible to read the next ring, whilst pressing cancels read rings.<br />
Repair rings<br />
Occasionally the ring is blocked after the writing of data.<br />
Press repair rings, and the master requests that the ring is placed in the basketing antenna.<br />
The non-OTP part of the ring is set back to scratch, and the ring is ready to use.<br />
BRICON <strong>CLUB</strong>-<strong>MASTER</strong> 28
11. Race Points.<br />
Select Main menu option 10 (race points) after which you<br />
will <strong>be</strong> given three sub-options.<br />
12. Set-up.<br />
1 Browse<br />
2 Add<br />
3 Delete<br />
Browse<br />
Press option 1, and you will see the list of the race points.<br />
With “? ” “? ” you can scroll to see the complete list of<br />
race points on the screen. Press to cancel (Quit).<br />
Add<br />
Press option 2 to add a new race point.<br />
With “? ” and “? ” you can select the first character.<br />
With “? ” you go to the next character. It is possible to<br />
correct a mistake with the “? ” or “? ” and select the<br />
wrong character and correct it with “? ” or “? ”.<br />
Confirm with or cancel with .<br />
Delete<br />
Press option 3 to delete a race point. With “? ” or “? ” it<br />
is possible to select a race point and delete it with .<br />
The <strong>Bricon</strong> Club-Master can <strong>be</strong> set up to suit the needs of your club.<br />
The available options can <strong>be</strong> found by selecting main menu 5 (setup).<br />
A sub-menu then gives you the available preferences (press the num<strong>be</strong>r on the key pad to select).<br />
1. The num<strong>be</strong>r of copies of the basketing list.<br />
2. The num<strong>be</strong>r of copies of the read out (clocking list).<br />
Sets the num<strong>be</strong>r of copies to <strong>be</strong> printed according to the clubs own requirements.<br />
Usually set to 2 or 3. ie. copies printed for the mem<strong>be</strong>r, the club and the federation.<br />
3. The num<strong>be</strong>r of lines.<br />
The num<strong>be</strong>r of lines on the print out (default setting at 66).<br />
4. The club ID.<br />
To <strong>be</strong> set to the club’s own official num<strong>be</strong>r (if applicable). Enables the Club-Master system<br />
to <strong>be</strong> shared by two organisations, each having access through its own ID num<strong>be</strong>r.<br />
Attention : A race can only <strong>be</strong> accessed, whilst in the club ID in which it was opened.<br />
5. Change PIN.<br />
Enables the officials to limit access to the system by setting a security pin code.<br />
13. Printing.<br />
In the main menu option 11(Printing) it is possible to<br />
print an Overview list or the Assignment list.<br />
1. Overview list<br />
2. Assignment List<br />
Choose: 1. Overview list.<br />
2. Assignment list - the allocation of ETS rings.<br />
The official allocation of the rings takes place when the<br />
print-off of the Assignment list is taken at the club.<br />
The process should <strong>be</strong> witnessed and signed by the club<br />
officials and the mem<strong>be</strong>r in order to comply with rules.<br />
BRICON <strong>CLUB</strong>-<strong>MASTER</strong> 29
14.Set time/strike master timer<br />
1. Set time<br />
2. Strike Master Timer<br />
Connect the <strong>Bricon</strong> radio-frequency controlled clock<br />
(see 4-6) and the printer.<br />
Press 1 and the master system will synchronise with the<br />
time on the radio-frequency clock.<br />
The printer will then automatically produce a print-out to<br />
confirm this synchronisation.<br />
Start count<br />
Connect the radio-frequency clock and the printer.<br />
Press 2 ‘Strike Master Timer’ if you wish to make a<br />
strike of clocks against the radio clock, at any point in<br />
the minute <strong>be</strong>fore that at which you wish to strike.<br />
A countdown will then commence ten seconds <strong>be</strong>fore<br />
the top of the minute with a <strong>be</strong>ep heard every second,<br />
and on the whole minute another sound will <strong>be</strong> heard as<br />
a signal for the strike to take place.<br />
Press OK for the printer to produce a record of the strike.<br />
15. Updating .<br />
Choose main menu option 12 (Updating). Select from<br />
the sub-menu the device or clock that must <strong>be</strong> updated.<br />
Install the device and the master will update the selected<br />
software in the device.<br />
Attention: To use this function, the Club-Master must<br />
have <strong>be</strong>en updated. This is done by connecting the<br />
master to a PC with the BCE programme, which gives an<br />
automatic update from the internet.<br />
16. Updating the ETS devices.<br />
When the Club-Master is connected to a computer that has internet access and the BCE programme<br />
loaded onto it, the latest software for the ETS clock will <strong>be</strong> loaded automatically into the master.<br />
The new software for the ETS clock can then <strong>be</strong> loaded directly onto each clock from the master<br />
using the master menu option 12 (updating).<br />
Attention: Updating of the software will only occur if there is a new version available.<br />
Don't disconnect the master from the PC or shut down the PC whilst making the download.<br />
BRICON <strong>CLUB</strong>-<strong>MASTER</strong> 30
17. Questions and solutions.<br />
17.1. It is not possible to erase races.<br />
If after a race, the ETS clock was not returned to the club for a read out, then it is not<br />
possible to delete the race from the ETS clock.<br />
All ETS clocks must <strong>be</strong> returned to the club after the race in order to close the race.<br />
17.2. There is nothing to see on the screen of the ETS.<br />
Confirm that the cable is correctly connected from the Club-Master to the ETS clock.<br />
Check the power supply.<br />
17.3. Rings are not <strong>be</strong>ing read.<br />
If the rings are not <strong>be</strong>ing read, restart the Club-Master and repeat the process.<br />
17.4. The pigeon is already basketed.<br />
This is <strong>be</strong>cause the ring num<strong>be</strong>r is already in the ETS clock.<br />
This could <strong>be</strong> <strong>be</strong>cause there are old races or training flights in the ETS clock.<br />
17.5. The printer doesn’t print.<br />
Check that it is a DOS-compatible printer, and also check each of the connections.<br />
Also check that the num<strong>be</strong>r of print-outs required is not set to zero.<br />
17.6. The ring is linked to another pigeon.<br />
Pigeons that are no longer to <strong>be</strong> raced should <strong>be</strong> removed from the linking table.<br />
The chip ring is then available to <strong>be</strong> used for another linking.<br />
BRICON <strong>CLUB</strong>-<strong>MASTER</strong> 31
BRICON nv<br />
Europark Oost 15c,<br />
9100 Sint-Niklaas<br />
Belgium<br />
Declaration of conformity<br />
Directive 99//5/EC (R&TTED)<br />
We declare on our sole responsibility, that the following product :<br />
Type of equipment : <strong>Bricon</strong> clocking system for pigeons.<br />
Type designation : Reader for transponders (125 kHz)<br />
is in compliance with the essential requirements of §3 of the R&TTE -directive.<br />
Health and Safety §3(1)a:<br />
Applied standards:<br />
EN60950:1992+A1+A2:1993+A3:1997+A11:1997<br />
EMC §3(1)b:<br />
Applied standards:<br />
EN 301 489-3/07.200<br />
Radio frequency spectrum §3(2)<br />
Applied standards:<br />
EN 300 330-2 V1.1/7.2000<br />
Health and safety requirements pursuant to §3(1)a:<br />
Applied standards or other means of providing conformity:<br />
EN60950:1992+A1+A2:1993+A3:1997+A11:1997<br />
Protection requirements concerning EMC §3(1)b:<br />
Applied standards or other means of providing conformity:<br />
EN 301 489-3/07.200<br />
Measure for the efficient use of the radio frequency spectrum §3(2)<br />
Applied standards:<br />
EN 300 330-2 V1.1/7.2000<br />
All references are available at <strong>Bricon</strong> nv, Europark Oost 15c, 9100 Sint-Niklaas, Belgium.<br />
Place and date of issue : Sint-Niklaas, 13-12-2005.<br />
Manufacturer / Authorised representative<br />
Ivan Baetens<br />
Director.<br />
Francis Nolmans<br />
Director.<br />
BRICON <strong>CLUB</strong>-<strong>MASTER</strong> 32