Premier Top Two Fitting Instructions - Curtain Poles
Premier Top Two Fitting Instructions - Curtain Poles
Premier Top Two Fitting Instructions - Curtain Poles

Create successful ePaper yourself
Turn your PDF publications into a flip-book with our unique Google optimized e-Paper software.
fixing line<br />
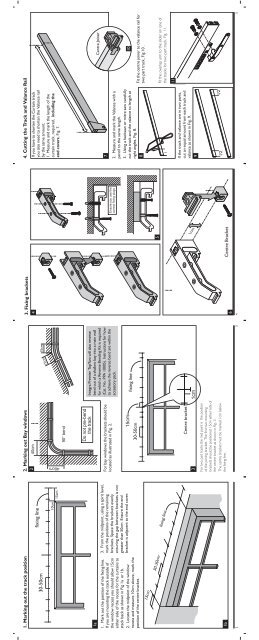
1. Marking out the track position<br />
30-50cm<br />
1a<br />
1. Mark out the position of the fixing line.<br />
If you are mounting the track outside of<br />
the window recess you should allow 15cm<br />
either side of the recess for the curtains to<br />
stack back as shown in Fig 1a or 1b.<br />
2. Locate the midpoint of the window<br />
recess and measure 10cm above, mark the<br />
position of the centre bracket.<br />
15cm<br />
30-50cm<br />
1b<br />
2<br />
fixing line<br />
10cm<br />
15cm<br />
3. From the midpoint, using a spirit level,<br />
mark the positions of the remaining<br />
brackets. Space the brackets evenly<br />
ensuring the gap between brackets is not<br />
greater than 50cm. Ensure the end<br />
bracket is adjacent to the end cover.<br />
15cm<br />
30-50cm<br />
Centre bracket<br />
15cm<br />
15cm<br />
2. Marking out Bay windows<br />
2 40cm<br />
3<br />
fixing line<br />
1cm<br />
40cm<br />
90° bend<br />
Do not pre-bend<br />
the track<br />
For bay windows the brackets should be<br />
located as illustrated in Fig. 2.<br />
For two part tracks the mid point is the position<br />
of the joining bracket. The first two mounting<br />
brackets should be positioned 15cm either side of<br />
the centre bracket as shown in Fig. 3.<br />
The centre bracket must be marked 1cm below<br />
the fixing line.<br />
Integra <strong>Premier</strong> <strong>Top</strong><strong>Two</strong> will also reverse<br />
bend out of a shallow bay into a main wall<br />
for which a Reverse Bending Kit is required<br />
(Cat. No. PPA 10005). <strong>Instructions</strong> for how<br />
to achieve the reverse bend are within the<br />
accessory pack.<br />
3<br />
3. Fixing brackets<br />
4<br />
6<br />
5<br />
1cm<br />
4<br />
Centre Bracket<br />
Ensure you use the<br />
correct fixing plugs<br />
4. Cutting the Track and Valance Rail<br />
If you have to shorten the <strong>Curtain</strong> track<br />
you also need to shorten the Valance rail<br />
by the same amount.<br />
1. Measure and mark the length of the<br />
curtain track, required,<br />
end covers , Fig. 7.<br />
including the<br />
Centre Joiner<br />
7<br />
2. Measure and mark the Valance with a<br />
pencil to the same length.<br />
3. Using a hacksaw or mitre saw carefully<br />
cut the track and the valance to length at<br />
right angles, Fig. 8.<br />
8<br />
10<br />
Fit the centre joiner to the valance rail for<br />
two part track, Fig 10 .<br />
Fit the overlap arm to the slider on one of<br />
the tracks for two part track, Fig. 11.<br />
If the track and valance are in two parts,<br />
cut an equal amount from each track and<br />
valance as shown in Fig. 9.<br />
9<br />
11<br />
l/2<br />
l/2<br />
5<br />
l
5. <strong>Fitting</strong> the track<br />
12<br />
6<br />
Centre Bracket<br />
13<br />
6. <strong>Fitting</strong> the valance<br />
14<br />
16<br />
18<br />
15<br />
17<br />
7<br />
7. <strong>Fitting</strong> the curtains and valance<br />
Using the curtain hooks provided, slide<br />
them into place so the hooks point<br />
downwards on your curtain.<br />
Starting from the centre of the track, slide<br />
each curtain hook into the roller gliders.<br />
Ensure the last hook is hooked into the<br />
hole in the end cover. Additional roller<br />
gliders are available if required.<br />
Draw rods can be attached to the glider at<br />
the centre or moving end of the curtain.<br />
The track has been designed to run<br />
smoothly for many years, however, the<br />
occasional application of silicon polish to<br />
the roller glider channel will ensure<br />
continued high performance.<br />
Hanging your valance<br />
Using the valance hooks provided, choose<br />
the suitable pocket on the curtain tape and<br />
slide the hooks into the tape, Fig. 19a.<br />
From one end, starting at the wall, hook<br />
the fabric valance onto the rail, Fig 19b.<br />
Press down to clip the hook to the valance<br />
rail paying particular attention to the side<br />
returns and corners. Additional valance<br />
hooks are available as an accessory.<br />
19<br />
b<br />
Safety<br />
<br />
<br />
<br />
<br />
<br />
<br />
<br />
Only use a step ladder or stable chair to<br />
reach the fixing height.<br />
Do not over reach. Always move the<br />
stepladder or chair, so that you are in a<br />
safe working position.<br />
Do not hold or lean on the track to<br />
support your weight.<br />
Use two people for the installation of<br />
longer tracks.<br />
Take care when using power tools, use<br />
of a Residual Current Device (RCD) is<br />
recommended.<br />
Always wear eye protection when<br />
drilling.<br />
Beware of hidden pipe runs and cables.<br />
Integra Products Ltd, Eastern Avenue, Lichfield, Staffordshire WS13 7SB<br />
tel: +44 (0)1543 267100 fax: +44 (0)1543 267105<br />
email: cus.care@integra-products.co.uk web: www.integra-products.co.uk<br />
<strong>Premier</strong> <strong>Top</strong> <strong>Two</strong><br />
Should any component be missing, please call the Customer Care Department on 0800 515493<br />
Content Lengths 1.25m 1.5m 1.75m 2.0m 2.25m 2.5m 3.0m 4.0m<br />
A<br />
B<br />
C<br />
D<br />
E<br />
F<br />
G<br />
H<br />
L<br />
M<br />
N<br />
O<br />
Track Sections<br />
Roller Gliders<br />
Base Brackets<br />
Centre Bracket<br />
End Cover<br />
Join Cover<br />
Valance Sections<br />
Centre Joining Piece<br />
Side Returns<br />
Side Return Clips<br />
Corner Pieces<br />
Valance Hooks<br />
Brackets<br />
<strong>Curtain</strong> Hooks<br />
Draw rods<br />
1<br />
16<br />
2<br />
20<br />
4<br />
27<br />
2<br />
4<br />
-<br />
2<br />
-<br />
1<br />
-<br />
2<br />
2<br />
1<br />
20<br />
2<br />
20<br />
4<br />
27<br />
2<br />
4<br />
-<br />
2<br />
-<br />
1<br />
-<br />
2<br />
2<br />
1<br />
23<br />
2<br />
28<br />
5<br />
27<br />
2<br />
5<br />
-<br />
2<br />
-<br />
1<br />
-<br />
2<br />
2<br />
1<br />
26<br />
2<br />
30<br />
5<br />
33<br />
2<br />
5<br />
-<br />
2<br />
-<br />
1<br />
1<br />
2<br />
2<br />
1<br />
29<br />
2<br />
36<br />
6<br />
33<br />
2<br />
6<br />
-<br />
2<br />
-<br />
1<br />
1<br />
2<br />
2<br />
1<br />
34<br />
2<br />
38<br />
6<br />
41<br />
2<br />
6<br />
-<br />
2<br />
-<br />
1<br />
1<br />
2<br />
2<br />
2<br />
40<br />
2<br />
44<br />
8<br />
47<br />
2<br />
9<br />
1<br />
2<br />
1<br />
2<br />
1<br />
2<br />
2<br />
2<br />
52<br />
13<br />
2<br />
58<br />
12<br />
59<br />
2<br />
1<br />
2<br />
1<br />
2<br />
1<br />
2<br />
2<br />
A B C D E F G<br />
Please ensure the<br />
correct wall plugs<br />
are used to suit<br />
your wall type.<br />
H I J K L M N O<br />
L4583<br />
I<br />
J<br />
K