4545 Ultraglide Metal Curtain... - Curtain Poles
4545 Ultraglide Metal Curtain... - Curtain Poles
4545 Ultraglide Metal Curtain... - Curtain Poles

You also want an ePaper? Increase the reach of your titles
YUMPU automatically turns print PDFs into web optimized ePapers that Google loves.
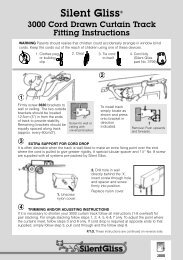
Installation and Assembly<br />
1. Carefully remove all the packaging, taking<br />
care not to damage the track.<br />
2. When you have decided the location of the rail<br />
mark out the position of the fixing line, 10cm above<br />
the window recess and allow 15cm either side for<br />
the curtains to stack back as shown in Fig 1.<br />
10cm<br />
15cm<br />
1<br />
Fig. 1<br />
Mounting Rail end brackets<br />
3. Take a rail end bracket, undo the small screw<br />
and separate the two parts (Fig. 2). This will<br />
make it easier to reach the screws to fix them to<br />
the batten or wall.<br />
20<br />
2<br />
4. Holding the bracket up to the fixing line,<br />
mark off the holes for the screws with a pencil<br />
(Fig. 3). If you are mounting on to a batten drill a<br />
2mm diameter hole in the batten to a depth of<br />
30mm. Use a spirit level to ensure the holes are<br />
straight. Repeat on the other side of the<br />
window.<br />
3<br />
Fig. 3<br />
5. Once you have marked the position of the<br />
brackets drill holes and using the appropriate<br />
wall plugs fix the brackets as shown in Fig. 4.<br />
4<br />
Fig. 4<br />
6. Reassemble the rail end bracket, ensure that<br />
the small screw is securely fixed (Fig. 5).<br />
5<br />
Fig. 5<br />
Attaching the <strong>Curtain</strong> Track<br />
7. Once the brackets are securely fixed, insert<br />
one end of the curtain track ‘projection‘ lug into<br />
the receiving channel of the end bracket and<br />
push the front of the track to click-close it in<br />
position (Fig. 6).<br />
8. Repeat the procedure on the other end, you<br />
may need to extend the track.<br />
9. You can adjust the position of the track<br />
relative to the wall by loosening the small locking<br />
screws in the end brackets and the pulling the<br />
track out to suit (Fig. 7).<br />
Fig. 7<br />
Fig. 8<br />
6 7<br />
Intermediate Support Brackets<br />
intermediate supports evenly spaced<br />
8<br />
inner section<br />
Fig. 9<br />
10. If you extend the curtain track horizontally<br />
by more than 300mm, you should use one or<br />
more intermediate support brackets. If you use<br />
one support bracket it should be positioned at<br />
the midpoint of the window recess. If you use<br />
more than one bracket, they should be evenly<br />
spaced along the track (Fig. 8).<br />
11. When you have marked the position of the<br />
brackets, remove the whole track from the rail<br />
end brackets. Hold the brackets up to the fixing<br />
line, mark off the holes for the screws with a<br />
pencil. If you are mounting on to a batten drill a<br />
2mm diameter hole in the batten to a depth of<br />
30mm.<br />
12. Once you have marked the position of the<br />
brackets, drill holes and fix the brackets securely<br />
(Fig. 9). If you are fixing directly to a wall use the<br />
appropriate wall plugs to fix the brackets.<br />
9<br />
Fig. 10<br />
13. Re-fit the track onto the rail end brackets<br />
ensuring it fits neatly under and into the support<br />
brackets. If you need to extend the support<br />
brackets, this can be done by loosening the<br />
fastening screws underneath and pulling the<br />
bracket backwards or forwards as shown in Fig.<br />
10.<br />
3<br />
10<br />
14. Underneath the support brackets you will<br />
find a locking clamp. You need a flat screwdriver<br />
to rotate the clamp (Fig. 11).<br />
15. When you clip the bracket over the front of<br />
the outer section of the track, you must turn the<br />
locking clamp anti-clockwise. If you fit the<br />
bracket over the inner (narrower) section of the<br />
track you must turn the locking clamp clockwise<br />
to engage with the track correctly (Fig. 12).<br />
4<br />
2<br />
Inner section<br />
11<br />
IN<br />
OUT<br />
Outer section<br />
turn with a screwdriver Fig. 12<br />
12<br />
Fig. 13<br />
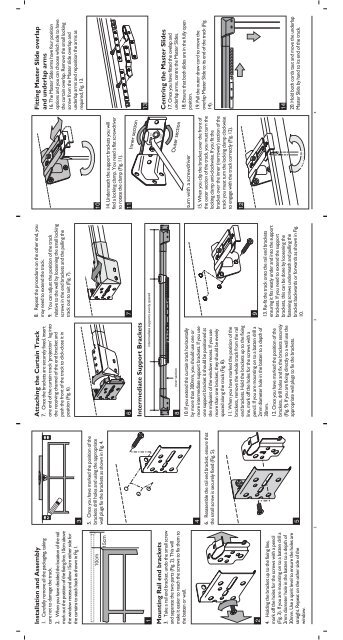
Fitting Master Slide overlap<br />
and underlap arms<br />
16. The Master Slide arms have four position<br />
options and you can choose which side to have<br />
the curtain overlap. Remove the small locking<br />
screw from the Master slide overlap and<br />
underlap arms and reposition the arms as<br />
required, Fig. 13.<br />
13<br />
Fig. 14<br />
Centring the Master Slides<br />
17. Once you have fitted the ovelap and<br />
underlap arms, centre the Master Slides.<br />
18. Ensure that both slides are in the fully open<br />
position.<br />
19. Pull the outer draw cord to move the<br />
overlap Master Slide to its end of the track (Fig.<br />
14).<br />
Fig. 15<br />
14<br />
20. Hold both cords taut and move the underlap<br />
Master Slide by hand to its end of the track.
21. Lift up the cord off the top peg behind the<br />
left hand side or underlap Master Slide, twist it<br />
once and place the loop created under the lower<br />
peg as shown in Fig. 15.<br />
15<br />
Fig. 16<br />
22. Pull the outside cord to tighten the loop.<br />
Check to ensure the Master Slides are still<br />
centred and adjust again if necessary.<br />
Fitting a Tension Pulley<br />
23. Using the two screws supplied, fix the<br />
tension pulley to the floor, skirting board or<br />
window sill, directly in line with the pull cord as<br />
shown (Fig. 16).<br />
16<br />
Fig. 17<br />
24. Extend the neck of the pulley and secure in<br />
higher position using a pin or small nail. Remove<br />
the central barrel of the pulley by pulling it down<br />
and then out (Fig. 17a). Place the cord inside the<br />
pulley and replace the barrel ensuring it clicks<br />
into place (Fig. 17b).<br />
Fig. 18a<br />
Fig.<br />
17a 18b<br />
17b<br />
25. Take up the slack of the cord and tie a knot<br />
behind the masterslide arm. Remove the pin or<br />
nail from the pulley, the cord will now be fully<br />
tensioned. If there is insufficient tension in the<br />
cord, reduce the cord length by adjusting the<br />
knot behind the masterslide arm (Fig. 18).<br />
18<br />
Fig. 19<br />
26. If the cord becomes twisted, simply rotate<br />
the head of the pulley to untwist it (Fig. 19). The<br />
track is now ready to accept curtains.<br />
19<br />
Fig. 20<br />
Safety<br />
• Only use a step ladder or stable chair to<br />
reach fixing height.<br />
• Do not over reach. Always move the step<br />
ladder or chair so that you are in a safe<br />
working position.<br />
• Donotholdorleanonthetrackto<br />
support your weight.<br />
• Use two people for the installation of<br />
longer tracks.<br />
• Take care when using power tools, use of<br />
a Residual Current Device (RCD) is<br />
recommended.<br />
• Always wear eye protection when drilling.<br />
• Beware of hidden pipe runs and cables.<br />
Care and Maintenance<br />
Tracks should be wiped clean periodically<br />
with a warm damp cloth.<br />
The track has been designed to run smoothly<br />
for many years, however, the occasional<br />
application of silicon polish to the roller glider<br />
channel will ensure continued high<br />
performance.<br />
Integra Products Ltd, Eastern Avenue, Lichfield, Staffordshire WS13 7SB<br />
tel: +44 (0)1543 267100 fax: +44 (0)1543 267105<br />
email: cus.care@integra-products.co.uk web: www.integra-products.co.uk<br />
<strong>Ultraglide</strong> <strong>Curtain</strong> Track<br />
Fitting Instructions<br />
Please read these instructions carefully and<br />
check the contents of the pack against the<br />
table, before attempting to assemble and fix<br />
this product. The fixing screws supplied are for<br />
use where a wooden batten is fixed to the wall.<br />
If you intend to fix the track directly to the wall,<br />
you must use the most appropriate wall plugs<br />
and fixings.<br />
Tools Required: Spirit level, Tape measure, Flat<br />
bladed screwdriver, Crosshead (Philips)<br />
screwdriver, 2mm drill bit (pilot hole for wood<br />
screws), Pencil, Step ladder.<br />
<br />
<br />
<br />
<br />
<br />
Should any component be missing, please<br />
call the Customer Care Department on<br />
0800 515493<br />
Lengths 1.0m to<br />
1.75m<br />
1.2m to<br />
2.0m<br />
1.75m to<br />
3.0m<br />
2.5m to<br />
4.0m<br />
Contents <br />
A Rail End Bracket 2 2 2 2 2<br />
B Intermediate Brackets 1 1 2 3 4<br />
C Master Slide overlap arms 2 2 2 2 2<br />
D Tension Pulley 1 1 1 1 1<br />
E Gliders 18 20 30 40 56<br />
3.0m to<br />
5.5m<br />
L<strong>4545</strong><br />
5