
You also want an ePaper? Increase the reach of your titles
YUMPU automatically turns print PDFs into web optimized ePapers that Google loves.
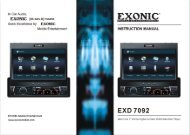
GENERAL OPERATION<br />
Power On/Off Button<br />
Press the POWER button to turn the unit on<br />
when the vehicle ignition switch is on. Press<br />
and hold the button to turn the unit off.<br />
Adjust Volume level<br />
Rotate the VOL/MENU control to adjust<br />
volume level. Rotate it clockwise to increase<br />
and anticlockwise to decrease the volume.<br />
<strong>Audio</strong> Mute<br />
Press the MUTE button to mute the volume<br />
from the system. “MUTE” will appear on the<br />
display panel and the volume will be muted.<br />
Press the MUTE button again, or rotate or<br />
press the VOL/MENU control to return the<br />
volume level to the setting in use before the<br />
Mute function was activated.<br />
<strong>Audio</strong> Controls<br />
To adjust the bass, treble, balance and<br />
fader, press the VOL/MENU control until the<br />
appropriate audio control appears on the<br />
display panel. Within five seconds, rotate the<br />
VOL/MENU control to adjust the audio settings<br />
for the selected function.<br />
Mode Button (SRC)<br />
Press the SRC button to change between<br />
Radio, DISC (when disc is in), USB (when<br />
USB is connected), Card(when SD/MMC card<br />
is in) or AUX play.<br />
Auxiliary Input<br />
To access an auxiliary device:<br />
1. Connect the portable audio player to the<br />
AUX interface on the front panel.<br />
2. Press the SRC button to select Aux-In<br />
mode.<br />
Press SRC again to cancel Aux-In mode and<br />
go to the next mode.<br />
Display Selector (DISP)<br />
This unit can display either the clock time<br />
or radio frequency/CD player functions.<br />
Ordinarily, the radio frequency or CD<br />
player track indication is displayed, but the<br />
unit will display the time when the DISP<br />
button is pressed. The time will display for<br />
approximately 5 seconds then return to the<br />
radio or CD player function display.<br />
Setting the Clock<br />
The correct time of day can be set by pressing<br />
and holding the DISP button.<br />
To set the clock, perform the following steps:<br />
1. Turn the vehicle ignition and radio on.<br />
2. Press the DISP button to view the clock.<br />
3. With the clock visible on the display, press<br />
and hold the DISP button until the time<br />
display flashes.<br />
4. Within 5 seconds, rotate the VOL/MENU<br />
control counter clockwise to adjust the<br />
minutes to the desired setting. To change<br />
the hour, rotate the VOL/MENU control<br />
clockwise to adjust the hour to the desired<br />
time.<br />
4<br />
9482CMU128J345A 说 明 书 .indd 4 2010-1-29 10:28:17