
You also want an ePaper? Increase the reach of your titles
YUMPU automatically turns print PDFs into web optimized ePapers that Google loves.
LEHNER<br />
VINERO ®<br />
Operating instructions with parts list<br />
Control LAS 3<br />
Software from version 2.0<br />
Status: June 2009<br />
Serial number: .................................................................<br />
Software version: ...............................................................
Table of Contents<br />
2<br />
1 What you should know .......................................................4<br />
1.1 Foreword ................................................................................................ 4<br />
1.2 Notes on these operating instructions .................................................... 4<br />
1.3 Intended use .......................................................................................... 5<br />
1.4 Warranty ................................................................................................. 5<br />
1.5 About your safety ................................................................................... 6<br />
1.6 Identification ........................................................................................... 6<br />
2 Starting up the VINERO ® ................................................. 7<br />
2.1 Mounting the frame ................................................................................ 7<br />
2.2 Electrical connection .............................................................................. 7<br />
2.3 Mounting the VINERO ® ........................................................................ 8<br />
2.4 Attaching the control panel .................................................................... 8<br />
3 Operating the VINERO ® ................................................... 9<br />
3.1 Controls on the control panel ................................................................. 9<br />
3.2 The display ........................................................................................... 10<br />
3.3 Switching on / off .................................................................................. 11<br />
3.4 Setting the speed ................................................................................. 13<br />
3.5 Setting the slide opening ...................................................................... 13<br />
3.6 Opening/closing the slide ..................................................................... 14<br />
3.7 Performing the slide reference run ....................................................... 15<br />
3.8 Setting the working width (special accessory) ..................................... 16<br />
3.9 Setting the lateral distribution (special accessory) ............................... 16<br />
3.10 Empty signal indicator .......................................................................... 17
Table of Contents<br />
4 Settings and displays .......................................................18<br />
4.1 Making settings ..................................................................................... 18<br />
4.2 Language .............................................................................................. 18<br />
4.3 Selecting the empty indicator ................................................................ 19<br />
4.4 Setting signal for electronic lifting gear control (EHR) ........................... 19<br />
4.5 Setting cycle for electronic lifting gear control (EHR)<br />
(special equipment for headland manager) ........................................... 20<br />
4.6 Adjusting the empty indicator ................................................................ 20<br />
4.7 Displaying the spreader type ................................................................. 21<br />
4.8 Checks .................................................................................................. 21<br />
4.9 Spreading width and turning procedure ................................................ 22<br />
5 Special accessories ..........................................................23<br />
5.1 Attach standard rail ............................................................................... 23<br />
5.2 Attach Vario rail ..................................................................................... 23<br />
5.3 Headland manager ................................................................................ 24<br />
6 Maintenance and cleaning ...............................................26<br />
6.1 Service .................................................................................................. 26<br />
6.2 Cleaning ................................................................................................ 26<br />
7 <strong>Appendix</strong> ...........................................................................27<br />
7.1 EU Declaration of Conformity ................................................................ 27<br />
7.2 Distribution box reference list ................................................................ 28<br />
7.3 List of spare parts .................................................................................. 29<br />
7.4 Troubleshooting ..................................................................................... 33<br />
7.5 Spreading charts ................................................................................... 34<br />
7.6 Slide settings ......................................................................................... 43<br />
3
1 What you should know<br />
1.1 Foreword<br />
4<br />
Thank you for placing your trust in us. We congratulate you on your<br />
decision. With the VINERO ® , you have acquired a high-quality and<br />
innovative product.<br />
Thanks to its advanced design, meticulous material selection, stateof-the<br />
art manufacturing techniques and the precision work of our<br />
employees, this equipment meets all efficiency, quality, reliability and<br />
value requirements.<br />
Care and maintainance in accordance with the operating instructions<br />
ensures safe operation and maintains the value of your VINERO ® .<br />
1.2 Notes on these operating instructions<br />
These operating instructions are a part of the VINERO ® and must always<br />
be readily available. All persons who work with the VINERO ® must read<br />
and follow the operating instructions.<br />
They will learn about the technical details and how to control the<br />
machine and optimise its performance.<br />
Warning notices<br />
Warning notices in these operating instructions are identified as follows:<br />
Danger!<br />
Warning against immediate danger. Non-observance of<br />
appropriate measures may result in death and severe<br />
personal injury or serious damage to property..<br />
Warning!<br />
Warning of possible danger. Death, severe personal injury<br />
or serious damage to property are possible.<br />
Caution!<br />
Warning of possible dangerous situations. Slight personal<br />
injury or damage to property is possible.
1 What you should know<br />
1.3 Intended use<br />
The VINERO ® is used exclusively for spreading fertilizer and seeds.<br />
1.4 Warranty<br />
We provide a guarantee of 6 months and warranty of 24 months on the<br />
VINERO ® .<br />
Caution!<br />
Defective plugs and cables or those of the wrong size can<br />
lead to functional deficiencies.<br />
Use original or cables and plugs approved by the<br />
manufacturer only.<br />
Any changes to cable or plug connections without factory approval<br />
automatically invalidates the warranty. Motors may not be opened or<br />
dismantled.<br />
Warranty repairs must be coordinated with the manufacturer before any<br />
work is started.<br />
For replacement parts, additional expenses are automatically<br />
charged for any changes made to cables and plugs by the customer.<br />
Replacement parts are to be returned carriage paid.<br />
Rusted bearings are not subject to the manufacturer's warranty.<br />
Prior to assembly:<br />
Check your VINERO ® . upon receipt for any damage caused in transit.<br />
Any such damage must be reported to the manufacturer within 24 hours<br />
of receipt.<br />
5
1 What you should know<br />
1.5 About your safety<br />
6<br />
•<br />
•<br />
•<br />
•<br />
•<br />
•<br />
•<br />
•<br />
•<br />
•<br />
Carefully read and observe these operating instructions before use.<br />
Always keep these instructions at the point of use.<br />
Observe the accident prevention regulations, safety and operating<br />
regulations and the regulations for environmental protection.<br />
Observe all applicable standards and guidelines.<br />
When travelling on public roads and streets, observe the road traffic<br />
regulations.<br />
Observe the safety instructions.<br />
Immediately resolve any safety-related deficiencies.<br />
Keep out of the spreading zone. Make sure that no other persons are in<br />
the spreading zone.<br />
Do not touch the hopper during operation.<br />
Follow the safety guidelines of the package insert when spreading<br />
granulates.<br />
Do not undertake any repairs, maintenance or cleaning procedures on<br />
the VINERO ® when the mains plug is connected.<br />
1.6 Identification<br />
The serial number of the spreader is located on the back of the<br />
framework.<br />
Note the serial number in these operating instructions so that it is readily<br />
available for inquiries.<br />
The hardware and software versions<br />
are briefly displayed when the control<br />
panel is connected.<br />
Make a note of the software version in<br />
these operating instructions so that it<br />
is readily available for inquiries.<br />
LEHNER <strong>GmbH</strong><br />
LAS3 V2.0
2 Starting up the VINERO ®<br />
2.1 Mounting the frame<br />
The VINERO ® can be screwed on directly or an auxiliary bracket used.<br />
Mounting holes have been provided on the back of the frame.<br />
The recommended delivery height is approx. 0.2 m. Please refer to the<br />
spreading charts for precise details.<br />
The VINERO ® can be mounted at the front or back of the tractor. It can<br />
be fitted to tractors, all-terrain vehicles or cultivation machines. Because<br />
a full hopper makes the VINERO ® considerably heavier, the load<br />
capacity of platform gates and other consoles is to be checked.<br />
2.2 Electrical connection<br />
Technical data<br />
Operating voltage 10 to 15 volts<br />
Fuse 25 A<br />
Motor output 12 watts<br />
Speed range 40 to 66 rpm<br />
Power consumption<br />
of gear motor<br />
0.4 - 1 A<br />
Operating temperature -10 to +70 °C<br />
Storage temperature -30 to +70 °C<br />
Any changes to cable or plug connections without factory approval<br />
automatically invalidates the entire warranty. Changes to cables are<br />
taken into account in the case of repair.<br />
You must consult with the manufacture before carrying out any cable<br />
modifications.<br />
Power loss must be taken into account when extending cables. A poor<br />
power supply may prevent you from achieving the desired speed. A poor<br />
power supply can momentarily cause the spreader to fail completely.<br />
7
2 Starting up the VINERO ®<br />
2.3 Mounting the VINERO ®<br />
8<br />
Check whether the hopper fits well in the hopper platform. Check that<br />
the VINERO® is securely attached .<br />
2.4 Attaching the control panel<br />
Caution, risk of short circuits!<br />
Ensure that the cable is not routed over any sharp edges.<br />
1<br />
2 3 4<br />
Mount support for the control panel in the vehicle cabin.<br />
Plug the control panel cable into the 3-pin plug 1 of the carrier vehicle.<br />
If the plug is not available, use the provided battery cable:<br />
Connect terminal 2 to -pin of the battery<br />
(not to the body).<br />
Connect terminal 3 (with fuse 4) to +pin of the battery<br />
Place cable end with socket in carrier vehicle.<br />
Plug the spreader cable into the 16-pin plug of the control panel.<br />
The battery cable supplied must be used to ensure an optimum power<br />
supply.<br />
Your device is now ready to operate.
3 Operating the VINERO ®<br />
3.1 Controls on the control panel<br />
1<br />
2<br />
1 2 3<br />
Switching on / off<br />
Display<br />
3 Opening and closing the slide<br />
Slide open: green LED lights up<br />
Slide closed: yellow LED lights up<br />
4<br />
5<br />
Setting the speed or slide<br />
4<br />
Switch to change between speed and slide<br />
6<br />
Empty indicator<br />
5<br />
6<br />
9
3 Operating the VINERO ®<br />
3.2 The display<br />
10<br />
1 2<br />
> RPM 60<br />
Slide 29 ok<br />
1 Arrow denotes the active line<br />
2 Agitator speed<br />
3 Slide opening<br />
4 OK sign for open slide<br />
3 4<br />
Error messages, also see Troubleshooting chapter.
3 Operating the VINERO ®<br />
3.3 Switching on / off<br />
Press the button.<br />
The speed of the agitator and the slide<br />
opening is displayed. The slide is always<br />
closed when switching on the drive motor.<br />
Press the button.<br />
The slide is opened, the green LED lights<br />
up.<br />
The drive motor starts.<br />
If this message is displayed, a cable is<br />
damaged or a plug disconnected.<br />
> Speed 60<br />
Slide 29<br />
> Speed 60<br />
Slide 29 ok<br />
> Speed 60<br />
Connecting spr.<br />
Low temperatures can cause the empty indicator to respond slowly.<br />
To check the adjustment:<br />
Allow the spreader to run for approx. 1 minute with the slide closed.<br />
If the slide is then opened, the empty indicator must be activated<br />
after approx. 5 seconds.<br />
If this doesn't happen, move the empty indicator 5% into the negative<br />
range; see Settings and displays chapter, Adjusting the empty indicator.<br />
11
3 Operating the VINERO ®<br />
12<br />
Autostart<br />
If the motor is difficult to start due to heavy<br />
loads, start the motor up to 10 times in<br />
alternating motor direction. If the mixer<br />
does not break free as a result, the motor is<br />
automatically switched off.<br />
The following message is displayed: Agitator blocked<br />
Slide 29<br />
Danger!<br />
Never open the hopper or touch the spreading disc when<br />
the drive motor is running.<br />
Switch off the drive motor and ensure that the motor is<br />
stopped before opening the hopper or touching the agitator.<br />
To eliminate the blockage:<br />
Switch off the machine.<br />
Empty hopper and check for foreign bodies.<br />
Check power supply.
3 Operating the VINERO ®<br />
3.4 Setting the speed<br />
If necessary, press the button to select the<br />
speed; the arrow points to the first line in<br />
the display.<br />
Press the button to set the speed.<br />
The speed can be adjusted continuously<br />
from 40 - 66 rpm.<br />
The optimum speed is 66 rpm.<br />
The setpoint speed is displayed for 10<br />
seconds, after which the actual speed is<br />
displayed.<br />
3.5 Setting the slide opening<br />
If necessary, press the button to select the<br />
slide. The arrow points to the second line<br />
in the display.<br />
Press the button to adjust the slide<br />
opening.<br />
You can take the required slide opening<br />
from the spreading chart.<br />
> Speed 60<br />
Slide 29<br />
Speed 60<br />
> Slide 29<br />
13
3 Operating the VINERO ®<br />
3.6 Opening/closing the slide<br />
14<br />
Danger!<br />
The drive motor starts immediately when switched on.<br />
Make sure the danger area is clear when starting.<br />
Press the button to open or close the slide.<br />
Slide open: green LED lights up<br />
Slide closed: yellow LED lights up<br />
> Speed 60<br />
Slide 29 ok<br />
Slide monitoring<br />
If the slide does not reach the specified position within 10 seconds, the<br />
spreader switches off.<br />
The following message is shown in the display:<br />
Slide not open or Slide not closed. 5 warning signals also sound. For<br />
troubleshooting, see Troubleshooting chapter.<br />
Manual adjustment<br />
The number of hoses to be used can be selected by manually setting the<br />
slider. The number depends on the slide; see Slide Settings.<br />
Lever in position A for all hoses.<br />
Lever in position B for some of the hoses.
3 Operating the VINERO ®<br />
3.7 Performing the slide reference run<br />
The slide motor and control panel are adjusted to match each other<br />
at the factory. The setting can be lost in the course of time or when<br />
replacing the control panel.<br />
Switch off the machine.<br />
Press and hold the button for switching between speed<br />
and slide and the + button to switch the machine on.<br />
The slide performs its reference run.<br />
Approx. 240 is displayed as the upper value and approx. 40 as the lower<br />
value; in the second line the message OK is displayed.<br />
Switch machine off at ON/OFF switch so that the values are stored.<br />
If a slide reference run cannot be performed, the following message<br />
flashes on the display: slide not calib.<br />
Check the mechanical clearance of the slide, the cable and the<br />
connectors. Then perform the reference run again.<br />
15
3 Operating the VINERO ®<br />
3.8 Setting the working width (special accessory)<br />
16<br />
The Vario-rail can be set to a working width of between 0.8 and 1.6 m.<br />
Undo screws (arrowed) and set distributor rails to the desired width.<br />
3.9 Setting the lateral distribution (special accessory)<br />
For wide area output all hoses are positioned vertically on the Vario-rail:<br />
1 2 3 4 5 6 7 8 9 10 11 12
3 Operating the VINERO ®<br />
For fertilising rows, the hoses on the Vario-rail are positioned at an<br />
angle. The inner hoses can each be positioned next to an outer hose.<br />
6-hose version:<br />
3-hose version:<br />
3.10 Empty signal indicator<br />
The empty indicator shows you when the spreading material in the<br />
hopper falls below a specific fill level:<br />
The following message flashes on the display for approx. 5 seconds:<br />
Hopper empty, 8 warning signals sound and the red LED flashes on the<br />
empty indicator.<br />
To switch off the empty signal:<br />
Close the slide or switch off the spreader.<br />
17
4 Settings and displays<br />
18<br />
The operating panel can be used to make the following settings:<br />
Language<br />
Empty warning<br />
EHR signal<br />
EHR cycle (special equipment for headland manager)<br />
Empty warning adjustment<br />
Control type<br />
4.1 Making settings<br />
Switch off the machine.<br />
Press both buttons at the same time to<br />
switch on the machine.<br />
The language selection is displayed.<br />
Press the button to select the desired<br />
menu item.<br />
4.2 Language<br />
Press the button to set the language.<br />
Press toggle switch: Setting saved, next<br />
menu item<br />
or<br />
press main switch: Setting saved and<br />
machine switched off.<br />
Language 0<br />
English<br />
Language 0<br />
English
4 Settings and displays<br />
4.3 Selecting the empty indicator<br />
Press the button to select the empty<br />
indicator.<br />
Via agitator motor (1) with soft agitator,<br />
via external empty indicator (2) - not<br />
programmed<br />
or<br />
empty indicator switched off (0)<br />
Press toggle switch: Setting saved, next<br />
menu item<br />
or<br />
press main switch: Setting saved and<br />
machine switched off.<br />
Empty ind. 1<br />
One agitator<br />
4.4 Setting signal for electronic lifting gear control (EHR)<br />
When the spreader is equipped with the headland manager accessory,<br />
the hydraulic signal of the tractor can be detected. The signal is emitted<br />
when lifting or lowering.<br />
The spreader is set at the factory for the signal when lifting.<br />
If the tractor emits the hydraulic signal when lowering, you can adjust the<br />
spreader.<br />
Press the button to set the EHR signal.<br />
EHR signal for lifting:<br />
High active is displayed.<br />
EHR signal for lowering:<br />
Low active is displayed.<br />
Press toggle switch: Setting saved, next<br />
menu item<br />
or<br />
press main switch: Setting saved and<br />
machine switched off.<br />
EHR signal 0<br />
High active<br />
19
4 Settings and displays<br />
4.5 Setting cycle for electronic lifting gear control (EHR)<br />
(special equipment for headland manager)<br />
20<br />
If the spreader is equipped with the headland manager accessory, a<br />
specific cycle can be set for opening the slide.<br />
Press button to select the EHR cycle<br />
between 1 and 10.<br />
Press toggle switch: Setting saved, next<br />
menu item<br />
or<br />
press main switch: Setting saved and<br />
machine switched off.<br />
4.6 Adjusting the empty indicator<br />
EHR cycle 4<br />
Depending on the requirement and spreading material, the empty<br />
indicator can be set to respond earlier or later.<br />
The value for the empty indicator to switch on (if the spreading material<br />
falls below a certain fill level) can be adjusted from -50 to +50.<br />
Note:<br />
Depending on the spreading material or material humidity, the remainder<br />
level may vary somewhat.<br />
Press the button to set the respective<br />
value.<br />
Factory setting is 0<br />
With + values, the empty indicator<br />
responds at a higher fill level.<br />
With - values, the empty indicator responds<br />
at a lower fill level.<br />
Setting 0<br />
Empty ind. ON
4 Settings and displays<br />
Press toggle switch: Setting saved, next<br />
menu item<br />
or<br />
press main switch: Setting saved and<br />
machine switched off.<br />
4.7 Displaying the spreader type<br />
The control is provided for a variety of spreaders.<br />
The VINERO ® is programmed at the factory.<br />
4.8 Checks<br />
Press toggle switch: Setting saved, next<br />
menu item<br />
or<br />
press main switch: Setting saved and<br />
machine switched off.<br />
Spread. type 0<br />
VINERO<br />
Voltage check<br />
In order to check the operating voltage (in V), the spreader must be on<br />
and the hopper filled.<br />
Press the button for 5 seconds.<br />
The operating voltage is displayed for 8<br />
seconds.<br />
Voltage 14.0 V<br />
Performance check<br />
The motor is set at the factory. No changes are permitted,<br />
since otherwise the drive and control parameters no longer match.<br />
To check the performance data, the spreader must be on.<br />
21
4 Settings and displays<br />
22<br />
Press the button for min. 5 seconds.<br />
The following information is displayed as<br />
long as the button is pressed:<br />
Line 1: current drive motor, power<br />
consumption in watts and the exact speed.<br />
Line 2: R value for factory-internal data,<br />
the motor voltage in volts, the current<br />
consumption of the motor in amps.<br />
4.9 Spreading width and turning procedure<br />
TLP 23.4 W 2800<br />
91R 3.4V 1.0A<br />
Please note when turning that the turning quantities may differ from the<br />
quantities when using the device, as there may be vibrations.<br />
Calculation according to the following formula<br />
kg/min x 600<br />
Speed x spreading width (m)<br />
kg/min x 600<br />
Output/ha (kg) x spreading width (m)<br />
= Output (kg/ha)<br />
= Speed (km/h)<br />
Speed (km/h) x output /ha (kg) x spreading width (m)<br />
600<br />
= kg/min
5 Special accessories<br />
5.1 Attach standard rail<br />
The standard rail is mounted directly onto the carrier vehicle. The hoses<br />
can be connected independently of the numbering.<br />
5.2 Attach Vario rail<br />
Mount the rails 1 on the frame 2<br />
Mount distribution rail 3 on bars 1, paying attention to mounting direction<br />
(arrowed).<br />
Mount distributor rails 4 on distributor rail 3.<br />
Mount distributor rails 5 with 4 rubber buffers 6 onto distributor rail 3.<br />
Connect the hoses of the distributor rail to the spreader, paying attention<br />
to the numbering.<br />
23
5 Special accessories<br />
5.3 Headland manager<br />
24<br />
When lowering the hydraulics, the slide must be opened manually the<br />
first time.<br />
Press the button.<br />
The slide is opened, the green LED lights<br />
up.<br />
If the headline manager is connected,<br />
an * is displayed at the end of the first line.<br />
Speed 66*<br />
Slide 29<br />
With the headline manager, the slide is automatically opened when<br />
lowering the hydraulic and automatically closed when lifting.<br />
The slide can be manually opened and closed from the control panel.<br />
The signal can be detected by means of a 7-pin plug or a sensor signal.<br />
7-pin plug<br />
1. Connect the connecting cable of the control panel to the 7-pin signal<br />
plug of the tractor.<br />
2. Set the EHR signal of the spreader depending on whether the tractor<br />
emits the hydraulic signal when lifting or lowering.
5 Special accessories<br />
Sensor signal<br />
1. Mount the sensor in the joint section of the lower link.<br />
2. Mount the magnetic encoder to the lower link.<br />
3. Set position position of sensor and magnetic encoder.<br />
noting that the switching area of the sensor is at the side.<br />
Maximum spacing 10 mm.<br />
Hydraulics at bottom:<br />
sensor not in range of magnetic sensor.<br />
Hydraulics at top:<br />
sensor must be in field of magnetic encoder.<br />
When raising the hydraulics, the sensor must not exit the<br />
magnetic sensor range because otherwise the slide will<br />
opened again.<br />
25
6 Maintenance and cleaning<br />
6.1 Service<br />
1<br />
1<br />
26<br />
The dosing device and slide should be inspected and cleaned from time<br />
to time.<br />
In particular, spreading material with a high dust content can cause the<br />
slide unit to clog.<br />
2<br />
5<br />
3 3<br />
1. Remove screws 1 on the right and left.<br />
2. Remove the hopper 2.<br />
3. Remove four screwws at the side.<br />
4. Remove the cover plate 5.<br />
5. Undo screw 6 and remove agitator 4.<br />
6. Remove nuts 3.<br />
7. Dismantle the hopper platform and remove flow plates.<br />
8. Clean the slide unit with a broom or compressed air.<br />
For corrosive spreading material, regularly remove and clean the motor,<br />
and fill the shaft end with grease or copper compound.<br />
6.2 Cleaning<br />
The hopper can be almost fully emptied by means of the residual<br />
discharge.<br />
1. Unscrew hopper.<br />
2.<br />
Clean spreader and hopper with a broom.<br />
3<br />
6<br />
3<br />
4
7 <strong>Appendix</strong><br />
7.1 EU Declaration of Conformity<br />
We,<br />
LEHNER <strong>Agrar</strong> <strong>GmbH</strong><br />
Häuslesäcker 5-9<br />
D-89198 Westerstetten<br />
Tel.: (+49) 07348 95 96 - 0<br />
Fax: (+49) 07348 95 96 - 40<br />
www.lehner.eu<br />
info@lehner.eu<br />
declare that the 12 volt spreader VINERO ® conforms to the<br />
following directives:<br />
Machinery Directive 98/37/EC,<br />
Low Voltage Directive 73/23/EEC,<br />
EMC Directive 89/336/EEC,<br />
EC Directive 93/68/EEC,<br />
as well as other relevant EC directives.<br />
Westerstetten, 01.03.2007<br />
Manfred <strong>Lehner</strong><br />
27
7 <strong>Appendix</strong><br />
7.2 Distribution box reference list<br />
Key<br />
Steuerkabel Control cable Zuleitung Bedienteil Control panel supply line gelb yellow grau grey<br />
Verteilerdose Junction box Batteriekabel Battery cable rot red blau blue<br />
Motor Streuteller Spreading disc motor weiss white rosa pink<br />
Motor Rührwerk Mixer motor braun brown schwarz black<br />
Schiebermotor Slide motor grün green violett violet<br />
28
7 <strong>Appendix</strong><br />
7.3 List of spare parts<br />
29
7 <strong>Appendix</strong><br />
VINERO® parts list<br />
30<br />
Designation Quantity Material Size<br />
1 Hopper 1 Plastic 70/100/170 ltr.<br />
2 Sealing cap 1 Plastic<br />
3 Discharge cover 1 Plastic<br />
4 Edge guard with padding for hopper 1 Plastic<br />
5 Cover plate 1 VA<br />
6 Edge guard with padding 1 Plastic<br />
7 Steel frame 1 VA<br />
8 Front plate 1 VA<br />
9 Hopper bracket 1 VA 100/170 ltr.<br />
10 Knurled screw 4 Plastic / VA M 8/15<br />
11 Chain guide 1 Plastic<br />
12 Ball joint head 1 Plastic Left thread<br />
13 Rubber grommet 1 Plastic<br />
14 Adjuster slide guide 1 VA<br />
15 Plastic clamp 1 Plastic<br />
16 Control cable with plug 1 6/11 meters<br />
17 Distributor box 1 Plastic<br />
18 Pushrod 1 VA<br />
19 Chain motor 1<br />
20 Control panel 1<br />
21 Upper part of bracket 1 Steel<br />
22 Lower part of bracket Steel
7 <strong>Appendix</strong><br />
31
7 <strong>Appendix</strong><br />
Parts list for VINERO® slide unit<br />
32<br />
Designation Quantity Material Size<br />
1 Hopper seal 1 Rubber 140<br />
2 Hopper platform 1 plastic 150/150/15<br />
3 Agitator 1 VA<br />
4 Guide bush for slide 1 Plastic<br />
5 Dosing plate 1 VA 2 mm<br />
6 Adjuster slide 1 VA 2 mm<br />
7 Slide guide 2 VA 2.5 mm<br />
8 Dosing slide 1 VA 2 mm<br />
9 Base plate 1 VA 4 mm<br />
10 Tube plate 1 Plastic<br />
11 Drive motor 1
7 <strong>Appendix</strong><br />
7.4 Troubleshooting<br />
Status: 07/2008<br />
Troubleshooting LEHNER VINERO<br />
The following information should help you resolve minor problems yourself. You are welcome to call us as needed. We are glad to help.<br />
Problem Cause Solution<br />
No display Polarity reversed or fuse has blown Check connections and fuses<br />
Mixer does not turn over Foreign bodies in the agitator Empty hopper and check for foreign bodies<br />
Agitator does not turn over Power supply failed or too weak Check power supply.<br />
Slide not calib. Reference run could not be performed Query diagnosis at factory.<br />
Check agitator, agitator paddle<br />
see Section 3.7<br />
Check power supply<br />
Foreign body on the agitator, load too great or<br />
power supply too weak<br />
Spreading disc does not reach set speed<br />
Spreading material or dirt is jammed between the<br />
slide plates Clean slide<br />
Slide jams<br />
Agitator does not turn; switched off after 10 attempts<br />
Material may be compacted or blocked by foreign bodies Check agitator and, if necessary, try starting again<br />
On the display: Agitator blocked<br />
Check slide for contamination, or perform reference run; see<br />
section: Reference run for slide,<br />
Cable not plugged in, motor defective<br />
On the display: Slide not open Slide could not go into position when opening<br />
Check slide for contamination, or perform reference run; see<br />
section: Reference run for slide<br />
On the display: Slide not closed Slide could not go into position when closing<br />
The version is displayed again and again. Fuse oxidised, loose contact. Check contacts and fuses<br />
Slide does not open although no error message is<br />
displayed. Mechanical damage to slide mechanism Check slide motor and transfer mechanism<br />
Control panel plug not connected to spreader or cable<br />
damaged Check plug connections and lines<br />
On the display: Connecting spr.<br />
Empty indicator does not respond Empty indicator is set too low Adjust empty signal (see Section 4.6)<br />
Headland manager closes the slide when lowering<br />
hydraulics and opens when lifting Signal incorrectly applied Turn signal. See EHR signal<br />
Headline manager does not always close Distance to magnetic sensor too great Check distance, max. 10 mm.<br />
33
7 <strong>Appendix</strong><br />
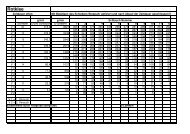
7.5 Spreading charts<br />
Red clover<br />
34<br />
Stopwatch is activated on actuation of slide and slide closes on expiry of period!!!<br />
Time open:<br />
g/min g/min<br />
Hose number<br />
Slide Ø per hose Ø overall 1 2 3 4 5 6 7 8 9 10 11 12<br />
V 1 20 318,4 3821 355 385 371 345 348 296 270 281 286 311 267 292<br />
V 2 335 386 372 344 371 313 281 287 293 310 262 280<br />
V 1 19 278,2 3339 296 341 328 308 306 264 230 243 250 273 222 245<br />
V 2 306 343 336 324 299 269 236 249 256 274 229 250<br />
V 1 18 245,1 2942 255 305 289 276 263 237 192 218 225 237 184 209<br />
V 2 265 309 301 283 285 247 203 223 232 246 188 211<br />
V 1 17 209,9 2519 219 270 260 246 241 207 167 190 194 206 147 168<br />
V 2 223 271 263 247 239 204 164 187 192 208 148 176<br />
V 1 16 165,0 1980 175 233 222 201 179 156 117 147 156 171 108 132<br />
V 2 168 222 215 200 180 159 122 149 153 165 104 126<br />
V 1 15 129,3 1552 117 189 179 167 146 122 90 118 122 132 68 82<br />
V 2 127 191 185 168 146 122 88 119 125 137 74 90<br />
V 1 14 86,4 1037 95 166 153 139 108 89 59 94 98 108 50 64<br />
V 2 55 121 110 100 68 57 37 70 76 88 31 37<br />
V 1 13 71,3 855 62 134 121 104 66 53 30 62 67 84 29 40<br />
V 2 62 135 125 106 65 53 31 62 64 83 30 42<br />
V 1 12 45,5 546 33 105 94 82 37 28 18 33 38 53 15 19<br />
V 2 29 103 90 80 40 30 14 34 37 51 12 17<br />
V 1 11 23,0 276 8 71 61 48 15 11 6 10 11 21 4 6<br />
V 2 12 73 62 47 16 9 6 10 10 24 4 7<br />
V 1 10 8,3 100 2 36 28 15 4 1 1 1 1 3 1 1<br />
V 2 6 39 31 15 2 1 1 1 1 5 1 3<br />
V 1 = 1st attempt<br />
V 2 = 2nd attempt<br />
Check settings with field samples. © LEHNER
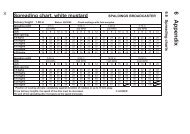
7 <strong>Appendix</strong><br />
White clover<br />
Stopwatch is activated on actuation of slide and slide closes on expiry of period!!!<br />
Time open:<br />
g/min g/min<br />
Hose number<br />
Slide Ø per hose Ø overall 1 2 3 4 5 6 7 8 9 10 11 12<br />
V 1 20 354,3 4251 369 423 411 386 373 339 311 318 319 352 302 323<br />
V 2 364 429 415 390 379 346 322 326 320 360 302 323<br />
V 1 19 310,0 3720 326 377 363 336 322 292 262 274 279 310 264 282<br />
V 2 319 380 371 346 335 304 272 282 277 321 262 283<br />
V 1 18 270,4 3245 292 342 328 303 289 260 228 238 248 270 223 246<br />
V 2 284 335 323 303 284 256 227 238 235 273 223 242<br />
V 1 17 237,4 2849 255 295 291 268 249 223 195 208 223 241 188 211<br />
V 2 253 305 289 268 253 226 195 206 220 241 189 206<br />
V 1 16 195,5 2346 210 259 244 228 195 174 152 173 183 199 154 174<br />
V 2 208 261 248 228 195 176 152 173 183 199 150 173<br />
V 1 15 153,6 1844 110 225 209 111 165 148 124 141 150 168 114 131<br />
V 2 167 222 209 185 154 134 115 140 148 163 118 136<br />
V 1 14 124,8 1498 124 190 179 94 132 117 95 112 123 132 86 101<br />
V 2 124 192 183 91 135 119 98 115 123 140 88 102<br />
V 1 13 100,7 1208 92 159 148 136 98 83 69 87 93 107 59 72<br />
V 2 92 161 151 135 102 85 69 88 92 107 59 72<br />
V 1 12 71,3 856 55 131 119 107 67 53 39 60 66 79 33 44<br />
V 2 58 133 122 105 68 55 40 60 65 79 32 42<br />
V 1 11 39,7 477 28 97 88 73 37 24 14 23 30 47 9 17<br />
V 2 28 98 85 54 32 22 14 27 29 47 11 19<br />
V 1 10 17,8 214 10 68 58 37 9 4 3 2 2 16 1 4<br />
V 2 7 66 56 39 11 6 1 7 2 16 1 2<br />
V 1 = 1st attempt<br />
V 2 = 2nd attempt<br />
Check settings with field samples. © LEHNER<br />
35
7 <strong>Appendix</strong><br />
36<br />
Stopwatch is activated on actuation of slide and slide closes on expiry of period!!!<br />
Phacelia<br />
Time open:<br />
g/min g/min<br />
Hose number<br />
Slide Ø per hose Ø overall 1 2 3 4 5 6 7 8 9 10 11 12<br />
V 1 38 510,8 6130 543 558 274 553 378 548 540 542 555 562 536 523<br />
V 2 539 555 253 558 433 547 542 538 562 554 538 528<br />
V 1 36 496,8 5962 540 549 164 549 397 552 542 537 555 549 535 528<br />
V 2 544 551 185 536 416 548 537 540 560 546 444 520<br />
V 1 34 482,8 5793 537 538 123 536 383 537 537 518 544 545 531 505<br />
V 2 531 539 135 529 553 538 363 514 538 511 504 497<br />
V 1 32 489,3 5872 437 525 517 485 512 493 483 465 490 510 475 485<br />
V 2 481 521 514 490 518 501 491 464 494 520 418 455<br />
V 1 30 391,0 4693 416 469 452 408 432 411 394 338 382 426 206 353<br />
V 2 509 470 450 391 426 400 386 313 383 414 192 364<br />
V 1 28 306,6 3679 331 409 351 319 343 329 306 241 280 332 147 275<br />
V 2 326 408 365 328 341 340 310 247 291 335 144 260<br />
V 1 26 230,7 2768 180 279 277 270 287 272 205 216 228 240 156 160<br />
V 2 189 285 280 267 279 257 206 207 212 227 181 176<br />
V 1 24 170,4 2045 168 230 220 197 202 193 177 146 165 181 129 134<br />
V 2 141 205 203 190 170 182 168 143 153 164 108 120<br />
V 1 22 113,8 1366 84 166 160 140 124 125 97 94 97 117 67 82<br />
V 2 79 166 164 137 130 137 104 94 100 116 71 81<br />
V 1 20 84,5 1014 59 130 122 109 91 100 74 73 75 86 48 55<br />
V 2 58 130 120 102 107 94 76 64 73 82 46 54<br />
V 1 18 38,4 461 25 67 59 44 43 38 31 29 37 42 16 20<br />
V 2 27 69 60 51 48 36 29 35 35 44 15 21<br />
V 1 16 31,3 376 22 62 59 50 32 22 17 26 33 38 14 18<br />
V 2 17 52 50 45 33 23 22 25 32 34 11 14<br />
V 1 14 11,9 143 8 39 34 33 13 8 7 13 2 16 4 6<br />
V 2 5 20 18 17 7 4 3 8 9 6 2 3<br />
V 1 = 1st attempt<br />
V 2 = 2nd attempt<br />
Check settings with field samples. © LEHNER
7 <strong>Appendix</strong><br />
Fodder radish<br />
Time open: Stopwatch is activated on actuation of slide and slide closes on expiry of period!!!<br />
g/min g/min<br />
Hose number<br />
Slide Ø per hose Ø overall 1 2 3 4 5 6 7 8 9 10 11 12<br />
V 1 38 830,7 9969 816 843 874 854 837 840 842 814 818 810 808 818<br />
V 2 728 850 870 862 857 848 852 818 835 807 811 825<br />
V 1 36 818,6 9824 836 805 853 833 840 833 824 800 802 798 790 804<br />
V 2 802 834 862 848 841 836 828 789 803 797 794 795<br />
V 1 34 758,7 9105 768 793 789 755 799 780 737 728 741 747 722 736<br />
V 2 769 803 801 770 792 762 766 732 739 744 724 712<br />
V 1 32 656,4 7877 694 730 709 653 696 656 610 609 645 647 637 617<br />
V 2 692 725 708 640 697 624 597 596 631 654 634 652<br />
V 1 30 529,3 6352 586 637 588 548 525 488 486 426 511 553 519 547<br />
V 2 575 621 424 562 573 515 516 414 508 514 523 545<br />
V 1 28 421,8 5062 489 547 133 447 504 448 434 339 426 449 403 448<br />
V 2 474 536 381 454 480 344 422 364 380 395 395 431<br />
V 1 26 330,5 3966 392 417 366 361 385 340 316 243 296 320 287 319<br />
V 2 373 441 396 342 363 327 308 254 235 339 277 235<br />
V 1 24 226,6 2720 248 311 271 230 291 258 266 124 196 221 166 203<br />
V 2 248 290 284 240 280 198 215 139 166 223 169 202<br />
V 1 22 134,6 1616 123 170 124 109 134 120 104 67 101 116 80 98<br />
V 2 169 216 227 160 218 158 140 81 110 161 104 141<br />
V 1 20 93,6 1123 102 169 123 97 124 93 72 44 59 88 60 78<br />
V 2 100 170 114 96 135 90 74 56 65 94 64 79<br />
V 1 18 48,7 585 47 93 71 53 67 46 38 21 26 43 31 35<br />
V 2 57 97 82 34 66 54 38 25 24 48 35 38<br />
V 1 16 20,5 246 24 50 49 10 23 7 18 7 8 25 9 20<br />
V 2 27 56 38 25 12 5 7 11 9 24 7 21<br />
V 1 14 6,7 80 6 7 14 2 3 2 3 1 13 6 27 5<br />
V 2 11 21 6 5 3 2 2 1 2 3 5 10<br />
V 1 = 1st attempt<br />
V 2 = 2nd attempt<br />
Check settings with field samples. © LEHNER<br />
37
7 <strong>Appendix</strong><br />
38<br />
Stopwatch is activated on actuation of slide and slide closes on expiry of period!!!<br />
KAS<br />
Time open:<br />
g/min g/min<br />
Hose number<br />
Slide Ø per hose Ø overall 1 2 3 4 5 6 7 8 9 10 11 12<br />
V 1 38 1545,4 18545 1473 1530 1646 1632 1642 1588 1550 1560 1552 1520 1470 1474<br />
V 2 1478 1528 1674 1626 1638 1532 1502 1514 1526 1498 1472 1464<br />
V 1 36 1503,3 18040 1458 1364 1630 1600 1640 1510 1464 1468 1508 1572 1420 1384<br />
V 2 1460 1520 1646 1594 1622 1478 1436 1458 1494 1466 1430 1458<br />
V 1 34 1409,3 16911 1388 1484 1540 1440 1548 1376 1334 1368 1376 1380 1380 1396<br />
V 2 1372 1448 1436 1446 1504 1406 1322 1364 1408 1350 1364 1392<br />
V 1 32 1143,1 13717 1220 1186 1232 1116 1286 1202 1112 1156 1162 1218 1190 1228<br />
V 2 1160 1052 1004 884 1100 1134 1082 1078 1128 1138 1152 1214<br />
V 1 30 847,8 10174 962 704 598 615 844 922 882 817 1042 1046 1046 830<br />
V 2 1016 770 622 384 902 916 733 875 958 922 954 988<br />
V 1 28 552,0 6624 718 487 419 385 616 682 458 535 216 668 666 729<br />
V 2 614 487 348 362 401 730 505 550 652 588 693 739<br />
V 1 26 341,9 4103 476 252 263 197 480 464 311 259 407 292 436 431<br />
V 2 438 308 267 262 402 433 237 88 437 315 398 353<br />
V 1 24 177,5 2130 341 64 94 133 288 192 189 132 113 185 149 326<br />
V 2 267 51 93 145 257 143 244 95 64 227 227 241<br />
V 1 22 78,9 947 150 26 33 41 60 127 46 7 11 79 135 155<br />
V 2 113 90 37 22 124 148 81 50 18 96 80 164<br />
V 1 20 16,6 199 28 5 22 1 10 25 24 4 5 0 41 36<br />
V 2 30 11 11 5 0 36 24 7 6 4 32 31<br />
V 1 18 5,0 60 15 5 0 2 4 5 6 4 6 0 11 9<br />
V 2 14 12 1 1 0 4 8 3 0 0 5 5<br />
V 1 = 1st attempt<br />
V 2 = 2nd attempt<br />
Check settings with field samples. © LEHNER
7 <strong>Appendix</strong><br />
Stopwatch is activated on actuation of slide and slide closes on expiry of period!!!<br />
White mustard<br />
Time open:<br />
g/min g/min<br />
Hose number<br />
Slide Ø per hose Ø overall 1 2 3 4 5 6 7 8 9 10 11 12<br />
V 1 38 1041,8 12501 1032 1046 1068 1068 1076 1044 1048 1020 1046 1040 1020 1018<br />
V 2 1016 1048 1062 1060 1084 1064 1036 1016 1034 1038 1008 1010<br />
V 1 36 1000,9 12011 1016 1034 1056 1040 1046 1024 1018 935 972 968 966 981<br />
V 2 1016 1028 1050 1022 1054 1028 978 938 954 970 962 966<br />
V 1 34 882,1 10586 946 938 909 816 883 917 867 848 849 887 866 852<br />
V 2 944 938 910 814 922 901 852 849 858 895 872 838<br />
V 1 32 790,3 9484 827 846 835 775 862 835 739 726 745 815 746 765<br />
V 2 820 842 833 782 809 804 736 711 755 816 773 771<br />
V 1 30 635,4 7625 682 731 702 632 742 660 599 519 531 633 604 612<br />
V 2 680 723 713 631 718 636 579 512 567 629 605 609<br />
V 1 28 528,7 6344 565 618 574 532 618 528 444 474 486 517 490 492<br />
V 2 549 604 592 534 594 512 502 474 481 528 488 492<br />
V 1 26 418,2 5019 444 506 464 434 502 410 386 328 357 442 372 388<br />
V 2 448 483 455 413 488 403 396 368 370 419 374 387<br />
V 1 24 317,8 3813 350 369 459 331 402 312 271 248 264 324 262 279<br />
V 2 354 398 348 322 402 326 280 226 252 292 267 288<br />
V 1 22 240,3 2883 260 321 277 238 310 237 214 194 191 221 184 213<br />
V 2 263 307 290 240 308 238 219 189 223 226 187 216<br />
V 1 20 168,7 2025 192 228 195 165 218 165 144 121 153 167 121 141<br />
V 2 183 245 210 164 222 170 137 118 141 180 123 146<br />
V 1 18 94,1 1130 108 171 137 121 129 99 76 72 63 121 69 85<br />
V 2 85 134 114 84 86 69 58 59 85 102 59 73<br />
V 1 16 63,1 757 61 122 92 71 68 58 43 32 52 65 36 50<br />
V 2 62 118 95 74 73 57 42 38 50 71 39 45<br />
V 1 14 22,1 265 31 67 51 37 30 23 15 13 17 34 17 22<br />
V 2 16 37 26 17 13 9 7 6 6 19 8 9<br />
V 1 12 3,4 41 8 35 18 4 5 1 1 0 0 4 1 4<br />
V 1 = 1st attempt<br />
V 2 = 2nd attempt<br />
Check settings with field samples. © LEHNER<br />
39
7 <strong>Appendix</strong><br />
Bellmix Mulchgrass 600<br />
40<br />
Stopwatch is activated on actuation of slide and slide closes on expiry of period!!!<br />
Time open:<br />
g/min g/min<br />
Hose number<br />
Slide Ø per hose Ø overall 1 2 3 4 5 6 7 8 9 10 11 12<br />
V 1 38 169,1 2030 170 167 166 161 172 164 174 171 171 166 165 160<br />
V 2 181 163 176 174 175 171 184 173 176 172 129 178<br />
V 1 36 169,0 2028 171 172 179 176 174 176 180 179 185 164 126 160<br />
V 2 174 170 182 146 163 176 179 177 175 169 131 171<br />
V 1 34 168,9 2027 172 173 174 174 161 172 177 167 177 170 136 169<br />
V 2 172 174 190 129 168 182 184 166 177 180 140 170<br />
V 1 32 152,0 1824 172 165 180 170 166 161 164 177 186 83 131 148<br />
V 2 178 69 105 169 143 155 164 168 145 156 121 171<br />
V 1 30 108,2 1299 164 8 95 111 79 128 124 94 49 154 94 154<br />
V 2 154 24 159 61 95 130 138 162 28 136 104 152<br />
V 1 28 71,3 856 84 20 117 73 4 74 77 100 29 72 67 57<br />
V 2 93 17 108 39 90 98 79 66 51 117 75 104<br />
V 1 26 40,3 484 43 12 26 30 50 48 52 20 52 51 39 45<br />
V 2 54 17 17 32 52 50 48 40 35 61 41 53<br />
V 1 24 20,5 247 27 5 23 5 29 31 27 16 9 35 25 24<br />
V 2 30 7 8 8 29 25 18 20 17 29 16 30<br />
V 1 22 10,2 122 12 4 4 2 16 15 17 7 5 13 11 14<br />
V 2 15 5 6 4 14 18 18 3 7 8 10 16<br />
V 1 20 4,8 58 8 3 1 2 4 7 7 1 3 7 6 8<br />
V 2 8 1 1 2 7 6 5 7 3 4 6 9<br />
V 1 18 2,4 29 2 2 1 1 4 1 4 2 2 1 4 6<br />
V 2 4 1 1 1 3 3 3 2 0 3 2 4<br />
V 1 16 0,9 11 0 1 1 1 2 1 2 0 0 0 1 3<br />
V 2 1 0 1 0 1 2 1 1 0 0 0 2<br />
V 1 = 1st attempt<br />
V 2 = 2nd attempt<br />
Check settings with field samples.<br />
© LEHNER<br />
The flow properties of grass seed are greatly affected by external<br />
factors such as moisture content and humidity.
7 <strong>Appendix</strong><br />
Bellmix Mulchgrass 500<br />
Time open: Stopwatch is activated on actuation of slide and slide closes on expiry of period!!!<br />
g/min g/min<br />
Hose number<br />
Slide Ø per hose Ø overall 1 2 3 4 5 6 7 8 9 10 11 12<br />
V 1 38 173,0 2076 175 174 166 157 172 165 171 176 177 180 163 170<br />
V 2 172 175 178 157 180 168 178 180 181 184 173 180<br />
V 1 36 176,2 2114 159 171 175 167 175 166 183 178 188 187 167 174<br />
V 2 175 176 184 158 180 175 190 169 187 190 173 181<br />
V 1 34 175,2 2103 177 168 182 173 148 177 196 154 191 181 177 182<br />
V 2 176 170 185 162 158 176 190 154 183 179 186 180<br />
V 1 32 166,0 1992 173 143 183 130 164 159 185 144 184 177 185 167<br />
V 2 169 145 168 132 160 174 180 156 185 177 176 168<br />
V 1 30 148,3 1779 160 154 161 107 134 166 160 135 164 173 160 156<br />
V 2 140 166 148 124 108 149 151 126 150 174 154 138<br />
V 1 28 111,5 1339 96 106 124 117 103 130 157 89 125 131 120 36<br />
V 2 75 119 129 38 158 126 135 114 144 147 112 46<br />
V 1 26 67,9 815 39 66 64 60 79 95 82 79 107 46 73 36<br />
V 2 65 45 48 87 46 103 93 109 99 8 71 30<br />
V 1 24 30,7 369 33 3 14 21 33 53 43 57 33 26 30 13<br />
V 2 36 6 19 18 58 42 58 23 51 20 34 13<br />
V 1 22 21,7 260 21 7 10 9 21 29 32 29 37 32 17 8<br />
V 2 18 2 9 9 24 36 34 32 34 33 29 8<br />
V 1 20 9,5 114 11 6 4 4 4 22 6 15 4 10 11 5<br />
V 2 14 5 4 4 8 15 23 18 5 11 11 7<br />
V 1 18 5,3 63 6 3 4 1 7 8 5 6 4 9 8 4<br />
V 2 10 2 2 2 4 7 6 4 5 5 9 5<br />
V 1 16 1,4 17 5 0 0 0 1 1 1 2 2 1 1 2<br />
V 2 2 0 1 0 2 1 2 3 1 1 3 1<br />
V 1 = 1st attempt<br />
V 2 = 2nd attempt<br />
Check settings with field samples.<br />
© LEHNER<br />
The flow properties of grass seed are greatly affected by<br />
external factors such as moisture content and humidity.<br />
41
7 <strong>Appendix</strong><br />
Bellmix Mulchgrass 300<br />
42<br />
Stopwatch is activated on actuation of slide and slide closes on expiry of period!!!<br />
Time open:<br />
g/min g/min<br />
Hose number<br />
Slide Ø per hose Ø overall 1 2 3 4 5 6 7 8 9 10 11 12<br />
V 1 38 168,0 2017 174 168 174 169 119 169 169 175 170 168 165 169<br />
V 2 172 169 172 174 139 164 179 179 168 179 174 175<br />
V 1 36 176,8 2122 180 184 182 187 137 168 177 185 180 182 176 180<br />
V 2 177 174 171 168 181 178 181 183 181 176 180 176<br />
V 1 34 178,8 2145 177 174 171 168 181 178 185 176 181 176 180 176<br />
V 2 190 174 173 177 180 181 187 178 190 180 179 178<br />
V 1 32 174,1 2089 174 183 177 169 158 173 176 181 172 186 177 173<br />
V 2 167 181 179 162 174 171 174 168 182 174 185 162<br />
V 1 30 155,2 1862 168 172 163 117 156 160 164 161 153 174 171 163<br />
V 2 148 190 60 84 162 161 161 167 179 173 169 148<br />
V 1 28 94,0 1128 91 38 23 107 113 112 118 143 127 118 107 87<br />
V 2 115 92 58 106 115 86 104 46 154 8 77 111<br />
V 1 26 49,8 597 47 43 26 45 27 74 51 75 105 3 49 50<br />
V 2 52 16 21 15 41 64 72 69 111 21 61 56<br />
V 1 24 18,0 216 12 3 9 3 7 18 27 6 9 19 23 19<br />
V 2 27 8 8 4 13 33 35 31 29 32 26 31<br />
V 1 22 8,7 105 8 4 4 3 13 12 14 15 10 11 16 15<br />
V 2 5 3 1 2 9 4 11 7 14 4 13 11<br />
V 1 20 6,3 76 3 1 1 1 11 8 10 6 11 2 9 9<br />
V 2 4 2 1 2 11 9 9 9 9 9 8 7<br />
V 1 18 2,3 28 1 0 1 0 3 4 5 2 5 2 2 3<br />
V 2 0 0 1 0 3 5 5 2 3 3 2 4<br />
V 1 = 1st attempt<br />
V 2 = 2nd attempt<br />
Check settings with field samples.<br />
© LEHNER<br />
The flow properties of grass seed are greatly affected by<br />
external factors such as moisture content and humidity.
7 <strong>Appendix</strong><br />
7.6 Slide settings<br />
Version with 12 hoses<br />
Number of opened hoses in position A: 12 (Exception: slide 81035)<br />
Slide number<br />
Opened hose<br />
Number of opened<br />
hoses in position B:<br />
1 2 3 4 5 6 7 8 9 10 11 12<br />
2 81006<br />
4 81003<br />
6 80986<br />
6 81007<br />
6 81008<br />
6<br />
81035<br />
Position A: 6<br />
8 80987<br />
10 81001<br />
= Hose opened<br />
43
7 <strong>Appendix</strong><br />
Version with 6 hoses<br />
44<br />
Number of opened hoses in position A: 6<br />
Slide number<br />
Opened hose<br />
Number of opened p<br />
hoses in position B:<br />
1 2 3 4 5 6<br />
2 81004<br />
4 80955<br />
= Hose opened
<strong>Lehner</strong> <strong>Agrar</strong> <strong>GmbH</strong><br />
Häuslesäcker 5-9<br />
D-89198 Westerstetten<br />
Tel.: (+49) 07348 95 96 0<br />
Fax: (+49) 07348 95 96 40<br />
www.lehner.eu<br />
info@lehner.eu<br />
English