Download Little Genius Plus - LCD Programming Guide
Download Little Genius Plus - LCD Programming Guide
Download Little Genius Plus - LCD Programming Guide

Create successful ePaper yourself
Turn your PDF publications into a flip-book with our unique Google optimized e-Paper software.
HO & Unit-I: #764, 4th Phase 707, Yelahanka New Town, Bangalore - 560 064.<br />
Ph : +91 80 32904489 / 28461777 TeleFax : +91 80 41272461<br />
E-mail: contactblr@elmeasure.com<br />
Unit-II: Gautham Garden, # 4 Veerapandi,Coimbatore - 641 019<br />
Ph : +91 422 2697200. TeleFax : +91 422 2695200 E-mail: contactcbe@elmeasure.com<br />
Unit-III: Plot No.: 323/19, Camp Road, Selaqi, Dehradun, UTTARANCHAL-248 197<br />
Ph: + 91 97600 02492 / 12492 E-mail: contactddn@elmeasure.com<br />
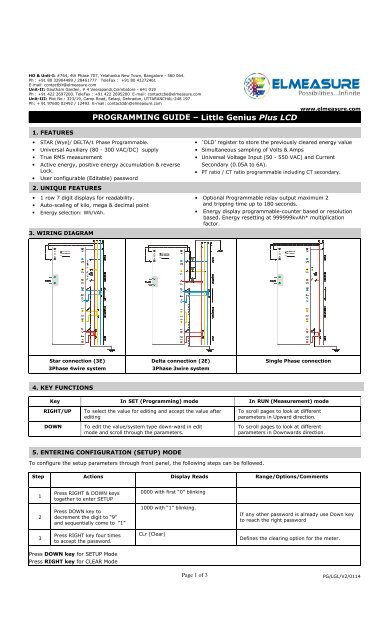
PROGRAMMING GUIDE – <strong>Little</strong> <strong>Genius</strong> <strong>Plus</strong> <strong>LCD</strong><br />
www.elmeasure.com<br />
1. FEATURES<br />
• STAR (Wye)/ DELTA/1 Phase Programmable.<br />
• Universal Auxiliary (80 - 300 VAC/DC) supply<br />
• True RMS measurement<br />
• Active energy, positive energy accumulation & reverse<br />
Lock.<br />
• User configurable (Editable) password<br />
• ‘OLD’ register to store the previously cleared energy value<br />
• Simultaneous sampling of Volts & Amps<br />
• Universal Voltage Input (50 - 550 VAC) and Current<br />
Secondary (0.05A to 6A).<br />
• PT ratio / CT ratio programmable including CT secondary.<br />
2. UNIQUE FEATURES<br />
• 1 row 7 digit displays for readability.<br />
• Auto-scaling of kilo, mega & decimal point<br />
• Energy selection: Wh/VAh.<br />
• Optional Programmable relay output maximum 2<br />
and tripping time up to 180 seconds.<br />
• Energy display programmable-counter based or resolution<br />
based. Energy resetting at 999999kvAh* multiplication<br />
factor.<br />
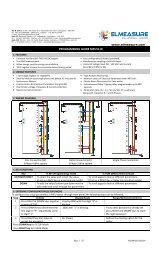
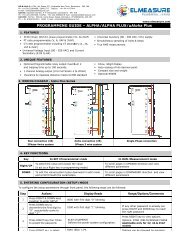
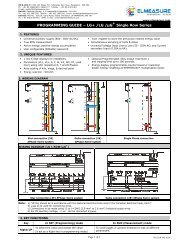
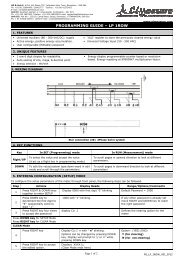
3. WIRING DIAGRAM<br />
Star connection (3E)<br />
3Phase 4wire system<br />
Delta connection (2E)<br />
3Phase 3wire system<br />
Single Phase connection<br />
4. KEY FUNCTIONS<br />
Key In SET (<strong>Programming</strong>) mode In RUN (Measurement) mode<br />
RIGHT/UP<br />
DOWN<br />
To select the value for editing and accept the value after<br />
editing<br />
To edit the value/system type down-ward in edit<br />
mode and scroll through the parameters.<br />
To scroll pages to look at different<br />
parameters in Upward direction.<br />
To scroll pages to look at different<br />
parameters in Downwards direction.<br />
5. ENTERING CONFIGURATION (SETUP) MODE<br />
To configure the setup parameters through front panel, the following steps can be followed.<br />
Step Actions Display Reads Range/Options/Comments<br />
1<br />
Press RIGHT & DOWN keys<br />
together to enter SETUP<br />
0000 with first “0” blinking<br />
2<br />
Press DOWN key to<br />
decrement the digit to “9”<br />
and sequentially come to “1”<br />
1000 with “1” blinking.<br />
If any other password is already use Down key<br />
to reach the right password<br />
3<br />
Press RIGHT key four times<br />
to accept the password.<br />
CLr (Clear)<br />
Defines the clearing option for the meter.<br />
Press DOWN key for SETUP Mode<br />
Press RIGHT key for CLEAR Mode<br />
Page 1 of 3<br />
PG/LGL/V2/0114
CLEAR Mode<br />
4<br />
Press RIGHT key Display CLr “ n”<br />
Options can be changed by pressing<br />
DOWN key. Display will prompt to ‘y’<br />
or ‘n’ while pressing DOWN key.<br />
Option : (YES) /(NO)<br />
Y (for clearing )<br />
N (for not clearing)<br />
5<br />
Press RIGHT key<br />
To accept the edited option.<br />
Displays LL XXXX<br />
(Clear Mode ends here)<br />
SETUP Mode<br />
6 Press DOWN key<br />
EL StAr<br />
Defines the power system configuration.<br />
Displays the previously set configuration.<br />
7<br />
Press RIGHT key to select the<br />
configuration options<br />
EL “StAr “ blinking<br />
Options: STAR /DELTA/1.Ph with selected<br />
mode blinking<br />
8 Press DOWN key<br />
EL StAr/dELt/1.Ph<br />
Use DOWN KEY to select<br />
9<br />
Press RIGHT key to accept<br />
STAR/DELTA/1. PHASE<br />
EL StAr<br />
selected mode stops blinking<br />
10<br />
Press DOWN key to navigate<br />
to next parameter<br />
P.P XXXX (415.0 -default/factory<br />
set) (PT Primary)<br />
PT Primary value<br />
11<br />
Press RIGHT key to select the<br />
PT primary value for editing<br />
P.P XXXX with Fourth digit<br />
blinking. Can be edited using<br />
DOWN key.<br />
12<br />
Press RIGHT key to accept the<br />
edited value for Fourth digit.<br />
P.P XXXX Fifth digit blinking.<br />
Can be edited using DOWN key.<br />
Press RIGHT key to accept the edited<br />
value. Continue the same method till<br />
seventh digit.<br />
Program Range for PT Primary : 100V to<br />
999kV. If value set is above the limit, display<br />
returns to the maximum PT Pri value<br />
13 Press RIGHT key<br />
14<br />
Press DOWN key to go to the<br />
next parameter.<br />
P.P XXXX Decimal point blinking.<br />
Can be set at appropriate location<br />
using DOWN key. Ascertain the<br />
correct scale (Kilo/Mega) is<br />
selected. Kilo/Mega is placed on the<br />
right hand side of the display by<br />
Letter K/M. Press RIGHT key to<br />
accept the edited value.<br />
P.S XXXX (415.0 -default/factory<br />
set) (PT Secondary).Follow steps 11<br />
to 13 to change the setting.<br />
Eg: To set 11.00kV<br />
Set first four digits (1100) as explained<br />
above keep pressing DOWN key to place<br />
decimal point at appropriate location. USE<br />
DOWN KEY. Letter K/M will indicate the<br />
Kilo/Mega.<br />
Range: 50V to 550V<br />
If value set is above the limit, display<br />
returns to the maximum PT sec value.<br />
15 Press DOWN key<br />
16 Press DOWN key<br />
17 Press DOWN key<br />
18 Press DOWN key<br />
19 Press Down key<br />
C.P XXXX (5.000-default/factory<br />
set) (CT Primary). Follow steps 11 to<br />
13 to change the settings.<br />
C.S XXXX (5.000 -default/factory<br />
set) (CT Secondary). Follow steps<br />
11 to 13 to change the settings.<br />
rE no<br />
(Reverse lock)<br />
VA. Arth<br />
(Method of VA Selection).<br />
d1. dSbL<br />
(digital Output 1)<br />
Program Range for CT Primary<br />
0.5A to 99kA<br />
CT Secondary Range: 0.5A to 6A<br />
Option : NO/YES. Reverse lock if yes, blocks<br />
energy accumulation in case the CT polarity is<br />
reverse.<br />
Arithmetic (Arth), Vector harmonics (UEC.H).<br />
Vector (UECt).Can be edited using<br />
RIGHT/DOWN key.<br />
1 st digital output parameter can be selected<br />
using DOWN key. OPTION: Disable, Single<br />
Phase, Over V/A/F/Watts/Wh ,Under V/A/F/PF<br />
20 Press Down key<br />
21 Press Down key<br />
22 Press DOWN key<br />
23 Press DOWN key<br />
24 Press DOWN key<br />
d1. 1000. 1 st digital output threshold value<br />
Range :0.001 to 999.9M<br />
d2. dSbL<br />
(digital Output 2)<br />
2 nd digital output parameter can be selected<br />
using DOWN key. OPTION: Disable, Single<br />
Phase, Over V/A/F/Watts/Wh ,Under V/A/F/PF<br />
d2. 1000 2 nd digital output threshold value<br />
Range :0.001 to 999.9M<br />
dd 3.000 (digital output trip delay<br />
time, default /factory set :3.000<br />
bA xxxx (baud rate)<br />
(9600 default /factory set)<br />
Range: 1 to 180 seconds<br />
Defines the baud rate communication speed.<br />
Option :2400,4800,9600,19.20k<br />
Page 2 of 3<br />
PG/LGL/V2/0114
25 Press DOWN key<br />
26 Press DOWN key<br />
27 Press DOWN key<br />
28<br />
Press RIGHT key to view<br />
the password<br />
29 Press DOWN key<br />
Pr EUEn (Parity)<br />
dU. 1.000 (device ID)<br />
PW ---- (Password user definable).<br />
CAUTION: memorize the Password.<br />
Use the same Password for next<br />
time. Instruments will reject other<br />
Passwords.<br />
1000<br />
En rESL<br />
30 Press DOWN key PO 250.0 (Pulse output On time)<br />
EUEn (even)/odd(odd)/no(no parity)<br />
Internal communication error check<br />
Defines the (ID) communications<br />
identification number.1 to 247 Follow<br />
steps 11 to 13 to change the value.<br />
Range: 1000-9999.<br />
CAUTION: Password can be reset only at the<br />
factory.<br />
CAUTION: Password can be reset only at the<br />
factory. Follow steps 11 to 13 to change the<br />
settings.<br />
Energy value format i.e., the energy<br />
accumulated in the meter to be displayed in<br />
Resolution (default) or Counter format.<br />
Options can be changed using RIGHT & DOWN<br />
keys.<br />
Range:50 CAUTION: to In 500ms counter mode energy<br />
Can be set using RIGHT & DOWN keys as in<br />
step Repeat steps 11 to 13 to change the settings.<br />
31 Press DOWN key E.S Wh. Energy Selection. Option : Wh/VAh<br />
32 Press DOWN key S A V E “Y” blinking.<br />
If “n”(no) is selected then Meter enters into<br />
RUN mode without affecting any edited Values<br />
in the setup<br />
Once the required parameter is programmed press the DOWN key continuously till it reaches SAVE page directly.<br />
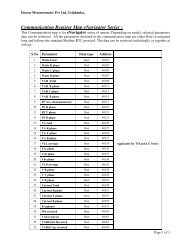
6 The List of parameters that can be configured and the range is given below<br />
Sl.No. Parameter<br />
Default setup<br />
Range<br />
1 Connection mode(EL) STAR STAR/ DELTA/ 1.Phase<br />
2 PT Primary (P.P) 415.0 100V- 999kV<br />
3 PT Secondary (P.S) 415.0 50V - 550V<br />
4 CT Primary (C.P) 5.000 0.5A - 99kA<br />
5 CT Secondary (C.S) 5.000 0.5A - 6A<br />
6 Reverse Lock (rE) no Yes/no<br />
7 VA selection (UA) Arth Arth (Arithmetic)<br />
8 Digital Output 1 (d1) dSbL<br />
/UECt(Vector)/UEC.H Disable, Single Phase, (vector Over V/A/F/Watts/Wh,<br />
Under V/A/F/PF.<br />
9 Digital Output 1 threshold value (d1). 1000 0.001 to 999.9M<br />
10 Digital Output 2 (d2). dSbL<br />
Disable, Single Phase, Over V/A/F/Watts/Wh,<br />
Under V/A/F/PF.<br />
11 Digital Output 2 threshold value (d2). 1000 0.001 to 999.9M<br />
12 Baud rate (bA) 9600 2400 to 19.2k<br />
13 Parity (Pr) Even Even/ Odd/ no<br />
14 Device Id (dU) 1.000 1.000 to 247.0<br />
15 Reverse lock(rE) no Yes/no<br />
16 Password (PW) 1000 1000 to 9999<br />
17 Energy (En) rESL rESL /COUΠ<br />
18 POP ON time (PO) 250.0 50 to 500 milliseconds<br />
19 Energy Selection (E.S) Wh. Wh/VAh<br />
7. Enabling and disabling of Auto scrolling:<br />
Enabling auto scrolling: Press UP key continuously for 5 seconds or until display shows EnbL Au. for upward scrolling. Press<br />
Down key continuously for 5 seconds or until display shows EnbL Au. for downward scrolling.<br />
Disabling auto scrolling: Press any key (UP/DOWN), display shows dSbL Au. and returns to normal mode.<br />
Page 3 of 3<br />
PG/LGL/V2/0114