MTS00216 EF mit TS 51,61.cdr - ECO-Schulte
MTS00216 EF mit TS 51,61.cdr - ECO-Schulte
MTS00216 EF mit TS 51,61.cdr - ECO-Schulte

You also want an ePaper? Increase the reach of your titles
YUMPU automatically turns print PDFs into web optimized ePapers that Google loves.
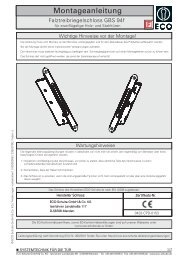
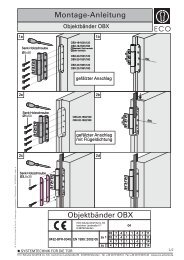
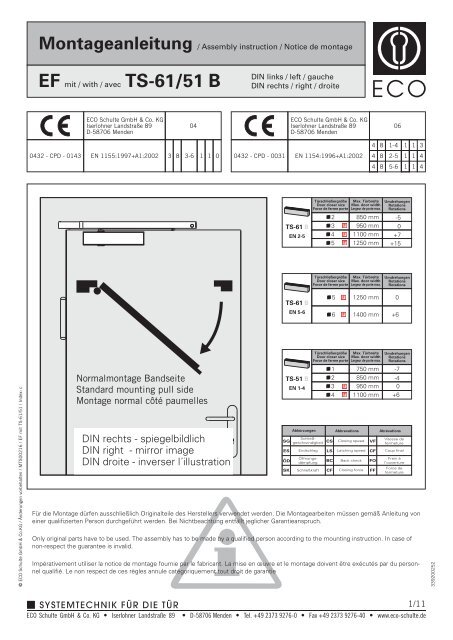
Montageanleitung / Assembly instruction / Notice de montage<br />
<strong>EF</strong> <strong>mit</strong> / with / avec <strong>TS</strong>-61/<strong>51</strong> B<br />
DIN links / left / gauche<br />
DIN rechts / right / droite<br />
<strong>ECO</strong> <strong>Schulte</strong> GmbH & Co. KG<br />
Iserlohner Landstraße 89<br />
D-58706 Menden<br />
04<br />
<strong>ECO</strong> <strong>Schulte</strong> GmbH & Co. KG<br />
Iserlohner Landstraße 89<br />
D-58706 Menden<br />
06<br />
0432 - CPD - 0143 EN 1155:1997+A1:2002 3 8 3-6 1 1 0<br />
0432 - CPD - 0031 EN 1154:1996+A1:2002 4 8 2-5 1 1 4<br />
4<br />
4<br />
8 1-4 1 1 3<br />
8<br />
5-6 1 1 4<br />
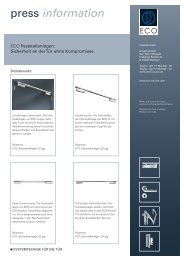
<strong>TS</strong>-61 B<br />
EN 2-5<br />
Türschließergröße Max. Türbreite<br />
Door closer size Max. door width<br />
Force de ferme porte Largeur de porte max.<br />
Umdrehungen<br />
Rotations<br />
Rotations<br />
2 850 mm -5<br />
3 950 mm 0<br />
4 1100 mm +7<br />
5 1250 mm +15<br />
Türschließergröße Max. Türbreite<br />
Door closer size Max. door width<br />
Force de ferme porte Largeur de porte max.<br />
Umdrehungen<br />
Rotations<br />
Rotations<br />
<strong>TS</strong>-61 B<br />
5<br />
1250 mm<br />
0<br />
EN 5-6<br />
6<br />
1400 mm<br />
+6<br />
© <strong>ECO</strong> <strong>Schulte</strong> GmbH & Co.KG / Änderungen vorbehalten / <strong>M<strong>TS</strong>00216</strong> / <strong>EF</strong> <strong>mit</strong> <strong>TS</strong>-61/<strong>51</strong> / Index: c<br />
DIN rechts - spiegelbildlich<br />
DIN right - mirror image<br />
DIN droite - inverser l´illustration<br />
<strong>TS</strong>-<strong>51</strong> B<br />
Abkürzungen<br />
Schließgeschwindigkeit<br />
SG<br />
ES<br />
ÖD<br />
SK<br />
EN 1-4<br />
Endschlag<br />
Öffnungsdämpfung<br />
Schließkraft<br />
Türschließergröße Max. Türbreite<br />
Door closer size Max. door width<br />
Force de ferme porte Largeur de porte max.<br />
CS<br />
LS<br />
BC<br />
CF<br />
1 750 mm -7<br />
2<br />
3<br />
4<br />
Abbrevations<br />
850 mm -4<br />
950 mm 0<br />
1100 mm +6<br />
Closing speed<br />
Latching speed<br />
Back check<br />
Closing force<br />
VF<br />
CF<br />
FO<br />
FF<br />
Umdrehungen<br />
Rotations<br />
Rotations<br />
Abrévations<br />
Vitesse de<br />
fermeture<br />
Coup final<br />
Frein á<br />
l’ouverture<br />
Force de<br />
fermeture<br />
Für die Montage dürfen ausschließlich Originalteile des Herstellers verwendet werden. Die Montagearbeiten müssen gemäß Anleitung von<br />
einer qualifizierten Person durchgeführt werden. Bei Nichtbeachtung entfällt jeglicher Garantieanspruch.<br />
Only original parts have to be used. The assembly has to be made by a qualified person according to the mounting instruction. In case of<br />
non-respect the guarantee is invalid.<br />
Impérativement utiliser la notice de montage fournie par le fabricant. La mise en œuvre et le montage doivent être exécutés par du personnel<br />
qualifié. Le non respect de ces règles annule catégoriquement tout droit de garantie<br />
339200252<br />
<strong>ECO</strong> <strong>Schulte</strong> GmbH & Co. KG Iserlohner Landstraße 89 D-58706 Menden Tel. +49 2373 9276-0 Fax +49 2373 9276-40<br />
1/11<br />
www.eco-schulte.de
Montageanleitung / Assembly instruction / Notice de montage<br />
<strong>EF</strong> <strong>mit</strong> / with / avec <strong>TS</strong>-61/<strong>51</strong> B<br />
DIN links / left / gauche<br />
DIN rechts / right / droite<br />
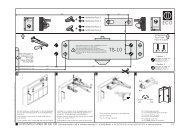
1 2<br />
24V DC<br />
+15%/-10%<br />
Ø12<br />
37<br />
3<br />
3a<br />
3b<br />
(optional, optional, optionnelle)<br />
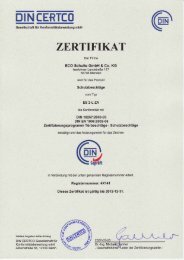
Direktmontage (ohne Unterprofil)<br />
Direct mounting (without underprofile)<br />
Montage direct (sans sous profil)<br />
Montage <strong>mit</strong> Standardprofil 20mm (Lochgruppe 120/428,5mm)<br />
Mounting with standardprofile 20mm (hole group 120/428,5mm)<br />
Montage avec profil standard 20mm (group de trous 120/428,5mm)<br />
3c<br />
4 M6<br />
(optional, optional, optionnelle)<br />
Montage <strong>mit</strong> Adaptionsprofil 30mm (Lochgruppe 120/428,5mm)<br />
Mounting with adaptor plate 30mm (hole group 120/428,5mm)<br />
Montage avec profil d’adaptation 30mm (group de trous 120/428,5mm)<br />
<strong>ECO</strong> <strong>Schulte</strong> GmbH & Co. KG Iserlohner Landstraße 89 D-58706 Menden Tel. +49 2373 9276-0 Fax +49 2373 9276-40<br />
2/11<br />
www.eco-schulte.de
Montageanleitung / Assembly instruction / Notice de montage<br />
<strong>EF</strong> <strong>mit</strong> / with / avec <strong>TS</strong>-61/<strong>51</strong> B<br />
DIN links / left / gauche<br />
DIN rechts / right / droite<br />
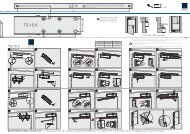
5<br />
6<br />
7 8<br />
2 3<br />
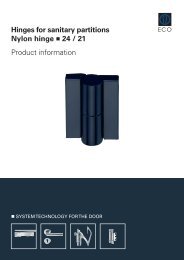
<strong>TS</strong>-<strong>51</strong> EN 1-4<br />
<strong>TS</strong>-61 EN 2-5<br />
<strong>TS</strong>-61 EN 5-6<br />
SK/<br />
CF/<br />
FF<br />
1<br />
2<br />
3<br />
+<br />
1 4<br />
3<br />
+<br />
2 5<br />
5<br />
+<br />
5 6<br />
EN<br />
1<br />
2<br />
3<br />
4<br />
mm<br />
750<br />
850<br />
950<br />
1100<br />
+<br />
-7<br />
-4<br />
0<br />
+6<br />
EN<br />
2<br />
3<br />
4<br />
5<br />
mm<br />
850<br />
950<br />
1100<br />
+<br />
-5<br />
0<br />
+7<br />
1250 +15<br />
EN<br />
mm<br />
5 1250<br />
6 1400<br />
0<br />
+6<br />
+<br />
9 10<br />
1 2 3<br />
1 2 3<br />
SG/<br />
CS/<br />
CF<br />
<strong>TS</strong>-<strong>51</strong> B<br />
<strong>TS</strong>-61 B<br />
180°-0°<br />
ES/<br />
LS/<br />
VF<br />
10°-0°<br />
<strong>ECO</strong> <strong>Schulte</strong> GmbH & Co. KG Iserlohner Landstraße 89 D-58706 Menden Tel. +49 2373 9276-0 Fax +49 2373 9276-40<br />
3/11<br />
www.eco-schulte.de
Montageanleitung / Assembly instruction / Notice de montage<br />
<strong>EF</strong> <strong>mit</strong> / with / avec <strong>TS</strong>-61/<strong>51</strong> B<br />
DIN links / left / gauche<br />
DIN rechts / right / droite<br />
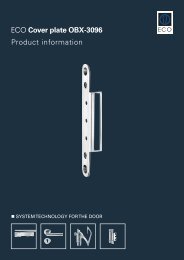
11 12<br />
1 2 3<br />
ÖD/<br />
BC/<br />
FO<br />
>70°<br />
13 14<br />
15<br />
16<br />
Elektrischer Anschluss<br />
Electrical connection<br />
Connexion électrique<br />
24 V DC<br />
+15%/-10%<br />
3<br />
2<br />
1<br />
<strong>ECO</strong> <strong>Schulte</strong> GmbH & Co. KG Iserlohner Landstraße 89 D-58706 Menden Tel. +49 2373 9276-0 Fax +49 2373 9276-40<br />
4/11<br />
www.eco-schulte.de
Montageanleitung / Assembly instruction / Notice de montage<br />
<strong>EF</strong> <strong>mit</strong> / with / avec <strong>TS</strong>-61/<strong>51</strong> B<br />
DIN links / left / gauche<br />
DIN rechts / right / droite<br />
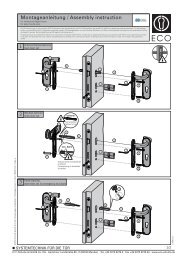
17 18<br />
1<br />
2<br />
1 2<br />
19<br />
1<br />
SW 2, 5<br />
1<br />
Funktionsprüfung <strong>EF</strong><br />
Functional test <strong>EF</strong><br />
Test fonctionnel <strong>EF</strong><br />
130°<br />
70°<br />
130° 90° 90° 70°<br />
<strong>ECO</strong> <strong>Schulte</strong> GmbH & Co. KG Iserlohner Landstraße 89 D-58706 Menden Tel. +49 2373 9276-0 Fax +49 2373 9276-40<br />
5/11<br />
www.eco-schulte.de
Montageanleitung / Assembly instruction / Notice de montage<br />
<strong>EF</strong> <strong>mit</strong> / with / avec <strong>TS</strong>-61/<strong>51</strong> B<br />
DIN links / left / gauche<br />
DIN rechts / right / droite<br />
Im Folgenden wird die Montage für Gangflügel links gezeigt. Bei Gangflügel rechts bitte entsprechend spiegelbildlich vorgehen.<br />
1<br />
2<br />
3a<br />
3b<br />
3c<br />
4<br />
5<br />
6<br />
7<br />
8<br />
9<br />
Bohrschablone anlegen und je nach Anbauvariante (Direktmontage, Montage <strong>mit</strong> Standardprofil oder Montage<br />
<strong>mit</strong> Adaptionsprofil) Bohrlochgruppe wählen und Locher bohren.<br />
Montageplatte und Türschließer anschrauben. Bohrloch nach Skizze (empfohlene Maße) für den elektrischen<br />
Anschluss bohren.<br />
Direktmontage<br />
Montage <strong>mit</strong> Standardprofil<br />
Standardprofil (optional) anschrauben.<br />
Montage <strong>mit</strong> Adaptionsprofil<br />
Adaptionsprofil (optional) anschrauben.<br />
Hebelarm an den Türschließer anschrauben.<br />
Gleitschiene an die Tür, das Standard - oder Adaptionsprofil schrauben.<br />
Kunststoff-Clip aufsetzten.<br />
Schließgeschwindigkeitsventil schließen 1. Die Hebelarme Richtung Gleitschiene führen 2 und <strong>mit</strong> den<br />
Gleitschienen verbinden 3 . Schließgeschwindigkeitsventil wieder öffnen, Tür schließen.<br />
Schließkraft einstellen.<br />
Schließgeschwindigkeit einstellen.<br />
10<br />
11<br />
Endschlag einstellen.<br />
Öffnungsdämpfung einstellen.<br />
12<br />
Ritzelabdeckung aufklippen<br />
13<br />
U-Cover aufklippen<br />
14<br />
Gleitschiene <strong>mit</strong> Türschließer fertig montiert.<br />
15<br />
Elektrischer Anschluss: 24V DC, +15% / -10%<br />
Verschraubungen der Stromversorgungsabdeckung lösen 1 . Kunststoff - Clip 2 und Abdeckung 3 entfernen.<br />
16 Stromzufuhr anschließen.<br />
<strong>ECO</strong> <strong>Schulte</strong> GmbH & Co. KG Iserlohner Landstraße 89 D-58706 Menden Tel. +49 2373 9276-0 Fax +49 2373 9276-40<br />
6/11<br />
www.eco-schulte.de
Montageanleitung / Assembly instruction / Notice de montage<br />
<strong>EF</strong> <strong>mit</strong> / with / avec <strong>TS</strong>-61/<strong>51</strong> B<br />
DIN links / left / gauche<br />
DIN rechts / right / droite<br />
17<br />
18<br />
19<br />
Abdeckung 1 und Kunstoff-Clip 2 einsetzen.<br />
Abdeckungen ausrichten und fixieren 1 . Schraublochabdeckung in die Gleitschiene klippen 2 .<br />
Die Feststellanlage ist für einen Türöffnungswinkel von 90° vormontiert. Der Öffnungswinkel lässt sich durch<br />
Verschieben der Feststelleinheit in Richtung Tür<strong>mit</strong>te bis auf 70° und Richtung Türbänder bis auf 130°<br />
verstellen. Hierzu wird die Tür auf den gewünschten Feststellwinkel geöffnet und festgesetzt. Zum Verschieben<br />
der Feststelleinheit muss die Klemmschraube 1 gelöst werden. Die Feststelleinheit dann auf Anschlag an das<br />
Gleitstück schieben und Klemmschraube 1 anziehen. Beim max. Türöffnungswinkel kleiner 90° kann das<br />
Gleitstück die Klemmschraube verdecken. In diesem Falle muss die Feststelleinheit vor dem Öffnen und<br />
Festsetzen der Tür auf Anschlag in Richtung Tür<strong>mit</strong>te nach Lösen der Klemmschraube verschoben werden.<br />
Klemmschraube wieder festziehen und wie vorher beschrieben den gewünschten Feststellwinkel einstellen.<br />
Funktionsprüfung der Feststellung durchführen!<br />
<strong>ECO</strong> <strong>Schulte</strong> GmbH & Co. KG Iserlohner Landstraße 89 D-58706 Menden Tel. +49 2373 9276-0 Fax +49 2373 9276-40<br />
7/11<br />
www.eco-schulte.de
Montageanleitung / Assembly instruction / Notice de montage<br />
<strong>EF</strong> <strong>mit</strong> / with / avec <strong>TS</strong>-61/<strong>51</strong> B<br />
DIN links / left / gauche<br />
DIN rechts / right / droite<br />
Assembly for active leaves on the left is described below. For active leaves on the right, please proceed accordingly.<br />
1<br />
2<br />
3a<br />
3b<br />
3c<br />
4<br />
5<br />
6<br />
7<br />
8<br />
9<br />
Attach drilling template and choose corresponding drill holes depending on mounting situation (direct mounting,<br />
mounting with standard profile or mounting with adaptor plate). Drill holes.<br />
Screw on mounting plate and door closer. Drill holes for electric connection acc. to drawing (recommended<br />
dimensions).<br />
Direct mounting<br />
Mounting with standard profile<br />
Mount the standard profile (as option).<br />
Mounting with adaptor plate<br />
Mount the adaptor plate (as option).<br />
Connect arm to door closer.<br />
Screw slide rail onto mounting plates.<br />
Attach nylon clips.<br />
Close the valves for closing speed 1 . Move the arm into the direction of the slide rail 2 and connect it to the<br />
slide rail 3 . Open the speed valve. Close the door.<br />
Adjust closing force.<br />
Adjust closing speed.<br />
10<br />
Adjust latching speed.<br />
11<br />
Adjust back-check.<br />
12<br />
Clip on pinion covers.<br />
13<br />
14<br />
15<br />
16<br />
Clip on U-Cover.<br />
Slide rail and door closer mounted.<br />
Electrical connection: 24V DC, +15% / -10%<br />
Loosen screws of the power supply unit 1 . Remove nylon clips 2 and covers 3 .<br />
Connect power.<br />
<strong>ECO</strong> <strong>Schulte</strong> GmbH & Co. KG Iserlohner Landstraße 89 D-58706 Menden Tel. +49 2373 9276-0 Fax +49 2373 9276-40<br />
8/11<br />
www.eco-schulte.de
Montageanleitung / Assembly instruction / Notice de montage<br />
<strong>EF</strong> <strong>mit</strong> / with / avec <strong>TS</strong>-61/<strong>51</strong> B<br />
DIN links / left / gauche<br />
DIN rechts / right / droite<br />
17<br />
18<br />
19<br />
Attach covers 1 and nylon clips 2 .<br />
Adjust and fix covers 1 . Attach covers for drill holes in slide rail 2 .<br />
The slide rail with hold-open function is premounted for a door opening angle of 90°. The open angle can be<br />
changed up to 70° by moving the hold open unit in the direction of the door middle. It can also be changed up to<br />
130° by moving the hold open unit in the direction of the door hinges. This is achieved by opening the door until<br />
the requested opening angle is achieved and fixing it in this position. In order to move the hold open unit, you<br />
have to loosen the fixing screw 1 . Move the hold-open unit till dead stop of the sliding block and tighten the<br />
fixing screw 1 . In case the max. door opening angle is smaller than 90°, the sliding block might cover the fixing<br />
screw. In this case, the hold-open unit has to be moved till dead stop in direction of door middle after fixing<br />
screw has been loosened. This has to be done before the door is opened and fixed in wished position. Tighten<br />
fixing screw and adjust (as described above) the requested hold-open angle.<br />
Carry out a functionality test of hold-open function.<br />
<strong>ECO</strong> <strong>Schulte</strong> GmbH & Co. KG Iserlohner Landstraße 89 D-58706 Menden Tel. +49 2373 9276-0 Fax +49 2373 9276-40<br />
9/11<br />
www.eco-schulte.de
Montageanleitung / Assembly instruction / Notice de montage<br />
<strong>EF</strong> <strong>mit</strong> / with / avec <strong>TS</strong>-61/<strong>51</strong> B<br />
DIN links / left / gauche<br />
DIN rechts / right / droite<br />
Ci-dessous le montage pour vantail principal gauche. Pour le montage à droite veuillez procéder en conséquence.<br />
1<br />
2<br />
3a<br />
3b<br />
3c<br />
4<br />
5<br />
6<br />
7<br />
8<br />
9<br />
Positionner le gabarit de perçage et selon le cas de configuration (montage direct, montage avec profile standard<br />
ou avec profil d’adaptation) choisir les trous adaptés puis perçer.<br />
Screw on mounting plate and door closer. Drill holes for electric connection acc. to drawing (recommended<br />
dimensions).<br />
Montage direct<br />
Montage avec profil standard<br />
Fixer le profil standard (en option).<br />
Montage avec profil d’adaptation<br />
Fixer le profil d´adaption (en option).<br />
Fixer le bras au ferme-portes<br />
Fixer la coulisse sur la plaque de montage.<br />
Fixer le clips en plastique.<br />
Fermer la valve du réglage de la vitesse 1 . Positionner le bras jusqu’au patin de la glissière puis visser le bras au<br />
patin 2 - 3 .<br />
Ajuster la force.<br />
Ajuster la vitesse de fermeture.<br />
10<br />
Ajuster l’à-coup final.<br />
11<br />
Ajuster le frein à l‘ouverture.<br />
12<br />
Clipser le cache de l‘axe.<br />
13<br />
Clipser le capot U en inox.<br />
14<br />
15<br />
16<br />
Monter la glissière et le ferme-portes.<br />
Raccordement électrique: 24V DC, +15% / -10%<br />
Devisser le capot du raccordement électrique 1 . Enlever les clips plastique ainsi que le cache 2 - 3 .<br />
Raccorder l‘alimentation.<br />
<strong>ECO</strong> <strong>Schulte</strong> GmbH & Co. KG Iserlohner Landstraße 89 D-58706 Menden Tel. +49 2373 9276-0 Fax +49 2373 9276-40<br />
10/11<br />
www.eco-schulte.de
Montageanleitung / Assembly instruction / Notice de montage<br />
<strong>EF</strong> <strong>mit</strong> / with / avec <strong>TS</strong>-61/<strong>51</strong> B<br />
DIN links / left / gauche<br />
DIN rechts / right / droite<br />
17<br />
18<br />
19<br />
Clipser le capot ainsi que les clips plastique 1 - 2 .<br />
Positionner le capot et le fixer 1 . Clipser les caches-vis de la glissière 2 .<br />
Le sélecteur de fermeture est pré-disposé pour un angle d’ouverture de 90°. Cet angle peut être modifié en<br />
dévissant les vis pointeaux et en déplacant l’arrêt de 70 à 130°. De cette façon la porte peut être maintenue à<br />
l’angle d’ouverture souhaité 1 .<br />
Tester le fonctionnement.<br />
<strong>ECO</strong> <strong>Schulte</strong> GmbH & Co. KG Iserlohner Landstraße 89 D-58706 Menden Tel. +49 2373 9276-0 Fax +49 2373 9276-40<br />
11/11<br />
www.eco-schulte.de