FS315081 Scout Skills - Mapping - ScoutBase UK
FS315081 Scout Skills - Mapping - ScoutBase UK
FS315081 Scout Skills - Mapping - ScoutBase UK

Create successful ePaper yourself
Turn your PDF publications into a flip-book with our unique Google optimized e-Paper software.
<strong>Scout</strong> <strong>Skills</strong>...<br />
<strong>Mapping</strong><br />
Item Code <strong>FS315081</strong> Aug/00 Edition no 2 (103854) 0845 300 1818<br />
A map is a picture of a given area of what the<br />
ground looks like from directly above. When<br />
undertaking a journey, we need to be able to find<br />
our way around competently, sometimes in<br />
unfamiliar territory. It is then that we need to be<br />
able to use and read maps. The type of map<br />
required will depend upon the journey or<br />
destination.<br />
A simple sketch map is maybe all that is required<br />
to find a room or building, or it may be a road map<br />
which helps you plan long distance routes across<br />
a whole country. There are also town maps and<br />
Ordnance Survey maps. All maps are drawn to a<br />
scale which means that a defined length on the<br />
map equates to a real length on the ground, for<br />
example one cm = one km.<br />
Road Maps<br />
or the possibility of enjoying a more scenic<br />
journey.<br />
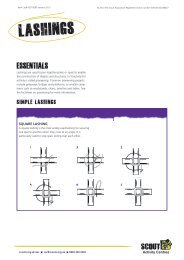
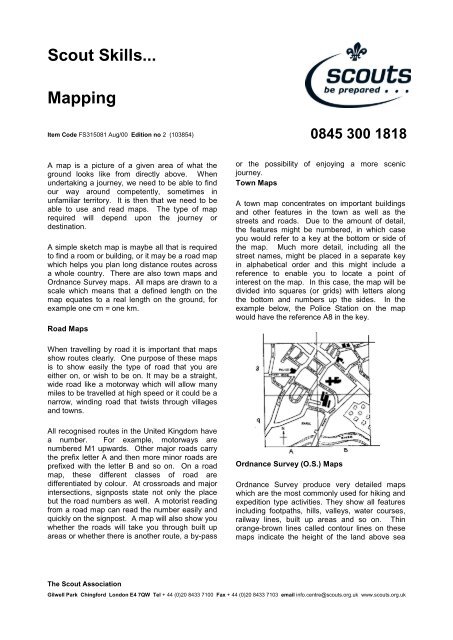
Town Maps<br />
A town map concentrates on important buildings<br />
and other features in the town as well as the<br />
streets and roads. Due to the amount of detail,<br />
the features might be numbered, in which case<br />
you would refer to a key at the bottom or side of<br />
the map. Much more detail, including all the<br />
street names, might be placed in a separate key<br />
in alphabetical order and this might include a<br />
reference to enable you to locate a point of<br />
interest on the map. In this case, the map will be<br />
divided into squares (or grids) with letters along<br />
the bottom and numbers up the sides. In the<br />
example below, the Police Station on the map<br />
would have the reference A8 in the key.<br />
When travelling by road it is important that maps<br />
show routes clearly. One purpose of these maps<br />
is to show easily the type of road that you are<br />
either on, or wish to be on. It may be a straight,<br />
wide road like a motorway which will allow many<br />
miles to be travelled at high speed or it could be a<br />
narrow, winding road that twists through villages<br />
and towns.<br />
All recognised routes in the United Kingdom have<br />
a number. For example, motorways are<br />
numbered M1 upwards. Other major roads carry<br />
the prefix letter A and then more minor roads are<br />
prefixed with the letter B and so on. On a road<br />
map, these different classes of road are<br />
differentiated by colour. At crossroads and major<br />
intersections, signposts state not only the place<br />
but the road numbers as well. A motorist reading<br />
from a road map can read the number easily and<br />
quickly on the signpost. A map will also show you<br />
whether the roads will take you through built up<br />
areas or whether there is another route, a by-pass<br />
Ordnance Survey (O.S.) Maps<br />
Ordnance Survey produce very detailed maps<br />
which are the most commonly used for hiking and<br />
expedition type activities. They show all features<br />
including footpaths, hills, valleys, water courses,<br />
railway lines, built up areas and so on. Thin<br />
orange-brown lines called contour lines on these<br />
maps indicate the height of the land above sea<br />
The <strong>Scout</strong> Association<br />
Gilwell Park Chingford London E4 7QW Tel + 44 (0)20 8433 7100 Fax + 44 (0)20 8433 7103 email info.centre@scouts.org.uk www.scouts.org.uk
page 2 of 6<br />
level and their shape indicates the shape of the<br />
land itself. Lines drawn close together indicate<br />
that the land rises or falls (that is gains or loses<br />
height) rapidly, while contours spaced more<br />
widely apart show that the slope, either up or<br />
down, is more gentle. Each contour will have its<br />
height above sea level printed on it at intervals so<br />
it is easy to decide if the ground is rising or falling.<br />
Grid References<br />
A grid system divides the whole area of the British<br />
Isles on maps into squares using lines running<br />
north to south and others crossing them, east to<br />
west. Each line has a number and by using these<br />
numbers, an area on any map can be located.<br />
For even greater accuracy, each square can be<br />
mentally divided by 10 on both lines and reference<br />
to these more accurate numbers will enable<br />
particular features to be located.<br />
Indeed, the grid system on Ordnance Survey<br />
maps enables a location to be identified to within<br />
100 metres, using a six figure grid reference and<br />
no matter what the scale of map, this grid<br />
reference will remain the same. Therefore, grid<br />
references can be transferred between Ordnance<br />
Survey maps of different scales. For details on<br />
how to find a grid reference, please see the Teach<br />
Yourself information section in this pack<br />
Each Ordnance Survey map has a letter code.<br />
The numbers of adjoining sheets and the national<br />
grid reference system is shown on the key of<br />
some maps. Other maps print the letter code on<br />
the flap cover, or the map itself. The letter code<br />
recurs every l00km along the length and breadth<br />
of the country. However, as even the most<br />
inexperienced beginner is unlikely to be I00km<br />
from the expected position, the letter code is<br />
seldom used.<br />
Tricks of the trade<br />
<br />
<br />
<br />
The more you use maps, the more conversant<br />
you will become with them and how they<br />
translate into the real thing.<br />
Practise grid references. How accurate can<br />
you be?<br />
Ensure that you have the right sort of map for<br />
the occasion. A map which gives too little or<br />
too much information is of little value. For<br />
example, an Ordnance Survey map will not<br />
help you find Acacia Avenue in the local town!<br />
Further information and resources<br />
Back to Basics - Available from the<br />
Information Centre at Gilwell Park. You can<br />
progress your map reading to more<br />
complicated levels. Try using different types of<br />
map; small and large scale, orienteering and<br />
so on.<br />
Factsheet entitled ‘Ordnance Survey Map<br />
Reproduction’ available from the <strong>Scout</strong><br />
Information Centre<br />
Estate agents often carry maps of the local area<br />
and will allow you a number of copies for Patrol<br />
work.<br />
Symbols<br />
Map symbols are the signs or diagrams shown on<br />
a map to indicate physical features. A list or 'key'<br />
of what these symbols mean is given at the same<br />
point on or in the map for identification. A number<br />
of the more common map symbols are shown<br />
below. These will be consistent on all modern<br />
O.S. maps but they might vary on other sorts of<br />
map, so it will be worth checking that on the map<br />
you are using that the symbol means what you<br />
think it does!
page 3 of 6<br />
TEACH YOURSELF<br />
<strong>Mapping</strong> is a skill, like many others, which<br />
becomes easier with practice and familiarity.<br />
Time<br />
Learning basic map reading will take from 30<br />
minutes to three hours. You may wish to approach<br />
the subject in small bites, or you may prefer to get<br />
stuck in and learn as much as possible at once.<br />
Equipment<br />
You will need a variety of maps including town<br />
maps, road maps and Ordnance Survey maps of<br />
different scales. Compass work is not involved at<br />
this stage.<br />
Learning all about it<br />
Before having a go, it is advisable to read the<br />
Information Sheet in this pack, if you have not<br />
already done so. This outlines the different types<br />
of map and their uses.<br />
Road maps show routes and types of road. A<br />
good starting point is to measure distances<br />
between two points on the map using a piece of<br />
string and the scale of the map.<br />
Alternatively, you could use a sheet of plain paper<br />
and a pencil, marking off the distance on the<br />
straight stretches of roads and again, check them<br />
off against the scale. Once you know the distance<br />
between two points, you can start to estimate the<br />
time it would take to travel between those two<br />
points using different average speeds.<br />
level. The closer the contour lines, the steeper the<br />
land.<br />
This can be most simply demonstrated by<br />
comparing maps of the Highlands of Scotland with<br />
Southern England or finding on a map a local hill<br />
that you know well and comparing the contours<br />
with those of some open, flat land.<br />
In order to become familiar with some map<br />
symbols, try cutting a square about 2cm x 2cm<br />
from the centre of a plain postcard. Place the<br />
postcard over a map. Examine the portion of the<br />
map that is visible and try to describe the details<br />
to another person.<br />
Another useful exercise is, using the same<br />
postcard and a local O.S. map, to try and visualise<br />
what the area looks like from a given point or grid<br />
reference. Then go to the location itself and see<br />
whether it looks anything like you imagined!<br />
Grid reference is a means of locating any point on<br />
the map by using a six figure number. All O.S.<br />
maps have thin blue lines running top to bottom<br />
and side to side in parallel to form a grid pattern of<br />
squares. The lines running up and down are<br />
called eastings and have a two digit number which<br />
can be found at the top and the bottom of the<br />
map. Similarly, the lines running from side to side<br />
are called northings and also have a two digit<br />
number. This grid is on all OS maps which cover<br />
the British Isles.<br />
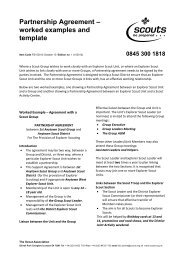
Here is an example. Imagine that you wish to find<br />
the grid reference for the Railway Station in the<br />
village of Easton Royal.<br />
The most effective way to become familiar with<br />
road maps, is to act as a navigator on a journey<br />
and to follow the route on the map.<br />
The best way of becoming familiar with Town<br />
maps is probably by walking a given route and<br />
specifying certain features (buildings, road<br />
junctions, rivers and so on) which must be found.<br />
Ordnance Survey maps, as already mentioned,<br />
are the most detailed maps available and as well<br />
as featuring physical landmarks, have contour<br />
lines which indicate the height of the land by<br />
linking together places of equal height above sea<br />
Read, from the top or bottom edges of the map,<br />
the number of the vertical (easting) line on the lefthand<br />
side of the station. In the diagrams, it is 73.
page 4 of 6<br />
In your mind, divide that square into vertical tenths<br />
(as shown in detailed insert) and decide how<br />
many tenths from that easting the station is. In<br />
our example, it is 7. Therefore, the easting<br />
reference is 737. Whether reading or quoting a<br />
grid reference, the first three numbers always<br />
relate to the easting.<br />
Now, working in a similar fashion, read the<br />
number of the nearest horizontal (northing) line<br />
below the station. In the example, this is 02.<br />
Again, in your mind, divide the square horizontally<br />
into tenths and decide how many tenths the<br />
station is above the 02 line. In the example, it is<br />
approximately 2. Therefore the northing reference<br />
is 022.<br />
The six figure grid reference for the station at<br />
Easton Royal is therefore 737022.<br />
Here are a couple of simple mnemonics one of<br />
which might help you to remember which set of<br />
numbers to read when working out grid<br />
references:<br />
‘In the door…and up the stairs’ or ‘You can walk<br />
before you can fly’.<br />
between those two points simply because the<br />
ground is undulating. Never set off walking in<br />
unfamiliar territory without letting someone know<br />
exactly where you are intending to go.<br />
You will also need to have a basic knowledge of<br />
the compass and how to set a map and follow<br />
compass directions if you are to undertake a hike<br />
or expedition.<br />
Can you do it?<br />
When you feel confident about maps, check how<br />
you are doing and see which of the following you<br />
can tick off:<br />
Estimate distances using the map's scale <br />
Recognise 20 common map symbols <br />
Follow a route as a navigator in a car <br />
Visualise ground features from the contours of a<br />
map<br />
<br />
Give a six figure grid reference<br />
<br />
Walk a route, noting features on the map <br />
So you want to know more?<br />
<br />
<br />
<br />
<br />
Find out how to set a map, then follow a route<br />
using the map;<br />
Learn about bearings;<br />
Talk to another Leader in your Group or<br />
District about mapping;<br />
Find out about Route cards and how to<br />
complete one.<br />
Your notes on this session<br />
Safety rules<br />
By themselves, maps are absolutely safe. It is<br />
only when people get hold of them that they<br />
become dangerous! Failing to correctly estimate<br />
the distance between two points whilst out walking<br />
can have disastrous consequences. Equally, you<br />
might have measured the distance accurately but<br />
forgotten to take into account the fact that you are<br />
climbing the equivalent height of Mount Everest
page 5 of 6<br />
HOW TO TRAIN OTHERS<br />
This section is designed to give some practical<br />
ideas about you can help other people to<br />
understand mapping. This might be Leaders or<br />
<strong>Scout</strong>s - either in an informal way on a Troop<br />
night or more formally on a skills workshop,<br />
training course or something similar.<br />
Objectives<br />
By the end of the session, participants will be able<br />
to:<br />
I. Describe the key elements of road maps,<br />
town maps and Ordnance Survey maps;<br />
II. Identify a minimum of 20 symbols used on<br />
maps and describe their meanings;<br />
III. Demonstrate the use of a six figure grid<br />
reference;<br />
IV. Demonstrate the use of an Ordnance<br />
Survey map;<br />
V. Describe the terms 'eastings', 'northings'<br />
and 'scales' on an Ordnance Survey map;<br />
VI. Demonstrate how contour lines may be<br />
interpreted into land surface shapes.<br />
Time<br />
Approximately one hour.<br />
Equipment<br />
Road maps, town maps, a selection of Ordnance<br />
Survey maps.<br />
Visual aids: 20 map symbols on cards; 3D model<br />
of ground features to illustrate contour lines; large<br />
sheets of paper and pens; games equipment as<br />
necessary.<br />
Training method<br />
Although some explanation of key elements and<br />
terms will be necessary, make this session as<br />
practical as possible.<br />
Stress the need for different types of maps for<br />
different situations. That is, explain that different<br />
features are found on town, road and O.S. maps.<br />
Map scales can be confusing. It is quite significant<br />
that we often describe the distance between two<br />
points in terms of time, rather than distance. We<br />
know it takes about an hour to get from home to<br />
work but we haven't got a clue how far it is!<br />
Spend time on this important aspect of mapping.<br />
Training activities<br />
1. Working in pairs, with maps, work out some<br />
grid references.<br />
2. Make a sketch map of the venue that you are<br />
currently in, using scales of your choice.<br />
3. Run a quiz night type activity with rounds on<br />
road signs, map symbols and so on.<br />
4. Make up bingo cards of map symbols and<br />
play the game with a set of map symbol cards<br />
or on an OHP transparency.<br />
5. Give each participant some paper and a<br />
pencil. Describe a journey by reading it from<br />
a map. For example, 'I left the local church<br />
and walked due north for 100 metres to the<br />
Post Office. Through the orchard to the east<br />
of the Post Office, I could hear a train on the<br />
railway line although it was 2 kilometres away.<br />
From the Post Office I walked a further 400<br />
metres due north to the bridge over the canal.<br />
A boat was passing through the lock. The<br />
Bridge public house seemed very busy...' and<br />
so on. Participants should make a sketch<br />
map and compare results.<br />
6. Participants, in small groups, make a display<br />
or mapping board showing map symbols and<br />
their meanings.<br />
7. Participants, again in small groups, are given<br />
a copy of the same map (one per group).<br />
They then work out the answers to a number<br />
of written questions. For example:<br />
What is the best walking route from 'A' to ‘B’?<br />
What is the best driving route from 'A' to 'B’?<br />
If you stood on top of the hill at ... (six figure<br />
grid reference), what would you expect to see<br />
if you were looking in a south westerly<br />
direction?<br />
You are at point Z ... (six figure map<br />
reference) when a cyclist says that he is lost<br />
and asks for directions to get to Y. Using the<br />
map, what instructions should be given?<br />
8. Give each group a copy of the same<br />
Ordnance Survey map. Call out various<br />
objects or places. Give a point to the person<br />
who first calls out the correct grid reference<br />
number or who runs up to a flip chart or board<br />
and writes it down accurately.<br />
9. In small groups, make a 3D model from<br />
polystyrene tiles, papier mache and so on, to<br />
represent a hill or feature from the map, to<br />
scale.
page 6 of 6<br />
10. In groups, or as individuals, ask participants to<br />
draw a sketch map that would enable a<br />
foreigner who is unable to communicate in<br />
English, to find his way between two local<br />
landmarks.<br />
Hints and tips<br />
<br />
<br />
Learn to use a map keeping it the right way<br />
up. Do not turn it round.<br />
Practise estimating distances by pacing out<br />
across open stretches of ground. Place a<br />
coin or marker on the ground and walk, say,<br />
100 metres; stop and turn right, walk 100<br />
metres; stop and turn right again and walk<br />
100 metres; and once again, stop, turn right<br />
and walk 100 metres. You should arrive back<br />
at the marker!<br />
Checking their progress<br />
Ask participants whether they feel they are happy<br />
with their ability to:<br />
Know the difference between town/road and<br />
Ordnance Survey maps<br />
<br />
Identify 20 map symbols<br />
<br />
Give six figure grid references<br />
<br />
Estimate distances<br />
<br />
Describe ground features from contour lines <br />
So they want to know more?<br />
<br />
<br />
<br />
<br />
<br />
<br />
Learn to use a compass with maps;<br />
Learn about bearings;<br />
Talk with another Leader about map reading<br />
skills;<br />
Check for mapping requirements in the <strong>Scout</strong><br />
Award, Pathfinder Award, Explorer Award and<br />
Chief <strong>Scout</strong>'s Award;<br />
Read Back to Basics available from the<br />
Information Centre, Gilwell Park.<br />
Put it into practice - go out and use it!<br />
Your notes on this session