KAMADO JOE GASJOE ULTRA LP to NG Conversion Instructions
KAMADO JOE GASJOE ULTRA LP to NG Conversion Instructions
KAMADO JOE GASJOE ULTRA LP to NG Conversion Instructions

You also want an ePaper? Increase the reach of your titles
YUMPU automatically turns print PDFs into web optimized ePapers that Google loves.
<strong>KAMADO</strong> <strong>JOE</strong> GAS<strong>JOE</strong> <strong>ULTRA</strong><br />
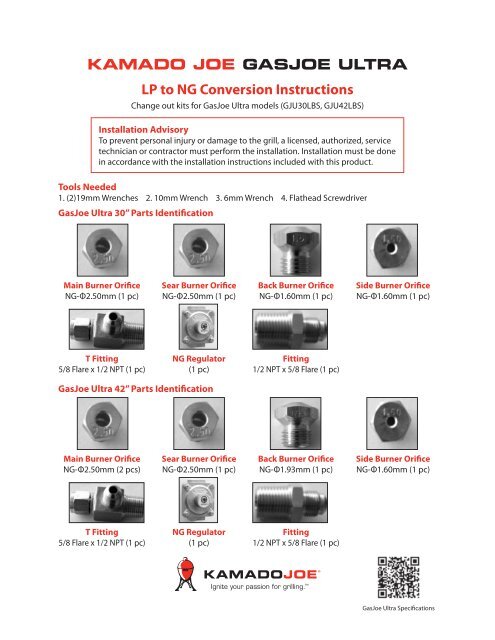
<strong>LP</strong> <strong>to</strong> <strong>NG</strong> <strong>Conversion</strong> <strong>Instructions</strong><br />
Change out kits for GasJoe Ultra models (GJU30LBS, GJU42LBS)<br />
Installation Advisory<br />
To prevent personal injury or damage <strong>to</strong> the grill, a licensed, authorized, service<br />
technician or contrac<strong>to</strong>r must perform the installation. Installation must be done<br />
in accordance with the installation instructions included with this product.<br />
Tools Needed<br />
1. (2)19mm Wrenches 2. 10mm Wrench 3. 6mm Wrench 4. Flathead Screwdriver<br />
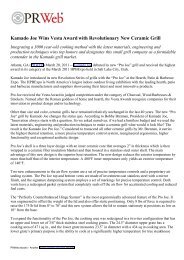
GasJoe Ultra 30” Parts Identification<br />
Main Burner Orifice<br />
<strong>NG</strong>-Φ2.50mm (1 pc)<br />
Sear Burner Orifice<br />
<strong>NG</strong>-Φ2.50mm (1 pc)<br />
Back Burner Orifice<br />
<strong>NG</strong>-Φ1.60mm (1 pc)<br />
Side Burner Orifice<br />
<strong>NG</strong>-Φ1.60mm (1 pc)<br />
T Fitting<br />
5/8 Flare x 1/2 NPT (1 pc)<br />
<strong>NG</strong> Regula<strong>to</strong>r<br />
(1 pc)<br />
Fitting<br />
1/2 NPT x 5/8 Flare (1 pc)<br />
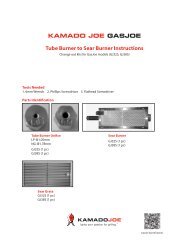
GasJoe Ultra 42” Parts Identification<br />
Main Burner Orifice<br />
<strong>NG</strong>-Φ2.50mm (2 pcs)<br />
Sear Burner Orifice<br />
<strong>NG</strong>-Φ2.50mm (1 pc)<br />
Back Burner Orifice<br />
<strong>NG</strong>-Φ1.93mm (1 pc)<br />
Side Burner Orifice<br />
<strong>NG</strong>-Φ1.60mm (1 pc)<br />
T Fitting<br />
5/8 Flare x 1/2 NPT (1 pc)<br />
<strong>NG</strong> Regula<strong>to</strong>r<br />
(1 pc)<br />
Fitting<br />
1/2 NPT x 5/8 Flare (1 pc)<br />
GasJoe Ultra Specifications
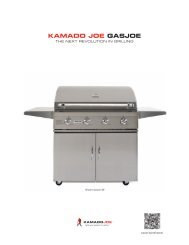
GasJoe Ultra <strong>LP</strong> <strong>to</strong> <strong>NG</strong> <strong>Conversion</strong> <strong>Instructions</strong><br />
Step 1<br />
Remove all cooking grates and<br />
burner covers.<br />
Step 3<br />
Remove burner by lifting up<br />
and pulling out <strong>to</strong>wards back<br />
of grill.<br />
Step 5<br />
Install the <strong>NG</strong> orifices and<br />
gently tighten. DO NOT over<br />
tighten (Φ2.50mm).<br />
Step 7<br />
(Change Sear Burner Orifice)<br />
Remove the sear burner using<br />
steps 2 and 3.<br />
Step 9<br />
Change the sear burner orifice<br />
using steps 3 and 4. Use the<br />
correct size orifice (Φ2.50mm).<br />
Step 11<br />
(Change Back Burner Orifice)<br />
Remove the back burner<br />
operation window panel on<br />
the rear hood.<br />
Step 13<br />
Reinstall the back burner<br />
operation window panel on<br />
the rear hood.<br />
Step 15<br />
Remove <strong>LP</strong> orifice with 6mm<br />
wrench and install <strong>NG</strong> orifice<br />
(Φ1.60mm). Reinstall burner<br />
and grate.<br />
Step 2<br />
(Change Main Burner Orifice)<br />
Remove the nut on the back<br />
end of the tube burner.<br />
Step 4<br />
Locate the valve with orifice<br />
in the hole on front basin. Use<br />
a 6mm box wrench <strong>to</strong> gently<br />
loosen the <strong>LP</strong> orifice.<br />
Step 6<br />
Reinstall main burner and<br />
tighten the nut on the back.<br />
Step 8<br />
Carefully lift the back end of the<br />
sear burner. Be careful with flash<br />
tube. DO NOT <strong>to</strong>uch burner<br />
surface <strong>to</strong> avoid damaging it.<br />
Step 10<br />
Reinstall the sear burner back<br />
in<strong>to</strong> the basin and tighten the<br />
nut on the back.<br />
Step 12<br />
Remove <strong>LP</strong> orifice with 10mm<br />
wrench. Install <strong>NG</strong> orifice and<br />
tighten gently.<br />
(30”= Φ1.60mm) (42”=Φ1.93mm)<br />
Step 14<br />
(Change Side Burner Orifice)<br />
Remove the <strong>to</strong>p grate. Lift<br />
brass burner assembly and<br />
locate orifice in bot<strong>to</strong>m.<br />
Step 16<br />
Remove the <strong>LP</strong> regula<strong>to</strong>r and<br />
T fitting.<br />
Kamado Joe • 2865 N. Berkeley Lake Road NW, Suite 6, Duluth, Georgia 30096 • Toll-Free (877) 215-6299 • KamadoJoe.com
GasJoe Ultra <strong>LP</strong> <strong>to</strong> <strong>NG</strong> <strong>Conversion</strong> <strong>Instructions</strong><br />
Step 17<br />
Preassemble <strong>NG</strong> regula<strong>to</strong>r with<br />
fittings on both ends. See regula<strong>to</strong>r<br />
bot<strong>to</strong>m for flow direction. Sealant<br />
may be needed <strong>to</strong> prevent leaking.<br />
Step 19 (Leak Test)<br />
Connect grill <strong>to</strong> gas supply and<br />
refer <strong>to</strong> User Manual pages 14<br />
and 15 for leak test procedure.<br />
Step 18<br />
Attach regula<strong>to</strong>r assembly <strong>to</strong><br />
grill as shown. Connect the<br />
side burner hose on T fitting.<br />
Step 20<br />
(Fire Test/Low Flame Setting)<br />
Refer <strong>to</strong> User Manual page<br />
16 for fire test and low flame<br />
setting procedures.<br />
See regula<strong>to</strong>r bot<strong>to</strong>m for flow direction.<br />
Kamado Joe • 2865 N. Berkeley Lake Road NW, Suite 6, Duluth, Georgia 30096 • Toll-Free (877) 215-6299 • KamadoJoe.com