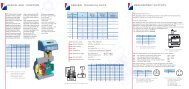
EVM-35-96 - Entes
EVM-35-96 - Entes
EVM-35-96 - Entes

You also want an ePaper? Increase the reach of your titles
YUMPU automatically turns print PDFs into web optimized ePapers that Google loves.
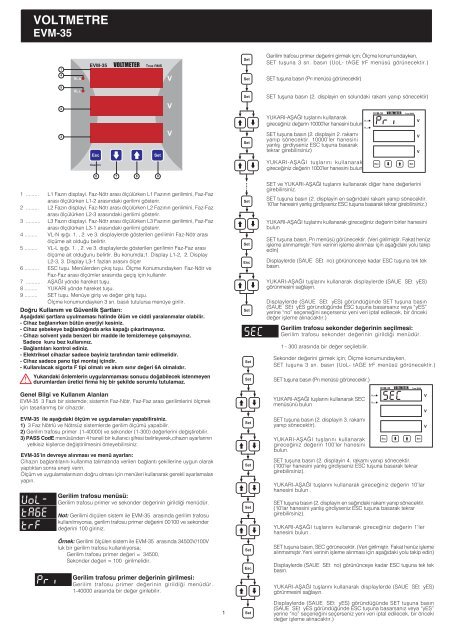
VOLTMETRE<br />
<strong>EVM</strong>-<strong>35</strong><br />
1<br />
4<br />
Gerilim trafosu primer deðerini girmek için; Ölçme konumundayken,<br />
SET tuþuna 3 sn. basýn (UoL- tAGE trF menüsü görünecektir.)<br />
SET tuþuna basýn (Prý menüsü görünecektir)<br />
5<br />
SET tuþuna basýn (2. displayin en solundaki rakam yanýp sönecektir)<br />
2<br />
YUKARI-AÞAÐI tuþlarýný kullanarak<br />
gireceðiniz deðerin 10000’ler hanesini bulun<br />
3<br />
SET tuþuna basýn (2. displayin 2. rakamý<br />
yanýp sönecektir. 10000’ler hanesini<br />
yanlýþ girdiyseniz ESC tuþuna basarak<br />
tekrar girebilirsiniz)<br />
YUKARI-AÞAÐI tuþlarýný kullanarak<br />
gireceðiniz deðerin 1000’ler hanesini bulun<br />
6 7 8 9<br />
1 ......... L1 Fazýn displayi. Faz-Nötr arasý ölçülürken L1 Fazýnýn gerilimini, Faz-Faz<br />
arasý ölçülürken L1-2 arasýndaki gerilimi gösterir.<br />
2 ......... L2 Fazýn displayi. Faz-Nötr arasý ölçülürken L2 Fazýnýn gerilimini, Faz-Faz<br />
arasý ölçülürken L2-3 arasýndaki gerilimi gösterir.<br />
3 .......... L3 Fazýn displayi. Faz-Nötr arasý ölçülürken L3 Fazýnýn gerilimini, Faz-Faz<br />
arasý ölçülürken L3-1 arasýndaki gerilimi gösterir.<br />
4 ......... VL-N ýþýðý. 1. , 2. ve 3. displaylerde gösterilen gerilimin Faz-Nötr arasý<br />
ölçüme ait olduðu belirtir.<br />
5 ......... VL-L ýþýðý. 1. , 2. ve 3. displaylerde gösterilen gerilimin Faz-Faz arasý<br />
ölçüme ait olduðunu belirtir. Bu konumda;1. Display L1-2, 2. Display<br />
L2-3, 3. Display L3-1 fazlarý arasýný ölçer<br />
6 .......... ESC tuþu. Menülerden çýkýþ tuþu. Ölçme Konumundayken Faz-Nötr ve<br />
Faz-Faz arasý ölçümler arasýnda geçiþ için kullanýlýr.<br />
7 .......... AÞAÐI yönde hareket tuþu.<br />
8 ......... YUKARI yönde hareket tuþu.<br />
9 ......... SET tuþu. Menüye giriþ ve deðer giriþ tuþu.<br />
Ölçme konumundayken 3 sn. basýlý tutulursa menüye girilir.<br />
Doðru Kullaným ve Güvenlik Þartlarý:<br />
Aþaðýdaki þartlara uyulmamasý halinde ölüm ve ciddi yaralanmalar olabilir.<br />
- Cihaz baðlanýrken bütün enerjiyi kesiniz.<br />
- Cihaz þebekeye baðlandýðýnda arka kapaðý çýkartmayýnýz.<br />
- Cihazý solvent yada benzeri bir madde ile temizlemeye çalýþmayýnýz.<br />
Sadece kuru bez kullanýnýz.<br />
- Baðlantýlarý kontrol ediniz.<br />
- Elektriksel cihazlar sadece bayiniz tarafýndan tamir edilmelidir.<br />
- Cihaz sadece pano tipi montaj içindir.<br />
- Kullanýlacak sigorta F tipi olmalý ve akým sýnýr deðeri 6A olmalýdýr.<br />
Yukarýdaki önlemlerin uygulanmamasý sonucu doðabilecek istenmeyen<br />
durumlardan üretici firma hiç bir þekilde sorumlu tutulamaz.<br />
Genel Bilgi ve Kullaným Alanlarý<br />
<strong>EVM</strong>-<strong>35</strong> 3 Fazlý bir sistemde; sistemin Faz-Nötr, Faz-Faz arasý gerilimlerini ölçmek<br />
için tasarlanmýþ bir cihazdýr.<br />
<strong>EVM</strong>-<strong>35</strong> ile aþaðýdaki ölçüm ve uygulamalarý yapabilirsiniz.<br />
1) 3 Faz Nötrlü ve Nötrsüz sistemlerde gerilim ölçümü yapabilir.<br />
2) Gerilim trafosu primer (1-40000) ve sekonder (1-300) deðerlerini deðiþtirebilir.<br />
3) PASS CodE menüsünden 4 haneli bir kullanýcý þifresi belirleyerek,cihazýn ayarlarýnýn<br />
yetkisiz kiþilerce deðiþtirilmesini önleyebilirsiniz.<br />
<strong>EVM</strong>-<strong>35</strong>’in devreye alýnmasý ve menü ayarlarý:<br />
Cihazýn baðlantýlarýný kullanma talimatýnda verilen baðlantý þekillerine uygun olarak<br />
yaptýktan sonra enerji verin.<br />
Ölçüm ve uygulamalarýnýzýn doðru olmasý için menüleri kullanarak gerekli ayarlamalarý<br />
yapýn.<br />
Gerilim trafosu menüsü:<br />
Gerilim trafosu primer ve sekonder deðerinin girildiði menüdür.<br />
Not: Gerilimi ölçülen sistem ile <strong>EVM</strong>-<strong>35</strong> arasýnda gerilim trafosu<br />
kullanýlmýyorsa, gerilim trafosu primer deðerini 00100 ve sekonder<br />
deðerini 100 giriniz.<br />
Örnek: Gerilimi ölçülen sistem ile <strong>EVM</strong>-<strong>35</strong> arasýnda 34500V/100V<br />
luk bir gerilim trafosu kullanýlýyorsa;<br />
Gerilim trafosu primer deðeri = 34500,<br />
Sekonder deðeri = 100 girilmelidir.<br />
Gerilim trafosu primer deðerinin girilmesi:<br />
Gerilim trafosu primer deðerinin girildiði menüdür.<br />
1-40000 arasýnda bir deðer girilebilir.<br />
SET ve YUKARI-AÞAÐI tuþlarýný kullanarak diðer hane deðerlerini<br />
girebilirsiniz.<br />
SET tuþuna basýn (2. displayin en saðýndaki rakam yanýp sönecektir.<br />
10’lar hanesini yanlýþ girdiyseniz ESC tuþuna basarak tekrar girebilirsiniz.)<br />
YUKARI-AÞAÐI tuþlarýný kullanarak gireceðiniz deðerin birler hanesini<br />
bulun<br />
SET tuþuna basýn, Prý menüsü görünecektir. (Veri girilmiþtir. Fakat henüz<br />
iþleme alýnmamýþtýr.Yeni verinin iþleme alýnmasý için aþaðýdaki yolu takip<br />
edin)<br />
Displaylerde (SAUE SEt no) görününceye kadar ESC tuþuna tek tek<br />
basýn.<br />
YUKARI-AÞAÐI tuþlarýný kullanarak displaylerde (SAUE SEt yES)<br />
görünmesini saðlayýn.<br />
Displaylerde (SAUE SEt yES) göründüðünde SET tuþuna basýn<br />
(SAUE SEt yES göründüðünde ESC tuþuna basarsanýz veya “yES”<br />
yerine “no” seçeneðini seçerseniz yeni veri iptal edilecek, bir önceki<br />
deðer iþleme alýnacaktýr.)<br />
Gerilim trafosu sekonder deðerinin seçilmesi:<br />
Gerilim trafosu sekonder deðerinin girildiði menüdür.<br />
1 - 300 arasýnda bir deðer seçilebilir.<br />
Sekonder deðerini girmek için; Ölçme konumundayken,<br />
SET tuþuna 3 sn. basýn (UoL- tAGE trF menüsü görünecektir.)<br />
SET tuþuna basýn (Prý menüsü görünecektir.)<br />
YUKARI-AÞAÐI tuþlarýný kullanarak SEC<br />
menüsünü bulun<br />
SET tuþuna basýn (2. displayin 3. rakamý<br />
yanýp sönecektir).<br />
YUKARI-AÞAÐI tuþlarýný kullanarak<br />
gireceðiniz deðerin 100’ler hanesini<br />
bulun.<br />
SET tuþuna basýn (2. displayin 4. rakamý yanýp sönecektir.<br />
(100’ler hanesini yanlýþ girdiyseniz ESC tuþuna basarak tekrar<br />
girebilirsiniz).<br />
YUKARI-AÞAÐI tuþlarýný kullanarak gireceðiniz deðerin 10’lar<br />
hanesini bulun .<br />
SET tuþuna basýn (2. displayin en saðýndaki rakam yanýp sönecektir.<br />
(10’lar hanesini yanlýþ girdiyseniz ESC tuþuna basarak tekrar<br />
girebilirsiniz).<br />
YUKARI-AÞAÐI tuþlarýný kullanarak gireceðiniz deðerin 1’ler<br />
hanesini bulun .<br />
SET tuþuna basýn, SEC görünecektir. (Veri girilmiþtir. Fakat henüz iþleme<br />
alýnmamýþtýr.Yeni verinin iþleme alýnmasý için aþaðýdaki yolu takip edin)<br />
Displaylerde (SAUE SEt no) görününceye kadar ESC tuþuna tek tek<br />
basýn.<br />
YUKARI-AÞAÐI tuþlarýný kullanarak displaylerde (SAUE SEt yES)<br />
görünmesini saðlayýn.<br />
1<br />
Displaylerde (SAUE SEt yES) göründüðünde SET tuþuna basýn<br />
(SAUE SEt yES göründüðünde ESC tuþuna basarsanýz veya “yES”<br />
yerine “no” seçeneðini seçerseniz yeni veri iptal edilecek, bir önceki<br />
deðer iþleme alýnacaktýr.)
VOLTMETRE<br />
<strong>EVM</strong>-<strong>35</strong><br />
Kullanýcý Þifresinin tanýmlanmasý<br />
Kullanýcý þifresinin tanýmlandýðý ve aktif yapýldýðý menüdür. Cihazýn<br />
ayarlarýnýn yetkisiz kiþilerce deðiþtirilmesini önlemek için, bu menüde<br />
4 haneli bir kullanýcý þifresi belirleyip bu þifreyi aktif hale getirmelisiniz.<br />
Pýn menüsünün altýnda 2 adet alt menü vardýr.<br />
Kullanýcý Þifresinin deðiþtirilmesi:<br />
Kullanýcý þifresini deðiþtirmek için kullanýlan menüdür.<br />
Not: Fabrika çýkýþý kullanýcý þifresi “1234” tür.<br />
Kullanýcý þifresini deðiþtirmek için; Ölçme konumundayken,<br />
SET tuþuna 3 sn. basýn (UoL- tAGE trF menüsü görünecektir.)<br />
YUKARI-AÞAÐI tuþlarýný kullanarak PASS CodE menüsünü bulun<br />
Boyutlar<br />
SET tuþuna basýn PASS CodE EnbL görünecektir. (Veri girilmiþtir. Fakat<br />
henüz iþleme alýnmamýþtýr.Yeni verinin iþleme alýnmasý için aþaðýdaki<br />
yolu takip edin)<br />
Displaylerde (SAUE SEt no) görününceye kadar ESC tuþuna tek tek<br />
basýn.<br />
YUKARI-AÞAÐI tuþlarýný kullanarak displaylerde (SAUE SEt yES)<br />
görünmesini saðlayýn.<br />
Displaylerde (SAUE SEt yES) göründüðünde SET tuþuna basýn<br />
(SAUE SEt yES göründüðünde ESC tuþuna basarsanýz veya “yES”<br />
yerine “no” seçeneðini seçerseniz yeni veri iptal edilecek, bir önceki<br />
deðer iþleme alýnacaktýr.)<br />
79.3mm<br />
70mm<br />
Panel Delik Ölçüleri<br />
Duvar 79.3mm<br />
70mm<br />
SET tuþuna basýn (PASS CodE EnbL menüsü görünecektir.)<br />
YUKARI-AÞAÐI tuþlarýný kullanarak PASS CodE CHnG menüsünü bulun.<br />
SET tuþuna basýn (2. displayin en solundaki rakam yanýp sönecektir)<br />
<strong>96</strong>mm<br />
90mm<br />
<strong>96</strong>mm<br />
Tip PR 19 (<strong>96</strong>x<strong>96</strong>)<br />
91mm<br />
91mm<br />
Tip PR 19 (<strong>96</strong>x<strong>96</strong>)<br />
90mm<br />
50mm<br />
Tip 19<br />
YUKARI-AÞAÐI-SET tuþlarýný kullanarak<br />
eski þifreyi girin.<br />
L1<br />
L2<br />
L3<br />
N<br />
System<br />
YUKARI-AÞAÐI-SET tuþlarýný kullanarak<br />
yeni þifreyi girin.<br />
7 8 9 10<br />
L1 L2 L3 N<br />
Gerilim Ölçme Giriþi<br />
YUKARI-AÞAÐI-SET tuþlarýný kullanarak<br />
yeni þifreyi tekrar girin.<br />
Yardýmcý<br />
Besleme<br />
11 12<br />
6A<br />
PR-19<br />
SET tuþuna basýn PASS CodE CHnG görünecektir. (Veri girilmiþtir. Fakat<br />
henüz iþleme alýnmamýþtýr.Yeni verinin iþleme alýnmasý için aþaðýdaki yolu<br />
takip edin)<br />
Displaylerde (SAUE SEt no) görününceye kadar ESC tuþuna tek tek basýn.<br />
YUKARI-AÞAÐI tuþlarýný kullanarak displaylerde (SAUE SEt yES)<br />
görünmesini saðlayýn.<br />
Displaylerde (SAUE SEt yES) göründüðünde SET tuþuna basýn (SAUE<br />
SEt yES göründüðünde ESC tuþuna basarsanýz veya “yES” yerine “no”<br />
seçeneðini seçerseniz yeni veri iptal edilecek, bir önceki deðer iþleme<br />
alýnacaktýr.)<br />
Kullanýcý þifresinin aktif hale getirilmesi:<br />
Kullanýcý þifresini aktif etmek için kullanýlan menüdür.<br />
Kullanýcý þifresi aktif hale getirildiði takdirde menülere girmek için;<br />
anlýk deðerler gözlemlenirken, “Set” tuþuna 3 sn. basýldýðýnda kullanýcý<br />
þifresi sorulacaktýr.<br />
Kullanýcý þifresini aktif hale getirmek için; Ölçme konumundayken,<br />
SET tuþuna 3 sn. basýn (UoL- tAGE trF menüsü görünecektir.)<br />
YUKARI-AÞAÐI tuþlarýný kullanarak PASS CodE menüsünü bulun<br />
SET tuþuna basýn (PASS CodE EnbL menüsü görünecektir.)<br />
Teknik Özellikler<br />
Iþletme Gerilimi (Un)<br />
Frekans (Hz)<br />
Besleme Giriþi Güç Tüketimi<br />
Ölçme Giriþleri Güç Tüketimi<br />
Vin<br />
Ölçme Aralýgý<br />
Sýnýf<br />
Gerilim Trafosu Oraný<br />
Primer : 1-40000<br />
Sekonder : 1-300<br />
Ortam Sýcaklýðý<br />
Gösterge<br />
Boyutlar<br />
Un<br />
: 24 ... 250 V AC/DC<br />
: 45-65 Hz<br />
: < 4 VA<br />
: < 1VA<br />
: 1 - 300 VAC (L-N)<br />
: 2 - 500 VAC (L-L)<br />
: 0...40 kV<br />
: %0,5±1dijit [(%10-%100) x tam skala]<br />
: -5°C; +70°C<br />
: Kýrmýzý LED display<br />
: PR-19<br />
Cihaz Koruma Sýnýfý : Çift yalýtým-sýnýf II ( )<br />
Kutu Koruma Sýnýfý : IP 54<br />
Terminal koruma sýnýfý : IP 00<br />
Kutu Malzemesi<br />
: Yanmaz ABS<br />
Baðlantý Þekli<br />
: Panoya önden<br />
Kablo Kesiti (Klemens için) : 2.5 mm2<br />
Aðýrlýk<br />
: 0.30 kg<br />
Montaj Sýnýfý<br />
: Sýnýf III<br />
Pano Delik Ölçüleri<br />
: 91x91mm<br />
EN-61010-1 standardý ile uyumludur.<br />
SET tuþuna basýn (2. displayin en solundaki rakam yanýp sönecektir)<br />
YUKARI-AÞAÐI-SET tuþlarýný kullanarak<br />
þifreyi girin.<br />
Fabrika Çýkýþ Deðerleri<br />
Prý - 00100<br />
SEC - 100<br />
PASS CodE EnbL - no<br />
PASS CodE - 1234<br />
SET tuþuna basýn EnbL no görünecektir.<br />
YUKARI-AÞAÐI tuþlarýný kullanarak EnbL<br />
yES menüsünü bulun<br />
2<br />
“Bu ürün, 30.05.2008 tarih ve 26891 sayýlý resmi<br />
gazetede yayýnlanan EEE Yönetmeliðinin Madde<br />
2 ve Ek-1A madde 9 kapsamýndadýr.”<br />
A3805/Rev.4
VOLTMETER<br />
<strong>EVM</strong>-<strong>35</strong><br />
1<br />
4<br />
In order to enter the voltage transformer primary value; press<br />
SET button for 3 sec. in measurement mode<br />
(UoL- tAGE trF is displayed)<br />
Press SET button (Prý menu is displayed)<br />
5<br />
Press SET button (Most left digit blinks in 2nd display.)<br />
2<br />
Find 1st digit of the value which you want<br />
to enter by scrolling UP/DOWN buttons.<br />
3<br />
Press SET button (2nd digit of second<br />
display blinks. If you set 1st digit value<br />
incorrect, you can set again by pressing<br />
ESC button)<br />
6 7 8 9<br />
1... Display of L-1 Phase:It shows L-1 phase-neutral voltage and L1-L2 phase-phase<br />
voltage.<br />
2... Display of L-2 Phase:It shows L-2 phase-neutral voltage and L2-L3 phase-phase<br />
voltage.<br />
3... Display of L-3 Phase:It shows L-3 phase-neutral voltage and L3-L1 phase-phase<br />
voltage.<br />
4... V L-N LED: Phase-Neutral Voltage<br />
5... V L-L LED: Phase-Phase Voltage<br />
6... ESC Button. Used to quit from the menu. Also in the measuring mode, used to<br />
scroll between L-N and L-L values.<br />
7... DOWN Button<br />
8... UP Button<br />
9... SET button. It is used to enter into the menu and to save the values.<br />
If SET button is pressed for 3 seconds in the measurement mode, you can<br />
enter into menus.<br />
Precautions For Installation And Safe Use:<br />
- Failure to follow those instructions will result in death or serious injury.<br />
- Disconnect all power before working on equipment.<br />
- When the device connected to the network, do not remove the back panel<br />
- Do not try to clean the device with solvent or the like.Only clean the device<br />
with dried cloth.<br />
- Verify correct terminal connections when wiring.<br />
- Electrical equipment should be serviced only by your component seller.<br />
- Only for rack panel mounting.<br />
- The fuse should be used F type and current boundary value must be 6A.<br />
No responsibility is assured by the manufacturer or any of its<br />
subsidiaries for any consequences arising out of the use of this<br />
material.<br />
General Information<br />
<strong>EVM</strong>-<strong>35</strong> is designed to measure the phase-phase voltage, phase neutral voltage<br />
of system.<br />
Application of <strong>EVM</strong>-<strong>35</strong><br />
1) It can measure voltage for each phase in 3 phase<br />
systems with neutral and without neutral.<br />
2) Voltage transformer primer ratio (1-40000) and seconder ratio (1-300) can be<br />
programmed.<br />
3) A password can be arranged from PASS CodE menu in order to prevent<br />
change of the setting by unauthorized person.<br />
<strong>EVM</strong>-<strong>35</strong> Menu Settings<br />
After making the connections of the device as given in user manual, voltage is<br />
supplied. Required settings must be done by using menus in order to have the<br />
correct measurements and applications.<br />
Voltage transformer ratio:<br />
Primary and secondary values of Voltage Transformer ratio can<br />
be programmed in this menu.<br />
Note: Enter the primary value as 00100 and secondary value as<br />
100 if there is no voltage transformer is used between <strong>EVM</strong>-<strong>35</strong><br />
and system.<br />
For example; If there is 34500V/100V voltage transformer is used<br />
between <strong>EVM</strong>-<strong>35</strong> and system;<br />
Primary voltage transformer value = 34500,<br />
Secondary value = 100 is set.<br />
Find 2nd digit of the value which you want<br />
to enter by scrolling UP/DOWN buttons.<br />
Enter the other digits similarly by scrolling SET, UP and DOWN buttons.<br />
Press SET button (most right digit blinks in 2nd display. If you set 4th<br />
digit value incorrect, you can set again by pressing ESC button)<br />
Find 5th digit of the value which you want to enter by scrolling UP/DOWN<br />
buttons.<br />
Press SET button, Prý menu is displayed. (New value is entered but it is<br />
not executed yet. In order to set the new value, please follow below<br />
steps.)<br />
Press ESC button one by one until SAUE SEt no is displayed.<br />
By using UP/DOWN buttons, find SAUE SEt yES<br />
Press SET button while SAUE SEt yES is displayed. (If you press<br />
ESC button or select “no” option instead of “yES”, new data is<br />
cancelled and the previous data is set.)<br />
Programming the Secondary value of voltage<br />
transformer:<br />
Secondary value of voltage transformer is entered in this<br />
menu. This value can be entered between 1-300.<br />
In order to enter the secondary value; press SET button for 3 sec.<br />
in measurement mode (UoL- tAGE trF is displayed)<br />
Press SET button (Prý menu is displayed)<br />
Find SEC menu by scrolling UP/DOWN<br />
buttons.<br />
Press SET button (3rd digit blinks in 2nd<br />
display).<br />
Enter the 3rd digit value by scrolling<br />
UP/DOWN buttons.<br />
Press SET button (4th digit blinks in 2nd display.<br />
(If you set 3rd digit value incorrect, you can set again by<br />
pressing ESC button).<br />
Enter the 4th digit value by scrolling UP/DOWN buttons<br />
Press SET button (most right digit blinks in 2nd display. If you set<br />
4th digit value incorrect, you can set again by pressing ESC<br />
button)<br />
Find 5th digit of the value which you want to enter by scrolling<br />
UP/DOWN buttons.<br />
Press SET button, SEC menu is displayed. (New value is entered but<br />
it is not executed yet. In order to set the new value, please follow below<br />
steps.)<br />
Press ESC button one by one until SAUE SEt no is displayed.<br />
Programming the primary value for voltage<br />
transformer:<br />
Primary value for voltage transformer is programmed in this<br />
menu. This value can be entered between 1-40000.<br />
1<br />
By using UP/DOWN buttons, find SAUE SEt yES<br />
Press SET button while SAUE SEt yES is displayed. (If you press<br />
ESC button or select “no” option instead of “yES”, new data is<br />
cancelled and the previous data is set.)
VOLTMETER<br />
<strong>EVM</strong>-<strong>35</strong><br />
User Password Settings<br />
User password is set and activated in this menu. In order to prevent<br />
the device’s settings from unouthorized access, it is necessary to set<br />
up a 4 digits user password and then activate it.<br />
This menu has 2 submenus.<br />
Changing the User Password<br />
In this menu, user password can be changed.<br />
Note: Factory set value for user password is “1234”<br />
Press SET button, PASS CodE EnbL is displayed. (New value is entered<br />
but it is not executed yet. In order to set the new value, please follow<br />
below steps.)<br />
Press ESC button one by one until “SAUE SEt no” is displayed.<br />
By using UP/DOWN buttons, find SAUE SEt yES<br />
In order to change the user password; in measurement mode,<br />
Press SET button for 3 secs. (UoL- tAGE trF menu is displayed)<br />
By using UP/DOWN buttons, find PASS CodE menu<br />
Dimensions<br />
Press SET button while SAUE SEt yES is displayed. (If you press<br />
ESC button or select “no” option instead of “yES”, new data is<br />
cancelled and the previous data is set.)<br />
79.3mm<br />
70mm<br />
Panel Cut-outs<br />
Duvar 79.3mm<br />
70mm<br />
Press SET button (PASS CodE EnbL menu is displayed.)<br />
<strong>96</strong>mm<br />
90mm<br />
91mm<br />
90mm<br />
By using UP/DOWN buttons, find PASS CodE CHnG menu.<br />
Press SET button (1st digit of second display blinks)<br />
<strong>96</strong>mm<br />
Type PR 19 (<strong>96</strong>x<strong>96</strong>)<br />
91mm<br />
Type PR 19 (<strong>96</strong>x<strong>96</strong>)<br />
50mm<br />
Tip 19<br />
By using UP-DOWN-SET buttons, enter<br />
old password.<br />
By using UP-DOWN-SET buttons, enter<br />
new password.<br />
Connection Diagram<br />
L1<br />
L2<br />
L3<br />
N<br />
7 8 9 10<br />
L1 L2 L3 N<br />
Voltage Measurement Input<br />
System<br />
By using UP-DOWN-SET buttons, enter<br />
re-enter new password.<br />
Auxiliary<br />
Supply<br />
11 12<br />
PR-19<br />
Press SET button PASS CodE CHnG is displayed. (New value is<br />
entered but is not executed yet. In order to set the new value, please<br />
follow below steps.)<br />
Press ESC button one by one until SAUE SEt no is displayed.<br />
By using UP/DOWN buttons, find SAUE SEt yES<br />
Press SET button while SAUE SEt yES is displayed. (If you press<br />
ESC button or select “no” option instead of “yES”, new data is cancelled<br />
and the previous data is set.)<br />
Activating the user password<br />
This menu is used to activate the user password.<br />
After activating the user password, if SET button is pressed for 3<br />
seconds in order to enter to the menu, a user password is required.<br />
In order to set CT ratio. In the measurement mode;<br />
Press SET button for 3 seconds (UoL- tAGE trF menu is displayed.)<br />
By using UP/DOWN buttons, find PASS CodE menu<br />
Press SET button (PASS CodE EnbL menu is displayed.)<br />
Press SET button (1st digit of second display blinks.)<br />
By using UP-DOWN-SET buttons, enter the<br />
password.<br />
6A<br />
Un<br />
Technical Features<br />
Operating Voltage (Un)<br />
: 24 ... 250 V AC/DC<br />
Frequency (Hz)<br />
: 45-65 Hz<br />
Auxiliary Supply Power Consumption : < 4 VA<br />
Measurement Input Power Consumption : < 1VA<br />
Vin<br />
: 1 - 300 VAC (L-N)<br />
: 2 - 500 VAC (L-L)<br />
Measurement Range<br />
: 0...40 kV<br />
Class<br />
: 0.5%±1digit [(10%-100%) x full scale]<br />
Voltage Transformer Ratio<br />
Primary : 1-40000<br />
Secondary : 1-300<br />
Ambient Temperature<br />
: -5°C; +70°C<br />
Display<br />
: Red LED display<br />
Dimension<br />
: PR-19<br />
Equipment Protection Class : Double Insulation-Class II ( )<br />
Box Protection Class : IP 54<br />
Terminal Protection Class : IP 00<br />
Box Material<br />
: Non-flammable<br />
Installation<br />
: Panel Mounted<br />
Wire Cross section (for terminal) : 2.5 mm2<br />
Weight<br />
: 0.30 kg<br />
Installation Category<br />
: Class III<br />
Panel Size<br />
: 91x91mm<br />
Complies with EN-61010-1 standard.<br />
Factory Set Values<br />
Prý - 00100<br />
SEC - 100<br />
PASS CodE EnbL - no<br />
PASS CodE - 1234<br />
Press SET button, EnbL no is displayed.<br />
By using UP/DOWN buttons, find EnbL<br />
yES menu<br />
2<br />
A3805/Rev.4