Tree of Life: Gustav with Gusto - Arts & Activities Magazine
Tree of Life: Gustav with Gusto - Arts & Activities Magazine
Tree of Life: Gustav with Gusto - Arts & Activities Magazine

Create successful ePaper yourself
Turn your PDF publications into a flip-book with our unique Google optimized e-Paper software.
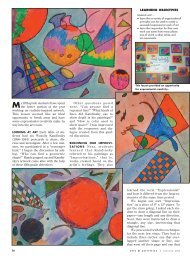
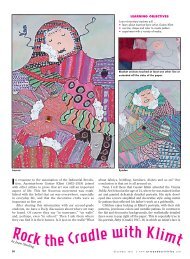
LEARNING OBJECTIVES<br />
Upper-elementary students will …<br />
• use wet-on-wet watercolor techniques.<br />
• incise a printing block, ink it and<br />
make prints.<br />
• sign and number an edition.<br />
MATERIALS<br />
• <strong>Gustav</strong> Klimt prints, especially <strong>Tree</strong> <strong>of</strong> <strong>Life</strong><br />
• 6" x 8" white copy paper<br />
• 6" x 8" polystyrene foam trays<br />
• 8" x 10" heavy (90-lb.) drawing<br />
or watercolor paper<br />
• Large brushes and water<br />
• Paper towels<br />
• Pencils and erasers<br />
• Black water-soluble printing ink or tempera<br />
• Brayers<br />
• Newspapers<br />
• Transparent tape and masking tape<br />
very talented fellow art teacher <strong>of</strong><br />
A mine, Phil Miller, shared a great<br />
lesson using the wet-on-wet watercolor<br />
technique as a base for block printing.<br />
He had fourth-graders etch line designs<br />
on polystyrene foam and use them to<br />
print over their watercolor papers.<br />
The results were very striking and<br />
impressive for such a simple printmaking<br />
project. I began thinking <strong>of</strong> other<br />
possibilities. What else could we print<br />
over beautifully hand-painted papers?<br />
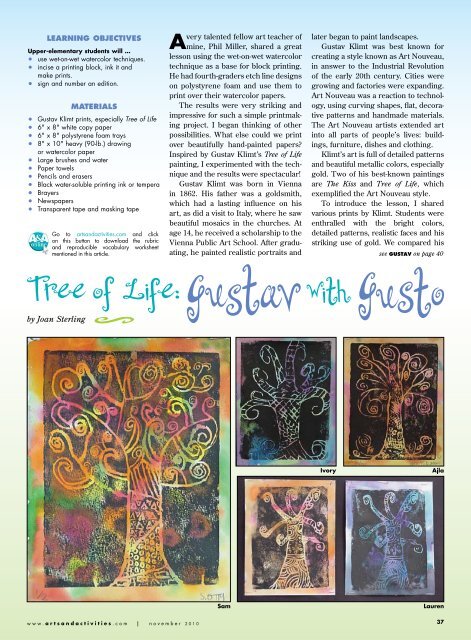
Inspired by <strong>Gustav</strong> Klimt’s <strong>Tree</strong> <strong>of</strong> <strong>Life</strong><br />
painting, I experimented <strong>with</strong> the technique<br />
and the results were spectacular!<br />
<strong>Gustav</strong> Klimt was born in Vienna<br />
in 1862. His father was a goldsmith,<br />
which had a lasting influence on his<br />
art, as did a visit to Italy, where he saw<br />
beautiful mosaics in the churches. At<br />
age 14, he received a scholarship to the<br />
Vienna Public Art School. After graduating,<br />
he painted realistic portraits and<br />
later began to paint landscapes.<br />
<strong>Gustav</strong> Klimt was best known for<br />
creating a style known as Art Nouveau,<br />
in answer to the Industrial Revolution<br />
<strong>of</strong> the early 20th century. Cities were<br />
growing and factories were expanding.<br />
Art Nouveau was a reaction to technology,<br />
using curving shapes, flat, decorative<br />
patterns and handmade materials.<br />
The Art Nouveau artists extended art<br />
into all parts <strong>of</strong> people’s lives: buildings,<br />
furniture, dishes and clothing.<br />
Klimt’s art is full <strong>of</strong> detailed patterns<br />
and beautiful metallic colors, especially<br />
gold. Two <strong>of</strong> his best-known paintings<br />
are The Kiss and <strong>Tree</strong> <strong>of</strong> <strong>Life</strong>, which<br />
exemplified the Art Nouveau style.<br />
To introduce the lesson, I shared<br />
various prints by Klimt. Students were<br />
enthralled <strong>with</strong> the bright colors,<br />
detailed patterns, realistic faces and his<br />
striking use <strong>of</strong> gold. We compared his<br />
Go to artsandactivities.com and click<br />
on this button to download the rubric<br />
and reproducible vocabulary worksheet<br />
mentioned in this article. see GUSTAV on page 40<br />
by Joan Sterling<br />
Ivory<br />
Ajla<br />
Sam<br />
Lauren<br />
www.artsandactivities.com x november 2010 37
(Circle No. 217 on A&A Reader Service Card)<br />
(Circle No. 231 on A&A Reader Service Card)<br />
School<br />
Assemblies<br />
(716) 684-0244<br />
(Circle No. 221 on A&A Reader Service Card)<br />
GUSTAV<br />
continued from page 37<br />
paintings and students<br />
noticed that<br />
although the faces<br />
were very three-dimensional and realistic,<br />
everything else was rather flat and<br />
stylized. I showed students how his artwork<br />
progressed from his early years<br />
into this Art Nouveau style, and shared<br />
biographical information to support this<br />
progression. We then focused on <strong>Tree</strong> <strong>of</strong><br />
<strong>Life</strong>, discussing the stylized quality <strong>with</strong><br />
the lovely patterns and gold overtones.<br />
I explained to students that our<br />
project would include both printmaking<br />
and painting, while asking them<br />
if they could explain the difference.<br />
We decided that prints are a way <strong>of</strong><br />
making more than one copy <strong>with</strong> various<br />
methods, including stamping,<br />
block printing, silkscreens, printers,<br />
I explained to students<br />
that our project would<br />
include printmaking<br />
and painting ...<br />
etc., whereas paintings are single,<br />
original works made by applying<br />
paints <strong>with</strong> a tool, such as a brush or<br />
palette knife.<br />
The first session we focused on creating<br />
our wet-on-wet watercolor backgrounds.<br />
We used heavy (90-lb.) drawing<br />
paper cut into 8" x 10" sheets. This<br />
would accommodate our polystyrene<br />
plates, which were made from lunch<br />
trays. After cutting <strong>of</strong>f the edges, our<br />
plates ended up being 6" x 8".<br />
I demonstrated the wet-on-wet technique,<br />
explaining that the paper needs<br />
to be very wet so the colors will bleed<br />
together. I show students how to place<br />
one color next to another and let them<br />
bleed together for exciting results. If<br />
they stay in the white spaces and don’t<br />
paint one color over another, the colors<br />
will stay vibrant.<br />
It is important that students get<br />
a good amount <strong>of</strong> color on their<br />
brushes so the colors will be vivid.<br />
Also, I discuss warm and cool colors,<br />
asking students to choose one<br />
color group, although they may<br />
introduce one accent color from the<br />
other group. This guarantees that<br />
see GUSTAV on page 41<br />
Established in 1922<br />
Try our<br />
ACMI approved<br />
AquaLine Inks<br />
www.faustink.com<br />
1-800-526-6826<br />
(Circle No. 210 on A&A Reader Service Card)<br />
(Circle No. 208 on A&A Reader Service Card)<br />
40<br />
november 2010 x www.artsandactivities.com
GUSTAV<br />
continued from page 40<br />
the colors will be<br />
bright and not get<br />
muddy. I had each<br />
student paint two papers, <strong>with</strong> the<br />
choice <strong>of</strong> doing more.<br />
When students are done painting,<br />
they get a 6" x 8" piece <strong>of</strong> paper and<br />
pencils to draw a tree Klimt-style. I<br />
demonstrate drawing the tree <strong>with</strong> a<br />
strong trunk and branches that turn<br />
into spirals at the ends. We use a variety<br />
<strong>of</strong> lines and shapes to create patterns<br />
on the trunk and branches. If<br />
time allows, they can outline the tree<br />
in extra-fine black marker. This will be<br />
used to etch on the polystyrene foam<br />
during the next session.<br />
The next class, students use their<br />
drawing to etch on the polystyrene<br />
plate. First, I have students make a<br />
Students enjoyed<br />
every aspect <strong>of</strong> this<br />
project and completed it<br />
<strong>with</strong> “mucho gusto.”<br />
little tab for a handle using a one and<br />
half inch–long piece <strong>of</strong> masking tape.<br />
Put the end <strong>of</strong> the masking tape on the<br />
middle <strong>of</strong> the back <strong>of</strong> the polystyrene.<br />
Pinch the middle <strong>of</strong> the tape, and then<br />
put the other end down. This creates a<br />
small tab that can be used for lifting up<br />
the plate.<br />
Then, tape the picture to the polystyrene<br />
on top and bottom <strong>with</strong> a small<br />
amount <strong>of</strong> tape. Using a sharp pencil,<br />
draw over all the lines and patterns,<br />
pressing lightly into the foam. Remove<br />
the paper and etch deeper into the<br />
foam, being sure to break the surface,<br />
but not go all the way through. A stylus<br />
<strong>with</strong> a metal tip or ballpoint pen<br />
may be used.<br />
The following session we complete<br />
the project by printing. I use a very<br />
controlled method that ensures good<br />
results <strong>with</strong> a minimum <strong>of</strong> mess. On<br />
each table <strong>of</strong> four, I have two printing<br />
stations. I lay out several sections <strong>of</strong><br />
newspaper on each station, <strong>with</strong> the<br />
open edges <strong>of</strong> the newspaper at the<br />
edge <strong>of</strong> the table. I put a tray <strong>with</strong> ink<br />
and a brayer in the middle <strong>of</strong> the table,<br />
<strong>with</strong> another clean brayer alongside.<br />
see GUSTAV on page 42<br />
Free furniture kit!<br />
With the purchase <strong>of</strong> a Paragon kiln<br />
For a limited time only, buy a new<br />
Paragon kiln and receive a free furniture<br />
kit to go <strong>with</strong> it.<br />
The free furniture promotion runs<br />
from September 1, 2010 through the<br />
end <strong>of</strong> 2010. This is our way <strong>of</strong> thanking<br />
you for your loyalty.<br />
Only 10- and 12-sided Paragon<br />
top-loading kilns qualify for the free<br />
furniture program. This includes the S,<br />
SnF, TnF, Janus, and Viking series.<br />
In addition, many Paragon ceramic<br />
top-loaders <strong>of</strong>fer 2” more interior depth<br />
than most competitive models. So you<br />
get extra kiln depth as a bonus to go<br />
<strong>with</strong> your free furniture.<br />
Call or send email for a free catalog<br />
on rugged Paragon kilns. Visit our<br />
home page to find an authorized Paragon<br />
reseller and to sign up for the free<br />
Kiln Pointers newsletter.<br />
(Circle No. 219 on A&A Reader Service Card)<br />
(Circle No. 214 on A&A Reader Service Card)<br />
The furniture kit includes a carefully selected<br />
assortment <strong>of</strong> shelves and posts<br />
for each Paragon kiln model.<br />
2011 South Town East Blvd.<br />
Mesquite, Texas 75149-1122<br />
800-876-4328 / 972-288-7557<br />
Toll Free Fax 888-222-6450<br />
www.paragonweb.com<br />
info@paragonweb.com<br />
www.artsandactivities.com x november 2010 41
(Circle No. 206 on A&A Reader Service Card)<br />
(Circle No. 218 on A&A Reader Service Card)<br />
GUSTAV<br />
continued from page 41<br />
Students will<br />
have one <strong>of</strong> their<br />
watercolor papers<br />
ready to print on one side <strong>of</strong> the<br />
newspaper. The other side will be<br />
used for inking. I show students how<br />
to roll the brayer just up to the ink<br />
to touch it, but not over it like a bulldozer.<br />
Too much ink is just as bad as<br />
not enough ink.<br />
Students first ink the plate <strong>with</strong> an<br />
even layer <strong>of</strong> black ink. Then they place<br />
the plate over the watercolor paper<br />
using their fingers to hold it up, making<br />
sure it’s straight before dropping it<br />
down on the paper. They press it into<br />
the paper, and they turn both the plate<br />
and paper over. It’s easier and more<br />
effective to rub it on the paper side.<br />
The clean brayer is used to roll the<br />
paper onto the foam plate <strong>with</strong> firm<br />
pressure. Students can take a peek at<br />
a corner, but once they lift the whole<br />
plate <strong>of</strong>f, it cannot go back on. The tape<br />
handles make it very easy to lift the<br />
plates. Place the print over to the side<br />
<strong>of</strong> the table and out <strong>of</strong> the way.<br />
Before printing another, fold one<br />
piece <strong>of</strong> newspaper up from the edge<br />
<strong>of</strong> the table to create a clean work<br />
surface. I also have paper towels available<br />
for students to wipe their fingers.<br />
Because <strong>of</strong> this, we had almost no fingerprints<br />
spoiling our prints.<br />
I show students how to sign and<br />
number their edition in pencil. They<br />
found this part very exciting, especially<br />
deciding how they should sign<br />
their names.<br />
Since we introduced so many new<br />
terms, I gave students a fill-in-theblank<br />
vocabulary worksheet. We also<br />
assessed this project using a rubric.<br />
The black ink emphasized the vivid<br />
watercolors, and the results were stunning.<br />
Students enjoyed every aspect<br />
<strong>of</strong> this project and completed it <strong>with</strong><br />
“mucho gusto.” Thanks, <strong>Gustav</strong>! n<br />
Joan Sterling teaches art at Hickory<br />
Woods Elementary School in Walled<br />
Lake, Mich., and is coauthor <strong>of</strong> “Art by<br />
the Book” (www.pieces<strong>of</strong>learning.com).<br />
VOCABULARY<br />
(Circle No. 211 on A&A Reader Service Card)<br />
(Circle No. 204 on A&A Reader Service Card)<br />
Brayer<br />
Edition<br />
Etching<br />
Plate<br />
Print<br />
Sign and number<br />
Stylus<br />
42<br />
november 2010 x www.artsandactivities.com