Keylocking Inserts - Pneumatic Technology, Inc
Keylocking Inserts - Pneumatic Technology, Inc
Keylocking Inserts - Pneumatic Technology, Inc

You also want an ePaper? Increase the reach of your titles
YUMPU automatically turns print PDFs into web optimized ePapers that Google loves.
THE<br />
DIFFERENCE<br />
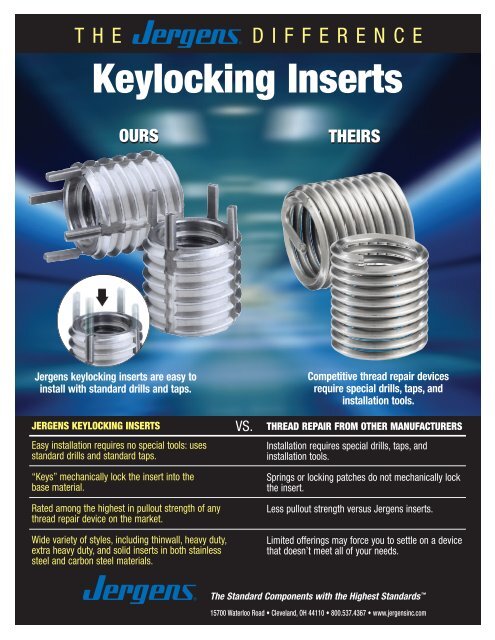
<strong>Keylocking</strong> <strong>Inserts</strong><br />
OURS<br />
THEIRS<br />
Jergens keylocking inserts are easy to<br />
install with standard drills and taps.<br />
JERGENS KEYLOCKING INSERTS<br />
Easy installation requires no special tools: uses<br />
standard drills and standard taps.<br />
“Keys” mechanically lock the insert into the<br />
base material.<br />
Rated among the highest in pullout strength of any<br />
thread repair device on the market.<br />
Wide variety of styles, including thinwall, heavy duty,<br />
extra heavy duty, and solid inserts in both stainless<br />
steel and carbon steel materials.<br />
VS.<br />
Competitive thread repair devices<br />
require special drills, taps, and<br />
installation tools.<br />
THREAD REPAIR FROM OTHER MANUFACTURERS<br />
Installation requires special drills, taps, and<br />
installation tools.<br />
Springs or locking patches do not mechanically lock<br />
the insert.<br />
Less pullout strength versus Jergens inserts.<br />
Limited offerings may force you to settle on a device<br />
that doesn’t meet all of your needs.<br />
The Standard Components with the Highest Standards <br />
15700 Waterloo Road • Cleveland, OH 44110 • 800.537.4367 • www.jergensinc.com
Installation Information<br />
1. Drill to allow full tap depth<br />
shown in chart. Note:<br />
Tap drill is oversized; see<br />
chart below. Countersink<br />
as shown in chart.<br />
3. Install insert .010" to<br />
.030" below surface.<br />
2. Tap to depth shown<br />
in chart.<br />
4. Drive keys down with<br />
proper installation tool.<br />
Installation Information<br />
Preparation of External Threads<br />
Prior to Installation (For <strong>Keylocking</strong> <strong>Inserts</strong> Only)<br />
Insert Installation Data Removal Data<br />
C'sink<br />
External Tap Dia. Minimum Drill<br />
Thread Length Drill +.010 Tap<br />
Class 2A L Size -.000 Depth Size Depth<br />
5/16-18 .31 I .323 .37 7/32 1/8<br />
3/8-16 .31/.37 Q .385 .37/.43 9/32 1/8<br />
7/16-14 .31/.37/.43 X .447 .37/.43/.50 11/32 3/16<br />
1/2-13 .37/.43/.50 29/64 .510 .44/.50/.56 13/32 3/16<br />
9/16-12 .43/.50/.56 33/64 .572 .50/.56/.62 15/32 3/16<br />
5/8-11 .50/.62 37/64 .635 .56/.68 17/32 3/16<br />
3/4-16 .62/.81 45/64 .760 .68/.94 21/32 3/16<br />
7/8-14 .68/.81/.87 53/64 .885 .75/.94/1.0 25/32 3/16<br />
1-12 .87 15/16 1.020 1.0 27/32 5/16<br />
1 1/8-12 1.12 1 1/16 1.145 1.31 31/32 5/16<br />
1 1/4-12 1.12/1.25 1 3/16 1.270 1.31/1.44 1 3/32 5/16<br />
1 3/8-12 1.25/1.37 1 5/16 1.395 1.44/1.56 1 7/32 5/16<br />
1 1/2-12 1.37/1.62 1 7/16 1.520 1.56/1.84 1 11/32 5/16<br />
1 5/8-12 1.81 1 9/16 1.640 2.06 1 15/32 5/16<br />
1 7/8-12 2.00 1 13/16 1.890 2.28 1 23/32 5/16<br />
Removal Information<br />
Jergens <strong>Keylocking</strong> <strong>Inserts</strong> can be removed<br />
without damage to the parent material.<br />
1. Drill the insert to the size and depth<br />
shown under removal data in the chart<br />
below.<br />
2. Bend the keys down and break them off.<br />
3. Remove the insert using an E-Z out or<br />
similar tool.<br />
The Standard Components with the Highest Standards <br />
www.jergensinc.com<br />
Jergens Way • 15700 S. Waterloo Road • Cleveland, OH 44110-3898 •<br />
USA (800) 537-4367 • (216) 486-5540 • Fax (216) 481-6193<br />
E-Mail: info@jergensinc.com