window treatments design pillows slipcovers upholstery
window treatments design pillows slipcovers upholstery
window treatments design pillows slipcovers upholstery

Create successful ePaper yourself
Turn your PDF publications into a flip-book with our unique Google optimized e-Paper software.
www.CHFmagazine.com<br />
September/October 2006
The Custom Home Furnishings Magazine September/October 2006
Contents September/October 2006<br />
Instructors’ Corner<br />
5 Advice from the Experts<br />
Cover Story…Master Bedrooms<br />
6 Master Bedrooms…Tradition Still Rules<br />
12 Sunburst Canopy<br />
15 Bedding Terminology<br />
34 Gathered Dust Ruffle: Serge & Flip Method<br />
A Sneak Peek Into a Workroom<br />
8 Mar-C's Custom Interior Decorating<br />
Industry Profile<br />
10 Glen Raven Custom Fabrics<br />
Design Ideas<br />
27 Pull-out Section of Design Ideas<br />
Down to Business<br />
38 Treatments Formerly Known as “Hard”<br />
Industry News<br />
39 News from WCAA Chapters<br />
Special Features<br />
40 Do You Need a Business Plan?<br />
41 CPR for the Designer/Workroom Relationship<br />
Extra Features<br />
42 Round Pillow with Decorative Border<br />
51 Knitting & Crocheting…Making a Comeback<br />
Business Therapy<br />
44 Will You Plant Seeds or Beg?<br />
Book Review<br />
46 The E-Myth Revisited<br />
Product Profile<br />
48 Rear Guard Tool Holder<br />
6<br />
Form of the Month<br />
49 Quote/Work Order Request<br />
Step-by-Step<br />
50 The Leading Edge Panel<br />
8 10<br />
The CHF Academy<br />
52 A Better View…Academy Success Story<br />
54 The Latest Career Professional Graduates<br />
55 The CHF Academy Schedule<br />
the custom home furnishings magazine<br />
13900-F South Lakes Drive<br />
Charlotte, NC 28273<br />
Margie Nance, Publisher<br />
Patricia Sprinkle, Editor<br />
Ross Terry, Graphics Artist<br />
SUBSCRIPTIONS<br />
800-222-1415 • 704-333-4636<br />
704-333-4639 FAX<br />
www.CHFmagazine.com<br />
$36 per year, including the CHF Forum<br />
editor@chfmagazine.com<br />
The CHF Magazine Advisory Board<br />
Jill Stanbro, Chairperson<br />
Karen Barnes • Linda Noakes • Amanda Endress<br />
Suzanne Cox-Hudson • Carlette Cormier • Judy Soccio<br />
Dean Fountain • Kelly Geraghty • Rebecca Mack<br />
Susan Kindel • Marilee Smock • Mary Ann Quinn<br />
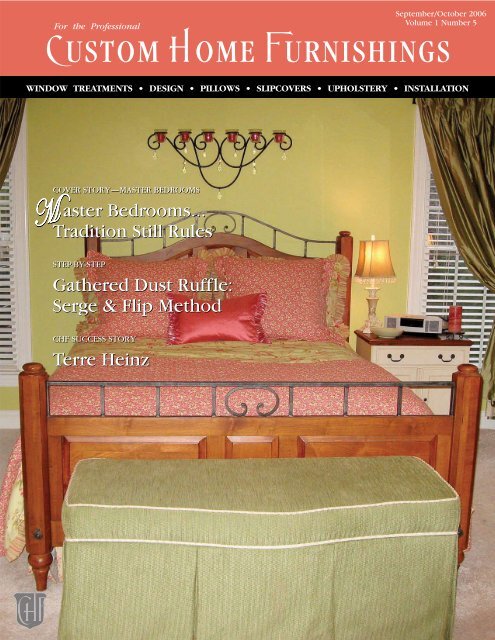
ON THE COVER…<br />
Connie Sikora created this comfortable retreat for her sister<br />
Paula Lempart-Stanfa’s Chapel Hill, NC, home. It features<br />
custom quilting by Prairie Creations. Photo by Tom Stanfa.<br />
Photo courtesy of A Room With A View.<br />
www.CHFmagazine.com<br />
September/October 2006
Associate Editor & Editor’s Journal September/October 2006<br />
from the associate editor<br />
Inspired by Color<br />
You’ll know it when you see it. This is what we<br />
tell our clients when they are searching for that<br />
“perfect” fabric, just the right paint color, or piece<br />
of furniture. The truth is that colors strike a cord<br />
within us that trigger certain feelings.<br />
Fall is my favorite season, and I am truly inspired by the changing<br />
colors of the trees. My entire house is decorated in the colors<br />
of fall. My living room and master bedroom are decorated in<br />
yellow and green. The living room is accented with rust and<br />
the bedroom has raspberry details. My kitchen is done is earth<br />
tones with chocolate brown printed fabric on the <strong>window</strong>s.<br />
I think that we tend to decorate our homes with colors that<br />
we look good in. So if you visit a retail client for the first time,<br />
take a look at her closet. Take mental notes of the overall color<br />
scheme. This will help you steer her in the right direction with<br />
her fabric and treatment selections. Our products are emotional<br />
purchases for our clients. I have learned that draperies are not<br />
“just curtains.” Our clients think of their <strong>window</strong> <strong>treatments</strong><br />
as being a reflection of themselves. If their friends don’t like<br />
them, they will feel like they have failed.<br />
Learning the emotional perspective is essential to selling <strong>window</strong><br />
<strong>treatments</strong> and soft furnishings. You need to understand<br />
that knowing how to engineer the fabrication of a treatment<br />
is half the battle. There are many other things that you need<br />
to know in order to become a successful <strong>window</strong> treatment<br />
sales person. Mary Ann Plumlee has developed a fantastic sales<br />
class at the Academy. Watch the schedule for her class in 2007.<br />
You will leave with a better understanding of how to sell to a<br />
client's emotions.<br />
You have all heard the saying, “The cobbler's children have<br />
no shoes.” You can search the forum and ask, “How many of<br />
us have <strong>window</strong> <strong>treatments</strong> in our own homes?” You will see<br />
that most of us do not. There are many reasons that this is true.<br />
The most common is that we just don’t have time since we are<br />
so busy working on everyone else’s projects. Take some time<br />
to find the colors that inspire you and then surround yourself<br />
with them. Paint your workroom, you will spend a lot of time<br />
there and you should feel happy when you are working.<br />
I hope that you enjoy this issue of the magazine! See you on<br />
the forum.<br />
Connie Sikora<br />
from the editor<br />
Welcoming the Fall<br />
Nothing can beat the days when fall first begins. I<br />
just love the pure enjoyment of the chilly nights<br />
and the breeze that blows during the cooler<br />
days. Fall starts with a time of brilliant colors<br />
and weekends that are packed with fall festivals. It is a time<br />
of renewal. A time to spend raking leaves and cooking up that<br />
first pot of hearty soup. Nature gives us this spectacular season<br />
to renew our spirits and our time outdoors.<br />
Our issue this month starts with great colors, many of them fall<br />
colors on page 6 with our Cover Story on Master Bedrooms.<br />
In keeping with the Master Bedroom theme, Leslie Fehling<br />
has a great step-by-step article on a Sunburst Canopy beginning<br />
on page 12. As always Leslie's work is awesome, and we<br />
appreciate her sending us this article. On page 15 is an article<br />
on Bedding Terminology. And then on page 34 Susan Schurz's<br />
share with you a step-by-step article on a Gathered Dust Ruffle:<br />
Serge and Flip Method.<br />
There are lots of great business articles in this issue. On page<br />
38 Mary Ann Plumlee gives us an insight to Treatments Formerly<br />
Known as Hard. You will not want to miss this article.<br />
And do you need a business plan? Of course, you do. Rebecca<br />
Mack gives you great ideas on how to accomplish this on page<br />
40. A new column this issue is Business Therapy by Suzanne<br />
Cox-Hudson. She asks an important question, “Will You Plant<br />
Seeds or Beg?"<br />
On another note, I would like to address a<br />
personal issue. This September/October issue<br />
will be my last issue as Editor of The Custom<br />
Home Furnishings Magazine. The last three<br />
years I have spent editing and working on the<br />
SewWHAT? Magazine and The CHF Magazine<br />
have been three of the most wonderful<br />
years of my life. I have met many people in this industry who<br />
will remain lifelong friends. I would like to say a special thank<br />
you to the instructors at The Custom Home Furnishings Academy<br />
and my many CHF Network Forum friends. Without each<br />
of you, I would never have succeeded the way I have with this<br />
magazine. And to my special two mentors, Cheryl Strickland<br />
and Margie Nance, thanks doesn't seem quite enough. Best<br />
wishes to each of you for continued success in your business.<br />
Patricia Sprinkle<br />
The Custom Home Furnishings Magazine September/October 2006
Instructors’ Corner<br />
Patricia Sprinkle<br />
Advice from the Experts<br />
Marketing Tactics & Most Profitable Treatments<br />
This issue’s questions for the instructors at The<br />
Custom Home Furnishings Academy were: What<br />
has been your most successful marketing tactic?<br />
and the second questions was What is your most<br />
profitable treatment and why?<br />
~ Patricia Sprinkle<br />
WHAT HAS BEEN YOUR MOST SUCCESSFUL<br />
MARKETING TACTIC?<br />
Jill Stanbro — Swags, Top Treatments, and Embellishments<br />
Instructor: Being a wholesale workroom, I<br />
have never really had to advertise. In the beginning,<br />
I contacted two <strong>design</strong>ers that I knew<br />
about. Through good work, I eventually got<br />
all of their business. From that I then hooked<br />
up with most of my other <strong>design</strong>ers through<br />
the installer. It was his endorsement that was<br />
my best advertising strategy.<br />
Connie Sikora — Sew Like a Pro Instructor: When I decided<br />
that I wanted to concentrate on working “to the trade”, I<br />
went to DesignerFinder.com and pulled a list of <strong>design</strong>ers in<br />
the Chicagoland area. I then wrote a letter of introduction to<br />
about 20 of them. I ended up meeting with four of them and<br />
worked for two for quite some time. Other than that, the best<br />
marketing devise any good workroom can have is her work.<br />
The work speaks for itself and word of mouth is the best<br />
advertising.<br />
Jeanelle Dech — Professional Slipcovers Instructor: Early on,<br />
with a home-based slipcover business, I was always looking<br />
for places to show my work. I offered to create form-fitting<br />
<strong>slipcovers</strong> for two wing chairs in the waiting room of my<br />
OB-GYN's office. Each day 20-30 women passed through. I<br />
placed a small sign on the table that said,<br />
“Believe it or not, these are <strong>slipcovers</strong>!”<br />
and left a stack of business cards. Those<br />
two chairs brought slipcover business<br />
for more than 10 years until the office<br />
closed. They brought at least one job<br />
per month, and more importantly, led to<br />
www.CHFmagazine.com<br />
several whole-house <strong>design</strong> jobs for the doctors and nurses<br />
who worked there.<br />
Susan Schurz — High-end Fabrication Methods Instructor: As<br />
a to-the-trade workroom, I have not needed to<br />
advertise. Word-of-mouth has been my most<br />
successful marketing tactic. In order to keep<br />
positive referrals you must be consistent with<br />
your business practices and the quality of your<br />
product. After that I would say networking<br />
with my local WCAA group has been very<br />
beneficial.<br />
Terri Booser — Workroom Shortcuts, Draperies, and Shades<br />
Instructor: Undoubtedly the most successful<br />
marketing tactic I have ever done is creating my<br />
marketing kit and taking it to task. Attending<br />
conferences and local meetings with this in hand<br />
to showcase my business without feeling I am<br />
“showing off” opened many doors for me.<br />
WHAT IS YOUR MOST PROFITABLE<br />
TREATMENT AND WHY?<br />
Susan Schurz — High-end Fabrication Methods Instructor: This<br />
is difficult to answer, because in a custom market every job is<br />
different. What makes a profitable treatment in my workroom<br />
is often the extras that are added, such as interlining, trims, or<br />
other custom details, and not the specific style.<br />
Jill Stanbro — Swags, Top Treatments, and Embellishments<br />
Instructor: My most profitable treatment is a cornice board, I<br />
can make them quickly and have developed a way to put the<br />
cording on them with no sewing. There is very little cutting<br />
and assembling of the fabric needed, and they nearly always<br />
go together with very little fussing.<br />
Terri Booser — Workroom Shortcuts, Draperies, and Shades<br />
Instructor: The most profitable <strong>window</strong> treatment for me would<br />
have to be anything with embellishments. Why? Because every<br />
time an embellishment is added it adds on to the bottom line. A<br />
banded valance with beaded trim and microcord — cha-ching!<br />
It easily doubles the initial labor cost.<br />
September/October 2006
Cover Story<br />
Patricia Sprinkle<br />
Master Bedrooms<br />
Tradition Still Rules<br />
The bedroom has<br />
historically been<br />
a room for letting<br />
down your guard,<br />
gaining privacy, and experiencing<br />
love and romance. It<br />
has always been a room where<br />
we often find refuge from our<br />
chaotic world. Today is no different.<br />
We all look for a place<br />
where we can find peace and<br />
calm. In the Master Bedroom<br />
we have to please no one but<br />
ourselves. It is a place for<br />
pampering and indulgence.<br />
I can't tell you how many<br />
times I have taken refuge in<br />
the bedroom to steal away a<br />
few minutes to read a good<br />
book, watch a great television<br />
program (that is not a cartoon), work on my<br />
crocheting, or work on my book I am writing<br />
in peace and quiet.<br />
In the Master Bedroom tradition is still the<br />
king because it is so timeless. Interior <strong>design</strong>ers<br />
are selling a lot of sleigh beds and other classic<br />
looks with newer finishes like mocha and<br />
espresso.. Last year I received a sleigh bed for<br />
Christmas. I think it was one of the greatest<br />
gifts I have ever received. I love the traditional<br />
look and how it just warms up the room.<br />
Sandra VanSickle of North Carolina finds that<br />
her clients love to have that “over the top”<br />
custom look in their bedrooms. “They are indulging<br />
in luscious silks, trims, lots of <strong>pillows</strong>,<br />
chandeliers, art work, and beautiful rugs,” said<br />
Sandra. “More and more clients are turning<br />
to custom bedding for their rooms. It allows<br />
them to pick their own theme and place their<br />
individual stamp on their home versus choosing<br />
a store bought set."<br />
From the home of Philippe and Mary Bee Petot in Greensboro, NC, a<br />
traditional look with the gorgeous teal and brown colors that are popular<br />
right now. All fabrics shown are Sunbrella ® decorative fabrics. Photos<br />
submitted by Glen Raven, Inc..<br />
Gillian Wendel of Pinehurst, TX, has also seen an increase in custom made<br />
<strong>window</strong> <strong>treatments</strong> and bed coverings. She has seen that pieced coverlets<br />
The Custom Home Furnishings Magazine September/October 2006
Cover Story<br />
Patricia Sprinkle<br />
have been very successful as they introduce<br />
a truly custom feel to a master suite<br />
that extends beyond the traditional duvet.<br />
Gillian used nine fabrics plus trims for the<br />
pieced coverlet shown on page 7. “The<br />
pieced coverlet made the top of the bed very<br />
interesting,” said Gillian. “In Houston it is<br />
a nice weight. While the colorful mix of this<br />
set is not for the faint of heart, my client is<br />
an artist and was thrilled with the result.<br />
And the opportunity to <strong>design</strong> with multiple<br />
fabrics has pushed me as the <strong>design</strong>er and<br />
workroom to new levels,” stated Gillian.<br />
Terri Booser of Wattsburg, PA, feels that the<br />
Master Bedroom trend is also casual simplicity.<br />
It is includes warm or neutral colors.<br />
“Window <strong>treatments</strong> trends include simple<br />
panels or valances with blinds,” says Terri.<br />
“There is definitely no fuss and no muss."<br />
What makes the Master Bedroom come alive? It would be<br />
great choices in color, fabric, pattern, and accessories. As Gillian<br />
pointed out, the artistic hand really makes a difference.<br />
Pieced coverlets have been successful as they introduce a truly traditional,<br />
custom feel to a master suite. Photo submitted by Gillian Wendel.<br />
considering all the new mattresses are so high, a ready-made<br />
comforter just isn't large enough.”<br />
Flowery, highly feminized master bedrooms are not more<br />
appealing to a man than a bedroom decorated in the colors<br />
of the man's favorite sports team is for a woman. Looks that<br />
are gender-neutral and balance the room are the tradition for<br />
This client wanted to build a coverlet around a tapestry<br />
fabric. Six fabrics were used, and in keeping with the<br />
traditions of neutral colors, monochromatic colors were<br />
used. The different textures made it a visual delight. Photo<br />
Connie Sikora of Indiana has seen that this trend is definitely<br />
true. "People are using more fabric,” said Connie. "I do fuller<br />
bedskirts, breaking on the floor, with lots of fullness. Duvet<br />
covers are big as well as custom-quilted coverlets and several<br />
different sized <strong>pillows</strong>, including Euros, King, and standard.<br />
I think that the custom bedding market is bound to grow,<br />
www.CHFmagazine.com<br />
Creating a bedroom masterpiece is what the client is<br />
looking for. Photo submitted by A Room with a View.<br />
today's master bedroom. Creating a bedroom masterpiece is<br />
all about what the client is looking for and putting that in a<br />
good style and <strong>design</strong>.<br />
September/October 2006
A Sneak Peek Into A Workroom Mar-C's Custom Interior Decorating<br />
Mar-C's Custom Interior Decorating<br />
A Family Tradition<br />
Martha DeMeo learned the art of sewing from<br />
watching her grandmother in the dressmaking<br />
business. When she marred her husband<br />
Rich in 1967, she started doing alterations<br />
and dressmaking. Through word of mouth, this expanded<br />
her business into <strong>design</strong>ing and sewing prom and wedding<br />
gowns and then <strong>window</strong> <strong>treatments</strong> and <strong>slipcovers</strong>. Martha<br />
is basically a self-taught sewer. She has never had any formal<br />
training and learned as she created projects.<br />
She has always enjoyed creating and fabricating interior<br />
decorating <strong>treatments</strong>, and that's how Mar-C's Interior<br />
Decorating started. The name Mar-C's is for Martha, Rich,<br />
and children. Both our children, Christine and Cynthia, helped<br />
in and around the workroom in their younger years. Their<br />
workroom first started in the basement of their rural upstate<br />
New York home. Nothing fancy, just a few machines and a<br />
4'x8' table. Eventually fabric and trim samples were added,<br />
and then in 1994 they relocated to N. Myrtle Beach, SC, to<br />
help care for Martha's ill mother. This is when a dramatic<br />
change took place.<br />
They opened a 1,000 sq. foot retail store and drapery workroom,<br />
basically without any knowledge of running a full-time<br />
retail business. Within two years, we ran out of space and<br />
expanded by another 1,000 sq. feet. The workroom is in<br />
the rear of the first store space, along with the play area for<br />
Martha's 3-year old granddaughter, Trinity. The front is where<br />
Mar-C's is very family oriented. Martha's daughter<br />
Cyndi works in the office.<br />
Martha and Trinity at the sewing machine.<br />
the completed orders and blinds are stored until install. They<br />
also have some in-stock fabrics and accessories in this space.<br />
The other side of the store is used for fabric samples, ADO<br />
display, trim samples, hardware samples, blinds, verticals,<br />
and wallpaper samples. There are two workroom tables in<br />
the front of this side with our photo albums of previous jobs<br />
accumulated from the past 20 years. There is not any wasted<br />
space. (They consider their workroom cluttered, but they know<br />
right where everything is!)<br />
Martha doesn't see her workroom as typical. She is very nontraditional,<br />
casual, and family oriented. Her daughter, Cyndi,<br />
works there and her three children have also been working the<br />
workroom fro the past 10 years. They include Alexandra who<br />
is 10, Zachary who is 8, and Trinity.<br />
The favorite thing in Martha's workroom would have to be<br />
her husband and her granddaughter. “Rich and I have been<br />
working together for 40 years,” said Martha. “I couldn't<br />
do it without him. Trinity is such a joy to have around.” As<br />
Martha sews, Trinity will remove the pins as they come up,<br />
and when hemming, She puts the drapery weights in the hem.<br />
(She calls that a pocket.) Trinity is learning to interact with<br />
many different people and already knows how to sell clients.<br />
As for a favorite item, it would have to be my good old Elna<br />
from the early 1980's. This machine has been used to teach<br />
their children and grandchildren to sew, along with making<br />
many <strong>window</strong> <strong>treatments</strong> in the past. The main purpose for<br />
the Elna now is for tacking drapery pleats. It's small and<br />
portable and can be put in just about anywhere for tacking<br />
and other small jobs.<br />
The Custom Home Furnishings Magazine September/October 2006
A Sneak Peek Into A Workroom<br />
Mar-C's Interior Decorating<br />
As you enter Martha's workroom, the 5'x12' table is to the<br />
right. Brackets for the lining are attached at one end of the<br />
table, the other end has two narrow shelves for storage. Under<br />
the table, there are two shelves that store the fabric they<br />
are working on. There is walking room around the table with<br />
long shelves for storage against the wall. In the back of the<br />
workroom are the machines and more supplies. They have an<br />
old Singer industrial, a Tacsew blindhemmer, a Johnson ruffler,<br />
the Elna, and a few sergers.<br />
Rich at the cutting table.<br />
Martha would like to advise anyone who is interested in starting<br />
a workroom to "jump in and get started.” "If someone asks<br />
you to do a treatment that you haven't yet mastered, go ahead<br />
View of sewing machines.<br />
They have a shelf area behind the machines for storing thread.<br />
Rich built a shelf about 3' down from the ceiling, and this is<br />
where the extra pillow forms are stored. To the left of this is<br />
another shelf for the drapery tapes, Velcro, and buckram. More<br />
hardware is stored on the left side of this space along with the<br />
copier and packing supplies. This is also space for Trinity, which<br />
includes her lunch table, television and nap space.<br />
Although Martha admits that she is not the most organized<br />
person, she definitely knows that she has organized chaos in<br />
the workroom. “We custom make some of the best and most<br />
talked about <strong>treatments</strong> on the beach,” says Martha.<br />
www.CHFmagazine.com<br />
Front display <strong>window</strong>.<br />
Fabric sample books with trim storage on top of the racks.<br />
and try it. If you say you can't do it before you try, you will<br />
never know if<br />
you could have<br />
done it,” said<br />
Martha. “That<br />
has been my<br />
thinking from<br />
the beginning.<br />
If you want to<br />
explore deeper The in-stock fabric storage area.<br />
o c e a n s , y o u<br />
have to first leave sight of the shore. There is nothing that you<br />
can't do if you don't try!”<br />
September/October 2006
Industry Profile<br />
Glen Raven, Inc.<br />
Glen Raven Custom Fabrics<br />
Delivers Good Looks and High Performance with Sunbrella ® Fabrics<br />
Forget what you thought you knew about Sunbrella®; it’s not just<br />
for outdoor decorating anymore. Now available through decorative<br />
jobbers, such as Silver State, Donghia and B. Berger, Sunbrella<br />
Furniture Fabrics feature beautiful color and <strong>design</strong> along with<br />
legendary durability.<br />
Sunbrella offers luxurious textures, jacquards and velvets in a full range of<br />
colors perfect for inside and outside the home. Your clients can rest assured<br />
that virtually any stain can be removed, and Sunbrella will withstand the<br />
rigors of active lifestyles. With the addition of Sunbrella Sheers, Glen Raven<br />
now offers a complete range of looks for your <strong>window</strong> treatment needs, and<br />
you can rest assured that they will not fade, shred, or degrade when exposed<br />
to harsh sunlight.<br />
High Performance Sunbrella ® fabrics shown in <strong>upholstery</strong> and <strong>window</strong> applications in Glen Raven's High<br />
Point showroom. Fabrication and installation by Beth Hodges, Soft Furnishings, Elberton, GA.<br />
10 The Custom Home Furnishings Magazine September/October 2006
Industry Profile<br />
Glen Raven ,Inc.<br />
Sunbrella residential fabrics<br />
offer the same performance<br />
as their outdoor counterparts,<br />
making them ideal<br />
for your clients with children,<br />
pets, bay <strong>window</strong>s or<br />
busy entertainment schedules.<br />
Most stains clean up<br />
with mild soapy water, but<br />
all Sunbrella fabrics are<br />
bleach cleanable.<br />
Sunbrella fabrics debuted in<br />
the early 1960s as an alternative<br />
to the most popular<br />
awning fabric at that time,<br />
cotton. Sunbrella offered<br />
the same rich look of cotton,<br />
but did not fade or<br />
degrade, even in the brightest<br />
sun, and offered years of<br />
care free service.<br />
Boaters soon discovered the<br />
good looks and durability of<br />
Sunbrella fabrics for boat tops<br />
and sail covers. Around the<br />
world today, Sunbrella is the No. 1 fabric choice for power<br />
boaters and sailors, enjoying universal name recognition, synonymous<br />
with quality and durability.<br />
Luxurious Sunbrella Velvet with all of the same performance properties that you've<br />
come to expect from Sunbrella Performance Fabrics. Available in: Terracotta, Vellum,<br />
Cocoa, Wheat, Plum, Antique Beige, Deep Sea. Not pictured: Bay Brown and Herbal.<br />
While Sunbrella was gaining recognition in the great outdoors,<br />
Glen Raven was preparing Sunbrella to come inside the home.<br />
Thanks to intricate jacquard weaving, innovative yarn constructions<br />
and advanced fabric finishes, the <strong>design</strong> and manufacturing<br />
teams at Glen Raven created Sunbrella fabrics that match<br />
the look and feel of fine interior fabrics.<br />
You will also find Sunbrella on the nation’s roadways. Sunbrella<br />
is the leading choice for convertible car tops and is increasingly<br />
popular for recreational vehicles. Fade resistance, durability and<br />
popular colors have made Sunbrella a leader in these market<br />
Glen Raven Custom Fabrics, the makers of Sunbrella fabrics,<br />
next took this winning formula – high-performance fabrics<br />
with the look and feel of cotton – to the outdoor furniture<br />
industry. Market umbrellas and furniture cushions made with<br />
Sunbrella fabrics are fast drying, durable, easy to clean and<br />
beautiful. Over the years, all of the nation’s leading casual<br />
furniture manufacturers have adopted Sunbrella for their premium<br />
furniture lines.<br />
International <strong>design</strong> authorities Joe Ruggiero and Richard<br />
Frinier, along with Sunbrella’s own <strong>design</strong> team, have pushed<br />
the envelope on performance fabrics. Today you will find Sunbrella<br />
throughout the home, from decks, patios and poolside,<br />
to dining rooms, family rooms, bedrooms and even kitchen and<br />
bath. Sunbrella delivers a complete package of enduring color,<br />
exquisite <strong>design</strong>, sumptuous hand and ease of cleaning.<br />
Design and performance innovation continues for Sunbrella<br />
fabrics, focused on providing texture, color and luxury to<br />
interior and exterior spaces, along with legendary durability.<br />
Wherever people demand fabrics that are beautiful, comfortable<br />
and dependable, Sunbrella will be there with fashion right<br />
colors, <strong>design</strong>s, and textures.<br />
Visit www.sunbrella.com, or view Silver State’s extensive<br />
Sunbrella line at www.silverstatetextiles.com.<br />
www.CHFmagazine.com September/October 2006 11
Master Bedrooms<br />
Leslie Fehling<br />
Sunburst Canopy<br />
Makes a Dramatic Statement<br />
A<br />
Sunburst Canopy makes a dramatic<br />
statement in a bedroom,<br />
enhancing and complementing<br />
the drapery <strong>treatments</strong> on a<br />
canopy bed. They are a bit of a challenge<br />
to make, and I recommend working with a<br />
helper to make the whole process go more<br />
smoothly. Your efforts will be rewarded<br />
with an impressive and beautiful finished<br />
product that your customer will love.<br />
CONSTRUCTING THE FRAME<br />
Begin by measure the bed canopy and determine<br />
how the finished sunburst will be<br />
installed. Sometimes it is possible to simply lay<br />
the completed piece on top of the bed frame.<br />
In some cases, however, it is necessary to drop<br />
the sunburst into the canopy opening and support it with 4'<br />
steel mending plates screwed into the sunburst canopy frame,<br />
extending out onto the bed frame and attaching with screws.<br />
For some beds, it is necessary to make cutouts on the corners of<br />
the canopy frame for the bedposts. Measure door openings in<br />
The finished<br />
canopy.<br />
your workroom and at the customer's home to ensure that the<br />
canopy frame will fit through the doors on installation day.<br />
Illustration 1<br />
Illustration 2<br />
12 The Custom Home Furnishings Magazine September/October 2006
Master Bedrooms<br />
Leslie Fehling<br />
Construct a frame of 1"x2" boards as shown in<br />
illustration 1. Use a 1"x10" across the middle with a 5" hole<br />
cut in the center. A test fit on the bed might be a good idea<br />
at this point to prevent any surprises later on. On the canopy<br />
frame, mark the head and foot of the bed, since the bed frame<br />
may not always be perfectly square.<br />
Paint the frame or staple on a layer of polyester batting to<br />
prevent staining from the wood and to give the edges a softer<br />
look shown in illustration 2. Be sure you can still see your head<br />
and foot marks. When constructing the frame, be sure to allow<br />
for the thickness of the batting and the fabric that will be<br />
wrapped around it.<br />
FIGURING YARDAGE<br />
Measure from a corner of the frame<br />
to the center of the 5" hole (as<br />
shown in illustration 1 as A.)<br />
Option 1: If (A + 5") is less than or<br />
equal to the width of your fabric,<br />
then the selvage will be positioned<br />
around the outside edge of the<br />
frame. Allow for 2 to 3 times fullness.<br />
Measure around the outside edge of the frame, multiply<br />
by fullness, and divide by 36 to obtain the yardage amount<br />
needed.<br />
Gather one long edge of the fabric to the correct fullness. Divide<br />
into eight equal sections.<br />
ATTACHING THE FABRIC TO THE FRAME<br />
To divide the circumference of the frame into 8 equal sections,<br />
mark the center of each side, then measure the distance between<br />
marks and place marks halfway between (not on the corners<br />
of the frame.) See illustration 1 on page 12.<br />
Lay the frame on a worktable, top side up, and fasten fabric<br />
in place with large push pins at ¹⁄₈" marks. Place the fabric<br />
about 1-1½" in from the edge. Distribute fullness evenly. See<br />
illustration 3.<br />
Illustration 3<br />
Staple the gathered fabric all around the edges of the frame as<br />
shown in illustration 4.<br />
Option 2: If (A + 5") is greater than the width of your fabric,<br />
you must cut the fabric into lengths of at least (A + 5".) To<br />
figure yardage, measure around the outside edge of the frame,<br />
multiply by fullness, and divide by your fabric width to determine<br />
how many cuts are needed. Multiply the number of cuts<br />
by (A + 5") to get the total length required. Divide by 36 to<br />
convert inches to yards.<br />
PREPARING THE FABRIC<br />
For Option 1: Join the two short ends of the length of the fabric,<br />
right sides together, to form a continuous loop.<br />
Illustration 4<br />
For Option 2: Join cut lengths together, right sides together, to<br />
form a continuous loop.<br />
To reduce bulk in the center of the sunburst, you may choose<br />
to make darts in the fabric. Stitch darts approximately 20"<br />
long, starting at 3" wide and tapering down to 0. If you used<br />
Option 2, place some of the darts on the seams. Take plenty of<br />
darts. It will greatly simplify your work later on, and the dart<br />
seams will not show when the sunburst is finished. They will<br />
be folded into the pleats.<br />
(continued on page 14)<br />
www.CHFmagazine.com September/October 2006 13
Master Bedrooms<br />
Leslie Fehling<br />
Sunburst Canopy (continued from page 13)<br />
GATHERING THE FABRIC INTO THE CENTER<br />
First, divide the fullness by firmly pulling the fabric in from<br />
each corner and stapling just outside the center circle. Then<br />
pull the fabric from each corner and staple. Use ¼" or ³⁄₈"<br />
staples in the beginning, and as in the thickness of the gathers<br />
increases, change to ½" or ⁵⁄₈".<br />
to have only about 6" fullness in each one, take each 6" section<br />
and fold in three or 4 pleats. Put in the final staples. It<br />
works best to do every other section at this point, then do the<br />
final ones. Radiate staples out from the center, like a sunburst,<br />
perpendicular to the circle. See illustration 5.<br />
When you have finished stapling the front, staple down the<br />
fabric on the back side and trim off the excess. See illustration 6.<br />
Check all the pleats on the front and rearrange any that may<br />
need to be tidied up.<br />
MAKING THE ROSETTE<br />
Cut strips 5" wide. Join together, fold in half, and serge the<br />
long edge. Gather 2½xfull. Cut two 6½" circles of buckram<br />
and baste together. Mark concentric circles 1" apart. Sew or hot<br />
glue four circles of ruffles over the marked lines. Attach a 1⁷⁄₈"<br />
covered button in the center by looping tufting twine through<br />
the button shank, then pulling the twin through to the back<br />
side of the buckram and typing it securely. See illustration 7.<br />
Staple the rosette to the 1"x10", hiding the staples under the<br />
ruffles. Make sure it is perfectly centered.<br />
Illustration 5<br />
Now work on one of these sections at a time. Divide each<br />
section in half and staple once at the half point. Then divide<br />
each one of those sections in half. Keep dividing into smaller<br />
and smaller sections. When sections have been broken down<br />
Illustration 7<br />
Illustration 6<br />
FINISHING<br />
Staple blackout lining on the top side of the canopy frame about<br />
½" from the edge. Trim off the excess lining then cover the<br />
14 The Custom Home Furnishings Magazine September/October 2006
Master Bedrooms<br />
Leslie Fehling<br />
staples and the edge of the lining with gimp trim. The finished<br />
sunburst canopy is ready to be installed. See illustration 8.<br />
Illustration 8<br />
Bedding Terminology<br />
There are many choices when it comes to making the bedding<br />
<strong>treatments</strong> for the best bedroom space available. Being able to<br />
explain the differences to your clients is important. We'll take<br />
a look at some of the terms used.<br />
Bedsack: The cover is made to cover the mattress, just like a<br />
fitted sheet. All four corners are stitched down with approximately<br />
4" allowed to go under the mattress. There is elastic<br />
at the corners.<br />
Bedspread: A treatment that entirely covers the bed, hanging<br />
down over the sides to the floor.<br />
Box Pleat: A pleat that is formed on the front side of the fabric<br />
and is flat rather than folded and tacked like pleated drapes.<br />
Canopy: A fabric treatment that is installed above the bed.<br />
Comforter: A reversible throw style that covers the top of the<br />
bed to the headboard and approximately 2" below the mattress<br />
on the sides and the foot.<br />
Corona: A canopy hung from a crown or ring attached either<br />
to a ceiling or to the wall at the head of the bed.<br />
Coverlet: A bed treatment, like a bedspread, but with a shorter<br />
drop (usually to expose a dust ruffle.)<br />
The canopy shown in this article was part of an elaborate bed<br />
ensemble in a historic Victorian home. Contrast-lined swags<br />
and self-lined jabots were Velcro-mounted inside the bed<br />
canopy, and contrast-lined puddled panels were hung from<br />
screw eyes installed in the bottom of the sunburst canopy<br />
frame. Large double-tassel tiebacks and a gathered bedskirt,<br />
along with a purchased comforter and <strong>pillows</strong> completed the<br />
luxurious look of this master bedroom.<br />
Leslie Fehling is the owner of Leslie Fehling<br />
Designs, a home-based workroom in<br />
Prosperity, PA, serving both retail customers<br />
and <strong>design</strong>ers. Leslie holds a BA in art<br />
and has been sewing for most of her life.<br />
In addition to <strong>window</strong> <strong>treatments</strong>, her<br />
business offers custom <strong>slipcovers</strong>, <strong>pillows</strong>,<br />
bedding, and ottomans. She enjoys<br />
using her background in art and quilting<br />
to bring a unique touch to the soft furnishings she creates<br />
for her customers. Leslie is a frequent contributor to The<br />
Custom Home Furnishings Magazine.<br />
Drop: The length from the top of a bed treatment to the floor,<br />
or toward the floor if not floor length.<br />
Dust Ruffle or Bed Skirt: A bed treatment that lies between the<br />
mattress and the box springs and hangs down to the floor.<br />
Duvet: A pillowcase type cover for a comforter with a closure<br />
that is usually a zipper or buttons, but the closure can be other<br />
styles.<br />
Gusset: A flap of fabric that hangs down from the bottom<br />
corner of a bed treatment which as a split corner. It is used to<br />
keep the mattress of box springs from showing.<br />
Pillowcase: A sewing technique used to hide seams by sewing<br />
them with the right sides of the fabric together and then turning<br />
the fabric inside out.<br />
Pillow Sham: A decorative pillow cover that is usually ruffled<br />
or flanged. Shams are used as extra <strong>pillows</strong> on beds to hide<br />
the bed <strong>pillows</strong>.<br />
Reverse Sham: A separate flap of fabric sewn to the top of a<br />
bedspread that folds over the top of the <strong>pillows</strong>, instead of tucking<br />
under the front of the <strong>pillows</strong> like a typical pillow turn.<br />
Tester: The frame above a four-poser bed.<br />
www.CHFmagazine.com September/October 2006 15
16 The Custom Home Furnishings Magazine September/October 2006
CHF Tips & Tricks<br />
Slipcover Solution<br />
By Jeanelle Dech<br />
I like to refer to nightmare jobs as lessons learned. The one I<br />
remember most occurred nearly 12 years ago. Up until that<br />
point I had been doing C.O.M. <strong>slipcovers</strong> out of my home.<br />
This particular job consisted of form-fitting <strong>slipcovers</strong> for<br />
a 3-piece sectional sofa and 45 yards of heavy tapestry. It<br />
was my first significant fabric purchase and was to be the<br />
most profitable slipcover job to date.<br />
We picked up the pieces to begin work — a one-armed<br />
three-seater, a one-armed two seater, a corner piece, and 12<br />
cushions. The cushions came together effortlessly. I was on<br />
a roll. I pin fit the three pieces quickly (using the reverse-pin<br />
technique) and stitched it all in record time. As I went to put<br />
the covers on right side out to admire my work....DUH!! The<br />
three-seater’s arm was on the wrong side! The two-seater’s<br />
arm was on the wrong side! And, even the corner piece did<br />
not fit as it was not symmetrical.<br />
Frantically, I ripped and re-pinned and began stitching again.<br />
With alterations I was able to reuse the three-seater cover<br />
for the two-seater, but it was clear that to complete this job<br />
I would need to order another 14 yards of fabric. That’s not<br />
so bad. Except that when the fabric arrived two weeks later,<br />
the dye lot was off. When I called to replace the 14 yards,<br />
the fabric had been discontinued. The mill had a 30 yard<br />
piece left that matched the 14 yards but nothing that came<br />
close to the initial order.<br />
Well beyond the expected completion date, I used the new<br />
yardage to redo the entire set, including the cushions. So<br />
much for the profit on the fabric and so much for my speedy<br />
work. When all was complete, I think I made less than $.50<br />
per hour.<br />
www.CHFmagazine.com September/October 2006 17
18 The Custom Home Furnishings Magazine September/October 2006
CHF Tips & Tricks<br />
What Ladder and Saw to Buy?<br />
Paree Gregg was looking for a few installation supplies<br />
for her husband and asked for advice on The CHF<br />
Network Forum. She was looking particularly for<br />
a ladder and a good saw. These were suggestions<br />
from two of The CHF Academy Instructors:<br />
Beth Hodges: The best saw to have is a chop saw<br />
that you can plug in somewhere to cut 2" poles. It<br />
cuts perfectly straight. Other than that, we use a<br />
hack saw. Any saw will do. I think it is a personal<br />
preference. Don't bother with those 5" mini saws.<br />
It doesn't reach through the 2" pole.<br />
As for ladders, I highly recommend the Little<br />
Giant. Personally, I have the 22' model, and it is<br />
a perfect installation tool. It folds small enough<br />
to fit in the back of the van. It is not a good idea<br />
to store installation ladders on top of the car or<br />
outside. When the Little Giant is unfolded end to<br />
end, I can reach a second story <strong>window</strong>. I couldn't<br />
install without, but it is heavy for me to carry,<br />
so I keep a 4' ladder in the truck too. I use it for<br />
regular installs.<br />
Mary Ann Plumlee: You can get a mitre box. It is<br />
a rather low tech guide to cut straight across and<br />
angles. It usually comes with a hand saw. It is a<br />
box that your work lays in with slits across that<br />
guide your saw.<br />
www.CHFmagazine.com September/October 2006 19
20 The Custom Home Furnishings Magazine September/October 2006
CHF Tips & Tricks<br />
3 yards per WOM for Panels (up to 90-95)<br />
1.5 yards per Swag<br />
Common Yardages<br />
1.5 yards for Bias = 2" yields 35 yards<br />
3" yields 27 yards<br />
4: yields 17 yards<br />
1.5 yards per tailored pillow sham (Standard/<br />
Queen)<br />
6 yards per comforter/duvet top*<br />
5 yards per tailored skirt (Full/King)<br />
6 yards per tableskirt (up to 107" round)<br />
5 yards per standard shower curtain<br />
*No repeats are considered here.<br />
The CHF Magazine<br />
How To Advertise<br />
The Custom Home Furnishings Magazine is celebrating 14<br />
years as the leading source of inspiration and information<br />
for people in the custom home furnishings industry. Six<br />
times a year workroom enthusiasts, decorators, <strong>design</strong>ers,<br />
installers, slipcoverers, and upholsterers look forward to<br />
a new issue. Each issue is filled with creative <strong>design</strong> ideas,<br />
technical step-by-steps, tricks and tips, extra features, special<br />
features, business articles, product profiles, and much more.<br />
All articles are written by practicing industry experts, as well<br />
as regular contributions by the CHF Academy instructors.<br />
Our 2007 Themes will include: Fabrics/Textiles, Hardware,<br />
Trims, What's New in the Industry, Workroom Equipment,<br />
and Preparing for the Holidays.<br />
If you would like to advertise in the 2007 Custom Home<br />
Furnishings Magazine, call 800-222-1415 (704-333-4636)<br />
for a Media Kit. We will be happy to help you with your<br />
advertising needs.<br />
www.CHFmagazine.com September/October 2006 21
22 The Custom Home Furnishings Magazine September/October 2006
CHF Tips & Tricks…Elements of Style<br />
Tips From Lisabeth Martin at Decorate Now<br />
Just like the exterior of the home, the interior needs a theme<br />
or style. Yet too much of a good thing can be, well, too much.<br />
This section deals with tips on how to make your home your<br />
own using some basic <strong>design</strong> tips.<br />
Get out your favorite magazines and every time you find a<br />
photo that you are drawn to, pull the page out and draw an<br />
arrow to the item that caught your eye. Organize your pages<br />
by room type (kitchens, baths, living spaces, bedrooms, dining<br />
rooms), then go through the pages again. You will see a<br />
pattern begin to emerge as to what elements you are drawn<br />
to. Perhaps it is the center island in the kitchen with the hanging<br />
pot rack? Or the soft tone on tone look of neutrals used<br />
luxuriously in the living room? Or perhaps you are drawn to<br />
dramatic colors and rooms where there are elements of high<br />
contrast? Whatever your style is, taking the time to define it<br />
will help you in your quest to decorate your home.<br />
Modern style isn’t just a room full of spare, clean lines<br />
anymore. Designers delight in unexpectedly mixing up old<br />
and new, straight lines with curvaceous, simple with ornate.<br />
Traditional style no longer means that all the furniture must<br />
come from the same collection. Yet good style does follow<br />
some basic rules:<br />
Rule 1: Too many straight lines need some curves as counterpoint.<br />
In decorating a log home, for example, the horizontal<br />
lines are so prominent throughout the home that <strong>window</strong><br />
<strong>treatments</strong> will benefit from not being quite so geometric. The<br />
hard lines of the log walls need some softness elsewhere in<br />
the room. The counterpoint of softness against the hard lines<br />
makes each element that much more appealing. A luxurious<br />
sofa or a grouping of overstuffed <strong>pillows</strong> may be all that is<br />
needed to make the room more appealing.<br />
Rule 2: Objects in a group have more impact than those<br />
same objects spread around the room. Just as a collection<br />
of candlesticks looks more dramatic when they are grouped<br />
on one table, thus also furniture needs to be in groups. Pull<br />
furniture and chairs into seating groups, allowing enough<br />
walking room between the furniture. Don’t make the mistake<br />
of having the seating arrangement be so spread out that your<br />
guests can’t converse comfortably.<br />
Rule 3: Find the focal point for your room, and emphasize<br />
that. Unless your living room is the size of a hotel lobby, every<br />
room needs one spot that your eye is drawn towards. When<br />
a room has several focal points, the focal points compete<br />
with each other, and the room loses its visual impact and<br />
begins to look disorganized. A fireplace mantle is a natural<br />
focal point. Other focal points can be a large armoire or<br />
entertainment center. Arrange one furniture grouping facing<br />
this focal point. Add art and art objects to add additional<br />
texture and interest to your focal point. Look for more rules<br />
in another issue.<br />
CHF Tips & Tricks<br />
Math Chart<br />
If you use a calculator to do your math problems,<br />
you may find this chart to be helpful. The<br />
fractions go in ascending order.<br />
¹⁄₁₆ = .0625<br />
¹⁄₈ = .125<br />
³⁄₁₆ = .1875<br />
¼ = .25<br />
⁵⁄₁₆ = .3125<br />
³⁄₈ = .375<br />
⁷⁄₁₆ = .4375<br />
½ = .5<br />
⁹⁄₁₆ = .5625<br />
⁵⁄₈ = .625<br />
¹¹⁄₁₆ = .6875<br />
¾ = .75<br />
¹C⁄₁₆ = .8125<br />
⁷⁄₈ = .875<br />
¹⁵⁄₁₆ = .937<br />
The CHF Magazine will begin accepting<br />
classified ads for the 2007 January/February<br />
issue. If you would like to submit an ad, call<br />
800-222-1415 (704-333-4636.<br />
www.CHFmagazine.com September/October 2006 23
CHF Tips & Tricks<br />
Fraction Chart<br />
4.5 inches = ¹⁄₈ yard = .125<br />
9 inches = ¼ yard = .25<br />
12 inches = ¹⁄₃ yard = .333<br />
13.5 inches = ³⁄₈ yard = 3.75<br />
18 inches = ½ yard = .5<br />
22.5 inches = ⁵⁄₈ yard = .625<br />
24 inches = ²⁄₃ yard = .666<br />
27 inches = ½ yard = .75<br />
31.5 inches = ⁷⁄₈ yard = .875<br />
24 The Custom Home Furnishings Magazine September/October 2006
CHF Tips & Tricks<br />
How To Group Accessories and Pictures<br />
Tips From Lisabeth Martin at Decorate Now<br />
For wall displays: Place the heaviest objects at the bottom.<br />
The picture grouping or art grouping should have a rectangular,<br />
triangular, or circular rough shape. Rectangular and<br />
triangular grouping shapes are easier to pull off. Don’t space<br />
the pictures or art too far apart; keep objects close enough<br />
to be visually associated together. This is especially true if<br />
the objects are dissimilar. Vary the sizes, shapes, colors, and<br />
textures used in the group. Keep the center of your grouping<br />
at eye level, except when the display is placed over a sitting<br />
area. In these cases, you can place the group lower on the<br />
wall so that it can be seen better when people are seated. If<br />
pictures or artworks are to be lined up horizontally, then odd<br />
numbers work better than even numbers. 3 paintings hung<br />
at the same height on the wall looks better than just 2 or 4.<br />
Several smaller frames can be substituted for one larger frame,<br />
if they are grouped closely together. Thus, the traditional<br />
large painting behind the sofa can be replaced by a group<br />
of coordinated smaller framed art, as long as the grouping<br />
takes up the same visual space.<br />
For table top displays: Have one item dominate your display,<br />
making sure that the items are appropriately scaled for the<br />
table surface. Avoid items that are so small that they might<br />
get lost in the grouping. Also avoid items that are too large<br />
for the display surface. Odd numbers work better than even<br />
numbers, so 3 or 5 objects work better than 4. Place objects<br />
close enough together so that they look like a distinct grouping.<br />
For example, 3 candles look better grouped together<br />
on one end of a coffee table instead of spread out. Vary the<br />
height of the items. Try raising the height of lamps or vases or<br />
small sculpture by stacking nicely bound books underneath<br />
several of your items.<br />
www.CHFmagazine.com September/October 2006 25
26 The Custom Home Furnishings Magazine September/October 2006
Design Ideas September/October 2006<br />
www.CHFmagazine.com September/October 2006 27
Design Ideas September/October 2006<br />
28 The Custom Home Furnishings Magazine September/October 2006
Design Ideas September/October 2006<br />
From the book<br />
“Sketches for Home Decor”<br />
By Susan Schurz<br />
www.CHFmagazine.com September/October 2006 29
Design Ideas September/October 2006<br />
30 The Custom Home Furnishings Magazine September/October 2006
www.CHFmagazine.com September/October 2006 31
"I think I like it. Can you make one up so I can<br />
see if I really like it or not?"<br />
(From "The Adventures of Curtainlady" by Mary Ann Plumlee)<br />
32 The Custom Home Furnishings Magazine September/October 2006
SUNSHINE FOAM RUBBER COMPANY<br />
~ We Make Furniture More Comfortable ~<br />
CUSTOM CUT FOAM RUBBER!<br />
Send Sunshine your measurements or pattern and we will cut it to that shape in ONE week!<br />
We can fabricate odd shaped <strong>window</strong> seats, dining & kitchen chairs, Feather & Down cushions or <strong>pillows</strong>,<br />
chair & sofa cushions, etc. Your project is our passion!<br />
Sunshine Foam supplies Drapery &<br />
Upholstery Products, such as: Pins,<br />
Batting, Staple Guns, Décor Nails,<br />
Cornice Lining, Tools, Fabrics,<br />
Shirring Tape, Thread, Zipper, Etc.<br />
Call for a FREE Catalog.<br />
Modern & Classical Fabrics,<br />
Faux Leather & Suede,<br />
Leather, Contract Tweed,<br />
Vinyl, and Outdoor Fabrics<br />
are available.<br />
Call for FREE Samples!<br />
1-800-688-7648<br />
Local (513) 681-7300 * Fax (513) 681-5192 * sunshinefoam.com * 4900 Spring Grove Ave. Unit 2. Cincinnati, OH 45232<br />
CHF Tips & Tricks… Types of Foam Rubber<br />
From Sunshine Foam Rubber Company<br />
Pincore Latex - Pincore latex rubber is the most luxurious<br />
foam you can buy. Pincore maintains its firmness and creamy<br />
feel with no sagging and no break down.<br />
High Resilient (H.R.) - Fire retardant, high quality foam.<br />
Frequently used furniture needs this type of foam. Available<br />
in soft, medium, firm, and extra firm densities.<br />
Premium Sunlux - Fire retardant, high quality foam. Excellent<br />
for seat cushions. Available in medium and firm densities. 10<br />
year guarantee.<br />
Prime - Middle grade and most commonly used foam. Available<br />
in soft, medium and firm densities.<br />
Poly - Slightly lower grade than Prime. This foam is best<br />
used for furniture that is seldom used. Available in soft and<br />
medium densities. Super Soft, Poly Rolls, Mattress Topper,<br />
and Bolsters.<br />
Mattress Topper - Can be ordered in almost any type of foam<br />
- soft to firm density in twin to king size.<br />
Church Seating - Church seating foam is High Resilient or<br />
Prime Foam especially for use in church pews. Available in<br />
firm density. Sizing is available.<br />
Automotive - Automotive sew foam is used in automotive door<br />
panels, as well as, arms and backs of furniture. Available with<br />
scrim and Velcro loop backing.<br />
Shredded - Small shreds of foam used for stuffing <strong>pillows</strong> or<br />
back cushions.<br />
Rebond - Extra firm 8 lb. Rebond is very dense polyethylene<br />
foam, mainly used for exercise benches, mats, bus seats,<br />
church seating, etc.<br />
Outdoor - Dri-Fast Outdoor foam is open cell and will not<br />
retain water. Ultimate for boat cushions and lawn-patio<br />
furniture.<br />
Memory-NRG - Energy absorbing and temperature resistance<br />
foam. Used in the Health Care Industry as well as mattress<br />
toppers. Available in soft, medium and firm densities. Custom<br />
order to your size.<br />
www.CHFmagazine.com September/October 2006 33
Step-by-Step<br />
Susan Schurz<br />
Gathered Dust Ruffle Fabrication…<br />
Serge and Flip Method<br />
With this style<br />
of dust ruffle,<br />
the skirt<br />
is attached<br />
to a platform, which will be<br />
installed between the mattress<br />
and box springs. You must<br />
serge the edges for a professional<br />
finish.<br />
HELPFUL TERMS:<br />
Drop: The distance measured<br />
from the top of the box springs<br />
to the floor.<br />
Facing: Strips of material<br />
along the edge to prevent lining<br />
from showing.<br />
Foot: The end of the bed.<br />
Gusset: A Finished piece of<br />
material inserted behind edges where side and foot sections<br />
meet.<br />
Platform: A base of lining to which the skirt is attached. Also<br />
called a deck or a foundation.<br />
Sides: The left and right edges of the bed.<br />
Tabling Allowance: Extra material added to cuts to accommodate<br />
take up or errors.<br />
INSTRUCTIONS:<br />
A. CUTTING:<br />
Lining:<br />
Face Fabric:<br />
.<br />
2.<br />
.<br />
Cut face fabric, allowing for a finished drop plus a 4"<br />
allowance for the hem and a 2" tabling allowance. Solid<br />
colors or non-directional prints can be railroaded. Allow<br />
2½ times fullness. Seam together widths. Note: If a split<br />
and gusset are needed for the foot board, seam together<br />
the sides and foot pieces separately. If no split and gusset<br />
are needed, seam all widths together.<br />
Cut enough 8" strips of fabric to make a facing along the<br />
sides and the foot of the platform. Seam together.<br />
Cut strips for enough welt cord to go around the sides<br />
and the platform.<br />
.<br />
2.<br />
Cut lining for the platform, allowing 6" for the hem and<br />
2" for the tabling allowance. A single width can be used<br />
for twin beds, or seam together two widths for larger beds.<br />
Wide lining or a flat sheet can be used with no seams. Cut<br />
the platform to size, allowing for ½" seam allowance along<br />
the sides and the bottom edges Round off corners at the<br />
foot to fit the box springs.<br />
Cut lining for the drop finished length plus 2" tabling<br />
allowance. Railroad lining if possible. Allow 2½ times<br />
fullness.<br />
B. FABRICATION:<br />
Platform:<br />
.<br />
2.<br />
.<br />
Press in a 3" double hem along the top edge of the platform.<br />
Take strips for facing which have been seam together and<br />
press under a ½" along one side.<br />
Glue baste facing along the edge of the platform. See<br />
illustration #1. Miter facing at corners. See illustration<br />
34 The Custom Home Furnishings Magazine September/October 2006
Step-by-Step<br />
Susan Schurz<br />
#2. Trim away excess fabric under the mitered area.<br />
See illustration #3. Continue around all three sides. See<br />
illustration #4.<br />
Illustration 4<br />
Illustration 1<br />
4.<br />
5.<br />
6.<br />
7.<br />
Top stitch the inside edge of the facing and the hem in<br />
the lining.<br />
Serge outer edges of facing.<br />
Serge outer edges of facing.<br />
Make welt cord and serge the edges. Sew welt cord along<br />
the edge of the facing on the platform. See illustration #5.<br />
(Note: If not welt cord is desired, omit this step.)<br />
Illustration 2<br />
Illustration 5<br />
Drops:<br />
Illustration 3<br />
.<br />
2.<br />
.<br />
Sew together the lining and the face fabric with face of<br />
fabrics together 2" up from the bottom edge. Sew with<br />
the lining on top.<br />
Press 2" seam towards the face fabric. See illustration<br />
#6.<br />
Turn the lining and the face fabric right sides out and press<br />
in 2" hem. See illustration #7.<br />
(continued on page 36)<br />
www.CHFmagazine.com September/October 2006 35
Step-by-Step<br />
Susan Schurz<br />
Gathered Dust Ruffle Fabrication (continued)<br />
Illustration 6<br />
Illustration 8<br />
Illustration 7<br />
Illustration 9<br />
4.<br />
5.<br />
6.<br />
Fold in 1½" double side hem on ends. See illustration #8.<br />
Measure and mark the finished drop from the bottom<br />
edge plus ¾" for seam allowance and take up. Staple, pin,<br />
or glue-baste the top edges together and serge off excess<br />
fabric on the line.<br />
Finish off side hems by blindhemming, hand-sewing, or<br />
using an iron-on hem tape.<br />
Gather drop along the top edge.<br />
Attaching Drops to Platform:<br />
.<br />
2.<br />
Pin drop face down on top of the platform next to cording.<br />
You may need to work in excess material by dividing drop<br />
into equal sections, pinning to platform and gathering up<br />
excess material between pins. Sew drop to platform next<br />
to welt cord.<br />
Flip drop over for finished dust ruffle. See illustration #9.<br />
Adding a Split and Gusset:<br />
.<br />
If a split and gusset are needed between the side and the<br />
foot, fabricate platform and drops as described except<br />
36 The Custom Home Furnishings Magazine September/October 2006
Step-by-Step<br />
Susan Schurz<br />
you will be making<br />
three sections to<br />
fit sides and foot.<br />
Stitch sides and<br />
foot drops to platform,<br />
meeting at<br />
the corners.<br />
with face of fabric and face of lining together and stitch<br />
edges together with a ½" seam allowance along the edges.<br />
See illustrations #10 and #11. Clip corners, turn right sides<br />
out, and press. Mark at desired length, including seam<br />
allowance and serge off excess material. See illustration<br />
#12.<br />
2.<br />
To make the gussets,<br />
cut the face<br />
fabric 8" wide by<br />
drop length plus<br />
4" for the hem and<br />
2" for the tabling<br />
allowance. Cut lining<br />
8" wide plus 2"<br />
tabling allowance.<br />
Sew 2" up from the<br />
bottom edge with<br />
lining and face fabric,<br />
face of fabrics<br />
together. Turn face<br />
fabric away from<br />
lining, allowing for<br />
2" hem. Turn back face<br />
fabric at the bottom edge<br />
Illustration 10<br />
Illustration 11<br />
.<br />
4.<br />
Illustration 12<br />
Sew gussets face down on drops centered over the corner<br />
where drops meet. Slightly gather or clip edges to ease<br />
around corner.<br />
Flip over drops. Gussets will fall behind drops.<br />
Susan Schurz owns Tavern Hill located<br />
in Amelia, VA, a wholesale workroom<br />
since 1988. She specializes in handcrafted,<br />
detailed <strong>window</strong> <strong>treatments</strong> and<br />
accessories. Susan is an instructor for<br />
The Custom Home Furnishings Academy<br />
and is a frequent contributor to The<br />
CHF Magazine.<br />
www.CHFmagazine.com September/October 2006 37
Down to Business<br />
Mary Ann Plumlee<br />
Treatments Formerly Known as “Hard”<br />
Looking at Hard and Soft Treatments<br />
I<br />
keep waiting for someone to do it. I keep thinking it needs<br />
to be done, so I guess it will be me. So I hereby take on the<br />
huge task of renaming the entire industry. Of course, I'm<br />
talking about the twin sisters of <strong>window</strong> <strong>treatments</strong>…one<br />
named Hard and the other Soft. As the owner of a business<br />
who carries both, I've often thought that they were misnamed<br />
somehow, switched at birth so to speak.<br />
The beauty of hard <strong>treatments</strong> is that they are so easy. Anyone<br />
that can read through a manufacturer's price list and brochure<br />
is well on their way to becoming an expert. Add an old blind<br />
that you can autopsy to the mix, and you can know pretty<br />
much all there is to know about blinds inside and out. Other<br />
so called hard <strong>treatments</strong> can be added to a dealer's repertoire<br />
with pretty much the same process.<br />
Even the truly hard treatment,<br />
plantation shutters, can<br />
be learned with relatively short<br />
training, or added by incorporating<br />
a subcontractor.<br />
In contrast soft <strong>treatments</strong> require<br />
mountains of words contained<br />
in copious volumes of<br />
instructive manuals. A I write, I glance at a shelf full of <strong>design</strong><br />
book after <strong>design</strong> book dealing with soft <strong>treatments</strong>, not counting<br />
magazines on top of magazines with articles depicting<br />
the same subject. A good example of this is the SewWHAT?<br />
Magazine started by Cheryl Strickland in 1993. It was in print<br />
for 12 years with each volume containing tricks of the trade,<br />
methods of construction, and styling. One would think that the<br />
subject would be exhausted by now. But not so. A cursory scan<br />
of the associated CHF Forum Network shows over 270,000<br />
threads, featuring still more questions and answers on the<br />
subject. A common saying in the soft side of the industry is,<br />
“You never learn it all.” And after 20 years in this business, I<br />
have to agree.<br />
“When asked to describe what a<br />
workroom does, I often say we're<br />
builders; we're carpenters, only we<br />
use fabric. We're engineers solving<br />
problems; we're mathematicians,<br />
especially in the field of geometry.”<br />
When asked to describe what a workroom does, I often say<br />
we're builders; we're carpenters only we use fabric. We're<br />
engineers solving problems,; we're mathematicians, especially<br />
in the field of geometry. We're people who have to think three<br />
dimensionally. With soft <strong>treatments</strong>, anyone leaving out that<br />
third dimension is in for some nasty surprises. We're also magicians,<br />
making things float in the air or disappear if we have to.<br />
We have to coax fabric to do things it was never intended to<br />
do. We're mind readers and code deciphers, able to interpret<br />
the worst of hen-scratching and stick figures and bring them<br />
to life.<br />
We're women and men with strength, hoisting 50-75 pound<br />
bolts of fabric, wrestling cornice boards into submission, and<br />
dressing down drapes until they purr. Our eyes brighten at the<br />
thought of power tools. The hardware store clerks all know<br />
us because we like to sort through lumber like a pro, and we<br />
know what a number 6 screw is. Grown men come into our<br />
workshops and experience tool envy.<br />
So why don't more of us carry hard <strong>treatments</strong>? I'm convinced<br />
it's because of the name. Most<br />
companies that carry only hard<br />
<strong>treatments</strong> are predominantly<br />
run by men. Most hard treatment<br />
salespersons are men. I think hard<br />
<strong>treatments</strong> are kind of a metaphor<br />
for men. Measure, decide, done.<br />
Whereas the soft treatment side<br />
seems to be dominated by women.<br />
It fits us; it describes us. We're complex; we're detail-oriented;<br />
we want to mull and delve into all the options and enjoy the<br />
beauty, the emotion, and experience of it all. And besides,<br />
aren't hard <strong>treatments</strong> hard? For some of us in the soft side,<br />
they might as well be named — difficult <strong>treatments</strong>, or impossible<br />
<strong>treatments</strong>, because being call hard <strong>treatments</strong> is enough<br />
to keep us away.<br />
If we look at the two halves of the industry, hard and soft, it<br />
seems that the two never meet, except at the retail level. Of<br />
course, hard treatment suppliers don't enter the soft world, and<br />
fabric suppliers don't cross into the hard side. Yet, they are both<br />
in the same industry. Unfortunately, we find ourselves in the<br />
same situation, often at the retail level. We have retailers who<br />
only do hard, and retailers/workrooms who only do soft.<br />
The most important component we have to offer in the custom<br />
<strong>window</strong> treatment industry is customer service. The very best<br />
in customer service is a person at the retail level who is a true<br />
“<strong>window</strong> treatment” expert. There are some functional issues<br />
38 The Custom Home Furnishings Magazine September/October 2006
Down to Business<br />
Mary Ann Plumlee<br />
that can only be met with a hard treatment. By the same token,<br />
there are some ascetic issues that can only be solved by a soft<br />
treatment. Retailers with only one expertise find themselves in<br />
the position of trying to bend the customer to settle for their<br />
solution, whether it is a good fit for the customer or not. The<br />
retailer that can approach the customer as a <strong>window</strong> treatment<br />
consultant, knowing all the available products has a competitive<br />
advantage, and can provide a better service to customers who<br />
are more and more strapped for time. Going to one retailer for<br />
hard <strong>treatments</strong> and then having to deal with a totally different<br />
person for soft <strong>treatments</strong> is not meeting today's customer<br />
needs for convenience. And quite frankly, a retailer who doesn't<br />
have the full array of all <strong>treatments</strong> is not able to make the best<br />
recommendation based upon the customer's needs.<br />
Everything seems to be pointing toward the market moving<br />
toward soft <strong>treatments</strong>. Many of those customers who put in<br />
hard <strong>treatments</strong> in recent year out of a necessity for privacy as<br />
they moved up in the housing market are now ready for soft<br />
<strong>treatments</strong>. Businesses that can provide a mix of both hard and<br />
soft will be in a better position to take advantage of market<br />
trends in the near and long-term future.<br />
So how can the industry as a whole prepare for that future?<br />
Hard coverings manufacturers would be wise to reach out to<br />
the soft side. It doesn't help the hard coverings industry for<br />
drapery people to be pushing only drapes when hard <strong>treatments</strong><br />
are the solution in so many instances. Drapery people need to<br />
know that there's nothing hard about hard coverings except<br />
INDUSTRY NEWS<br />
News from WCAA Chapters<br />
The Central New Jersey Chapter of WCAA meets on the first<br />
Thursday of each month. The November meeting will be held<br />
November 2 at 540 Ridge Road, South Brunswick. The topic<br />
will be Feng Shui and how it impacts <strong>design</strong>. Speaker will<br />
be Jeanette Schwartz. For more information, contact Nicole<br />
Lorber at nlorber@comcast.net. The December meeting will<br />
be held on December 7 at Wegmans, 55 US Route 9 South,<br />
Manalaphan. The topic will be Holiday Party.<br />
The 2006 Chicagoland Chapter holds regular meetings on<br />
the third Thursday of each month, usually from 10:00am-<br />
12:00noon, unless otherwise stated. RSVP to meetings by<br />
contacting Victoria McEligott at 630-922-5919 or email to<br />
the name. Adding hard coverings to a predominantly soft coverings<br />
business strengthens that business. And predominantly<br />
hard coverings retailers that are moving into the soft side need<br />
to know that soft doesn't mean easy. In fact carrying drapes<br />
without knowing the complexity and pitfalls of the drapery<br />
business is one of the easiest ways to loose money that I know.<br />
Hard coverings people learn all you can. The learning curve<br />
is steep.<br />
Meanwhile, I'd like to do some renaming of the industry. For<br />
hard <strong>treatments</strong>, how about “Easy Treatments” (formerly<br />
known as Hard) or “Two Dimensional Treatments”, or “Paper<br />
Turning Money Making Treatments,”, or perhaps “Treatments<br />
That Everybody Could Sell If They Weren't Misnamed Hard.”<br />
And for soft <strong>treatments</strong>, how about “Great Money Making<br />
If You Know Your Stuff” Treatments or the “Never Ending<br />
Choices Treatments.”<br />
I really think I'm on to something here. It'll help us all.<br />
Mary Ann Plumlee started her business in<br />
1985 with a $50 investment and a home sewing<br />
machine on her dining room table. Mary<br />
Ann has built her business through trial and<br />
error, which is an expensive way to learn. She<br />
currently has 13 employees and does wholesale/retail<br />
and commercial work. Mary Ann<br />
is a frequent contributor to The Custom Home Furnishings<br />
Magazine.<br />
toria@wideopenwest.com. The November meeting will be<br />
held November 19 at the Arlington Design Center, 3425,<br />
N. Ridge Avenue, unit B, Arlington Heights, IL 60004. The<br />
topic will be the Chicago Design Team, trade only showroom.<br />
Trends for 2007 will also be discussed. Refreshments<br />
will be served.<br />
The St. Louis Chapter usually meets on the third Thursday of<br />
each month at the Creve Coeur City Hall, unless otherwise<br />
stated. The November meeting will be held November 16.<br />
The topic will be Using Feng Shui in our Designs, Home, and<br />
Businesses with Cynde Meyer, Editor of Spirit Magazine. For<br />
more information, contact Shelly Wise at 636-399-6217, or<br />
email to wise<strong>design</strong>s@charter.net.<br />
www.CHFmagazine.com September/October 2006 39
Special Feature<br />
Rebecca Bergman Mack<br />
Do You Need a Business Plan?<br />
Hint: The Answer Is Yes<br />
You may be thinking, Why would I need a business<br />
plan? I’m so busy I can barely handle my current<br />
workload. What’s the point?<br />
The point is, ask yourself these questions. Do you<br />
have the type of customer that is profitable and that you enjoy<br />
working with? Are you making as much money as you thought<br />
you would? What percentage of the money that you bring in<br />
goes to cover expenses, and what percentage is your profit? Do<br />
you know what your profit is this month? How much do you<br />
expect to earn in salary this year? What’s the difference between<br />
an owner’s profit and an owner’s take-home pay?<br />
Although business plans are most commonly created by startup<br />
companies seeking venture financing, the process of creating<br />
and following a defined business plan can be very helpful for<br />
even a one-person home-based business. A business plan serves<br />
many purposes:<br />
TARGETING YOUR MARKET<br />
A business plan defines who you are as a company, and which<br />
market(s) you serve. Who is your ideal customer? What is the<br />
type of customer that you have had the most success with in<br />
the past? Most of us answer this question solely in terms of<br />
retail versus wholesale, but in order to reap the full benefits of<br />
this exercise we need to be much more specific.<br />
Define your ideal customer(s) not only by retail versus wholesale<br />
(I do believe it is possible to do both simultaneously, although it<br />
can be more difficult in smaller towns), but also by age, gender,<br />
income, preferences, hobbies -- whatever helps you to clearly<br />
identify these individuals.<br />
For example, my target customer is Women 35 – 65, Household<br />
Income $100,000+, who enjoy spending money on the finer<br />
things in life and are accustomed to hiring and paying good<br />
money for professionals to help them achieve their goals.<br />
Be imaginative, and don’t be afraid to dream big! It doesn’t<br />
cost anything, and in order to bring something new into your<br />
life, you must first envision it!<br />
REACHING YOUR IDEAL CUSTOMERS<br />
Once you have defined your ideal customer, you are ready to<br />
develop the marketing tactics to reach those customers. A marketing<br />
plan is especially important for home-based businesses<br />
that can’t depend on a storefront to provide walk-in traffic.<br />
Your marketing efforts should be scheduled on your calendar<br />
– define which activities will be undertaken quarterly, monthly,<br />
or weekly. This way, you will build a steady stream of new and<br />
repeat clients for the future.<br />
Your marketing plan may include any or all of the following:<br />
website, newsletters, e-zines, direct mail, the outgoing message<br />
on your voicemail, brochures, reciprocal arrangements with<br />
other vendors, advertising, networking groups, goal groups,<br />
press releases, speaking engagements, etc.<br />
USING YOUR BUSINESS PLAN TO EVALUATE<br />
POTENTIAL INVESTMENTS IN YOUR BUSINESS<br />
Do you need additional workroom, <strong>design</strong> or business tools<br />
to fabricate and/or sell the products that your target market<br />
will buy? Should you take time away from the workroom to<br />
speak to your local women’s group? Your business plan will<br />
give you a road map to more objectively evaluate the potential<br />
cost/benefits of every investment, both of time and of money.<br />
Personally, I have found that investing in technology – specifically,<br />
accounting and <strong>design</strong> software packages - has been<br />
indispensable to my business. I consider these investments to be<br />
just as important as my worktable! The <strong>design</strong> software helps<br />
me close sales more quickly and avoid costly mistakes, and<br />
without the accounting software I would have to spend quite<br />
of bit of time in order to get the detailed financial information<br />
and to quickly generate professional-looking, accurate estimates<br />
and invoices. Technology is here to stay, and investing the time<br />
to make use of these tools will help to keep you a step ahead<br />
of the competition.<br />
PREPARING FOR THE FUTURE OF YOUR BUSINESS<br />
Your business plan might include developing written policies<br />
and procedures to train staff for new positions; a goal and<br />
roadmap for the eventual sale of your business; or a financial<br />
plan that would allow you to bring on new management. Just<br />
like defining your target market, this is another important<br />
exercise in visioning.<br />
The most important part of a business plan if you’re seeking<br />
a loan is the financial projections. For others, the marketing<br />
plan is most important part of the business plan. In any case,<br />
a business plan usually includes the following elements:<br />
• A target market and a marketing plan.<br />
• Financial projections. (An income and expense statement<br />
40 The Custom Home Furnishings Magazine September/October 2006
Special Feature<br />
Rebecca Bergman Mack<br />
for sure, and possibly also a balance sheet, and a statement<br />
of cash flows.)<br />
• A logical flow of ideas, with realistic assumptions, that<br />
describes how the business will achieve its stated financial<br />
goals.<br />
Once you have developed and refined your business plan,<br />
commit to a regular business plan review session and course<br />
correction process. You might decide to review job profitability<br />
after each job is complete; your overall financials on a quarterly<br />
basis; and your sales lead generation on a monthly basis.<br />
Compare your performance against your goals and adjust your<br />
future decisions accordingly.<br />
Where do you start the process of creating a business plan? I’d<br />
suggest beginning with your local bookstore. Go to the business<br />
section and browse around to find a book with a good<br />
outline and examples of how to create a business plan. I’m sure<br />
you’ll find a whole shelf full of books, so expect to spend some<br />
time there! Your business plan needn’t be 20 pages long. If it’s<br />
concise, I think you could put down the key information in<br />
There always seems to be a tension existing between <strong>design</strong>ers<br />
and workrooms. I admit I have had a few tension<br />
headaches in the past myself. And due to these headaches it has<br />
made me analyze my own business practices and how we can<br />
improve. Let’s face it, we need each other. So if your relationship<br />
with your workroom or <strong>design</strong>er seems to be dying or needs<br />
revitalizing then take the following issues to “heart”.<br />
I want to share with you my “CPR” for the <strong>design</strong>er workroom<br />
team. It is my belief that if you practice this than the tension<br />
headaches will be few and far between, and the heart of the<br />
relationship will be revived.<br />
C- Communication P- Professionalism R- Respect (or is it<br />
Responsibility)<br />
Communication is key:<br />
1. Talk. Talk. Talk. Talk. Talk. Ask questions of each other<br />
and do not make assumptions.<br />
2. Communicate by fax or email. Person to person talking<br />
is important but communication between fax and email<br />
will give written verification of conversations.<br />
3. Designers, use consistent and standard written work<br />
orders that include all pertinent information: (Use the<br />
Form of the Month in this month’s issue on page 49.)<br />
one or two pages. Remember, in many cases “done” is better<br />
than “perfect.” If all you can do this month is a half a page,<br />
then that will be fine for now!<br />
Summary:<br />
• Every business, even home-based one-person workrooms,<br />
can benefit from the creation of a business plan.<br />
• The marketing component of a business plan is especially<br />
important for home-based businesses.<br />
• A marketing plan guides decisions on how to market to<br />
reach your ideal customer and provides information regarding<br />
how much volume, and at what prices, you must sell<br />
your products to reach your financial and business goals.<br />
Rebecca Mack established Bergman Mack Designs<br />
two years ago as a one-person workroom and<br />
interior <strong>design</strong> studio based in Newport Coast, CA.<br />
Prior to that she worked in various office positions<br />
for many years, including a stint as a Vice President<br />
of Public Relations.<br />
CPR for the Designer/Workroom Relationship<br />
By Terri Booser<br />
a. Submit measurements in proper form: Width X<br />
Length.<br />
b. Submit fabric content, width and repeats<br />
c. Submit sketch or picture whenever possible. Use<br />
software such as Minutes Matter Studio, Dream<br />
Draper, or Mastervisions to convey ideas<br />
d. Submit digital pictures of room if possible.<br />
e. Submit trim usage and placements.<br />
f. Submit Hardware requirements or specifications<br />
4. Workrooms, submit consistent quotes with yardage<br />
requirements. I highly recommend using Quickbooks Pro<br />
for quoting.<br />
Professionalism encompasses mainly treating your business<br />
as a business.<br />
1. Workrooms should have terms and conditions and/or<br />
policies and procedures. They should submit these to the<br />
prospective <strong>design</strong>er and agree to these policies before<br />
work is begun. Terms and Conditions should contain<br />
policies for the following but are not limited to:<br />
a. Lead times; b. Rush Charges; c. Deposit and payment<br />
policy; d. Changes in work order policy;<br />
(continued on page 45)<br />
www.CHFmagazine.com September/October 2006 41
Extra Feature<br />
Susan Schurz<br />
Round Pillow with Decorative Border<br />
Create One-of-a-Kind Pillows<br />
The following instructions show how to add a decorative<br />
border to a round pillow. This method can<br />
be adapted to create one-of-a-kind <strong>pillows</strong> in any<br />
shape.<br />
INSTRUCTIONS:<br />
The pillow sample shown will be finished 17" with a 3"<br />
border and a 2" boxing. (Tip: Use Rowley Pillow Template<br />
for cutting.)<br />
1. Cut a circle of interlining 18".<br />
2. Cut a 12" circle of the fabric to be featured in the<br />
center.<br />
Center the circle on the interlining and glue-baste.<br />
3. Center the 12" circle on the interlining, and glue-baste<br />
around the edges.<br />
Cut away on the line. Clip the inside edges.<br />
4. Cut a circle of border fabric 18" wide. Draw a line in<br />
from the edge 4". Cut away on the line, and clip the inside<br />
edges. (Do not clip more than ½".) Press under a ½" seam<br />
allowance along the inside edge of the border.<br />
Glue-baste under the seam allowance only.<br />
5. Place the border on the pillow front, and glue-baste under<br />
the seam allowance only. Iron to set glue.<br />
Attach the border to the pillow front.<br />
6. Attach the border to the pillow front by stitching in the<br />
crease.<br />
7. Press the border, and glue-baste the outer edges of the<br />
border to the interlining.<br />
42 The Custom Home Furnishings Magazine September/October 2006
Extra Feature<br />
Susan Schurz<br />
Add welt cord, clipping edges.<br />
8. Add welt cord, clipping edges. Cut boxing strips 3",<br />
seam together if needed, and sew on next to welt cord,<br />
clipping the edges. Attach the back of the pillow in the<br />
same manner.<br />
Add a pillow form.<br />
9. Add a pillow form, and hand-stitch opening closed.<br />
Note: A knife edge form can be used for a round boxed pillow.<br />
Use a pillow form that is larger than the finished pillow by following<br />
these guidelines: Finished pillow diameter + boxing size<br />
+ extra for a generous fill = size of knife edge form to use. For<br />
example: 17" + 2" + 1" = 20" knife edge round pillow form.<br />
Try these other creative ideas:<br />
1. Add cording to the inside of the border by sewing welt<br />
cord to the inside shape before pressing under and gluebasting<br />
to the interlining.<br />
2. Add a double border by cutting two borders, one with a<br />
larger inside diameter than the other and overlapping the<br />
two.<br />
3. The same technique shown for the round pillow can also<br />
be used for octagon, diamond, or free-form shapes, which<br />
can be inset on round, square, or rectangular <strong>pillows</strong>.<br />
For example: Using<br />
the same technique<br />
as above, cut out<br />
an octagon shape.<br />
Clip and turn under<br />
the seam allowance<br />
on the inside edge.<br />
G l u e - b a s t e t h e<br />
seam allowance to<br />
the interlining. See<br />
illustration 1. Stitch<br />
in place as shown in<br />
illustration 2. Neatly<br />
press border, and gluebaste<br />
edges to the<br />
interlining. Add welt<br />
cord, ruffles, or fringe<br />
to the edges, and stitch<br />
backing to the pillow.<br />
Illustration 2<br />
Illustration 1<br />
Susan Schurz<br />
Illustration 3<br />
owns Tavern Hill<br />
located in Amelia,<br />
VA, a wholesale workroom since 1988. She<br />
specializes in hand-crafted, detailed <strong>window</strong><br />
<strong>treatments</strong> and accessories. Susan is an<br />
instructor for The Custom Home Furnishings<br />
Academy and is a frequent contributor to The<br />
CHF Magazine.<br />
www.CHFmagazine.com September/October 2006 43
Business Therapy<br />
Suzanne Cox-Hudson<br />
Will You Plant Seeds or Beg?<br />
Kicking Off Business Therapy Column<br />
I<br />
love language, and I also love quotes. When I hear something<br />
said just so, I want to savor that juicy nugget of<br />
wisdom, that tasty bite of truth forever. It started when<br />
I was probably four or five years old, and I would listen<br />
intently to words being said by those around me more than I<br />
would talk. By the time I was a moody teenager, I was filling<br />
journals with quotes. I even had one, which at the time summed<br />
up my philosophy of life, printed on my high school graduation<br />
announcement. And beside the quote? I hate to admit it, but<br />
there was the watercolor rainbow. It was cheesy, I know.<br />
A newly-found quote has been on my mind lately, and I think<br />
it is a great one to kick off this thing we are calling Business<br />
Therapy. I recently attended the Society of Decorating Professionals<br />
Annual Conference in Pennsylvania. At one point during<br />
the event, the words “You must either learn to plant seeds in<br />
the Spring or you will have to learn to beg in the Fall,” were<br />
flashed on a screen at the front of the room.<br />
Ever the quote-lover, I was taken in. The idea is simple, as are<br />
most great quotes, but I had never heard it put just that way. I<br />
could barely write fast enough to get the words down. “That’s<br />
so true,” I thought to myself as I wrote. This unattributed quote<br />
applies so much to what we do as fabricators and <strong>design</strong>ers.<br />
In the <strong>design</strong> industry, the months from “Back to School Time”<br />
through “The Holidays” are definitely not our slow ones, so<br />
this quote has to be somewhat turned on its ear to apply to<br />
us. But that’s just what I want to do. I want us to remember to<br />
“plant seeds” when we are busy, thinking ahead to the days<br />
when we are not. Our “Spring” can be said to be the “Fall”<br />
to which the author referred.<br />
It is easy to abandon our marketing efforts when we are very<br />
busy. But success in our business means striving for top-ofmind-awareness<br />
or TOMA among our target customers. While<br />
it is true that we may be swamped with customers who want<br />
drapes by the time of their annual Christmas party, it is also<br />
true that we can easily be sitting idle if we don’t plan ahead<br />
for what comes after the shiny paper and ribbons have been<br />
cleared from under the tree!<br />
“Okay, Suzanne, that’s all well and good,” I hear you saying<br />
now, “but how do I find the time to sew seeds in this season?”<br />
To answer that question, here are several things you could be<br />
doing now that will pay off later:<br />
1.<br />
2.<br />
3.<br />
4.<br />
Capture information from hits you get. If you have a website,<br />
add a “join our newsletter”, or offer a contest for a<br />
January makeover to encourage those who hit your site to<br />
leave their contact information. This information can be<br />
invaluable (as we will discuss in future columns.) Always<br />
ask for the contact information, including email, of folks<br />
who call for information but don’t book an appointment.<br />
Even if you currently do not use email to send campaigns,<br />
you may want to in the future. Having their contact<br />
information means you can make future contact, and more<br />
contact means more TOMA. Follow-up with a note or a<br />
special offer certificate in the mail to thank them for their<br />
interest and to get you brochure or card in their hands.<br />
Continue your advertising. If you have been a consistent<br />
advertiser, don’t drop off the face of the earth during the<br />
busy season. Let customers see your ad. Perhaps you could<br />
include words that get people thinking about the “January<br />
Blahs” or the opportunity of the new year such as “now<br />
taking appointments for January” or “Not sure what to<br />
do with that Christmas bonus? Treat yourself to the gift of<br />
a lovely home in 2007!” Here in Cleveland, I am quick to<br />
remind people who call that the months of January through<br />
April can be very dark and depressing if they are trapped<br />
inside a décor-challenged home they hate!<br />
Get out of the office or workroom. Offer a holiday seminar<br />
or trunk show as a way to meet some new potential<br />
customers. Part of the idea behind TOMA is that though<br />
a few people will buy your product or service right away<br />
the first time they are exposed, their will be a time lag<br />
between when most of your clients are exposed to your<br />
business and when they decide they need what you offer. In<br />
the meantime, speaking opportunities, workshops, classes,<br />
TV appearances, or trunk shows take very little time,<br />
especially if you have worked during the slow months to<br />
develop them. The leads you generate can be “percolating”<br />
for spring, and hopefully those people are talking you up<br />
to friends and neighbors in the interim.<br />
Have some “passive” advertising vehicles. Yard signs,<br />
vehicle lettering, and your website are all examples of<br />
44 The Custom Home Furnishings Magazine September/October 2006
Business Therapy<br />
Suzanne Cox-Hudson<br />
5.<br />
6.<br />
advertising which once they are created continue to help<br />
with TOMA with little or no new effort on your part.<br />
A phone call a day keeps the loneliness away. Call one<br />
past retail client, one <strong>design</strong>er/wholesale client, or allied<br />
professional a day during the busy season. Offer them a<br />
word of encouragement, check in on how they like the last<br />
thing you did for them.<br />
It’s called a marketing plan. Everyone should have a 12-<br />
week marketing strategy. You can be working now on<br />
your marketing plan for January thru March. Deadlines<br />
will come faster than you think and it’s unlikely you will<br />
be up to much planning the last weeks of December. Having<br />
a plan is key to knowing where your clients will come<br />
from and how you will spend your marketing dollars and<br />
energy. Take time to plant seeds!<br />
This is the first in a series of columns by Suzanne<br />
Cox-Hudson. Suzanne has been an instructor for<br />
the CHF Conferences and began her professional<br />
life as a clinical therapist. She holds three degrees<br />
in counseling and psychology. After leaving the<br />
field of psychology to have children, Suzanne<br />
stopped dabbling in <strong>design</strong> and pursued her<br />
dream of being a professional decorator. She<br />
has built her company, What a Lovely Home, into a successful<br />
interior decorating, <strong>window</strong> treatment, and re<strong>design</strong> business.<br />
CPR for the Designer/Workroom Relationship (continued from page 41)<br />
By Terri Booser<br />
e. Guarantee of workmanship.; f. Work Order<br />
submittal request; g. Delivery and/or Pick up policy.<br />
2. Workrooms should follow the guidelines for standard<br />
workmanship as outlined by the WCAA.<br />
3. Workrooms and Designers should abide by a clear cut<br />
Code of Ethics. These would certainly include a noncompete<br />
policy.<br />
4. Handle all problems/discrepancies in a professional<br />
manner, which would entail remaining calm and discussing<br />
rationally in a non accusative manner.<br />
5. Be reliable and reasonable with due dates.<br />
6. Be consistent and considerate with payment.<br />
7. Be proficient with the latest styles and techniques: educate<br />
each other!<br />
8. Be personable with each other, not personal. This is a tough<br />
one for many women because we can be so emotional but<br />
it is imperative to implement this philosophy. You do not<br />
have to like the workroom owner or the <strong>design</strong>er to be<br />
able to work successfully with them. Keep a professional<br />
relationship.<br />
Respect (and responsibility) encompasses everything else!<br />
1. Respect each other in every aspect and be honest.<br />
a. Be considerate of each others time. Set appointments to<br />
discuss work orders and projects. Do not take phone<br />
calls or accept interruptions during this time.<br />
b. Respect each others knowledge: Designers, respect<br />
the workroom’s judgment on fabrication approach<br />
or advice on style versus fabric.<br />
c. Workrooms, respect that the <strong>design</strong>er has many other<br />
details of a <strong>design</strong> project to tend to and that <strong>window</strong><br />
<strong>treatments</strong> are only one component of the project.<br />
2. Take responsibility for your mistakes; do not place blame.<br />
Respect each other when mistakes happen and resolve the<br />
issues together<br />
3. Treat the relationship as a “partnership”, and remember<br />
it’s a two way street.<br />
With all the above being said, I want to convey one more<br />
thought that may seem to contradict a few points: Not all<br />
workrooms and <strong>design</strong>ers are meant to work together. Personality<br />
will play a part.<br />
I know I already said that you do not have to like the person<br />
you are working with as long as their business practices are<br />
similar to your own. And in theory this should always hold<br />
true. But sometimes it is hard to respect someone you do not<br />
like. Therefore one of the key components of CPR just broke<br />
down. If you can not hold respect for that person, then it is<br />
time to move on and find a new relationship.<br />
I literally cherish the relationships I have with my <strong>design</strong>ers. I<br />
am forever grateful for their knowledge, their talent and their<br />
business. I hope they feel the same towards me. For anyone that<br />
has been hesitant or skeptical about finding good workrooms<br />
or good <strong>design</strong>ers, fear no more. It may take some time and<br />
some good business practices to implement but the good ones<br />
are out there. I encourage you to go forth and cultivate those<br />
Designer/ Workroom Teams! Always Remember CPR and one<br />
last acronym of TEAM, which stands for Together Everyone<br />
Achieves More.<br />
www.CHFmagazine.com September/October 2006 45
Book Review<br />
Zona Tiller<br />
The E-Myth Revisited<br />
By Michael E. Gerber<br />
I<br />
have been attending a workshop for small businesses<br />
given by a pro-biz coach. One of our first<br />
assignments was to read the book The E-Myth<br />
Revisited. I would encourage all to read it and<br />
implement this business practice into your own business.<br />
The book encourages you to transform your business<br />
into an incredibly effective organization by implementing<br />
systems as a way of doing business. In effect, go<br />
to work on your business instead of in your business.<br />
There are three elements for a successful business: the<br />
entrepreneur, the manager, and the technician. The<br />
entrepreneur is the dreamer. He lives in the future. He<br />
is creating probabilities out of possibilities, engineering<br />
chaos into harmony. And he has a need to control. The<br />
manager is the planner. He lives in the past. The manager<br />
is the part of us that goes to Target to get various<br />
sizes of boxes to put our thread, tapes, scissors, and<br />
tools into each box and then labeling each box. The<br />
entrepreneur creates the things the manager puts things<br />
in rows. The manager craves control, and clings to the<br />
status quo. The technician is the doer. He lives in the<br />
present. Things aren’t to be dreamed about; they are<br />
done. He is happy when he is control of the work flow.<br />
The technician knows if it weren’t for him the work<br />
wouldn’t get done. In most small businesses the owner is<br />
10% entrepreneur, 20% manager, and 70% technician.<br />
The entrepreneur wakes up with a vision. The manager<br />
screams “oh no” and while the two of them are battling it out,<br />
the technician goes to work. And that’s the problem; the wrong<br />
person is in charge — the technician. In our business most of<br />
us concentrate on the being the technician, because sewing is<br />
what we do best. To be successful you need all three working<br />
together as a part of an organized system. If you don’t have all<br />
three, you just have a job and not a business.<br />
I have been getting by for a number of years being just a technician.<br />
If you took me out of my business, my business would<br />
simply disappear. By implementing a system as a way of running<br />
my business, it would be able to run itself if I went away,<br />
or better yet I might have something tangible to sell one day.<br />
Also by having a system of always doing things the same way<br />
every time, I will become more efficient in all I do, along with<br />
making fewer mistakes. This system is best described by looking<br />
how McDonalds runs its business. McDonalds is a system<br />
dependent business, not a people dependent business. Every<br />
McDonalds has a system for doing every job in the restaurant.<br />
The hamburgers are always prepared in the same manner. The<br />
french fries are left in the warming bin for no longer than seven<br />
minutes to prevent sogginess. Cleanliness is enforced. It is very<br />
disciplined and standardized. All the employees and managers<br />
are sent through a vigorous training program. That is why there<br />
are more than 28,000 McDonalds all over the world. Anyone<br />
with training can work there or manage one<br />
McDonalds has a smooth running operation because it is always<br />
done the same way every time. Well, what if every time you<br />
made a pleated drape or Roman shade and did it the same every<br />
time, think of how proficient you would become in making<br />
46 The Custom Home Furnishings Magazine September/October 2006
Book Review<br />
Zona Tiller<br />
the treatment. If you documented how you did this, then an<br />
employee could read the instructions and make the <strong>treatments</strong><br />
just as you had specified. Or if you only make a Roman shade<br />
two times a year, you won’t have to reinvent it every time you<br />
need to make it. By implementing this system you would be<br />
able to work more efficiently, therefore faster production, and<br />
as a result you are making more money. There are many books<br />
and instructional systems available for purchase that will aid<br />
you in documenting instructions on all the <strong>treatments</strong> you<br />
do. Debbie Green from Minutes Matter has an instructional<br />
system. Debbie also has many forms to help in organizing a<br />
system for your workroom. Ann Johnson has a book on how<br />
to make swags, or purchase the Parkhill Royale System from<br />
Scot Robbins. M’Fay has a workroom manual with instructions<br />
already written out for many <strong>treatments</strong>. Ethel Mahon’s book<br />
the Encyclopedia of Fabrications has a lot of great information.<br />
There are many books that can be found on the CHF website.<br />
You don’t have to rewrite everything; just critique the information<br />
already available to fit the way you do things.<br />
Here are a few more ideas for implementing systems:<br />
When you go out and measure for <strong>window</strong> <strong>treatments</strong>, develop<br />
a measuring chart. With a chart you won’t be as apt to forget<br />
to take one of the measurements. Always begin on one side of<br />
the room and work your way around. Take with you all the<br />
supplies needed to measure any type of <strong>window</strong>. Carry the<br />
supplies in the same container each time. Take photos of the<br />
<strong>window</strong>s to help remember what was in the room. If you get<br />
a deposit check, put it in the same place every time.<br />
File your clients’ information in different color folders placed<br />
in a file cabinet in alphabetical order or in the order in which<br />
they are scheduled to be worked on.<br />
Develop a work order system. Use it and fill it out the same way<br />
every time. On the work order you should have information<br />
which is useful in developing a system for fabricating, such<br />
as cut length, side hems allowance, bottom hem allowance,<br />
fullness allowances, etc. I have several clipboards hanging on<br />
a wall with work orders lined up in the order they need to be<br />
completed. I used to misplace my work orders all the time.<br />
I can’t tell you how much time I wasted trying to find them.<br />
They are tied down now so I can’t walk away with them. I do<br />
the same thing with small scissors to clip threads by my sewing<br />
machines. There is a clipper tied to every machine.<br />
I use different colored papers for all my tasks. Purple is my<br />
work order, yellow is the bid I submitted to the <strong>design</strong>er, blue is<br />
a purchase order, pink is my measuring sheet, and green is the<br />
work order for my installer. All the white papers are those sent<br />
to me by my <strong>design</strong>ers. I can find the paper I need in a client’s<br />
folder just by looking for a certain color of paper.<br />
I place a fluorescent label on my fabric rolls to record the date<br />
when I received them and an estimated completion date. I can<br />
easily see the fluorescent labels so I don’t spend time trying<br />
to find the client’s name on the package. I also have a chart<br />
where I document estimated completion so I can refer to it<br />
when a client calls and asks about it. There is a place on the<br />
chart to mark off if I have submitted an invoice or not. The<br />
worst thing I can think of is to forget to send an invoice out.<br />
I also use fluorescent labels for my installer. I label the treatment<br />
stating who the client is, who the <strong>design</strong>er is, what room<br />
it goes into, and the finished width and length.<br />
When you are setting up an appointment with a client, have a<br />
system where you ask the same questions to prequalify them<br />
each time someone calls. Use the same pad for recording the<br />
pertinent information about the client, such as phone number,<br />
addresses, room needing drapes, colors, etc.<br />
Try different approaches to your sales. Document the success,<br />
and when you discover what has worked best, stick with that.<br />
Here’s an example. Wear a brown pantsuit to the client’s home.<br />
For the next several appointments document how many sales<br />
you get. Then wear a blue pantsuit, and again document your<br />
sales. I’ll tell you the results as recorded in the book E-Myth,<br />
blue outsells brown. The point is when you find what works;<br />
stick with it. Think about how you answer the phone or how<br />
you greet a potential client when they come into your studio.<br />
Ask a question that requires an answer, not just a yes or no.<br />
I have discovered most of these organizational tips from<br />
reading the Forum, the CHF magazine, or attending a CHF<br />
conference. If it was your brilliant idea, thanks! Keep educating<br />
yourself for organizational tips.<br />
All of this has to do with the technician. There’s also the<br />
entrepreneur and the manager. As the entrepreneur you need<br />
to have a vision. Think about what kind of lifestyle you wish<br />
you could live. What kind of house would you live in? What<br />
kind of car would you drive? How will your business help you<br />
achieve those goals? You need a plan, a tool for measuring<br />
your progress toward a specific end. Set goals for how much<br />
money you would like to earn, this month, this year, in five<br />
years. How will you get there? Do you want a store front? Do<br />
(continued on page 50)<br />
www.CHFmagazine.com September/October 2006 47
Book Review<br />
Zona Tiller<br />
The E-Myth Revisited (continued from page 47)<br />
you want to grow? The key is plan, envision, and articulate<br />
what you see in the future. Organize your thoughts and write<br />
it down. If you don’t write it down, you don’t own it. Think<br />
about writing a vision statement, and from your vision, set<br />
goals necessary to achieve them. Think about a well-defined<br />
future, and then bring it back to the present and make your<br />
business match your vision. Break your goals down to daily,<br />
monthly, and yearly. Think about how your business will work,<br />
not what work has to be done.<br />
Lastly there’s the manager. How many hats are you wearing<br />
managing now? We’re all the CEO of our little or big business.<br />
We are also the person who markets, are in charge of finance,<br />
the operations manager, the sales manager, the advertiser, and<br />
the facilities manager. All of these jobs, should in one way or<br />
another, have a plan to carry each task out so that it can easily<br />
be taught to someone else. It’s all part of a system-dependent<br />
business, not a people dependent business. Your business should<br />
have an operations manual or a how-to-do-it-guide not just for<br />
fabricating but for all the hats you wear. Work on a business<br />
that could work without you. Develop a business where you<br />
can begin as the seamstress and work your way through the<br />
system. It doesn’t matter if you plan to grow to 50 employees<br />
or just stay the way you are, if you have a system, the business<br />
will run smoother with less room for error.<br />
The book E-Myth continues with how to implement each of<br />
the different hats you wear as a whole business development<br />
program. By implementing such a format your success rate<br />
is increased substantially. The success rate in our industry<br />
is probably pretty good; most of us are live in a two-income<br />
household. But if you could add more to that income, why not?<br />
Along with adding more income a smooth running business<br />
with less stress, maybe even less hours of being the technician<br />
would be added bonuses.<br />
McDonalds set the example of what a franchise looks like.<br />
Their way of operating a business is how all franchises operate<br />
today with a series of systems. Think about their success rate.<br />
I’ll end with encouraging you again to read E-Myth Revisited<br />
by Michael E. Gerber. Continue your education through books.<br />
I’m currently reading a book on marketing. Keep reading this<br />
magazine. Get on the Forum and read, read, read. Attend<br />
CHF conferences or the CHF Academy. If you would really<br />
like to take your business to the next level, consider a pro-biz<br />
coach. My coach can be reached at tom@probizcoaches.com.<br />
His coaching can be done via the internet. Remember, this is<br />
a business not a job.<br />
Zona has been in the <strong>window</strong> coverings<br />
business for 25 years and has<br />
one employee. She has a home-based<br />
workroom, serving <strong>design</strong>ers and retail<br />
clients. Zona specializes in <strong>design</strong>ing and<br />
fabricating <strong>window</strong> coverings along<br />
with <strong>upholstery</strong> and <strong>slipcovers</strong>. She has<br />
also taught at the CHF Conferences.<br />
Product Profile<br />
Rear Guard Tool Holder<br />
Keep your tools handy when you are on the go in the workroom or out on<br />
an installation. Wherever you are, this versatile pouch lets you travel light.<br />
Padded and reinforced for durability, yet slips easily into a back pants<br />
pocket. The snap loop secures also to a belt or tool bag. Four front pockets<br />
hold tools, pencils, scissors, and much more while leaving your hands free to work on<br />
your projects.<br />
Several students at The CHF Academy have been heard to say that, “this is the best<br />
next thing since sliced bread.” “I love this Rear Guard Tool Holder. It is the one of the<br />
greatest tools I own.”<br />
This Rear Guard Tool Holder is available through The Custom Home Furnishings School<br />
store. You can order by calling 800-222-1415 (704-644-7730) or by visiting the website<br />
at www.CHFschool.com. Item #S-251; $13.50.<br />
48 The Custom Home Furnishings Magazine September/October 2006
Form of the Month<br />
Terri Booser<br />
Quote/ Work Order Request<br />
Company ____________________<br />
SideMark<br />
Treatment ___________________ Fax #<br />
Sketch with short point/long point noted<br />
This Work Order is of a very simplistic nature and was developed from a format that one of the <strong>design</strong>ers<br />
that I work for uses. It always had everything I needed to quote or complete the job. I decided I would<br />
put it in a form and provide these to my other <strong>design</strong>ers to use as well. This form can be used for either<br />
a quote request or a work order. I ask my <strong>design</strong>ers to circle the appropriate word (work order or quote<br />
request) when it is first submitted. If the quote becomes a work order, then it is simply resubmitted. In the<br />
main block (where these instructions are written), sketch the treatment and denote long points and short<br />
points. For instance, if the treatment was for a Bordeaux valance with cascades this would be inside the<br />
block. Below this box in the next section allows for all the specifications: quantity, FW (finished width), FL<br />
(finished length), and return (board size.) The specification line is used to denote any special instructions<br />
which the sketch may not depict, such as the number of swags or scallops desired per treatment. The<br />
remaining boxes are to denote the fabric, trim, and lining specifications so they can be identified and<br />
verified when the workroom receives them. In the lining box, you or the <strong>design</strong>er simply circles whether<br />
sateen or blackout is desired. Write in the color desired, and circle if it is to be interlined or not. (White<br />
out these instructions before copying for your use.)<br />
Window Sizes Quantity FW FL Return Specifications<br />
X X X<br />
X X X<br />
X X X<br />
Main Fabric<br />
Trim<br />
Company Company<br />
Pattern/color Pattern/Color<br />
Width VR HR Placement<br />
Contrast Fabric<br />
Company<br />
Lining<br />
Pattern/color Type Sateen or Black Out<br />
Width VR HR Color<br />
Placement<br />
Interlined Yes or No<br />
www.CHFmagazine.com September/October 2006 49
Step-by-Step<br />
Zona Tiller<br />
The Leading Edge Panel<br />
With a Decorative Edge<br />
INSTRUCTIONS:<br />
Figure the fullness for your panel.<br />
1. In this sample, the panel has a 4" decorative leading edge.<br />
Figure the fullness for your panel as you always do. Add<br />
an additional 8" to the panel for take-up of the pleats.<br />
Example: Your panel finished width is 25". Multiple<br />
25"x2½ times fullness = 62½ + 8" = 70½ divided by 54"<br />
fabric width = 1.30 or 1½ widths of fabric.<br />
The finished Leading Edge Panel.<br />
Cut the selvage off the leading edge.<br />
2. Cut the selvage off the leading edge of the panel. Measure<br />
in 3½" for the 3" side hem. Mark with a pin as shown<br />
above 1", ½", 1", ½", 1", ½", etc. You will need eight 1"<br />
spaces. Your last mark should be a 1" space. Draw lines<br />
to mark the vertical pleats.<br />
Fold 1" pleat in half, and sew along that line.<br />
3. The 1" lines are the pleats, and the ½" lines are the spaces.<br />
Fold the 1" pleat in half, and sew along that line. I stuck<br />
a pin through the fabric to line up my lines and sewed as<br />
seen in the photo above.<br />
50 The Custom Home Furnishings Magazine September/October 2006
Step-by-Step<br />
Zona Tiller<br />
Mark up from the bottom where the hem line will be.<br />
4. After sewing all the vertical lines, mark up from the<br />
bottom where the hem line will be. Divide what your<br />
finished length will be so that each horizontal line will be<br />
approximately 5" apart. My panel measured 70", so my<br />
spacing was 5". Mark lines with a disappearing pen.<br />
Sew the horizontal lines.<br />
5. Sew the horizontal lines, folding the vertical lines facing<br />
the leading edge then fold towards the center of the panel.<br />
The edge will have a back and forth wave pattern. See the<br />
finished panel on page 50.<br />
Knitting & Crocheting…<br />
Making a Comeback<br />
By Zona Tiller<br />
Finish the panel as you normally would.<br />
6. Finish the panel in the usual way. When you sew the side<br />
hem where the pleats are, be sure to set your blind hemmer<br />
so it doesn't sew through to the face fabric. Or hand-sew<br />
the side hem. I don't recommend using a döfix iron for<br />
the side hem as it will press the folds down too much.<br />
Zona has been in the <strong>window</strong> coverings business<br />
for 25 years and has one employee. She<br />
has a home-based workroom, serving <strong>design</strong>ers<br />
and retail clients. Zona specializes in <strong>design</strong>ing<br />
and fabricating <strong>window</strong> coverings along with<br />
<strong>upholstery</strong> and <strong>slipcovers</strong>. She has also taught<br />
at the CHF Conferences.<br />
Did you know that knitting and crocheting is making<br />
a big comeback? A lot of the clothing has lacey<br />
knitting or crocheting on the edges. Do you have<br />
a very special client who would love a handmade<br />
pillow? How about crocheting the edge of a pillow? I often<br />
do my crocheting<br />
while waiting<br />
in a parking lot<br />
for my son to be<br />
done with soccer.<br />
I spend a lot of<br />
time waiting in my<br />
van for somebody,<br />
which gives me<br />
plenty of time to<br />
crochet. Do you<br />
have an upcoming<br />
road trip? Or<br />
Offer your clients something special<br />
with a lacey crocheted or knitted edge.<br />
how about while watching that favorite television program?<br />
Knitting or crocheting is a very relaxing hobby. You don't have<br />
to think much or count stitches. Why not share it with one of<br />
your favorite clients?<br />
www.CHFmagazine.com September/October 2006 51
CHF Academy Success Story<br />
Terre Heinz<br />
A Better View<br />
Making Another Successful Move<br />
Terre Heinz of Nashua, MI, is truly a<br />
creative person. I had the privilege of<br />
interviewing Terre at a CHF Conference<br />
last year. The Conference was<br />
sponsoring a Creativity Contest in the Working<br />
Workroom. Contestants were given 1¼ hours to<br />
complete a <strong>window</strong> treatment, using only their<br />
creativity with the items that were provided.<br />
The key was contestants could not use sewing<br />
machines. Terre's winning entry was absolutely<br />
gorgeous and so creative. Here is Terre's success<br />
story.<br />
CHF MAGAZINE: When did you attend the CHF Academy?<br />
And which classes did you attend?<br />
TERRE: “I attended the school in March of this year. I had the<br />
great fortune to have won five days at the school from one of<br />
the Creativity Contests that I had participated in at the CHF<br />
Conference in Greenville, SC. Then with 'Lady Luck' truly on<br />
my side, I won two more days as a door prize. From there it was<br />
an easy choice to attend a full Career Professional Program. I<br />
chose the Window Coverings Career Professional Program.”<br />
CHF MAGAZINE: When did you first decide to further your<br />
education to become more successful?<br />
TERRE: “I really don't remember the sequence of events, but I<br />
do know it was first from making a decision to step out of my<br />
comfort zone and begin to network. I needed to try and find<br />
out what was out there and readily available to help me with<br />
my decision to try my hand at my own business. I then met<br />
someone who so very openly gave me all sorts of information,<br />
one of which was the WCAA (Window Coverings Association<br />
of America.) I knew from there I was really headed in the right<br />
direction. And with the Academy's connections to the WCAA,<br />
it's a smart decision for anyone to join. I have also made it<br />
my policy, sort of the 'Pay It Forward' theory to try and be as<br />
helpful to anyone else interested in this business.”<br />
CHF MAGAZINE: How long have you been in business?<br />
TERRE: “Having already been in business for about five years<br />
(and around three moves during that time, having to stop and<br />
A Better View Creation<br />
restart my business), I needed to confirm the skills that I already<br />
had and looked forward to the new ones that I would be learning.<br />
I hoped that I would be able to improve upon these skills. I<br />
left The Academy armed with the samples I made, the valuable<br />
class notebooks, new friends, and unexpected enthusiasm for<br />
who I was and what I could do if I put my mind to it. The school<br />
was the opportunity to prove to myself that I was capable of<br />
being the professional that I saw myself becoming.”<br />
When I was at the school last March, I knew then that I would<br />
be moving again during the summer. There were also going to<br />
be other changes and challenges in my life. With my newfound<br />
confidence in my skills from The CHF Academy and with the<br />
confident support that is available to all of us through the<br />
fabulous CHF Network, I was ready for the challenge.”<br />
CHF MAGAZINE: How did getting an education enable you<br />
and your workroom become more successful?<br />
TERRE: When I was first asked about being highlighted in this<br />
column, I was extremely flattered. I was moving again (only<br />
about 375 miles this time.) We have moved 10 times in 20 years,<br />
but there was never a question in my mind that I would and<br />
could get my business up and running again. (As I am planning<br />
for this article, I am sitting at my computer using a drop<br />
light with everything still semi-packed and covered in plastic<br />
in what will be my new workroom. The contractor knocked<br />
down a wall and the electrician will be here in two days…so<br />
you can get the picture.)<br />
52 The Custom Home Furnishings Magazine September/October 2006
CHF Academy Success Story<br />
Terre Heinz<br />
To obtain success, you need a positive outlook,<br />
the ability to step outside your comfort zone<br />
(and out of the contractor's zone), and most<br />
importantly, a good sense of humor. I truly feel<br />
that I am a success in my own small way.”<br />
CHF MAGAZINE: Terre, tell us about your<br />
new workroom.<br />
TERRE: “My new workroom will have two<br />
worktables, one 9' the other 12', so the space<br />
will be wonderful. I will have one wall that has<br />
three 6' sliding glass doors looking out to a<br />
small garden space. Not bad for a quick break<br />
from eye strain. I truly feel that I am a success<br />
in my own small way.”<br />
CHF MAGAZINE: What are some of the challenges<br />
you will be facing with your new workroom?<br />
And what advice would you give to someone<br />
thinking about continuing their education?<br />
TERRE: “Some of the challenges I know will be in my immediate<br />
future will be deciding the structure of my 'new'<br />
again business. I have always been a retail only workroom.<br />
But a lot of that has been because of my previous locations.<br />
I have grown from a fabrication only business to full service<br />
<strong>window</strong> treatment professional. If any of you are doing retail,<br />
I highly recommend that you offer all services to your clients.<br />
Today's customers want more one-stop shopping. I also know<br />
in my new location that I need to be more flexible with how<br />
I'll grow. I plan on attending additional classes at The CHF<br />
More of Terre's stunning creations.<br />
Academy to even further my career and help bring my business<br />
to a higher level.<br />
To help me keep smiling as all this goes on around me, I keep<br />
two quotes and my mission statement close at hand:<br />
• 'If nothing changes, nothing changes.'<br />
• 'All of our dreams come true if we have the courage to<br />
pursue them.'<br />
• My mission statement: A Better<br />
View seeks to constantly strive<br />
for growth in the custom home<br />
furnishings industry with the<br />
wisdom to solve problems, the<br />
expertise to manage projects,<br />
and the imagination to make<br />
dreams come true.<br />
For those of us who have found<br />
Terre Heinz<br />
our way to The Academy, the<br />
CHF Network Forum, and all the other opportunities<br />
it affords us, we have been given a special gift. But like<br />
any gift or life opportunity, it all depends on what you<br />
do with it. So check back with me in a couple of months<br />
for an update on my success in a new location.”<br />
Terre's success with her business is measured by the gorgeous<br />
work she does, such as these chair covers.<br />
CHF MAGAZINE: I'm sure we can expect big things<br />
from Terre. Her willingness to always share her expertise<br />
and knowledge with others is a benefit to everyone in<br />
the custom home furnishings industry.<br />
www.CHFmagazine.com September/October 2006 53
Career Professional Graduates<br />
The CHF Academy<br />
Congratulations to the Latest<br />
Career Professional Graduates!<br />
Window Coverings:<br />
Sandy Alexander, Waxhaw, NC<br />
Katie Groover, Alpharetta, GA<br />
Shelley L. Feese, Purcellville, VA<br />
Annette W. Wilkinson, Columbia, SC<br />
Kathryn A. Denial, Wattsburg, PA<br />
Cathie Gulliver, Guelph, Ontario<br />
Mariana Aviles, Bloomfield, NJ<br />
Richard Dean, Rocherster, NY<br />
Cathy Cuddington, Apex, NC<br />
Roxanne D. Ross, Rochester, NY<br />
Bernadette W. Marin, Chicago, IL<br />
Wendy Roudette-Blake, Covington, GA<br />
Erica A. Boeyinga, Reidsville, NC<br />
Pat Byrne, Mendon, VT<br />
Danielle Il. Love, Las Vega, NV<br />
Upholstery:<br />
Annette Lockwood, Middleville,<br />
MI<br />
What can the Career Professional Program at The Custom Home Furnishings<br />
Academy do for<br />
you? The benefits of the<br />
program include recognition as an<br />
industry professional, an engraved<br />
wall plaque with your name and<br />
program <strong>design</strong>ation, and a camera-ready<br />
Career Professional logo,<br />
which can be used on business cards,<br />
letterhead, etc.<br />
Advanced Window Covering:<br />
Wendy Riggs, Whittier, NC<br />
Kate Kissell, Fort Matilda, PA<br />
Terri Horton, Enumclaw, WA<br />
Installation:<br />
Jim Blinebury, Glassboro, NJ<br />
Gerard Milich, Bristol, RI<br />
John Grace, Addison, IL<br />
Tate D. Pepper, Canton, MS<br />
Dan Murphy, Woodstock, GA<br />
Brian J. Budnar, Easley, SC<br />
Michael Bailey, Hot Springs Village, AK<br />
Carlos Aviles, Bloomfield, NJ<br />
Slipcovers:<br />
Carolyn Dail<br />
Jana K. Gebhardt<br />
Cathy Cuddington, Apex, NC<br />
Beth McCrory, Green Bay, WI<br />
Cornice Boards/Headboards:<br />
Sylvia Griner, Riverview, FL<br />
Jeanette Pina, Port St. Lucie, FL<br />
All graduates choosing to do so<br />
will be announced in The Custom<br />
Home Furnishings Magazine. Your<br />
name will also be listed on the CHF<br />
Academy’s website, along with a link<br />
to your website. There are seven Career<br />
Professional Programs to choose<br />
from: Window Coverings, Advanced<br />
Window Coverings, Professional<br />
Slipcovers, Cornice/Headboards, Installation,<br />
Pillows/Bedding, and The<br />
Art of Upholstery.<br />
Would you like to be a Career Professional?<br />
Give the CHF Academy a call today at<br />
800-222-1415 (704-333-4636), or visit their<br />
website at www.CHFschool.com.<br />
If your name has not appeared in the list<br />
of Career Professional Graduates and you<br />
would like to have it listed, please send<br />
an email with your name, city, and state to<br />
editor@chfmagazine.com.<br />
Students showcase their<br />
<strong>treatments</strong> from the Window<br />
Treatments 104 Career<br />
Professional Program.<br />
54 The Custom Home Furnishings Magazine September/October 2006
2006 Custom Home Furnishings Academy Schedule<br />
800-222-1415 (704) 333-4636 ~ www.CHFschool.com<br />
January<br />
3-4 Starting and Operating a Workroom<br />
5-9 Workroom Shortcuts, Draperies, and Shades<br />
7-11 Professional Installation Techniques<br />
11-14 Swags, Top Treatments, and Embellishments<br />
12-13 Advanced Installation Techniques<br />
18-22 CHF Educational Conference - Greenville, SC<br />
23-27 Advanced Top Treatments and Shades<br />
23-28 Professional Slipcovers<br />
29-2/1 High-end Fabrication Methods<br />
29-2/4 The Art of Upholstery<br />
February<br />
4-5 Starting and Operating a Workroom<br />
6-10 Workroom Shortcuts, Draperies, and Shades<br />
12-15 Swags, Top Treatments, and Embellishments<br />
13-14 Basic Cornices<br />
13-18 Cornices and Headboards<br />
18-19 Window Treatments for Designers (NEW CLASS)<br />
March<br />
1-5 CHF Educational Conference - Phoenix, AZ<br />
6-7 Starting and Operating a Workroom<br />
8-12 Workroom Shortcuts, Draperies, and Shades<br />
11-15 Professional Installation Techniques<br />
16-17 Advanced Installation Techniques<br />
14-17 Swags, Top Treatments, and Embellishments<br />
18 Building a Professional Image<br />
19-23 Advanced Top Treatments and Shades<br />
23-28 Professional Slipcovers<br />
25-28 High-end Fabrication Methods<br />
April<br />
1-2 Basic Cornices (Cornice Boards 100)<br />
1-2 Starting and Operating a Workroom (WT 100)<br />
3-7 Workroom Shortcuts, Draperies, and Shades (WT 101)<br />
1-6 Cornices and Headboards (Cornice Boards 102)<br />
8-9 All About Pillows<br />
9-12 Swags, Top Treatments, and Embellishments (WT 102)<br />
10-13 Fabricating Bed Treatments<br />
22-28 The Art of Upholstery<br />
22-23 Window Treatments for Designers (NEW CLASS)<br />
29-30 Starting and Operating a Workroom (WT 100)<br />
May<br />
1-5 Workroom Shortcuts, Draperies, and Shades (WT 101)<br />
6-11 Professional Slipcovers<br />
7-10 Swags, Top Treatments, and Embellishments (WT 102)<br />
12-13 Arched and Unusual Swags (NEW CLASS)<br />
15-19 Advanced Top Treatments and Shades )WT 103)<br />
21-24 High-end Fabrication Methods (WT 104)<br />
20-24 Professional Installation Techniques (Installation 101)<br />
25-26 Advanced Installation Techniques (Installation 102)<br />
June<br />
3-4 Starting and Operating a Workroom (WT 100)<br />
3-6 Headboards and Ottomans<br />
5-9 Workroom Shortcuts, Draperies, and Shades (WT 101)<br />
11-14 Swags, Top Treatments, and Embellishments (WT 102)<br />
July<br />
7-8 Starting and Operating a Workroom (WT 100)<br />
7-13 The Art of Upholstery<br />
9-13 Workroom Shortcuts, Draperies, and Shades (WT 101)<br />
15-18 Swags, Top Treatments, and Embellishments (WT 102)<br />
15-19 Professional Installation Techniques (Installation 101)<br />
20-24 Advanced Top Treatments and Shades (WT 101)<br />
20-21 Advanced Installation Techniques (Installation 102)<br />
23-28 Professional Slipcovers<br />
25-28 High-end Fabrication Methods (WT 104)<br />
29-30 Window Coverings Weekend Academy, Charlotte, NC<br />
August<br />
1-2 Starting and Operating a Workroom (WT 100)<br />
3-7 Workroom Shortcuts, Draperies, and Shades (WT 101)<br />
9-12 Swags, Top Treatments, and Embellishments (WT 102)<br />
12-13 Window Coverings Weekend Academy, Denver, CO<br />
14-15 Starting and Operating a Workroom (WT 100)<br />
14-18 Ottomans and Headboards<br />
16-20 Workroom Shortcuts, Draperies and Shades (WT 101)<br />
19-20 Window Treatments for Designers<br />
21-22 Lifestyle Marketing<br />
22-25 Swags, Top Treatments, and Embellishments (WT 102)<br />
23-24 Administrative Management of the Workroom<br />
26-27 All About Pillows<br />
28-31 Fabricating Bed Treatments<br />
September<br />
6-7 Starting and Operating a Workroom (WT 100)<br />
8-12 Workroom Shortcuts, Draperies, and Shades (WT 101)<br />
8-12 Professional Installation Techniques (Installation 101)<br />
13-14 Advanced Installation Techniques (Installation 102)<br />
16-17 Window Coverings Weekend Academy, St. Louis, MO<br />
18-23 Swags, Top Treatments, and Embellishments (WT 103)<br />
19-23 Advanced Top Treatments and Shades (WT 103)<br />
24-27 High-end Fabrication Methods (WT 104)<br />
October<br />
3-4 Starting and Operating a Workroom (WT 100)<br />
5-9 Workroom Shortcuts, Draperies, and Shades (WT 101)<br />
11-14 Swags, Top Treatments, and Embellishments (WT 102)<br />
13-16 Sew Like a Pro<br />
15-16 Window Treatments for Designers<br />
17-18 Starting and Operating a Workroom (WT 100)<br />
17-23 The Art of Upholstery<br />
19-20 Administrative Management of the Workroom<br />
19-23 Workroom Shortcuts, Draperies, and Shades (WT 101)<br />
25-28 Swags, Top Treatments, and Embellishments (WT 102)<br />
November<br />
3-4 Starting and Operating a Workroom (WT 100)<br />
4-8 Professional Installation Techniques (Installation 101)<br />
5-9 Workroom Shortcuts, Draperies, and Shades (WT 101)<br />
9-10 Advanced Installation Techniques (Installation 102)<br />
11-14 Swags, Top Treatments, and Embellishments (WT 102)<br />
December<br />
1-2 Starting and Operating a Workroom (WT 100)<br />
2-3 All About Pillows<br />
3-7 Workroom Shortcuts, Draperies, and Shades (WT 101)<br />
4-7 Fabricating Bed Treatments<br />
9-12 Swags, Top Treatments, and Embellishments (WT 102)<br />
LOOK FOR THE NEW 2007 ACADEMY SCHEDULE<br />
IN THE NOVEMBER/DECEMBER ISSUE!<br />
www.CHFmagazine.com September/October 2006 55
2<br />
3<br />
1<br />
Call for a free sample<br />
56 The Custom Home Furnishings Magazine September/October 2006