GTS-65 (2L Wrapid Sleeve) IG.cdr - Canusa-CPS
GTS-65 (2L Wrapid Sleeve) IG.cdr - Canusa-CPS
GTS-65 (2L Wrapid Sleeve) IG.cdr - Canusa-CPS

You also want an ePaper? Increase the reach of your titles
YUMPU automatically turns print PDFs into web optimized ePapers that Google loves.
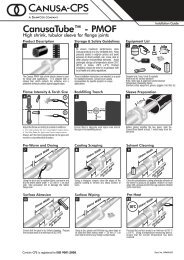
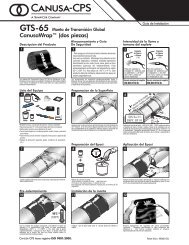
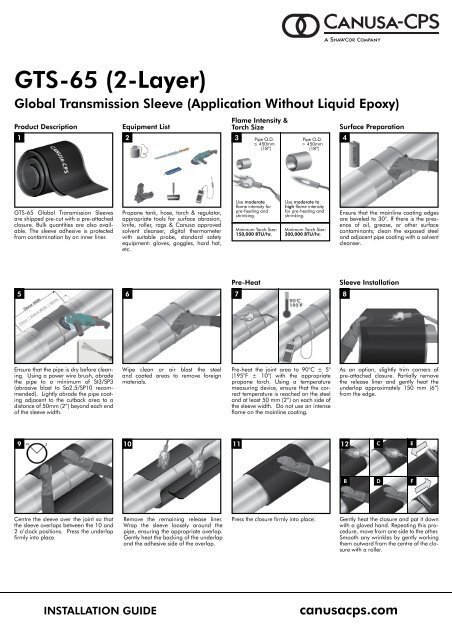
<strong>GTS</strong>-<strong>65</strong> (2-Layer)<br />
Global Transmission <strong>Sleeve</strong> (Application Without Liquid Epoxy)<br />
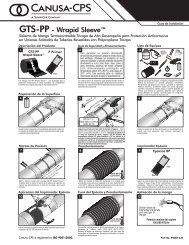
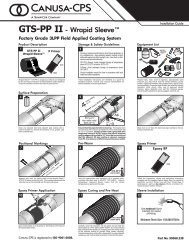
Product Description<br />
1<br />
Equipment List<br />
2<br />
Flame Intensity &<br />
Torch Size<br />
3<br />
Pipe O.D.<br />
≤ 450mm<br />
(18”)<br />
Pipe O.D.<br />
> 450mm<br />
(18”)<br />
Surface Preparation<br />
4<br />
<strong>GTS</strong>-<strong>65</strong> Global Transmission <strong>Sleeve</strong>s<br />
are shipped pre-cut with a pre-attached<br />
closure. Bulk quantities are also available.<br />
The sleeve adhesive is protected<br />
from contamination by an inner liner.<br />
Propane tank, hose, torch & regulator,<br />
appropriate tools for surface abrasion,<br />
knife, roller, rags & <strong>Canusa</strong> approved<br />
solvent cleanser, digital thermometer<br />
with suitable probe, standard safety<br />
equipment: gloves, goggles, hard hat,<br />
etc.<br />
Use moderate<br />
flame intensity for<br />
pre-heating and<br />
shrinking.<br />
Minimum Torch Size:<br />
150,000 BTU/hr.<br />
Use moderate to<br />
high flame intensity<br />
for pre-heating and<br />
shrinking.<br />
Minimum Torch Size:<br />
300,000 BTU/hr.<br />
Ensure that the mainline coating edges<br />
are beveled to 30°. If there is the presence<br />
of oil, grease, or other surface<br />
contaminants; clean the exposed steel<br />
and adjacent pipe coating with a solvent<br />
cleanser.<br />
Pre-Heat<br />
<strong>Sleeve</strong> Installation<br />
5<br />
6<br />
7<br />
8<br />
Ensure that the pipe is dry before cleaning.<br />
Using a power wire brush, abrade<br />
the pipe to a minimum of St3/SP3<br />
(abrasive blast to Sa2.5/SP10 recommended).<br />
Lightly abrade the pipe coating<br />
adjacent to the cutback area to a<br />
distance of 50mm (2”) beyond each end<br />
of the sleeve width.<br />
Wipe clean or air blast the steel<br />
and coated areas to remove foreign<br />
materials.<br />
Pre-heat the joint area to 90°C ± 5°<br />
(195°F ± 10°) with the appropriate<br />
propane torch. Using a temperature<br />
measuring device, ensure that the correct<br />
temperature is reached on the steel<br />
and at least 50 mm (2”) on each side of<br />
the sleeve width. Do not use an intense<br />
flame on the mainline coating.<br />
As an option, slightly trim corners of<br />
pre-attached closure. Partially remove<br />
the release liner and gently heat the<br />
underlap approximately 150 mm (6”)<br />
from the edge.<br />
9<br />
10<br />
11<br />
12<br />
C<br />
E<br />
B<br />
D<br />
F<br />
Centre the sleeve over the joint so that<br />
the sleeve overlaps between the 10 and<br />
2 o’clock positions. Press the underlap<br />
firmly into place.<br />
Remove the remaining release liner.<br />
Wrap the sleeve loosely around the<br />
pipe, ensuring the appropriate overlap.<br />
Gently heat the backing of the underlap<br />
and the adhesive side of the overlap.<br />
Press the closure firmly into place.<br />
Gently heat the closure and pat it down<br />
with a gloved hand. Repeating this procedure,<br />
move from one side to the other.<br />
Smooth any wrinkles by gently working<br />
them outward from the centre of the closure<br />
with a roller.<br />
INSTALLATION GUIDE<br />
canusacps.com
Storage & Safety Guidelines<br />
<strong>Sleeve</strong> Installation Cont’d<br />
13<br />
14<br />
15<br />
To ensure maximum performance, store<br />
<strong>Canusa</strong> products in a dry, ventilated area.<br />
Keep products sealed in original cartons<br />
and avoid exposure to direct sunlight, rain,<br />
snow, dust or other adverse environmental<br />
elements. Avoid prolonged storage at<br />
temperatures above 35°C (95°F) or below<br />
-20°C (-4°F). Product installation should be<br />
done in accordance with local health and<br />
safety regulations.<br />
These installation instructions are<br />
intended as a guide for standard<br />
products. Consult your <strong>Canusa</strong><br />
representative for specific projects or<br />
unique applications.<br />
Pipe O.D.<br />
≤450mm (18”)<br />
1 torch<br />
>450mm (18”)<br />
2 torches<br />
Using the appropriate sized torch, begin<br />
at the centre of the sleeve and heat circumferentially<br />
around the pipe. Use<br />
broad strokes. If utilizing two torches,<br />
operators should work on opposite sides<br />
of pipe.<br />
16<br />
Continue heating from the centre toward<br />
one end of the sleeve until recovery is<br />
complete. In a similar manner, heat<br />
and shrink the remaining side.<br />
17 18<br />
Shrinking has been completed when the<br />
adhesive begins to ooze at the sleeve<br />
edges all around the circumference.<br />
Finish shrinking the sleeve with long<br />
horizontal strokes over the entire surface<br />
to ensure a uniform bond.<br />
Inspection<br />
<strong>Canusa</strong>-<strong>CPS</strong><br />
A division of ShawCor Ltd.<br />
Head Office<br />
25 Bethridge Rd.<br />
Toronto, ON M9W 1M7 Canada<br />
Tel: +1 416 743 7111<br />
Fax: +1 416 743 5927<br />
Canada<br />
Suite 3200, 450 - 1st Street S.W.<br />
Calgary, AB T2P 5H1 Canada<br />
Tel: +1 403 218 8207<br />
Fax: +1 403 264 3649<br />
While the sleeve is still hot and soft, use<br />
a hand roller to gently roll the sleeve<br />
surface and push any trapped air up<br />
and out of the sleeve, as shown above.<br />
If necessary, reheat to roll out air.<br />
Continue the procedure by also firmly<br />
rolling the closure with long horizontal<br />
strokes from the weld outwards.<br />
Visually inspect the installed sleeve for<br />
the following:<br />
• <strong>Sleeve</strong> is in full contact with the steel<br />
joint.<br />
• Adhesive flows beyond both sleeve<br />
edges.<br />
• No cracks or holes in sleeve backing.<br />
Americas<br />
2408 Timberloch Place, Building C-8<br />
The Woodlands, TX 77380 USA<br />
Tel: +1 281 367 8866<br />
Fax: +1 281 367 4304<br />
Europe, Middle East,<br />
Africa & Russia<br />
Unit 3, Sterling Park,<br />
Gatwick Road, Crawley, West Sussex<br />
RH10 9QT United Kingdom<br />
Tel: +44 1293 541254<br />
Fax: +44 1293 541777<br />
Asia-Pacific<br />
101 Thomson Road,<br />
#11-03 United Square<br />
307591 Singapore<br />
Tel: +<strong>65</strong> 6749 8918<br />
Fax: +<strong>65</strong> 6749 8919<br />
<strong>Canusa</strong>-<strong>CPS</strong> is registered<br />
to ISO 9001:2008<br />
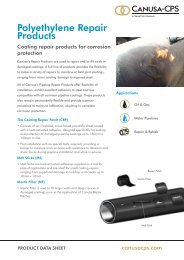
Backfilling Guidelines<br />
After shrinking is complete, allow the sleeve to cool for 2 hours prior to lowering and backfilling. To prevent damage<br />
to the sleeve, use selected backfill material, (no sharp stones or large particles) otherwise an extruded polyethylene<br />
mesh or other suitable shield should be used.<br />
<strong>Canusa</strong> warrants that the product conforms<br />
to its chemical and physical description<br />
and is appropriate for the use stated on the<br />
installation guide when used in compliance<br />
with <strong>Canusa</strong>’s written instructions. Since<br />
many installation factors are beyond<br />
our control, the user shall determine the<br />
suitability of the products for the intended<br />
use and assume all risks and liabilities in<br />
connection therewith. <strong>Canusa</strong>’s liability is<br />
stated in the standard terms and conditions<br />
of sale. <strong>Canusa</strong> makes no other warranty<br />
either expressed or implied. All information<br />
contained in this installation guide is to be<br />
used as a guide and is subject to change<br />
without notice. This installation guide<br />
supersedes all previous installation guides<br />
on this product. E&OE<br />
Part No. 99060-038<br />
<strong>IG</strong>_<strong>GTS</strong><strong>65</strong> (<strong>2L</strong>)_rev014