
Create successful ePaper yourself
Turn your PDF publications into a flip-book with our unique Google optimized e-Paper software.
<strong>Swirling</strong><br />
<strong>Segments</strong><br />
A Simple ‘How to Guide’<br />
This tutorial is meant as a guide only and is fairly wide open to interpretation by each individual.<br />
This is an easy technique to master, needing very few tools, most of which many people will already<br />
own.<br />
• Band saw with narrow blade (I use a ¼ inch)<br />
• Pressure clamp for gluing<br />
• CA glue, I use thick for gluing the cut segments<br />
• Parcel tape or equivalent<br />
• The usual turning tools<br />
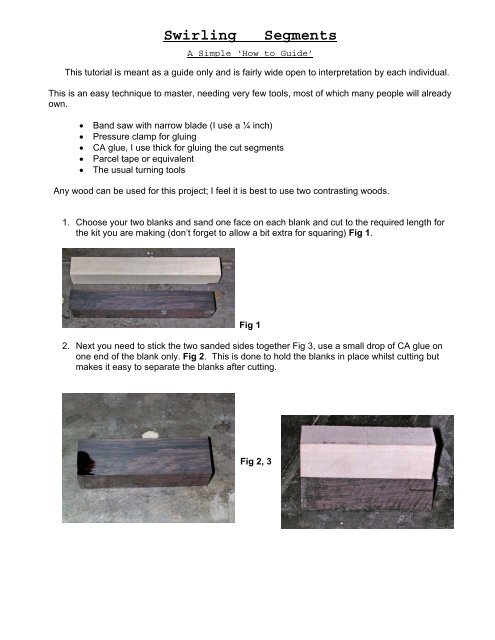
Any wood can be used for this project; I feel it is best to use two contrasting woods.<br />
1. Choose your two blanks and sand one face on each blank and cut to the required length for<br />
the kit you are making (don’t forget to allow a bit extra for squaring) Fig 1.<br />
Fig 1<br />
2. Next you need to stick the two sanded sides together Fig 3, use a small drop of CA glue on<br />
one end of the blank only. Fig 2. This is done to hold the blanks in place whilst cutting but<br />
makes it easy to separate the blanks after cutting.<br />
Fig 2, 3
3. Now comes the cutting, this part of the work is where you can make it as complex as you<br />
wish. But remember the more cuts you do the more pieces you will have to put back<br />
together. I have only done two cuts in this tutorial to keep it easier to understand. Fig 4<br />
When starting, cut the end which has NOT been glued first. The red line represents the<br />
glued end. PLEASE TAKE GREAT CARE WHEN CUTTING AS FINGERS CAN BE VERY<br />
CLOSE TO THE BLADE.<br />
Fig 4<br />
After you have done your cuts you need to<br />
separate the pieces and swap the cut pieces<br />
for each other. Fig 5 . If the pieces do not<br />
separate easily I normally use the band saw<br />
and cut the two different pieces of wood along<br />
where they were glued.<br />
Fig 5<br />
4. The next step is to glue the pieces together, sometimes you may end up with a bit of a burr<br />
edge on some pieces, carefully hand sand of these burrs to get the best fit possible. When<br />
you are happy with a dry fit you can glue them together. I use a thick CA glue for this process<br />
as it gives you better gap filling and<br />
more time to position the pieces. Use<br />
clamps if you have them to get the best<br />
possible fit, when I have clamped them<br />
together I normally throw a bit a<br />
sawdust onto the excess glue to stop it<br />
running onto the clamps Fig 6. Allow<br />
time to dry and then you are ready for<br />
the next stage.<br />
Fig 6
5. If you want a more random look to your segments, you will need to do another series of cuts<br />
at 90 degrees to your first ones. Sand two of the faces and re-follow the steps from Number<br />
2.<br />
Fig 7<br />
This figure shows the blanks ready for cutting a<br />
second time. The vertical face which is showing, is<br />
the one sanded the first time in step number one.<br />
Hopefully this will show you how the blanks need<br />
to be arranged before gluing up ready for the<br />
second cut.<br />
6. You are now ready for drilling the blanks whether you have done 1 or 2 series of cuts, before<br />
drilling I put some parcel tape around the blanks to help reduce blow-outs Fig 8. This is<br />
especially important if you have done 2 sets of cuts as you will have some very small<br />
segments within your blanks which do pop out very easily<br />
Fig 8<br />
7. All that is left to be done know is to glue in your tubes and turn as you would do normally, the<br />
only difference is that you may need to do lighter cuts to avoid dig-ins which could destroy<br />
your blank.<br />
Remember that you will end up with two pens identical in pattern but with inversed colours.<br />
If you have any further questions on how to do these pens please let me know and I will try<br />
and explain.<br />
I.A.P name<br />
Email<br />
UKpenmaker<br />
unique-pens@tiscali.co.uk
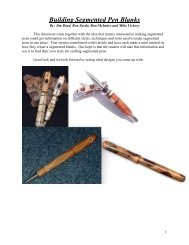
The Completed Pens<br />
The 2 pens from the blanks used for this<br />
tutorial.<br />
These are pens which have had 2<br />
series of cuts done on them, giving<br />
them a more random “<strong>Swirling</strong>”<br />
pattern.