Installation manual 4.2 Mb - Sonab Audio
Installation manual 4.2 Mb - Sonab Audio
Installation manual 4.2 Mb - Sonab Audio

Create successful ePaper yourself
Turn your PDF publications into a flip-book with our unique Google optimized e-Paper software.
R<br />
ENG - installation <strong>manual</strong> - Wired set-up<br />
DE - Bedienungsanleitung - Einrichtung mit Kabel<br />
FR - Manuel d’utilisation - Configuration filaire<br />
ES - Manual del propietario - Configuración con cable<br />
SE - installations<strong>manual</strong> - <strong>Installation</strong> med kabel
R<br />
© <strong>Sonab</strong> <strong>Audio</strong> AB Sverige<br />
<strong>Sonab</strong> ® , <strong>Sonab</strong> logotypen, är registrerade varumärken av <strong>Sonab</strong> <strong>Audio</strong> AB, Sverige. Cloud 9. Alla rättigheter reserverade.<br />
<strong>Sonab</strong> följer en policy om ständig produktutveckling. Specifikationer kan ändras utan föregående meddelande.<br />
www.sonabaudio.com<br />
© <strong>Sonab</strong> <strong>Audio</strong> AB Sweden<br />
<strong>Sonab</strong> ® , the <strong>Sonab</strong> logotype are all registered trademarks of <strong>Sonab</strong> <strong>Audio</strong> AB, Sweden. Cloud 9. All rights reserved.<br />
<strong>Sonab</strong> follows a policy of continuous advancement in development. Specifications may be changed without notice.
SONAB CLOUD 9<br />
ALL wireD<br />
installation<br />
<strong>manual</strong><br />
English<br />
Deutsch<br />
Français<br />
Español<br />
Svenska
ENGLISH / CONTENTS<br />
1. general installation notes<br />
2. Cloud 9 product range<br />
3. All WireD installation<br />
4. Troubleshooting<br />
Note: <strong>Installation</strong>s examples on last pages in <strong>manual</strong><br />
GENERAl<br />
installations notes,<br />
ALL WIRED INSTallation<br />
- A wired only installation is a straightforward procedure, start by connecting a shielded balanced<br />
cable (+,ground,-) from the CGV and then continue to the speakers.<br />
- In a wired installation there is more work doing the planning for the installation as there is<br />
no (or limited) possibilities to change placement afterwards, when all wiring has been done.<br />
So plan the installation carefully before starting to install the wiring for the speakers.<br />
- The CGV is best placed near the source(s).<br />
- Add a CVX (volume control extender) to have the volume control placed more convenient.<br />
- In wired mode, the CSW remote makes it easy to adjust bass levels when CSW is<br />
mounted to wall on wallbracket.
SONAB CLOUD 9 RANGE<br />
This is an overall general description of the <strong>Sonab</strong> Cloud 9 music system. For product<br />
specifications of the <strong>Sonab</strong> products please see the specific user <strong>manual</strong> that comes with<br />
each of the products. Following products are available in the <strong>Sonab</strong> Cloud 9 series:<br />
CLS, Loudspeaker<br />
The CLS is equipped with the GLOBAL trac Multi adapter GA 69 which suits almost<br />
every 3-phase tracks on the market. The CLS is made for mounting direct into the<br />
tracks for optimum convenience. The CLS can receive it´s audio signal either wirelessly<br />
from the CTX transmitter, or wired from a CGV or another CLS or CSW speaker.<br />
CSW, Subwoofer<br />
The CSW should be mounted on the wall with the included wall bracket. If possible on<br />
the same height as the CLS speakers. The CSW have both wireless and wired capabilities,<br />
so both installation options are available. For a convenient set up of the volume<br />
adjustment in wired mode there is an IR remote included with the subwoofer.<br />
CTX, Wireless transmitter<br />
The CTX connects directly to the Mac or PC through the USB interface. All audio available<br />
on the computer (also streaming services like Spotify or Youtube) can be wireless<br />
transmitted. If there are no computer available as source the CTX has the option to also<br />
receive an analogue signal through the 3,5mm line input. The 3,5 mm line in can be<br />
connected to any analogue source.<br />
CVM Wireless volume control<br />
The CVM must be used if the installation should be wireless or be a combination<br />
of wireless and wired. The CVM controls the master volume and the different zone<br />
volumes.<br />
CVX, Volume control extender<br />
The CVX, wired volume extender is available to extend the master volume from the<br />
CVM or CGV to a more convenient placement. Using the CVX also prevents unwanted<br />
tampering with the CVM or CGV, where also different zone volumes can be set (CVM),<br />
or switching of inputs (CGV).<br />
CEX, Wireless range extender<br />
The CEX wireless extender is used to extend the wireless network, or to go around<br />
difficult wifi conditions.<br />
CGV, Wired volume control<br />
The <strong>Sonab</strong> CGV should be used if a wired only installation is intended. The CGV has<br />
inputs for 2 different analogue sources. The CGV unit contains the master volume for<br />
the complete system.<br />
CLS optional wallbracket<br />
Optional wall bracket/table stand for CLS loudspeaker. Use if location don´t have<br />
tracks for power. Comes with power cord to connect to AC outlet.
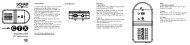
BASS LEVEL<br />
All wired installation<br />
1. Connect a sound source to Line in 1 (LED<br />
Red) or Line in 2 (LED Blue).<br />
Or two sources to Line in 1 and 2.<br />
2. Set all speaker to WIRED input.<br />
3. Connect balanced cable from CGV LINE<br />
OUT (either one, or both) to first speaker/s.<br />
4. Set volume on each speaker (-20 dB to<br />
+20 dB). (0 is volume unchanged from sound<br />
source connected.)<br />
5. Place components<br />
- Place CLS speaker in tracks or on wall.<br />
- Place CSW subwoofer preferably near<br />
wall/corner.<br />
Plan placement of each component to<br />
make cable connections easy.<br />
6. Connect balanced cable to all<br />
components (+, G, -)<br />
Connect all speakers with shielded balanced<br />
cable. The topology should be linear daisy<br />
chain or tree structure. If using tree structure,<br />
avoid branching more than two speakers to a<br />
single line output.<br />
7. Connect all components to power<br />
8. Setting different volume in different areas<br />
Use volume control on speakers to set<br />
individual volume on each speaker.<br />
(0 is volume the speaker is receiving from<br />
connected sound source.)<br />
Note: In wired mode, bass levels on CSW subwoofer can<br />
be adjusted by the remote. If <strong>manual</strong> volume knob on rear<br />
of CSW is adjusted, this overrides all previous settings<br />
done by remote.<br />
3<br />
1<br />
4<br />
3<br />
2<br />
2<br />
4<br />
3
Daisy chain connection<br />
To Line In on<br />
next speaker<br />
To Line In on<br />
next speaker<br />
Tree structure<br />
troubleshooting<br />
- Make sure that all wiring is made with shielded<br />
balanced cable with conductors for plus(+),<br />
ground, minus (-)<br />
- Make sure that all wiring is tightly secured in the<br />
connection blocks.<br />
- Make sure that the contact block containing the<br />
wiring is firmly in place in the speakers corresponding<br />
contact block.<br />
- Make sure that all speakers are in “wired mode”.<br />
- Make sure that the wiring is not mixed between<br />
the speakers (+ to +, ground to ground, - to -)
examples/Beispiele/exemples/ejemplos/Exempel<br />
Example 1<br />
Example 2<br />
Example 3<br />
Volume area A<br />
Volume area B<br />
Volume area C