microARRANGER Quick Start Guide - Korg
microARRANGER Quick Start Guide - Korg
microARRANGER Quick Start Guide - Korg

You also want an ePaper? Increase the reach of your titles
YUMPU automatically turns print PDFs into web optimized ePapers that Google loves.
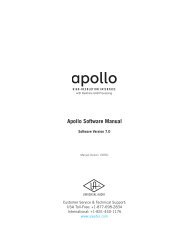
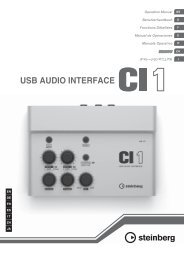
9 Display and User Interface<br />
Display controls<br />
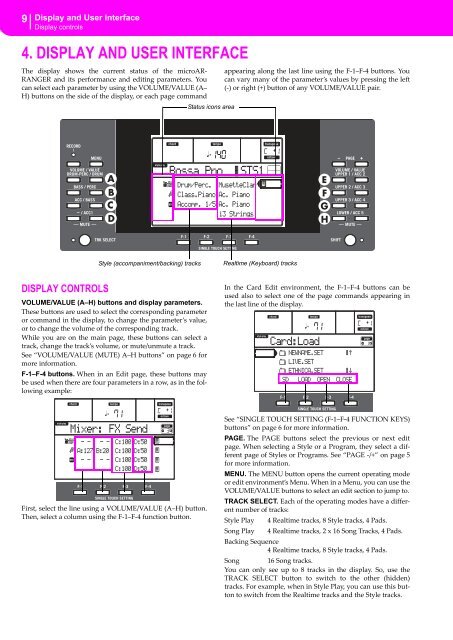
4. DISPLAY AND USER INTERFACE<br />
The display shows the current status of the microAR‐<br />
RANGER and its performance and editing parameters. You<br />
can select each parameter by using the VOLUME/VALUE (A–<br />
H) buttons on the side of the display, or each page command<br />
Status icons area<br />
appearing along the last line using the F‐1–F‐4 buttons. You<br />
can vary many of the parameter’s values by pressing the left<br />
(‐) or right (+) button of any VOLUME/VALUE pair.<br />
Style (accompaniment/backing) tracks<br />
Realtime (Keyboard) tracks<br />
DISPLAY CONTROLS<br />
VOLUME/VALUE (A–H) buttons and display parameters.<br />
These buttons are used to select the corresponding parameter<br />
or command in the display, to change the parameter’s value,<br />
or to change the volume of the corresponding track.<br />
While you are on the main page, these buttons can select a<br />
track, change the track’s volume, or mute/unmute a track.<br />
See “VOLUME/VALUE (MUTE) A–H buttons” on page 6 for<br />
more information.<br />
F-1–F-4 buttons. When in an Edit page, these buttons may<br />
be used when there are four parameters in a row, as in the following<br />
example:<br />
In the Card Edit environment, the F‐1–F‐4 buttons can be<br />
used also to select one of the page commands appearing in<br />
the last line of the display.<br />
First, select the line using a VOLUME/VALUE (A–H) button.<br />
Then, select a column using the F‐1–F‐4 function button.<br />
See “SINGLE TOUCH SETTING (F‐1–F‐4 FUNCTION KEYS)<br />
buttons” on page 6 for more information.<br />
PAGE. The PAGE buttons select the previous or next edit<br />
page. When selecting a Style or a Program, they select a different<br />
page of Styles or Programs. See “PAGE ‐/+” on page 5<br />
for more information.<br />
MENU. The MENU button opens the current operating mode<br />
or edit environment’s Menu. When in a Menu, you can use the<br />
VOLUME/VALUE buttons to select an edit section to jump to.<br />
TRACK SELECT. Each of the operating modes have a different<br />
number of tracks:<br />
Style Play<br />
Song Play<br />
4 Realtime tracks, 8 Style tracks, 4 Pads.<br />
4 Realtime tracks, 2 x 16 Song Tracks, 4 Pads.<br />
Backing Sequence<br />
4 Realtime tracks, 8 Style tracks, 4 Pads.<br />
Song 16 Song tracks.<br />
You can only see up to 8 tracks in the display. So, use the<br />
TRACK SELECT button to switch to the other (hidden)<br />
tracks. For example, when in Style Play, you can use this button<br />
to switch from the Realtime tracks and the Style tracks.