Garmin Scouts Geocaching ActivityPack
Garmin Scouts Geocaching ActivityPack
Garmin Scouts Geocaching ActivityPack

You also want an ePaper? Increase the reach of your titles
YUMPU automatically turns print PDFs into web optimized ePapers that Google loves.
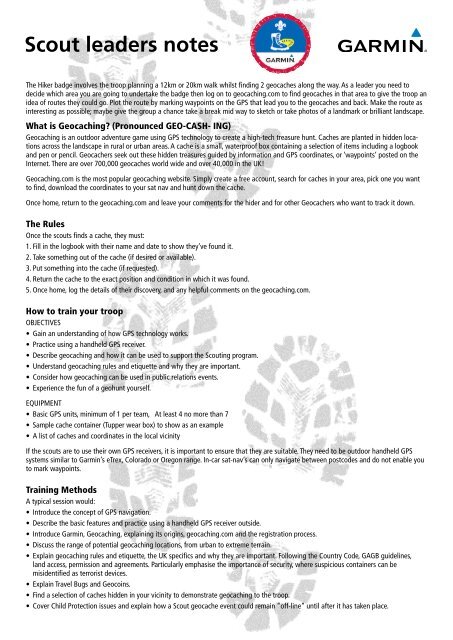
Scout leaders notes<br />
The Hiker badge involves the troop planning a 12km or 20km walk whilst finding 2 geocaches along the way. As a leader you need to<br />
decide which area you are going to undertake the badge then log on to geocaching.com to find geocaches in that area to give the troop an<br />
idea of routes they could go. Plot the route by marking waypoints on the GPS that lead you to the geocaches and back. Make the route as<br />
interesting as possible; maybe give the group a chance take a break mid way to sketch or take photos of a landmark or brilliant landscape.<br />
What is <strong>Geocaching</strong>? (Pronounced GEO-CASH- ING)<br />
<strong>Geocaching</strong> is an outdoor adventure game using GPS technology to create a high-tech treasure hunt. Caches are planted in hidden locations<br />
across the landscape in rural or urban areas. A cache is a small, waterproof box containing a selection of items including a logbook<br />
and pen or pencil. Geocachers seek out these hidden treasures guided by information and GPS coordinates, or ‘waypoints’ posted on the<br />
Internet. There are over 700,000 geocaches world wide and over 40,000 in the UK!<br />
<strong>Geocaching</strong>.com is the most popular geocaching website. Simply create a free account, search for caches in your area, pick one you want<br />
to find, download the coordinates to your sat nav and hunt down the cache.<br />
Once home, return to the geocaching.com and leave your comments for the hider and for other Geocachers who want to track it down.<br />
The Rules<br />
Once the scouts finds a cache, they must:<br />
1. Fill in the logbook with their name and date to show they’ve found it.<br />
2. Take something out of the cache (if desired or available).<br />
3. Put something into the cache (if requested).<br />
4. Return the cache to the exact position and condition in which it was found.<br />
5. Once home, log the details of their discovery, and any helpful comments on the geocaching.com.<br />
How to train your troop<br />
Objectives<br />
• Gain an understanding of how GPS technology works.<br />
• Practice using a handheld GPS receiver.<br />
• Describe geocaching and how it can be used to support the Scouting program.<br />
• Understand geocaching rules and etiquette and why they are important.<br />
• Consider how geocaching can be used in public relations events.<br />
• Experience the fun of a geohunt yourself.<br />
Equipment<br />
• Basic GPS units, minimum of 1 per team, At least 4 no more than 7<br />
• Sample cache container (Tupper wear box) to show as an example<br />
• A list of caches and coordinates in the local vicinity<br />
If the scouts are to use their own GPS receivers, it is important to ensure that they are suitable. They need to be outdoor handheld GPS<br />
systems similar to <strong>Garmin</strong>’s eTrex, Colorado or Oregon range. In-car sat-nav’s can only navigate between postcodes and do not enable you<br />
to mark waypoints.<br />
Training Methods<br />
A typical session would:<br />
• Introduce the concept of GPS navigation.<br />
• Describe the basic features and practice using a handheld GPS receiver outside.<br />
• Introduce <strong>Garmin</strong>, <strong>Geocaching</strong>, explaining its origins, geocaching.com and the registration process.<br />
• Discuss the range of potential geocaching locations, from urban to extreme terrain.<br />
• Explain geocaching rules and etiquette, the UK specifics and why they are important. Following the Country Code, GAGB guidelines,<br />
land access, permission and agreements. Particularly emphasise the importance of security, where suspicious containers can be<br />
misidentified as terrorist devices.<br />
• Explain Travel Bugs and Geocoins.<br />
• Find a selection of caches hidden in your vicinity to demonstrate geocaching to the troop.<br />
• Cover Child Protection issues and explain how a Scout geocache event could remain “off-line” until after it has taken place.
Task 1 the treasure hunt<br />
• Plan and plot a 12k or 20k walk using a GPS (Global Positioning System).<br />
• Log on to geocaching.com to select some local geocaches and plot your route from one to the next.<br />
• Once you’ve selected the geocaches you want to find make notes of the description and tips online to<br />
help you find the cache.<br />
• When plotting your route, take into consideration the contours of the land e.g. do you have to climb over<br />
a mountain to reach your geocache?<br />
• Let people know where you are going and always geocache with a troop of at least four and no more<br />
than seven.<br />
HIKER<br />
PREP<br />
WORK<br />
CHECK LIST<br />
• Wear appropriate clothing and footwear, take plenty of water, a hat and sun cream if it’s hot.<br />
• Always take a first aid kit in case of emergency.<br />
• Take something to place in the geocache, this could be a woggle, a Scout badge, a skill card, a small toy,<br />
a compass, almost anything that isn’t food, too valuable or dangerous.<br />
• Remember your task sheet with your cache card on it.<br />
• Take a pen.<br />
• Navigate your route by reaching each waypoint and geocache.<br />
• Fill out the cache card as you find the geocaches.<br />
• If you take an item from the cache, be sure to replace it with an item. Don’t put food, valuables or<br />
anything dangerous into the cache.<br />
• Leave a cache as you found it, if it’s well hidden then make sure you hide it in the exact same place<br />
to ensure others can find it.<br />
• Respect the countryside, close gates and don’t trespass. Follow the country code.<br />
THE<br />
HIKE<br />
BACK<br />
AT<br />
BASE<br />
• Once home log back on to geocaching.com and make a record of the caches you found.<br />
• Write clues and notes about the location of the cache that may help other geocachers in the future.<br />
• Download the grid map from www.scouts.org/hikerbadge and plot the route you took and mark the<br />
geocaches you found.<br />
• Show and tell the rest of your Scout troop about the route you walked, the geocaches you found and<br />
what you left in them.<br />
LOG YOUR CACHE HERE:<br />
Cache Name Date Time Contents
Task 2 cache me if you can<br />
HIKER<br />
PREP<br />
WORK<br />
• Split into 4 troops (at least 4 members per troop, max 7).<br />
• In your troop plot a route that involves finding the most geocaches on a 20k walk.<br />
• Log on to geocaching.com and find geocaches to plot your route from one to the next.<br />
• Once you’ve selected the geocaches you want to find, make notes of the description and tips online to<br />
help you find the cache.<br />
• When plotting your route, take into consideration the contours of the land e.g. do you have to climb<br />
over a mountain to reach your geocache?<br />
• Let people know where you are going.<br />
CHECK LIST<br />
• Wear appropriate clothing and footwear, take plenty of water, a hat and sun cream if it’s hot.<br />
• Always take a first aid kit in case of emergency.<br />
• Take something to place in the geocache, this could be a woggle, a Scout badge, a skill card, a small toy,<br />
a compass, almost anything that isn’t food, too valuable or dangerous.<br />
• Remember your task sheet with your cache card on it.<br />
• Take a pen.<br />
• Keep a record of the caches you have found on your cache card.<br />
• If you take an item from the cache, be sure to replace it with an item. Don’t put food, valuables<br />
or anything dangerous into the cache.<br />
• Leave a cache as you found it, if it’s well hidden then make sure you hide it in the exact same<br />
place to ensure others can find it.<br />
• Respect the countryside, close gates and don’t trespass. Follow the country code.<br />
THE<br />
HIKE<br />
BACK<br />
AT<br />
BASE<br />
• Once home log back on to geocaching.com and make a record of the caches you found.<br />
• Write clues and notes about the location of the cache that may help other geocachers in the future.<br />
• Download the grid map from www.scouts.org/hikerbadge and plot the route you took and mark the<br />
geocaches you found.<br />
• Compare cache cards and compete with the other troops at your next Scout meeting.<br />
LOG YOUR CACHE HERE:<br />
Cache Name Date Time Contents
Task 3 cache in hand<br />
HIKER<br />
PREP<br />
WORK<br />
• In troops of 4 (max 7), plot a 12k walk finding at least one geocache along the<br />
way and hide your own geocache for others to find.<br />
• Log on to geocaching.com and choose at least one geocache that you want to find along your route.<br />
• Once you’ve selected the geocache/s you want to find make notes of the description and tips online to<br />
help you find the cache.<br />
• When plotting your route, take into consideration the contours of the land e.g. do you have to climb<br />
over a mountain to reach your geocache?<br />
• Take a water tight Tupperware box (cache) and hide it along your route, you may want to give it a<br />
<strong>Scouts</strong> theme?<br />
• Let people know where you are going.<br />
CHECK LIST<br />
• Wear appropriate clothing and footwear, take plenty of water, a hat and sun cream if it’s hot.<br />
• Always take a first aid kit in case of emergency.<br />
• Take something to place in the geocache, this could be a woggle, a Scout badge, a skill card, a small toy,<br />
a compass, almost anything that isn’t food, too valuable or dangerous.<br />
• Remember your task sheet with your cache card on it.<br />
• Take a pen.<br />
• Navigate your route using GPS finding your geocaches along the way.<br />
• Decide where you want to place your cache.<br />
• Remember to take note of the coordinates of your hidden cache, as you need them to register your<br />
cache at geocaching.com once home.<br />
• If you take an item from the cache, be sure to replace it with an item. Don’t put food, valuables or<br />
anything dangerous into the cache.<br />
• Leave a cache as you found it, if it’s well hidden then make sure you hide it in the exact same place<br />
to ensure others can find it.<br />
• Respect the countryside, close gates and don’t trespass. Follow the country code.<br />
THE<br />
HIKE<br />
BACK<br />
AT<br />
BASE<br />
• When home, log on to geocaching.com, log which caches you found and register your new cache.<br />
• Give your cache a Scout-themed name or something that relates to your Scout troop.<br />
• Also add in clues and notes to help others find it in the future.<br />
• You can keep logging on to geocaching.com to see how many people have found your cache.<br />
• Download the grid map from www.scouts.org/hikerbadge and plot the route you took and mark the<br />
geocaches you found and the one you placed.<br />
• Show and tell the rest of your Scout troop about the route you walked, the geocaches you found and hid<br />
and what you left in them.<br />
LOG YOUR CACHE HERE:<br />
Cache Name Date Time Contents
What is geocaching and how<br />
do I use a GPS handheld?<br />
What is <strong>Geocaching</strong>?<br />
It’s pronounced GEO-CASH-ING. There are 700,000 geocaches or ‘caches’ worldwide and over 40,000 in the UK, it’s your job is to find<br />
them! <strong>Geocaching</strong> is an outdoor adventure game using GPS (Global Positioning System) technology to create a high-tech treasure hunt.<br />
Caches are planted in hidden locations across the landscape in rural or urban areas. A cache is a small, waterproof box containing a<br />
selection of items including a logbook and pen or pencil. Geocachers seek out these hidden treasures guided by information and GPS<br />
coordinates, or ‘waypoints’ posted on the internet; www.geocaching.com<br />
Using a <strong>Garmin</strong> GPS device, the Geocacher explores an area where a cache has been hidden. Once discovered, you may find the cache<br />
contains a reward for you to keep. If you take something out of a cache, you might be asked to leave something in return. You must leave<br />
the cache in the same place and in the same condition as it was found for its next visitor. Sometimes a cache will contain a clue to find<br />
another hidden treasure!<br />
Once home, return to the cache website and leave your comments for the hider and for other Geocachers inspired to track it down.<br />
To keep the game going, you must also hide some caches of your own.<br />
How to mark a waypoint<br />
1. To turn the GPS on press the button on the bottom right-hand side.<br />
2. Stand outside in an open area with no trees overhead.<br />
3. Wait for the GPS to get a satellite reception (this can take a couple minutes)<br />
4. Once you have satellite signal press the FUNCTION button at the top right-hand side of the GPS. This lets you switch between various<br />
screens. This button also acts as a BACK button to take you back to the previous screen.<br />
5. In MAIN MENU, press the button on the front of the GPS to select MARK (This is how you plot a WAYPOINT to mark the location of<br />
your chosen geocache).<br />
6. You can rename your WAYPOINT by selecting the number on the flag and entering a new name.<br />
7. Key in the coordinates of the geocache you have chosen from geocaching.com. Then select the GO TO button at the bottom of the<br />
screen and the GPS will guide you to your selected location.<br />
8. The compass screen will tell you the speed you are walking, how far away you are from your WAYPOINT and the direction in which<br />
you are heading<br />
9. The Trip Computer screen will tell you how far you have traveled (TRIP ODOMETER), your current speed, your average speed<br />
(MOVING AVERAGE) and how long you have been walking (MOVING TIME).<br />
How to plot a route<br />
1. To plot a route first you need to plot the WAYPOINTS. These mark places on the route you need to follow to reach your end destination.<br />
You can plot up to 20 waypoints on a single route.<br />
2. From the MAIN MENU select ROUTES. Then select NEW. You can rename your route by selecting the name field which will be<br />
displayed as EMPTY.<br />
3. Select the dotted line to open the FIND menu. Select the WAYPOINTS option. This will give you a list of your saved WAYPOINTS.<br />
4. Select the WAYPOINT you want to find first. This will be listed as the first WAYPOINT. Select the dotted line underneath the list<br />
of WAYPOINTS to add further WAYPOINTS.<br />
5. Once you have plotted your ROUTE via your saved WAYPOINTS, select NAVIGATE and the GPS will direct you to your first one.<br />
Once you reach your first waypoint the GPS will lead you on to the next until you reach your final destination.
Glossary of Terms<br />
GPSr/GPS - A Global Positioning System receiver, usually referred to as a GPS. In reality a combination of the satellites and the receiver<br />
make up the system.<br />
Geocache - Often called simply a ‘Cache’, this is the actual container placed at the waypoint. The word is formed from ‘Geo’ for Earth and<br />
‘Cache’ for a store of goods or supplies, often left by explorers.<br />
<strong>Geocaching</strong> - A recreational activity that involves seeking a container hidden at a given set of coordinates, finding it, recording your<br />
details in the logbook and re-hiding it for the next person to find.<br />
Waypoint - A specific place with a set of coordinates you can programme into a GPS before you set off or mark when you’re at the<br />
location to return to the same point later.<br />
Heading - The direction you are travelling.<br />
Bearing - The direction to the selected waypoint.<br />
Route - A path between two or more waypoints.<br />
Geocoin – A geocaching coin which has a trackable number on it so you can track its location on geocaching.com.<br />
Latitude - The North/South component of a set of coordinates for a location on the Earth.<br />
Longitude - The East/West component of a set of coordinates for a location on the Earth.<br />
Multi-Cache - A type of cache that requires several waypoints to complete. The first waypoint may contain a small cache with the<br />
coordinates of the next stage. Or several waypoints might each contain parts of the coordinates for the final waypoint.<br />
Trackback - The ability to reverse a route on a GPS to help the Geocacher return to their starting point.<br />
Track Log – This is how the GPS automatically records points along a route – in an electronic ‘breadcrumb trail’.<br />
Travel Bug - An item with an Identity Tag and unique tracking number which can be tracked on the internet as it is moved from<br />
cache to cache.