Maintenence book - AGROVOK-SERVIS, sro
Maintenence book - AGROVOK-SERVIS, sro
Maintenence book - AGROVOK-SERVIS, sro

Create successful ePaper yourself
Turn your PDF publications into a flip-book with our unique Google optimized e-Paper software.
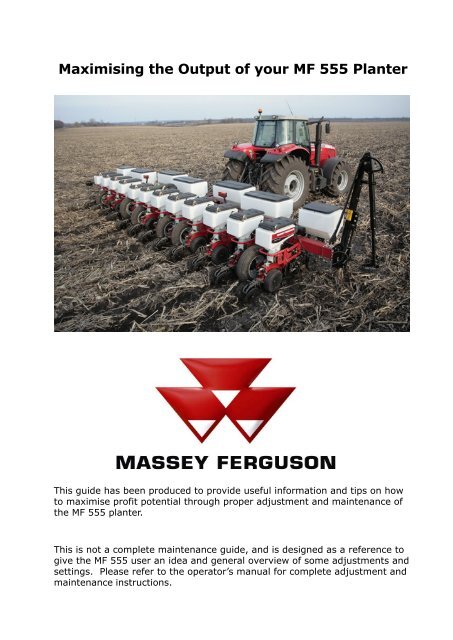
Maximising the Output of your MF 555 Planter<br />
This guide has been produced to provide useful information and tips on how<br />
to maximise profit potential through proper adjustment and maintenance of<br />
the MF 555 planter.<br />
This is not a complete maintenance guide, and is designed as a reference to<br />
give the MF 555 user an idea and general overview of some adjustments and<br />
settings. Please refer to the operator’s manual for complete adjustment and<br />
maintenance instructions.
Step 1: Safety!<br />
Read the operator’s manual before taking your MF 555 into the field. It is<br />
your responsibility to read the operator’s manual and comply with the safety<br />
guidelines and correct operating procedures and to lubricate and maintain<br />
the planter according to the maintenance schedule. Read the instructions<br />
carefully to acquaint yourself with the equipment. Working with unfamiliar<br />
equipment can lead to accidents. Please take time to check your planter for<br />
proper operation before you get to the field.<br />
A. Be safe. Never clean, lubricate, or adjust the planter whilst it is in<br />
motion. Always install lockup mechanisms before servicing.<br />
B. Familiarise yourself with the machine and how to adjust it as field<br />
conditions change.<br />
C. Be in control. Don’t hurry. Your life depends on it.<br />
D. Remember that accidents can be prevented.
Maintenance and Row Unit Inspection<br />
Look for wear on closing<br />
wheel<br />
Check Seed Hoppers<br />
Check Hydraulic<br />
Functions<br />
Check Tyre<br />
Pressure<br />
Inspect seed tubes, opener<br />
blades, and gauge wheels<br />
Inspect linkage arms for<br />
wear<br />
Clean and check metering unit<br />
adjustment
Step 2: Maintenance!<br />
You cannot afford to operate a planter that is not properly maintained! You<br />
are responsible for inspecting the planter and having parts repaired as<br />
needed.<br />
A. Be safe. Ensure the machine is not in motion and that all moving<br />
components are stopped.<br />
B. Check and ensure that all nuts and bolts are tight on the machine<br />
C. Tyre pressure – Make sure that the tyres are adequately inflated per<br />
the recommendations in the operator’s manual.<br />
1. Proper inflation keeps the toolbar level to the soil surface.<br />
Proper inflation keeps all drive tyres turning at the same speed; an<br />
under-inflated/low drive tyre will do all the driving and increase the<br />
seeding population rate due to a smaller circumference<br />
Ensure all nuts and bolts on<br />
the machine are tight<br />
Check Tyre Pressure and<br />
inspect for wear
Step 3: Planter Row Unit Inspection<br />
A. Parallel linkage arms – Worn parts can cause the row unit to<br />
operate in an unbalanced manner, affecting seed placement, closing<br />
wheel spring pressure, and row unit spring pressure.<br />
1. Inspect the parallel arms for wear (eg bushings, bolts, and<br />
elongated holes in the parallel arms).<br />
2. Look for bent, broken, and twisted parallel arms.<br />
3. Replace parts as necessary.<br />
B. Seed tubes – Worn or broken seed tubes can affect seed depth and<br />
spacing.<br />
1. Check the seed tubes for wear (eg split ends, holes, or cracks).<br />
2. Inspect the seed tube guard (ie inside scraper) for wear. A worn<br />
out guard is the leading cause of seed tube wear. The guard<br />
should be replaced when it has a width of less than 1.5 cm.<br />
3. Bend the clip to centre the tube between the opener discs.
C. Disc opener blades – Worn, cracked, or warped blades will affect<br />
seed placement, depth and spacing. Consult the operator’s manual for<br />
proper adjustment procedures.<br />
1. Blades worn too small need to be replaced because they cannot<br />
be adjusted to have contact with each other.<br />
2. Adjust the blades to contact with each other for 3.8 to 5 cm. Add<br />
or remove shims from both blades as equally as possible.<br />
Adjusting only one blade will cause uneven seed placement and<br />
facilitate wear on the seed tube.<br />
3. Replace the blade if it is warped or cracked.<br />
4. Replace the bearing or the complete blade and bearing assembly<br />
if the bearing is worn or loose. Failure to replace the bearing can<br />
cause uneven seed placement.
D. Gauge wheels – Worn or improperly adjusted wheels will allow soil to<br />
fall into the seed furrow ahead of the seed causing uneven seed depth.<br />
1. Inspect the tyre for wear or cracks. If any part of the tyre is<br />
worn away the tyre cannot be properly adjusted and should be<br />
replaced.<br />
2. Inspect the bearings. The wheel must maintain continuous<br />
contact with the disc blade. If the bearings are loose they should<br />
be replaced.<br />
3. Inspect the depth control arms. The arms must be able to pivot<br />
and adjusted so that the wheel makes either light continuous<br />
contact with the disc blade or so that they just clear one another.<br />
Make sure the grease fitting will take grease. Remove and clean<br />
the gauge wheel arm pivot as necessary.<br />
E. Seed Hoppers – A misaligned seed hopper will cause the meter to<br />
drop seed into the seed tube.<br />
1. Check the seed hopper for holes or cracks.<br />
2. Inspect the seed hopper for cleanliness. Make sure it is free of<br />
debris (eg plant residue, paper, string and buildup of seed<br />
treatments) which can obstruct seed flow to the meter.<br />
3. Seed hoppers need to be evenly filled for even weight<br />
distribution across the planter.
F. Closing wheels – It is important that the seed is covered with soil<br />
that is free of air pockets and compaction.<br />
1. Inspect for good seed-to-soil contact.<br />
2. Check the closing wheel arm and pivot bushings. The parts must<br />
be in good condition to prevent the closing wheels from moving<br />
from side to side.<br />
3. Inspect the wheel. If it wobbles replace the wheel or the bearing.<br />
G. Metering Unit<br />
1. Clean seed disc of chemical buildup.<br />
2. Inspect disc for damage and wear.<br />
3. Check meter clutch alignment to ensure clutch hub slides freely<br />
on and off of the shaft.<br />
on shaft<br />
off shaft
3. Check cutoff brush length and if it is doesn’t extend past the<br />
shelf by at least 3 mm it should be replaced.<br />
4. Check that bristles extend 3 to 6 mm beyond the machined<br />
surface.<br />
5. Check clearance between seed disc and meter at several<br />
locations. Clearance should be a minimum of 0.1 mm.
H. Hydraulic System - Check Hydraulic Functions<br />
1. Check pump oil levels<br />
2. Check hoses and connections<br />
3. Check selector valve<br />
4. Check system for correct operation<br />
5. Change PTO pump oil annually<br />
6. Change blower fan filter annually<br />
Check hoses and<br />
connections<br />
Check selector<br />
valve<br />
Check pump oil<br />
levels