NEO ProLink 3V9 Installation and operation ... - Neo Car Audio
NEO ProLink 3V9 Installation and operation ... - Neo Car Audio
NEO ProLink 3V9 Installation and operation ... - Neo Car Audio

You also want an ePaper? Increase the reach of your titles
YUMPU automatically turns print PDFs into web optimized ePapers that Google loves.
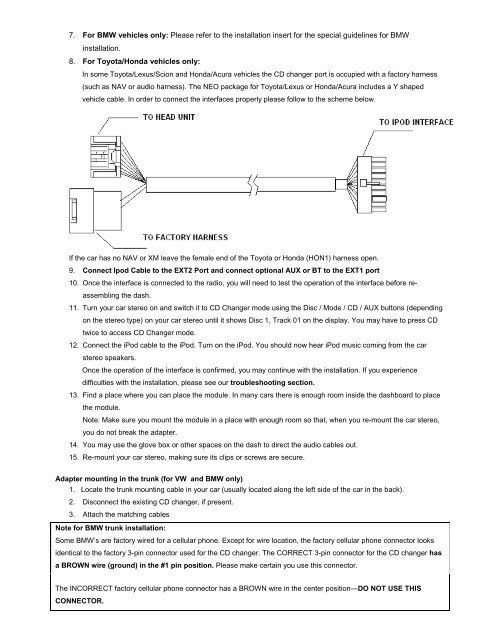
7. For BMW vehicles only: Please refer to the installation insert for the special guidelines for BMW<br />
installation.<br />
8. For Toyota/Honda vehicles only:<br />
In some Toyota/Lexus/Scion <strong>and</strong> Honda/Acura vehicles the CD changer port is occupied with a factory harness<br />
(such as NAV or audio harness). The <strong>NEO</strong> package for Toyota/Lexus or Honda/Acura includes a Y shaped<br />
vehicle cable. In order to connect the interfaces properly please follow to the scheme below.<br />
If the car has no NAV or XM leave the female end of the Toyota or Honda (HON1) harness open.<br />
9. Connect Ipod Cable to the EXT2 Port <strong>and</strong> connect optional AUX or BT to the EXT1 port<br />
10. Once the interface is connected to the radio, you will need to test the <strong>operation</strong> of the interface before reassembling<br />
the dash.<br />
11. Turn your car stereo on <strong>and</strong> switch it to CD Changer mode using the Disc / Mode / CD / AUX buttons (depending<br />
on the stereo type) on your car stereo until it shows Disc 1, Track 01 on the display. You may have to press CD<br />
twice to access CD Changer mode.<br />
12. Connect the iPod cable to the iPod. Turn on the iPod. You should now hear iPod music coming from the car<br />
stereo speakers.<br />
Once the <strong>operation</strong> of the interface is confirmed, you may continue with the installation. If you experience<br />
difficulties with the installation, please see our troubleshooting section.<br />
13. Find a place where you can place the module. In many cars there is enough room inside the dashboard to place<br />
the module.<br />
Note: Make sure you mount the module in a place with enough room so that, when you re-mount the car stereo,<br />
you do not break the adapter.<br />
14. You may use the glove box or other spaces on the dash to direct the audio cables out.<br />
15. Re-mount your car stereo, making sure its clips or screws are secure.<br />
Adapter mounting in the trunk (for VW <strong>and</strong> BMW only)<br />
1. Locate the trunk mounting cable in your car (usually located along the left side of the car in the back).<br />
2. Disconnect the existing CD changer, if present.<br />
3. Attach the matching cables<br />
Note for BMW trunk installation:<br />
Some BMW’s are factory wired for a cellular phone. Except for wire location, the factory cellular phone connector looks<br />
identical to the factory 3-pin connector used for the CD changer. The CORRECT 3-pin connector for the CD changer has<br />
a BROWN wire (ground) in the #1 pin position. Please make certain you use this connector.<br />
The INCORRECT factory cellular phone connector has a BROWN wire in the center position—DO NOT USE THIS<br />
CONNECTOR.