Owner's Manual - FIMCO Industries
Owner's Manual - FIMCO Industries
Owner's Manual - FIMCO Industries

You also want an ePaper? Increase the reach of your titles
YUMPU automatically turns print PDFs into web optimized ePapers that Google loves.
<strong>Owner's</strong> <strong>Manual</strong><br />
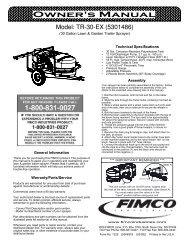
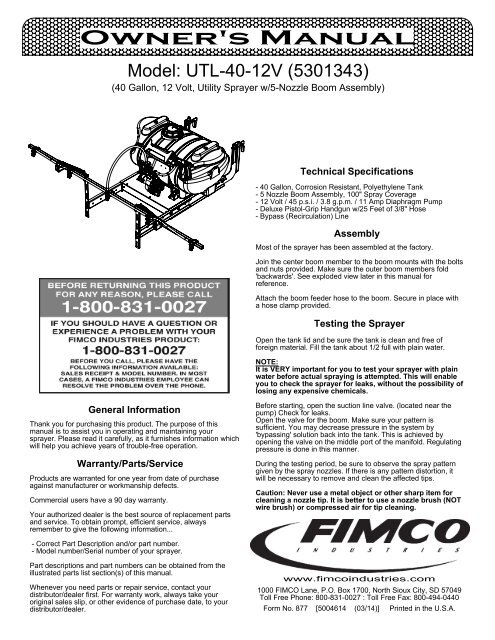
Model: UTL-40-12V (5301343)<br />
(40 Gallon, 12 Volt, Utility Sprayer w/5-Nozzle Boom Assembly)<br />
Technical Specifications<br />
- 40 Gallon, Corrosion Resistant, Polyethylene Tank<br />
- 5 Nozzle Boom Assembly, 100" Spray Coverage<br />
- 12 Volt / 45 p.s.i. / 3.8 g.p.m. / 11 Amp Diaphragm Pump<br />
- Deluxe Pistol-Grip Handgun w/25 Feet of 3/8" Hose<br />
- Bypass (Recirculation) Line<br />
Assembly<br />
Most of the sprayer has been assembled at the factory.<br />
Join the center boom member to the boom mounts with the bolts<br />
and nuts provided. Make sure the outer boom members fold<br />
'backwards'. See exploded view later in this manual for<br />
reference.<br />
Attach the boom feeder hose to the boom. Secure in place with<br />
a hose clamp provided.<br />
Testing the Sprayer<br />
Open the tank lid and be sure the tank is clean and free of<br />
foreign material. Fill the tank about 1/2 full with plain water.<br />
NOTE:<br />
It is VERY important for you to test your sprayer with plain<br />
water before actual spraying is attempted. This will enable<br />
you to check the sprayer for leaks, without the possibility of<br />
losing any expensive chemicals.<br />
General Information<br />
Thank you for purchasing this product. The purpose of this<br />
manual is to assist you in operating and maintaining your<br />
sprayer. Please read it carefully, as it furnishes information which<br />
will help you achieve years of trouble-free operation.<br />
Warranty/Parts/Service<br />
Products are warranted for one year from date of purchase<br />
against manufacturer or workmanship defects.<br />
Commercial users have a 90 day warranty.<br />
Your authorized dealer is the best source of replacement parts<br />
and service. To obtain prompt, efficient service, always<br />
remember to give the following information...<br />
Before starting, open the suction line valve. (located near the<br />
pump) Check for leaks.<br />
Open the valve for the boom. Make sure your pattern is<br />
sufficient. You may decrease pressure in the system by<br />
'bypassing' solution back into the tank. This is achieved by<br />
opening the valve on the middle port of the manifold. Regulating<br />
pressure is done in this manner.<br />
During the testing period, be sure to observe the spray pattern<br />
given by the spray nozzles. If there is any pattern distortion, it<br />
will be necessary to remove and clean the affected tips.<br />
Caution: Never use a metal object or other sharp item for<br />
cleaning a nozzle tip. It is better to use a nozzle brush (NOT<br />
wire brush) or compressed air for tip cleaning.<br />
- Correct Part Description and/or part number.<br />
- Model number/Serial number of your sprayer.<br />
Part descriptions and part numbers can be obtained from the<br />
illustrated parts list section(s) of this manual.<br />
Whenever you need parts or repair service, contact your<br />
distributor/dealer first. For warranty work, always take your<br />
original sales slip, or other evidence of purchase date, to your<br />
distributor/dealer.<br />
www.fimcoindustries.com<br />
1000 <strong>FIMCO</strong> Lane, P.O. Box 1700, North Sioux City, SD 57049<br />
Toll Free Phone: 800-831-0027 : Toll Free Fax: 800-494-0440<br />
Form No. 877 [5004614 (03/14)] Printed in the U.S.A.
Operation & Calibration<br />
The performance of any agricultural chemical depends upon the<br />
proper application<br />
The tips supplied as standard with the sprayer can be used for a<br />
wide variety of spraying applications. Other tip sizes are<br />
available for different coverages. The speed and pressure charts<br />
shown indicate the rates can be changed considerably by<br />
changing speed and pressure. The nozzles on the boom will<br />
spray a 100" wide swath. The proper nozzle height is 17" to 20"<br />
above the object being sprayed.<br />
Check the spray patterns. Each nozzle should overlap the next<br />
nozzle approximately 30%.<br />
The pumping system draws solution from the tank,<br />
through the strainer/filter, and to the pump. The pump forces the<br />
solution under pressure to the handgun and/or boom nozzles.<br />
• Open the handgun by squeezing the handle lever.<br />
• Rotating the adjustable nozzle tip on the handgun will<br />
change the tip pattern from a straight stream to a cone<br />
pattern (finer mist).<br />
Conditions of weather and terrain must be considered when<br />
setting the sprayer. Do not spray on windy days. Protective<br />
clothing must be worn in some cases.<br />
Be sure to read the chemical label(s) correctly!<br />
WARNING: Some chemicals will damage the pump valves if<br />
allowed to soak untreated for a length of time. ALWAYS<br />
thoroughly flush the pump with water after use. DO NOT allow<br />
chemicals to sit in the pump for extended times of idleness.<br />
Follow the chemical manufacturer's instructions on disposal of<br />
all waste water from the sprayer.<br />
When you are ready to spray, mix chemicals as follows. Add the<br />
proper amount of water to the tank. Run the sprayer while<br />
adding chemical to the water. Do NOT spray through the boom<br />
at this time. This will allow the solution to return (or 'bypass') to<br />
the tank. The movement of solution through the bypass will aid<br />
in mixing the water and chemicals. You should now be ready to<br />
spray.<br />
Maintenance During/After Spraying<br />
Periodically close the suction line valve. Check the line strainer<br />
and clean the screen.<br />
Proper care and maintenance will prolong the life of your sprayer.<br />
After use, fill the sprayer tank part way with water. Start the<br />
sprayer, and allow the clear water to be pumped through the<br />
plumbing system and out through the spray nozzles.<br />
Refill the tank about half full with plain water and use <strong>FIMCO</strong> Tank<br />
Neutralizer and Cleaner, and repeat cleaning instructions above.<br />
Flush the entire sprayer with the neutralizing/cleaning agent, then<br />
flush out one more time with plain water. Follow the chemical<br />
manufacturer's disposal instructions of all wash or rinsing water.<br />
For the boom, (if applicable) remove the tips and screens from the<br />
nozzle assemblies. Wash these items out thoroughly. Blow the<br />
orifice clean and dry. If the orifice remains clogged, clean it with a<br />
fine bristle (NOT WIRE) brush, or with a toothpick. Do not damage<br />
the orifice. Water rinse and dry the tips before storing.<br />
WARNING: Some chemicals will damage the pump valves if<br />
allowed to soak untreated for a length of time! ALWAYS flush<br />
the pump as instructed after each use.<br />
- Four things must be considered before spraying with the boom:<br />
1. How much chemical must be mixed in the tank?<br />
2. Rate of spray? (Gallons per Acre to be sprayed)<br />
3. What Pressure (p.s.i.) will be used?<br />
4. Speed Traveled (m.p.h.) while spraying?<br />
- Refer to your chemical's label to determine the chemical mixture.<br />
- See the tip chart to determine the pressure to be used. The chart<br />
will also show the speed used when spraying.<br />
- If the towing vehicle does not have a speedometer, speed can<br />
be determined as per the directions.<br />
Determining the proper speed of the pulling vehicle can be done<br />
by marking off 100, 200, & 300 feet. The speed chart indicates the<br />
number of seconds it takes to travel the distances. Set the throttle<br />
and with a running start, travel the distances. Adjust the throttle<br />
until you travel the distances in the number of seconds indicated<br />
by the speed chart. Once you have reached the throttle setting<br />
needed, mark the throttle location so you can stop and go again,<br />
returning to the same speed.<br />
Add water and proper amount of chemical to the tank and drive to<br />
the starting place for spraying.<br />
Once you know how much you are going to spray, then determine<br />
(from the tip chart) the spraying pressure (PSI), and the spraying<br />
speed (MPH). The pressure can be set by running the sprayer<br />
with the boom nozzles 'on', and then adjusting the relief valve until<br />
the gauge reads the desired pressure. Notice that the pressure<br />
will go up when the boom line is shut off. This is normal, and the<br />
pressure will return as before when you open the boom line.<br />
When selecting pressure from the tip chart, it is a good idea to try<br />
for the 20 or 30 p.s.i. range as this allows an excellent nozzle<br />
pattern. Spraying at 10 p.s.i. begins to break up the pattern, and<br />
at 40 p.s.i. you may notice some drift.<br />
Speed Chart<br />
Time Required in seconds to travel a distance of:<br />
Speed in M.P.H.<br />
(Miles per Hour)<br />
100 Ft. 200 Ft. 300 Ft.<br />
1.0<br />
2.0<br />
3.0<br />
4.0<br />
68 sec.<br />
34<br />
23<br />
17<br />
136 sec.<br />
68<br />
45<br />
34<br />
205 sec.<br />
102<br />
68<br />
51<br />
5.0<br />
6.0<br />
14<br />
11<br />
27<br />
23<br />
41<br />
34<br />
7.0<br />
9.7<br />
19<br />
29<br />
8.0<br />
9.0<br />
10.0<br />
8.5<br />
7.6<br />
6.8<br />
17<br />
15<br />
14<br />
26<br />
23<br />
20<br />
Winter Storage<br />
Drain all water out of your sprayer, paying special attention to<br />
the pump, handgun, and valve(s). These items are especially<br />
prone to damage from chemicals and freezing weather.<br />
The sprayer should be winterized before storage by pumping<br />
a solution of RV antifreeze through the entire plumbing<br />
system. This antifreeze solution should remain in the plumbing<br />
system during the winter months. When spring time comes<br />
and you are preparing your sprayer for the spray season, rinse<br />
the entire plumbing system out, clearing the lines of the<br />
antifreeze solution. Proper care and maintenance will prolong<br />
the life of your sprayer.<br />
Page 2
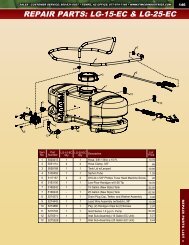
Pump Model: 5277982<br />
2<br />
1<br />
Available Replacement Parts<br />
5<br />
10<br />
3<br />
4 6<br />
9<br />
7<br />
8<br />
Item<br />
No<br />
1<br />
2<br />
3<br />
4<br />
5<br />
6<br />
7<br />
8<br />
9<br />
10<br />
Part<br />
Number<br />
5075019<br />
5157206<br />
5168821<br />
20408-000<br />
5157203<br />
5168824<br />
5168826<br />
5168828<br />
5168832<br />
5168833<br />
Qty Description<br />
1<br />
1<br />
1<br />
1<br />
1<br />
1<br />
1<br />
1<br />
1<br />
1<br />
Pkg. (4) Grommets<br />
15 Amp 'Mini Blade' Fuse<br />
Upper Housing w/Pressure Switch<br />
Pkg. (2) Clips (Port Fitting)<br />
Pressure Switch Assembly<br />
Check Valve w/O-Ring<br />
Diaphragm Kit w/Pistons & (4) Screws<br />
Cam/Bearing Kit, w/Set Screw<br />
Port Kit Fitting, 1/2" MNPT<br />
Port Kit Fitting, 1/2" Hose Barb<br />
Troubleshooting the Pump:<br />
Motor does not run:<br />
°<br />
°<br />
°<br />
°<br />
°<br />
Check for loose wiring connection(s).<br />
Make sure the 'ON/OFF' switch in the<br />
lead wire assembly is in the 'ON' position.<br />
"I" is the 'ON' position and 'O' is the 'OFF' position.<br />
Check for defective pressure switch. Make sure<br />
you are connected to a good 12 volt power source.<br />
Make sure any on/off switches are in the 'on' position.<br />
Remove the cap to the pressure switch. Pull both<br />
red wires off of their terminals, and touch the two<br />
ends together. If your pump runs when you do this,<br />
your pressure switch will need to be replaced.<br />
Check the fuse.<br />
Check for low voltage at the power supply.<br />
Pump does not prime:<br />
°<br />
°<br />
°<br />
°<br />
°<br />
°<br />
Check for air leaks in supply line.<br />
Check for debris in the check valve assembly.<br />
Check for defective check valve.<br />
Check for clogged strainer/filter.<br />
Check for cracks in the pump housing.<br />
Check for empty product supply.<br />
Pulsating flow (surging):<br />
°<br />
°<br />
°<br />
°<br />
°<br />
°<br />
Check for defective pressure switch.<br />
Check for leaks in the discharge line.<br />
Check for restriction in the discharge line.<br />
Check for debris in nozzle orifice.<br />
Discharge hose may be too long.<br />
Check for clogged strainer.<br />
Motor continues to run after discharge is shut off:<br />
° Check for empty product supply.<br />
° Check for open bypass valve. (if equipped)<br />
° Check for low voltage.<br />
° Check for leak in discharge line.<br />
° Check for defective or dirty check valve.<br />
° Check for defective pressure switch.<br />
Flow Rate:<br />
Current:<br />
Check Valve:<br />
Port Type:<br />
Motor Voltage:<br />
Pump Specifications<br />
3.8 GPM @ Open Flow<br />
7.4 Amps @ 40 PSI<br />
Viton<br />
Plug-In Port<br />
12 Volts DC<br />
Wetted Parts Housing: Polypropylene<br />
Diaphragm:<br />
Liquid Temperature:<br />
Santoprene<br />
130° F max.<br />
Fuse<br />
2.250<br />
GPM = Gallons Per Minute<br />
PSI = Pounds per Square Inch<br />
DC = Direct Current<br />
Outlet<br />
12V Connection<br />
Pump Model Number<br />
3.188<br />
Inlet<br />
Pump Serial Number<br />
Page 3
2.5<br />
Pump Assembly #5278021<br />
2.3<br />
2.1<br />
2.6<br />
2.4<br />
1<br />
1<br />
2.2<br />
1<br />
Item<br />
No<br />
1<br />
2<br />
2.1<br />
2.2<br />
2.3<br />
2.4<br />
2.5<br />
2.6<br />
3<br />
Part<br />
Number<br />
5117168<br />
5275570<br />
5006209<br />
5067121<br />
5010430<br />
5116242<br />
5143188<br />
5005287<br />
5277982<br />
Qty Description<br />
3<br />
1<br />
1<br />
1<br />
1<br />
1<br />
1<br />
1<br />
1<br />
#10-24 x 1" Phillips Truss Head Machine Screw<br />
Filter/Valve Sub-Assembly<br />
Poly Knurled Swivel Nut, 3/4" FGHT<br />
Poly Hose Fitting, 3/4" MGHT 1/2" HB<br />
Port Kit Elbow, 1/2" FNPT<br />
Strainer, 1" Filter Washer<br />
Nylon Shut-Off Valve (3/4" GHT)<br />
Poly Swivel Adapter Spud, 1/2" NPT<br />
Hi Flo Gold Series 3.8GPM Pump<br />
3<br />
Tip<br />
Number<br />
AIXR11002VP<br />
Tip<br />
Number<br />
AIXR11002VP<br />
Spray Tip Rate Chart<br />
(20" Spacing)<br />
Gallons Per Acre - Based on Water<br />
Spray PressureCapacity<br />
Height (psi) (GPM) 1 2 3 4<br />
MPH MPH MPH MPH MPH<br />
5<br />
MPH<br />
6 8<br />
MPH<br />
15<br />
18"<br />
30<br />
20<br />
0.12 35.6 17.8 11.8 8.9 7.1 5.9 4.5<br />
0.14 41.6 20.8 13.8 10.4 8.3 6.9 5.2<br />
0.17 50.4 25.2 16.8 12.6 10.1 8.4 6.3<br />
40 0.20 59.6 29.8 19.8 14.9 11.9 9.9 7.4<br />
Gallons Per 1000 Sq. Ft. - Based on Water<br />
Spray PressureCapacity<br />
Height (psi) (GPM) 2 3 4 5<br />
MPH MPH MPH MPH<br />
15 0.12 .41 .27 .20 .16<br />
18"<br />
30<br />
0.14<br />
0.17<br />
.48<br />
.58<br />
.32<br />
.39<br />
.24<br />
.29<br />
.19<br />
.23<br />
40 0.20 .68 .45 .34 .27<br />
110° wide, tapered flat spray angle with air induction technology<br />
for better drift management. Made of 2-piece UHMWPE polymer<br />
construction which provides excellent chemical resistance,<br />
including acids, as well as exceptional wear life. Compact size to<br />
prevent tip damage. Removable pre-orifice. Excellent for<br />
systemic products and drift management.<br />
5-Nozzle Boom Assembly<br />
(with 3/8" Hose, 1" Sq. Tubing, & AIXR11002VP Tips)<br />
Page 4<br />
Item<br />
No<br />
1<br />
2<br />
3<br />
4<br />
5<br />
6<br />
7<br />
8<br />
9<br />
10<br />
11<br />
12<br />
13<br />
14<br />
15<br />
16<br />
17<br />
18<br />
19<br />
Part<br />
Number<br />
5006259<br />
5006345<br />
5016157<br />
5018371<br />
5019228<br />
5020347<br />
5020510<br />
5034169<br />
5046106<br />
5046219<br />
5051144<br />
5056113<br />
5056114<br />
5056115<br />
5116019<br />
5277834<br />
5277835<br />
5277838<br />
5277923<br />
Elbow<br />
Qty Description<br />
4<br />
6<br />
5<br />
5<br />
2<br />
2<br />
2<br />
2<br />
2<br />
5<br />
8<br />
2<br />
2<br />
1<br />
5<br />
1<br />
1<br />
1<br />
5<br />
6<br />
16<br />
Tee<br />
3/8"-16 Hex Whiz (Flange) Locknut<br />
3/8"-16 Flange Locknut (Grade F)<br />
Seat Washer (QJ Caps)<br />
Air-Induction XR Flat Spray Tip (AIXR11002VP)<br />
Extension Spring<br />
Hose, 3/8"-1 Brd. x 21"<br />
Hose, 3/8"-1 Brd. x 19-3/8"<br />
H.H.C.S., 3/8"-16 x 2 1/2"<br />
Square Cap, Black (1" Square Tube)<br />
Quick TeeJet Cap ONLY (Yellow)<br />
Hose Clamp, 3/8"<br />
Single Hose Shank (3/8" Hose)<br />
Double Hose Shank (3/8" Hose)<br />
Triple Hose Shank (3/8" Hose)<br />
Nozzle Strainer, Red (50 Mesh)<br />
Outer Boom Weldment 1" Sq. Tube L.H.<br />
Outer Boom Weldment 1" Sq. Tube R.H.<br />
Center Boom Weldment 1" Sq. Tube<br />
Boom Clamp Assembly (1in Sq.)<br />
7<br />
18<br />
19<br />
12<br />
15<br />
3<br />
4<br />
10<br />
Elbow<br />
Clamp<br />
Cross<br />
19<br />
Tee<br />
2<br />
1<br />
13<br />
15<br />
3<br />
4<br />
10<br />
7<br />
Opposite side has typical hardware setup<br />
5<br />
2<br />
1<br />
8<br />
17<br />
9<br />
2<br />
6<br />
11<br />
14<br />
15<br />
19<br />
3<br />
4<br />
10<br />
Cross Clamp
Exploded View/Parts List:<br />
UTL-40-12V (5301343)<br />
20<br />
16<br />
12<br />
15<br />
16<br />
30<br />
25<br />
21<br />
18<br />
31<br />
18<br />
6<br />
5<br />
29<br />
26<br />
28<br />
7 19 19<br />
9 19 19<br />
4<br />
34<br />
17<br />
1<br />
8 19 19<br />
15<br />
31<br />
23<br />
10<br />
30<br />
2<br />
11<br />
24<br />
14<br />
37.1<br />
35<br />
21<br />
2<br />
37.2<br />
13<br />
27<br />
3<br />
22<br />
32<br />
3<br />
25<br />
1<br />
36 14<br />
32<br />
14<br />
22<br />
13<br />
27<br />
3<br />
33<br />
Item<br />
No<br />
Part<br />
Number<br />
Qty<br />
Description<br />
1 5006186 6 #10-24 Hex Whiz (Flange) Locknut<br />
2 5006259 8 3/8-16nc Hex Flanged Whiz Nut Gr. 5<br />
3 5006307 8 5/16-18nc Hex Flanged Whiz Nut Gr. 5<br />
4 5010202 1 Poly Elbow, 1/2" MNPT x 3/8" HB<br />
5 5010203 1 Poly Elbow, 1/2" MNPT x 1/2" HB<br />
6 5020307 1 Hose, 1/2"-1 Brd. x 23"<br />
7 5020521 1 Hose, 3/8"-1 Brd. x 29-3/4"<br />
8 5020527 1 Hose, 3/8"-1 Brd. x 25 Ft.<br />
9 5020528 1 Hose, 3/8"-1 Brd. x 25"<br />
10 5023126 1 Clamp Arm R.H.<br />
11 5023127 1 Clamp Arm L.H.<br />
12 5034101 4 H.H.C.S., 3/8"-16 x 1 3/4"<br />
13 5034159 2 Square U-Bolt, 5/16" x 1 5/16" x 1 7/8"<br />
14 5034660 12 H.H.C.S. Flanged 3/8"-16nc x 3/4" Long<br />
15 5038698 4 Plastic Tank Hold-Down Leg Clip<br />
16 5038775 1 Handgun Bracket<br />
17 5038855 1 Pump Mount Bracket<br />
18 5051114 2 Hose Clamp (3/8"-1/2")<br />
19 5051144 6 Hose Clamp, 3/8"<br />
20 5058188 1 Tank Lid w/Lanyard<br />
Item<br />
No<br />
Part<br />
Number<br />
Qty<br />
Description<br />
21 5075014 4 Rubber Grommet (Black)<br />
22 5095176 2 Boom Mount, 40/60 Gallon Utility Sprayer<br />
23 5095348 1 Upright Tube Mount L.H.<br />
24 5095349 1 Upright Tube Mount R.H.<br />
25 5117234 4<br />
#10-24 x 1/2" Phillips Truss Head Machine<br />
Screw<br />
26 5117314 1 #10-24 x 3" Truss Head Machine Screw<br />
27 5117323 4 5/16"-18 x 3/4" Flange Whiz Lock Screw<br />
28 5127192 1 Manifold Spacer (3.8gpm)<br />
29 5167007 1 Pressure Gauge, 0-100 p.s.i.<br />
30 5169245 1 40 Gallon Elliptical Tank (White)<br />
31 5273959 1 Deluxe Pistol-Grip Handgun w/X-26 Tip<br />
32 5277933 2 Boom Bracket, 40/60 Gallon Utility Weldment<br />
33 5278018 1<br />
Lead Wire Assembly w/15A Fuse & 30A Clips<br />
(96" Long)<br />
34 5278019 1 Manifold Assembly (Utility Carts)<br />
35 5278021 1 Pump Assembly (Utility Sprayers)<br />
36 5278054 1 Utility Sprayer Frame (Red)<br />
37.1 5277779 1 Boom Sub-Assembly (1" Sq. Tube)<br />
37.2 5277695 1 5-Nozzle Harness (3/8" & 1" Sq Tube)<br />
Page 5
1<br />
8<br />
9<br />
1<br />
Manifold Assembly #5278019<br />
5<br />
2<br />
4<br />
6<br />
4<br />
6<br />
7<br />
9<br />
4<br />
1<br />
3<br />
Item<br />
No<br />
1<br />
2<br />
3<br />
5 4 6<br />
7<br />
8<br />
9<br />
Part<br />
Number<br />
5006209<br />
5010236<br />
5010430<br />
5016066<br />
5041073<br />
5143188<br />
5143405<br />
5149034<br />
5149148<br />
Qty Description<br />
3<br />
1<br />
1<br />
3<br />
1<br />
2<br />
1<br />
1<br />
2<br />
Poly Knurled Swivel Nut, 3/4" FGHT<br />
Poly Elbow, 1/2" FNPT x 1/2" FNPT<br />
Port Kit Elbow, 1/2" FNPT<br />
Garden Hose Washer<br />
Poly Reducing Bushing, 1/2" MNPT x 1/4" FNPT<br />
Nylon Shut-Off Valve (3/4" GHT)<br />
Manifold w/Mounting Tab<br />
Poly Swivel, 3/8" Hose Barb<br />
Swivel Elbow, 3/8" Hose Barb - Black<br />
(Pistol-Grip) Handgun #5273959<br />
Brass (2-Piece)<br />
Adjustable Tip<br />
(#5018331)<br />
Aluminum Barrel<br />
Brass Hose Connection<br />
(for 3/8" I.D. Hose)<br />
Trigger Lock<br />
28<br />
Page 6