Windows XP Instructions for Connecting to the LFSC File System
Windows XP Instructions for Connecting to the LFSC File System
Windows XP Instructions for Connecting to the LFSC File System

Create successful ePaper yourself
Turn your PDF publications into a flip-book with our unique Google optimized e-Paper software.
<strong>Windows</strong> <strong>XP</strong> <strong>Instructions</strong> <strong>for</strong> <strong>Connecting</strong> <strong>to</strong> <strong>the</strong> <strong>LFSC</strong> <strong>File</strong> <strong>System</strong>/Backup <br />
Note: If you are running Mcafee Virus Scanner, please disable it prior <strong>to</strong> connecting <strong>to</strong> this system. <br />
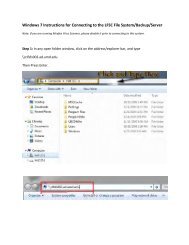
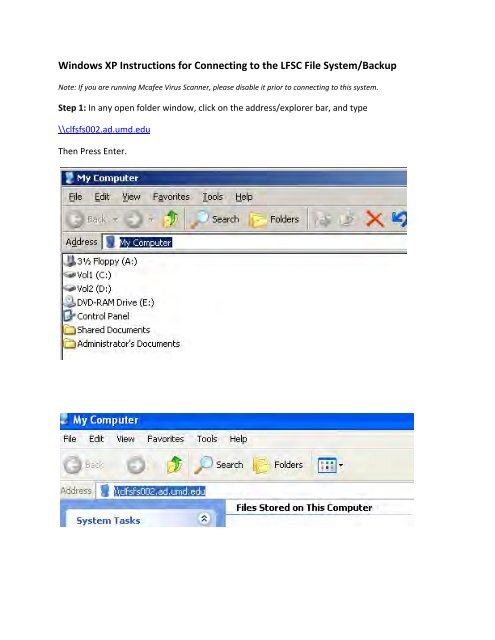
Step 1: In any open folder window, click on <strong>the</strong> address/explorer bar, and type <br />
\\clfsfs002.ad.umd.edu <br />
Then Press Enter.
Step 2: After you press enter, an au<strong>the</strong>ntication screen will pop up. Au<strong>the</strong>ntication is by your <br />
direc<strong>to</strong>ry ID and password, HOWEVER, you must put @ad.umd.edu AFTER your Direc<strong>to</strong>ry ID. <br />
In <strong>the</strong> below example, my direc<strong>to</strong>ry ID is rhshah. So my login <strong>to</strong> <strong>the</strong> server will be <br />
rhshah@ad.umd.edu <br />
My password <strong>to</strong> <strong>the</strong> server will be <strong>the</strong> same as my direc<strong>to</strong>ry ID password. <br />
Hit ok and continue. If <strong>the</strong>re is a login failure, <strong>the</strong>n you are ei<strong>the</strong>r not on <strong>the</strong> system yet (please <br />
contact Raju at rhshah@umd.edu or you put in <strong>the</strong> wrong password. The server au<strong>the</strong>nticates <br />
with your direc<strong>to</strong>ry password, which is <strong>the</strong> same password you use <strong>to</strong> check your email. <br />
Step 3: If your login is successful, a number of folders will appear. Ignore your user name <br />
folder, and double click on <strong>the</strong> CBMG Folder. Then double click on Home. Then double click
within <strong>the</strong> various divisions of CBMG (staff/faculty,etc) <strong>for</strong> which you belong. You’ll eventually <br />
see a list of user names, and double click on yours. These are your <strong>LFSC</strong> College Backup Folders. <br />
Step 4: There are three main folders <strong>for</strong> each individual. Drop Box, Personal <strong>File</strong>s, and Public. <br />
Personal files is where you s<strong>to</strong>re in<strong>for</strong>mation you don’t want anyone else <strong>to</strong> have access <strong>to</strong>. <br />
Drop Box is <strong>for</strong> receiving files from o<strong>the</strong>r individuals. If you browse <strong>to</strong> someone’s dropbox and <br />
place a file in it, <strong>the</strong> file will disappear, but <strong>the</strong>y will be able <strong>to</strong> access it. Public is <strong>for</strong> sharing <br />
files with o<strong>the</strong>r people on <strong>the</strong> server. They can access and see <strong>the</strong> files, but not write <strong>to</strong> <strong>the</strong>m. <br />
At this point, we now want <strong>to</strong> map your server drive <strong>to</strong> your computer, so that you don’t have <br />
<strong>to</strong> go through this process again. Don’t close <strong>the</strong> screen you have open, and follow <strong>the</strong> below <br />
instructions!
How <strong>to</strong> Map Your Backup Drive To Your Computer <br />
Step 5: Click in <strong>the</strong> address bar <strong>to</strong> see and select <strong>the</strong> address on <strong>the</strong> server you are currently at, <br />
and hit CTRL-‐C. This will copy <strong>the</strong> address <strong>to</strong> your clip board. (You can also use Edit-‐Copy via <br />
<strong>the</strong> folder menu’s, or right click and select copy) This example is <strong>for</strong> Dr. Smith but you have <strong>to</strong> <br />
select your own drive. <br />
Once you have copied this address with Ctrl-‐C, proceed <strong>to</strong> <strong>the</strong> next step. <br />
Step 6: Go <strong>to</strong> <strong>the</strong> folder menu option “Tools” and select “Map Network Drive”
Step 7: A Map Network Drive Window will pop up. Paste <strong>the</strong> Address you copied <strong>to</strong> your <br />
clipboard in<strong>to</strong> <strong>the</strong> folder location. Make sure “reconnect at login” is checked. Click Finish. <br />
Step 8: Congratulations. You have setup your backup drive, and have mapped it <strong>to</strong> your <br />
computer. From now on, <strong>to</strong> access your backup drive, browse <strong>to</strong> it like you would any drive on <br />
your computer, and use your direc<strong>to</strong>ryID@ad.umd.edu as your login, and your direc<strong>to</strong>ry <br />
password as your password! <br />
Your setup should look similar <strong>to</strong> below when all <strong>the</strong> steps are completed.
To access your folders, just click on <strong>the</strong> new network drive icon. (By default, this will be Drive Z: <br />
on your computer). That’s it! <br />
You can also use <strong>the</strong> MAP NETWORK DRIVE instructions <strong>for</strong> setting up o<strong>the</strong>r drives <strong>to</strong> <br />
individuals drop boxes that you normally work with. An easy way <strong>to</strong> do this would be <strong>to</strong> copy <br />
<strong>the</strong> address bar from this location and create a separate mapped drive <strong>for</strong> it. Here is <strong>the</strong> <br />
address you’d use <strong>to</strong> easily access anyone’s dropbox or public folder within <strong>the</strong> en<strong>to</strong>mology <br />
department! Just make sure <strong>to</strong> select a different drive from your already mapped drives.