
You also want an ePaper? Increase the reach of your titles
YUMPU automatically turns print PDFs into web optimized ePapers that Google loves.
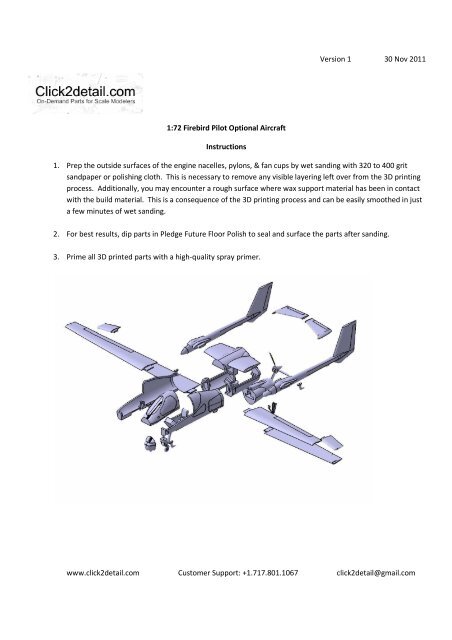
Version 1 30 Nov 2011<br />
1:72 <strong>Firebird</strong> Pilot Optional Aircraft<br />
Instructions<br />
1. Prep the outside surfaces of the engine nacelles, pylons, & fan cups by wet sanding with 320 to 400 grit<br />
sandpaper or polishing cloth. This is necessary to remove any visible layering left over from the 3D printing<br />
process. Additionally, you may encounter a rough surface where wax support material has been in contact<br />
with the build material. This is a consequence of the 3D printing process and can be easily smoothed in just<br />
a few minutes of wet sanding.<br />
2. For best results, dip parts in Pledge Future Floor Polish to seal and surface the parts after sanding.<br />
3. Prime all 3D printed parts with a high-quality spray primer.<br />
www.click2detail.com Customer Support: +1.717.801.1067 click2detail@gmail.com
Version 1 30 Nov 2011<br />
www.click2detail.com Customer Support: +1.717.801.1067 click2detail@gmail.com
Version 1 30 Nov 2011<br />
www.click2detail.com Customer Support: +1.717.801.1067 click2detail@gmail.com
Version 1 30 Nov 2011<br />
www.click2detail.com Customer Support: +1.717.801.1067 click2detail@gmail.com
Version 1 30 Nov 2011<br />
4. Paint just as you would paint any other model kit or resin accessories.<br />
www.click2detail.com Customer Support: +1.717.801.1067 click2detail@gmail.com