Profoto Pro-D4 user guide - Specular
Profoto Pro-D4 user guide - Specular
Profoto Pro-D4 user guide - Specular

You also want an ePaper? Increase the reach of your titles
YUMPU automatically turns print PDFs into web optimized ePapers that Google loves.
<strong>D4</strong> <strong><strong>Pro</strong>foto</strong> <strong>D4</strong> – Brief Instructions<br />
<strong><strong>Pro</strong>foto</strong> <strong>D4</strong> – Brief Instructions<br />
<strong>D4</strong><br />
. Connect<br />
. Connect .<br />
Press<br />
If .<br />
Choose<br />
Activate Connect<br />
Activate<br />
.<br />
Choose<br />
Choose<br />
Quick Guide<br />
the generator to the mains supply with the enclosed power cable [1].<br />
The Indicator for Mains Connection [2] should now light up indicating correct<br />
AC current to the generator.<br />
the desired lamp heads to the sockets A, B, C, D [9] – always start with A,<br />
next B etc. The <strong>D4</strong> is a default set to be compatible with the Acute series of heads<br />
(Acu) To change the <strong>D4</strong> to be compatible with the <strong>Pro</strong> series of heads (<strong>Pro</strong>) please<br />
follow instructions on page 19-20,<br />
the On/Standby Button [3].<br />
necessary activate the lamp socket(s) by pressing corresponding Flash and<br />
Modelling Light Button(s) [12] until the Power Display(s) [10] are activated.<br />
The white Ready Lamp [18] will light up when the generator is charged.<br />
energy distribution by using the Power Dial(s) [13] corresponding to the<br />
head(s) used.<br />
the modelling light(s) by quickly pressing the Flash and Modelling Light<br />
On/Off Button(s) [12] until it is lit. Choose the modelling light mode by holding down<br />
the Modelling Light Button [19] until it reaches the desired function [20].<br />
sync cord and/or flash meter to the Sync Sockets [4].<br />
the Photo/IR-Cell [5] by pressing the Photo/IR-Cell On/Off Button [6].<br />
the ready signal mode by pressing the Ready Mode Button [17] until the<br />
desired function is indicated [16].<br />
fast recharging by pressing the Normal/Fast Recycle Switch [21].<br />
Take pictures!<br />
Mains (AC) Connection<br />
Plug the included heavy-duty power cable into the generator’s Mains Connection [1].<br />
The <strong>D4</strong> can be used at all common mains voltages 90-240V/50-60 Hz, dedicated power<br />
cables for all countries are available. The generator automatically senses which voltage<br />
range is supplied. The Indicator for Mains Connection [2] is lit if the generator is receiving<br />
acceptable power from the mains, even in the standby mode. If not check the mains<br />
fuse and/or used power extension for faults. On top, a green dot in the right corner of the<br />
Auxiliary Functions Display [8] flashes to indicate that the generator is on standby.<br />
PLEASE NOTE! For proper function when powered by a petrol-electric generator<br />
see page 31!<br />
WARNING: Never use simple, thin household extension leads to elongate the<br />
power cable. Always unwind all cable if an extension cable is used.<br />
Self Test<br />
After connecting a <strong>D4</strong> to the mains, the generator starts automatically with a self test:<br />
During this time the AUX Functions Display [8] shows for three seconds “U344” if a US<br />
radio slave module, “E433” if a CE radio slave module or “no r” if no radio slave module<br />
is installed. Then the default head configuration= Acu or <strong>Pro</strong> is displayed. If the generator was<br />
deactivated by pressing the On/Standby Button [3] before disconnection, the self test will<br />
start without active display after reactivating the <strong>D4</strong> generator. During the self test<br />
(approximately 3s.) the generator does not react on any settings and it is not possible to<br />
release a flash.<br />
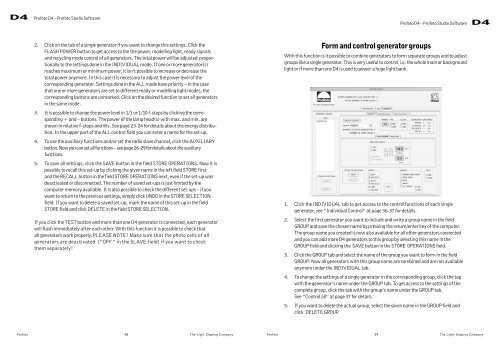
Connection Lamp Heads<br />
ATTENTION! Before connecting flash heads to the <strong>D4</strong> at 200-240V please make<br />
sure to configure your <strong>D4</strong> to be compatible with Acute/<strong>D4</strong>Head or <strong>Pro</strong>Head.<br />
The <strong>D4</strong> is made in such a way that you can decide, via the internal software, if you want<br />
the <strong>D4</strong> generator to be compatible with the <strong>Pro</strong>-7 series of heads or the Acute series of<br />
heads without the need to change modelling lamps.<br />
If you make the <strong>D4</strong> compatible with the <strong>Pro</strong>-7 series of heads there is no need to change<br />
the modelling lamp on the <strong>Pro</strong>-7 series of heads and you can then use it worldwide on any<br />
power supply voltage! (But if you then use an Acute series Head you must use a 120V<br />
lamp or a 100V lamp in Japan.)<br />
If you make the <strong>D4</strong> compatible with the Acute series of heads there is no need to change<br />
the modelling lamp on the Acute series of heads. (But if you then use a <strong>Pro</strong>-7 series Head<br />
you must use a lamp corresponding to the power supply voltage!)<br />
<strong><strong>Pro</strong>foto</strong> 18 The Light Shaping Company The Light Shaping Company 19 <strong><strong>Pro</strong>foto</strong>