Profoto Pro-D4 user guide - Specular
Profoto Pro-D4 user guide - Specular
Profoto Pro-D4 user guide - Specular

Create successful ePaper yourself
Turn your PDF publications into a flip-book with our unique Google optimized e-Paper software.
User Manual<br />
<strong><strong>Pro</strong>foto</strong>–Stockholm, Sweden<br />
<strong><strong>Pro</strong>foto</strong> x1 The Light Shaping Company
<strong>D4</strong> <strong><strong>Pro</strong>foto</strong> <strong>D4</strong> – Top Panel <strong><strong>Pro</strong>foto</strong> <strong>D4</strong> – Top Panel <strong>D4</strong><br />
d<br />
d<br />
a b c<br />
e<br />
f g h<br />
i i i i<br />
j j k j j<br />
l l l l<br />
m<br />
m m m<br />
n<br />
r<br />
o p q s<br />
t<br />
å<br />
See page 17 for descriptions!
<strong><strong>Pro</strong>foto</strong> <strong>D4</strong> – Warning<br />
<strong>D4</strong><br />
Safety Instructions<br />
<strong><strong>Pro</strong>foto</strong> generators and flash heads are part of a complete professional<br />
lighting system. Please read the instruction manual carefully before use.<br />
Flash tubes and modelling lights emit considerable heat and can be<br />
dangerous if not used properly. Always unplug the lamp cable from the<br />
generator before changing the modelling light, glass cover or flash tube.<br />
Under no circumstances are generators or heads to be opened! There is<br />
dangerous high voltage inside the generator! Service is only to be carried<br />
out by authorized personnel.<br />
.Never connect accessories of other brands without consulting an<br />
authorized service station.<br />
.Do not touch hot glass or metal parts.<br />
.Do not obstruct ventilation.<br />
.Do not connect the lamp head with the transport cap in place.<br />
.Never place filters or diffusing material directly onto glass covers,<br />
flash tubes or modelling lights.<br />
.Never position the light extremely close to people.<br />
.When mounting umbrellas, do not touch flash tubes or modelling lights<br />
with the metal shaft – risk of high voltage.<br />
.Always use a grounded power supply/mains outlet.<br />
.<strong>Pro</strong>tect the flash equipment against moisture, condensation,<br />
heat, sand and dirt.<br />
The Light Shaping Company 1 <strong><strong>Pro</strong>foto</strong>
<strong><strong>Pro</strong>foto</strong> <strong>D4</strong> – Content<br />
<strong>D4</strong><br />
User Manual<br />
Introduction.................................................................................................................................... 5<br />
Acute/<strong>D4</strong> Heads ...................................................................................................................... 6-10<br />
Other <strong><strong>Pro</strong>foto</strong> Heads .................................................................................................................... 12<br />
<strong>D4</strong> Generators ........................................................................................................................ 13-33<br />
System Chart .......................................................................................................................... 14-15<br />
Technical Data ............................................................................................................................ 33<br />
Digital Wireless Freedom (Radio Slave) .................................................................................... 34<br />
<strong><strong>Pro</strong>foto</strong> Studio Software .................................................................................................... 35-40<br />
Generators<br />
<strong>D4</strong> 1200<br />
<strong>D4</strong> 2400<br />
<strong>D4</strong>R 1200 (with radio slave receiver)<br />
<strong>D4</strong>R 2400 (with radio slave receiver)<br />
The <strong>D4</strong> system consists of the<br />
following products:<br />
The photographer’s tools are a natural part of the creative process.<br />
Like the painter’s brush, the sculptor’s chisel, or the musician’s<br />
instrument, their form and design should reflect their function.<br />
They should have the right feel, and be aesthetically pleasing.<br />
– <strong><strong>Pro</strong>foto</strong> founders Conny Dufgran and<br />
Eckhard Heine<br />
Heads<br />
Acute/<strong>D4</strong> head<br />
Acute/<strong>D4</strong> twin<br />
Acute/<strong>D4</strong> ring<br />
NEW <strong>Pro</strong>Head series<br />
<strong><strong>Pro</strong>foto</strong> Studio Software (1 CD)<br />
All actual <strong><strong>Pro</strong>foto</strong> light shaping<br />
tools and accessories.<br />
The Light Shaping Company 3 <strong><strong>Pro</strong>foto</strong>
<strong><strong>Pro</strong>foto</strong> <strong>D4</strong> – Welcome<br />
<strong>D4</strong><br />
<strong><strong>Pro</strong>foto</strong> welcomes you to the <strong>D4</strong> system,<br />
and thanks you for the<br />
confidence in our products!<br />
With the <strong>D4</strong> line of generators, <strong><strong>Pro</strong>foto</strong> offers a sophisticated tool of exceptional precision<br />
and versatility with a quantity of innovative, yet easy to use, functions that are the result of<br />
decades of collaboration with demanding photographers world-wide. The unique ergonomic<br />
design combines the positive feel of mechanical knobs and switches with the precision of<br />
digital technologies. <strong><strong>Pro</strong>foto</strong>’s special “Hybrid Flash Technology” uses advanced digital<br />
voltage stabilisation and individual capacitor banks to provide extremely stable flash power<br />
and colour temperature – from flash to flash and over the whole range, even when several<br />
flash heads are used. This makes the <strong>D4</strong> generators the first choice for critical analogue and<br />
digital shoots, always guaranteeing exact and repeatable results.<br />
Four asymmetric and individual adjustable lamp connections offer the same flexibility as<br />
several independent generators. In addition, our new “<strong><strong>Pro</strong>foto</strong> Studio” software makes<br />
remote adjustments via computer very simple, even when many generators are used in<br />
combination. We check that all <strong><strong>Pro</strong>foto</strong> equipment passes the quality and capability levels<br />
the most demanding photographers require. For this reason our flash equipment is the<br />
standard in leading rental studios in New York, Tokyo, Cape Town, Paris etc. and the most<br />
rented flash the world over.<br />
Create your own light<br />
The most important thing in photography is the light, and it is essential that the flash system<br />
offers complete freedom to create your own style. The Acute/<strong>D4</strong> heads give you this possibility:<br />
The light sources, the flash tube and the modelling light, are placed together inside the<br />
glass cover. What you see with the modelling light will be what you get when the flash<br />
fires. This makes it easier for you to adjust the light creatively. The reflectors are<br />
adjustable and lock easily into place.<br />
Most reflectors can be moved forward or backward in relation to the optical center of the<br />
light source, effectively narrowing or widening the spread of light and changing the intensity<br />
and fall-off charakteristics as well. The Acute/<strong>D4</strong> head and the Acute/<strong>D4</strong> twin are supplied<br />
with a frosted and UV-coated glass cover, which together with the flash tube, produce<br />
a colour temperature perfectly suited to daylight film. In addition there are glass covers<br />
with adjusted filtration available, that anable the colour temperature to be changed.<br />
The whole <strong>D4</strong> system is modular. Every single reflector and accessory creates its special<br />
light and the unique <strong><strong>Pro</strong>foto</strong> focusing system offers you a possibility to create your own<br />
light with only a few different light shaping tools.<br />
The Light Shaping Company 5 <strong><strong>Pro</strong>foto</strong>
<strong>D4</strong> <strong><strong>Pro</strong>foto</strong> <strong>D4</strong> – Acute/<strong>D4</strong> Heads<br />
<strong><strong>Pro</strong>foto</strong> <strong>D4</strong> – Acute/<strong>D4</strong> Heads<br />
<strong>D4</strong><br />
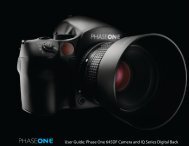
Acute/<strong>D4</strong> Head<br />
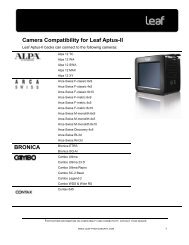
Acute/<strong>D4</strong> Twin<br />
1. UV-reduced flash tube<br />
2. Umbrella holder<br />
3. Manoeuvering system with locking lever<br />
4. Stand adapter 16mm (5/8")<br />
5. Glass Cover, frosted, UV-coated<br />
6. Halogen modelling lamp, 250W, Mini-Can E11 socket (500W optional)<br />
7. Locking springs<br />
8. Standard Zoom Reflector<br />
9. Modelling light On/Off switch<br />
1. UV-reduced flash tubes<br />
2. Umbrella holder<br />
3. Manoeuvering system with locking lever<br />
4. Stand adapter 16mm (5/8")<br />
5. Long Glass Cover, frosted, UV-coated<br />
6. Halogen modelling lamp, 500W, Mini-Can E11 socket<br />
7. Locking springs<br />
8. Magnum Reflector<br />
9. Modelling light On/Off switch<br />
1<br />
1<br />
6<br />
5<br />
6<br />
5<br />
7<br />
7<br />
1<br />
9 9<br />
3<br />
3<br />
2<br />
2<br />
8<br />
4<br />
8<br />
4<br />
<strong><strong>Pro</strong>foto</strong> 6 The Light Shaping Company The Light Shaping Company 7 <strong><strong>Pro</strong>foto</strong>
<strong>D4</strong> <strong><strong>Pro</strong>foto</strong> <strong>D4</strong> – Acute/<strong>D4</strong> Heads<br />
<strong><strong>Pro</strong>foto</strong> <strong>D4</strong> – Acute/<strong>D4</strong> Heads<br />
<strong>D4</strong><br />
Acute/<strong>D4</strong> Head<br />
All <strong><strong>Pro</strong>foto</strong> lamp heads are designed for maximum light shaping ability.The reflectors lock<br />
easily into place and by sliding the reflector different types of light shapes are achieved.<br />
All <strong><strong>Pro</strong>foto</strong> reflectors and accessories fit the Acute/<strong>D4</strong> Heads. The flash head has a built in<br />
holder for the umbrella. A UV-reduced quartz flash tube is included with all Acute/<strong>D4</strong> Heads.<br />
The flash tube has two metal pins. When removing a flash tube, pull it straight out of the<br />
sockets. When inserting a new flash tube, check that the trigger wire clasps properly around<br />
the flash tube (please see mounting instructions in package). Always use original Acute/<strong>D4</strong><br />
flash tubes, other flash tubes can create serious malfunctions. In case the head overheats<br />
the modelling light automatically switches off. When the temperature has dropped sufficiently<br />
the modelling light will switch on again.The Acute/<strong>D4</strong> Head is fan cooled and it has<br />
an automatic voltage selector for the fan.<br />
WARNING! The proportional modelling light is powered directly from the mains<br />
and it is therefore important to check that the rated voltage for the lamp<br />
corresponds with the mains supply before connecting a head with the generator.<br />
A switch at the back of the head allows turning off the modelling light.<br />
PLEASE NOTE! Always unplug the lamp cable from the generator before changing<br />
modelling lamp, glass cover or flash tube. A 250W E11 Mini-Can halogen lamp is<br />
included, but the head is also available with a 500W lamp.<br />
The Acute/<strong>D4</strong> Head is supplied with a frosted UV-coated glass cover and a Standard Zoom<br />
reflector. Combined with the UV-reducing quartz flash tube the frosted glass cover offers<br />
the recommended colour temperature for daylight type film. Distinctive colour temperature<br />
adjustments can be obtained by combining glass covers with different coatings.<br />
The following glass covers are available:<br />
For 250W modelling lamp<br />
10 15 33 Glass Cover, frosted, UV-coated (standard)<br />
10 15 34 Glass Cover, frosted, uncoated (+300°K)<br />
10 15 35 Glass Cover, frosted, extra UV-coated (-300°K)<br />
10 15 36 Glass Cover, clear, uncoated (-300°K)<br />
10 15 37 Glass Cover, clear, UV-coated<br />
10 20 02 250W, 120V Halogen, Mini-Can<br />
10 20 13 250W, 240V Halogen, Mini-Can<br />
For 500W modelling lamp (long version)<br />
10 15 18 Glass Cover, frosted, UV-coated (standard)<br />
10 15 19 Glass Cover, frosted, extra UV-coated (-300°K)<br />
10 15 20 Glass Cover, frosted, uncoated (+300°K)<br />
10 15 21 Glass Cover, clear, UV-coated<br />
10 15 23 Glass Cover, clear, uncoated (+300°K)<br />
10 20 07 500W, 120V Halogen, Mini-Can<br />
10 20 15 500W, 240V Halogen, Min-Can<br />
Acute/<strong>D4</strong> Twin<br />
The Acute/<strong>D4</strong> Twin offers even shorter flash duration,very quick recycling or the ability<br />
to obtain 4800 Ws out of one single head. An Acute/<strong>D4</strong> Twin has two flash tubes. As the<br />
flash duration is shorter at low power settings, and as only half of the desired power is<br />
used in each tube, consequently shorter flash duration is obtained. If you require shorter<br />
flash duration and for example need 1200 Ws, you connect the Acute/<strong>D4</strong> Twin to the A and B<br />
sockets on the <strong>D4</strong> 1200 generator and fire 600 Ws from each tube. The flash duration is<br />
shorter than if a standard Acute/<strong>D4</strong> Head is used.The flash duration at 1200 Ws with an<br />
Acute/<strong>D4</strong> Head is 1/1000 sec. while it is only 1/1600 sec. with an Acute/<strong>D4</strong> Twin. If, on the<br />
contrary, you require faster recycling, you power one Acute/<strong>D4</strong> Twin with two <strong>D4</strong> generators.<br />
The recycling is faster since each generator needs to recharge less of it’s energy.To get<br />
4800 Ws from one head you connect the Acute/<strong>D4</strong> Twin to two <strong>D4</strong> 2400 generators.<br />
WARNING!The proportional modelling light is powered directly from the mains<br />
and it is therefore important to check that the rated voltage for the lamp<br />
corresponds with the mains supply before connecting a head with the generator.<br />
A switch at the back of the head allows turning off the modelling light.<br />
PLEASE NOTE! Always unplug the lamp cable from the generator before changing<br />
modelling lamp, glass cover or flash tube.The modelling light is a 500W Halogen<br />
with a Mini-Can socket (E11). The flash tube has two metal pins. When removing<br />
a flash tube, pull it straight out of the sockets. When inserting a new flash tube,<br />
check that the trigger wire clasps properly around the flash tube (please see<br />
mounting instructions in package). Always use original Acute/<strong>D4</strong> Twin flash<br />
tubes, other flash tubes can create serious malfunctions.<br />
The Acute/<strong>D4</strong> Twin is supplied with a frosted UV-coated glass cover and a Magnum reflector.<br />
Combined with the UV-reducing quartz flash tube the frosted glass cover offers the recommended<br />
colour temperature for daylight type film. Distinctive colour temperature adjustments<br />
can be obtained by combining glass covers with different coatings.<br />
The following glass covers are available:<br />
10 15 18 Glass Cover, frosted, UV-coated (standard)<br />
10 15 19 Glass Cover, frosted, extra UV-coated (-300°K)<br />
10 15 20 Glass Cover, frosted, uncoated (+300°K)<br />
10 15 21 Glass Cover, clear, UV-coated<br />
10 15 23 Glass Cover, clear, uncoated (+300°K)<br />
10 20 07 500W, 120V Halogen, Mini-Can<br />
10 20 15 500W, 240V Halogen, Min-Can<br />
<strong><strong>Pro</strong>foto</strong> 8 The Light Shaping Company The Light Shaping Company 9 <strong><strong>Pro</strong>foto</strong>
<strong>D4</strong> <strong><strong>Pro</strong>foto</strong> <strong>D4</strong> – Acute/<strong>D4</strong> Heads<br />
<strong><strong>Pro</strong>foto</strong> <strong>D4</strong> – Welcome! <strong>D4</strong><br />
Acute/<strong>D4</strong> Ring<br />
The Acute/<strong>D4</strong> Ring is an entirely mobile source of<br />
light. The internal diameter of 100mm provides<br />
plenty of space for most professional camera lenses.<br />
Since the camera holder can be moved forwards and<br />
backwards, as well as upwards and downwards,<br />
most cameras can be attached. The Acute/<strong>D4</strong> Ring<br />
gives a direct light without any shadow on the foreground,<br />
this makes an excellent light source for confined<br />
areas, such as the interior of technical installations.<br />
Many fashion photographers also use the<br />
Acute/<strong>D4</strong> Ring to find new angles and capture details.<br />
The ring flash provides a very distinct, directed light,<br />
but can be complemented by the Softlight reflector,<br />
which increases the light source, thereby producing a<br />
softer light with little shadows. The optional Widesoft<br />
delivers even softer illumination. For close-ups,<br />
there is a reflector that focuses the light to 50cm in<br />
front of the camera lens.The maximum charge is<br />
9600Ws/ minute.This means 4 flashes a minute at<br />
2400Ws, 8 flashes at 1200 Ws,16 flashes at 600 Ws,<br />
etc. Changing the flash tube is only to be done by a<br />
professional service station.<br />
Mounting the reflector:<br />
.Remove the two ridged screws fixating the<br />
camera holder.<br />
.Remove the four ridged nuts holding the outer<br />
and inner reflectors together.<br />
.Run the lamp cable through the outer reflector<br />
and let the reflector slide into position.<br />
.Reassemble the outer and inner reflectors using<br />
the ridged nuts.<br />
.Reassemble the camera holder using the two<br />
ridged screws.<br />
Accessories:<br />
10 06 42 PR Softlight Reflector<br />
10 06 43 PR Close-up Reflector<br />
10 07 17 PR Widesoft Reflector<br />
<strong><strong>Pro</strong>foto</strong> 10 The Light Shaping Company The Light Shaping Company 11 <strong><strong>Pro</strong>foto</strong>
<strong>D4</strong> <strong><strong>Pro</strong>foto</strong> <strong>D4</strong> – Other Heads<br />
<strong><strong>Pro</strong>foto</strong> <strong>D4</strong> – Generators<br />
<strong>D4</strong><br />
Other Flash Heads<br />
The <strong>D4</strong> generators are fully compatible with the line of Acute2, Acute/<strong>D4</strong> Heads and the new<br />
<strong>Pro</strong>Head. When equipped with a 220-240V/50Hz modelling lamp, PF heads, PB, <strong>Pro</strong>-6 and<br />
<strong>Pro</strong>-7 heads (except <strong>Pro</strong>-7b head) can be used at 220-240/50Hz .<strong><strong>Pro</strong>foto</strong> does NOT recommend<br />
the use of these heads with <strong>D4</strong> generators at 90-130V, because the fan will not work<br />
properly, leading to problems with overheating.<br />
We don't recommend the use of old Acute PAB heads with <strong>D4</strong> generators because the<br />
missing fan may lead to problems with overheating. We also don’t recommend the use of the<br />
discontinued Acute Alfa heads (AB or ABS heads) – at some settings of the <strong>D4</strong> generator the<br />
fan of these heads doesn’t work properly.<br />
WARNING! Please make sure to configure your <strong>D4</strong> to be compatible with Acute/<strong>D4</strong><br />
Head or <strong>Pro</strong>Head before you connect a <strong><strong>Pro</strong>foto</strong> head with a <strong>D4</strong> generator.<br />
Se instructions on page 19-20. Heads used on a <strong>D4</strong> generator have to be equipped<br />
with a modelling lamp corresponding to the actual mains voltage. But any PF, former<br />
<strong>Pro</strong>-6, <strong>Pro</strong>-7 head or new <strong>Pro</strong>Head used on a <strong>Pro</strong>-3, <strong>Pro</strong>-5, <strong>Pro</strong>-6, <strong>Pro</strong>Pack or <strong>Pro</strong>-7<br />
generator, must be equipped with a 120V modelling lamp irrespective of the<br />
mains voltage.<br />
<strong>D4</strong> Generators<br />
System Chart .......................................................................................................................... 14-15<br />
Nomenclature .............................................................................................................................. 17<br />
Quick Guide .................................................................................................................................. 18<br />
Mains Connection ........................................................................................................................ 19<br />
Connecting Lamp Heads ...................................................................................................... 19-20<br />
Energy Control and Distribution .......................................................................................... 23-24<br />
Modelling Light .................................................................................................................... 24-25<br />
Connecting Camera & Flash Meter .......................................................................................... 25<br />
Recharging .................................................................................................................................. 25<br />
Ready/Charging Signals ...................................................................................................... 25-26<br />
Photo/IR-Cell .............................................................................................................................. 26<br />
Auxiliary Functions .............................................................................................................. 26-29<br />
Memory Function ................................................................................................................ 28-29<br />
Automatic Safety Functions .................................................................................................... 30<br />
Computer Connection.................................................................................................... 30, 35-40<br />
Additional Information<br />
Colour Temperature.................................................................................................................... 31<br />
f-stop Stability ............................................................................................................................ 31<br />
Flash Duration ............................................................................................................................ 31<br />
Petrol-Electric Generators ........................................................................................................ 31<br />
Warranty .................................................................................................................................... 32<br />
Technical Data ...................................................................................... .................. 33<br />
<strong><strong>Pro</strong>foto</strong> 12 The Light Shaping Company The Light Shaping Company 13 <strong><strong>Pro</strong>foto</strong>
<strong><strong>Pro</strong>foto</strong> –The Light Shaping System<br />
MONOLIGHTS AND GENERATORS<br />
ComPact 300 ComPact Plus 600 ComPact Plus 1200<br />
Acute2 2400/1200 Acute2R 2400/1200<br />
(with radio slave module)<br />
<strong>D4</strong> 1200/2400 <strong>D4</strong>R 1200/2400<br />
(with radio slave module)<br />
<strong>Pro</strong>-7b <strong>Pro</strong>-7s 1200 <strong>Pro</strong>-7s 2400 <strong>Pro</strong>-7a 1200 <strong>Pro</strong>-7a 2400<br />
HEADS<br />
<strong>Pro</strong>Tungsten<br />
<strong>Pro</strong>Daylight HMI<br />
(and ballast)<br />
Acute/<strong>D4</strong> Head<br />
90 06 66<br />
Acute/<strong>D4</strong> Twin<br />
90 06 78<br />
Acute/<strong>D4</strong> Ring<br />
33 05 13<br />
<strong>Pro</strong>-7b head<br />
90 07 25<br />
<strong>Pro</strong>Head<br />
90 07 09<br />
<strong>Pro</strong>Twin<br />
90 07 19<br />
<strong>Pro</strong>Ring<br />
30 05 15<br />
Narrow Beam Travel<br />
Reflector<br />
10 07 13<br />
Narrow Beam Reflector<br />
10 06 17<br />
TeleZoom Reflector<br />
10 07 12<br />
Magnum Reflector<br />
10 06 24<br />
Wide Zoom Reflector<br />
10 07 11<br />
Standard Zoom Reflector<br />
10 06 10<br />
Grid Reflector<br />
10 07 05<br />
Disc Reflector<br />
10 06 54<br />
<strong>Pro</strong>Globe<br />
10 06 73<br />
Softlight Reflector silver<br />
10 06 07<br />
Softlight Reflector white<br />
10 06 08<br />
<strong>Pro</strong>Fresnel<br />
10 07 06<br />
Barn Doors for <strong>Pro</strong>Fresnel<br />
10 07 07<br />
LIGHT SHAPING TOOLS<br />
7” Grids<br />
5˚ - 10 06 35<br />
10˚ - 10 06 34<br />
Glass Disc 10 07 04<br />
PR Softlight Reflector<br />
10 06 42<br />
PR Close-Up Reflector<br />
10 06 43<br />
PR WideSoft Reflector<br />
10 07 17<br />
<strong>Pro</strong>Focus Spotlight<br />
10 06 72<br />
10° Grid<br />
10 06 18<br />
<strong>Pro</strong> Tube<br />
10 06 70<br />
Barn Doors<br />
10 07 15<br />
10˚ WideZoom grid<br />
10 06 36<br />
Filter Holder<br />
10 07 01<br />
Grid - and filter holder<br />
90 06 49<br />
Barn Doors<br />
10 06 71<br />
Glass covers<br />
Hardbox<br />
10 07 18<br />
Snoot<br />
10 06 51<br />
5°, 10°, 20° Grids<br />
10 06 46, 10 06 05, 10 06 06<br />
Grid for softlight Reflectors<br />
10 06 09<br />
Slide Holder<br />
24x36<br />
10 06 86<br />
Slide Holder<br />
6x6<br />
10 06 87<br />
Heat Absorbing<br />
Glass<br />
10 06 88<br />
Iris<br />
Diaphragm<br />
10 06 52<br />
Softgrids, masks and diff<strong>user</strong>s available.<br />
<strong>Pro</strong>Box<br />
90 05 61<br />
Silver Umbrella<br />
10 06 16 - 1,05m<br />
10 07 20- 1,30m<br />
White Umbrella<br />
10 06 11 - 0,85m<br />
10 06 15 - 1,05m<br />
10 07 19 - 1,30m<br />
Head Adapter<br />
127mm - 10 06 30<br />
144mm - 10 06 33<br />
5´Giant Reflector 10 03 11, 7´Giant Reflector 10 03 12, 8´ Giant Reflector 10 03 13<br />
Diffusors available (-1/3 and 1 f-stop)<br />
Softbox 1x3´RF<br />
(30x90cm)<br />
25 45 36<br />
Softbox 1x4´RF<br />
(30x120cm)<br />
25 45 24<br />
Softbox 1x6´RF<br />
(30x180cm)<br />
25 45 34<br />
Softbox 2x2´RF<br />
(60x60cm)<br />
25 45 25<br />
Softbox 2x3´RF<br />
(60x90cm)<br />
25 45 26<br />
Softbox 3x4´RF<br />
(90x120cm)<br />
25 45 27<br />
Softbox 4x6´RF<br />
(120x180cm)<br />
25 45 35<br />
Softbox 3´Octa<br />
(90cm)<br />
25 45 28<br />
Softbox 5´Octa<br />
(150cm)<br />
25 45 29<br />
Softbox Adapter<br />
10 06 60<br />
Translucent Umbrella<br />
10 06 13 - 0,85m<br />
10 06 14 - 1,05m
<strong>D4</strong> <strong><strong>Pro</strong>foto</strong> <strong>D4</strong> – Light Shaping<br />
<strong><strong>Pro</strong>foto</strong> <strong>D4</strong> – Nomenclature<br />
<strong>D4</strong><br />
Nomenclature<br />
(see fold out)<br />
Systematically Shape<br />
with Light<br />
Modular light shaping tools are the heart of the <strong><strong>Pro</strong>foto</strong> design. They allow you to reveal<br />
your individual style with unparalleled quality of light and maximum control with minimum<br />
set up time. You can systematically work with dozens of tools and accessories<br />
to create the look you want.<br />
1: Mains Connection<br />
2: Indicator for Mains (AC) Connection<br />
3: On/Standby Button<br />
4: Sync Sockets<br />
5: Photo/IR-Cell<br />
6: Photo/IR-Cell On/Off Button<br />
7: Auxiliary Functions Button<br />
8: Auxiliary Functions Display<br />
9: Lamp Head Sockets<br />
10: Power Displays<br />
11: Ws/f-stop Switch and Recall/Save Button<br />
12: Flash and Modelling Light On/Off Buttons<br />
13: Power Dials<br />
14: Master Button<br />
15: USB Port<br />
16: Ready Mode Indicators<br />
17: Ready Mode Button<br />
18: Ready Lamp & Test Button<br />
19: Modelling Light Button<br />
20: Modelling Light Indicators<br />
21: Normal/Fast Recycle Switch<br />
The impressive range of <strong><strong>Pro</strong>foto</strong> light shaping tools include a system of reflectors, spotlights,<br />
softboxes and umbrellas, but it doesn’t stop there. Highly specialised accessories like the<br />
<strong>Pro</strong>Box, <strong>Pro</strong>Globe, Hardbox and <strong><strong>Pro</strong>foto</strong> 5’, 7’ and 8’ giant reflectors offer unique lighting<br />
solutions for any shooting situation. Each tool offers a specific character of light to create<br />
highlights and shadows in almost limitless combinations, a broad palette that is easy to<br />
work with – for the lighting artist in you.<br />
<strong><strong>Pro</strong>foto</strong> 16 The Light Shaping Company The Light Shaping Company 17 <strong><strong>Pro</strong>foto</strong>
<strong>D4</strong> <strong><strong>Pro</strong>foto</strong> <strong>D4</strong> – Brief Instructions<br />
<strong><strong>Pro</strong>foto</strong> <strong>D4</strong> – Brief Instructions<br />
<strong>D4</strong><br />
. Connect<br />
. Connect .<br />
Press<br />
If .<br />
Choose<br />
Activate Connect<br />
Activate<br />
.<br />
Choose<br />
Choose<br />
Quick Guide<br />
the generator to the mains supply with the enclosed power cable [1].<br />
The Indicator for Mains Connection [2] should now light up indicating correct<br />
AC current to the generator.<br />
the desired lamp heads to the sockets A, B, C, D [9] – always start with A,<br />
next B etc. The <strong>D4</strong> is a default set to be compatible with the Acute series of heads<br />
(Acu) To change the <strong>D4</strong> to be compatible with the <strong>Pro</strong> series of heads (<strong>Pro</strong>) please<br />
follow instructions on page 19-20,<br />
the On/Standby Button [3].<br />
necessary activate the lamp socket(s) by pressing corresponding Flash and<br />
Modelling Light Button(s) [12] until the Power Display(s) [10] are activated.<br />
The white Ready Lamp [18] will light up when the generator is charged.<br />
energy distribution by using the Power Dial(s) [13] corresponding to the<br />
head(s) used.<br />
the modelling light(s) by quickly pressing the Flash and Modelling Light<br />
On/Off Button(s) [12] until it is lit. Choose the modelling light mode by holding down<br />
the Modelling Light Button [19] until it reaches the desired function [20].<br />
sync cord and/or flash meter to the Sync Sockets [4].<br />
the Photo/IR-Cell [5] by pressing the Photo/IR-Cell On/Off Button [6].<br />
the ready signal mode by pressing the Ready Mode Button [17] until the<br />
desired function is indicated [16].<br />
fast recharging by pressing the Normal/Fast Recycle Switch [21].<br />
Take pictures!<br />
Mains (AC) Connection<br />
Plug the included heavy-duty power cable into the generator’s Mains Connection [1].<br />
The <strong>D4</strong> can be used at all common mains voltages 90-240V/50-60 Hz, dedicated power<br />
cables for all countries are available. The generator automatically senses which voltage<br />
range is supplied. The Indicator for Mains Connection [2] is lit if the generator is receiving<br />
acceptable power from the mains, even in the standby mode. If not check the mains<br />
fuse and/or used power extension for faults. On top, a green dot in the right corner of the<br />
Auxiliary Functions Display [8] flashes to indicate that the generator is on standby.<br />
PLEASE NOTE! For proper function when powered by a petrol-electric generator<br />
see page 31!<br />
WARNING: Never use simple, thin household extension leads to elongate the<br />
power cable. Always unwind all cable if an extension cable is used.<br />
Self Test<br />
After connecting a <strong>D4</strong> to the mains, the generator starts automatically with a self test:<br />
During this time the AUX Functions Display [8] shows for three seconds “U344” if a US<br />
radio slave module, “E433” if a CE radio slave module or “no r” if no radio slave module<br />
is installed. Then the default head configuration= Acu or <strong>Pro</strong> is displayed. If the generator was<br />
deactivated by pressing the On/Standby Button [3] before disconnection, the self test will<br />
start without active display after reactivating the <strong>D4</strong> generator. During the self test<br />
(approximately 3s.) the generator does not react on any settings and it is not possible to<br />
release a flash.<br />
Connection Lamp Heads<br />
ATTENTION! Before connecting flash heads to the <strong>D4</strong> at 200-240V please make<br />
sure to configure your <strong>D4</strong> to be compatible with Acute/<strong>D4</strong>Head or <strong>Pro</strong>Head.<br />
The <strong>D4</strong> is made in such a way that you can decide, via the internal software, if you want<br />
the <strong>D4</strong> generator to be compatible with the <strong>Pro</strong>-7 series of heads or the Acute series of<br />
heads without the need to change modelling lamps.<br />
If you make the <strong>D4</strong> compatible with the <strong>Pro</strong>-7 series of heads there is no need to change<br />
the modelling lamp on the <strong>Pro</strong>-7 series of heads and you can then use it worldwide on any<br />
power supply voltage! (But if you then use an Acute series Head you must use a 120V<br />
lamp or a 100V lamp in Japan.)<br />
If you make the <strong>D4</strong> compatible with the Acute series of heads there is no need to change<br />
the modelling lamp on the Acute series of heads. (But if you then use a <strong>Pro</strong>-7 series Head<br />
you must use a lamp corresponding to the power supply voltage!)<br />
<strong><strong>Pro</strong>foto</strong> 18 The Light Shaping Company The Light Shaping Company 19 <strong><strong>Pro</strong>foto</strong>
<strong>D4</strong> <strong><strong>Pro</strong>foto</strong> <strong>D4</strong> – Brief Instructions<br />
For the above reasons we do not recommend mixing the use of Acute and <strong>Pro</strong>Heads,<br />
especially on 230V markets, if you have a mixture of <strong>Pro</strong>-7, Acute and <strong>D4</strong> generators.<br />
The <strong>D4</strong> is as default set to be compatible with Acute heads (Acu). If you wish to change<br />
the default setting please follow the procedure below:<br />
1 . With the generator activated, disconnect the mains cable and any heads connected.<br />
2 . Press and hold down the 3 centre buttons shown in the image below.<br />
3 . Connect the power cable.<br />
4 . Wait for the Aux function display (In the right hand corner) to display <strong>Pro</strong>. (It will<br />
first display which radiomodule (optional) is installed, then the default head<br />
configuration =Acu, then it will change to <strong>Pro</strong>) After “<strong>Pro</strong>” is displayed, 3 short<br />
beeps confirm the new setting.<br />
5 . Release the 3 buttons and the generator is now configured for <strong>Pro</strong>-7 series heads.<br />
If you need to check which default setting the <strong>D4</strong> has, unplug the <strong>D4</strong> generator when activated<br />
(power on) then re-plug it and check the Aux function display which will show for<br />
2 seconds Acu (If configured for Acute heads) or <strong>Pro</strong> (If configured for <strong>Pro</strong>Heads).<br />
WARNING: At 100-120V power supply there is a risk of overheating if old <strong>Pro</strong>-3,<br />
<strong>Pro</strong>-5, <strong>Pro</strong>-6, PF, PB or <strong>Pro</strong>-7 heads is used even if the generator is set to “<strong>Pro</strong>”<br />
configuration, because the fans will only run at a slower than desirable speed.<br />
How to connect heads<br />
One, two, three or four lamp heads can be connected to the sockets marked A, B, C<br />
and D [9]. When connecting the lamp head plug, align the white dots on the plug with<br />
the white dot on the generator panel. Secure by turning the locking ring on the plug<br />
clockwise. If the generator is connected to the mains, and turned on a green dot in the<br />
right corner of the Power Display(s) [10] will indicate that the head is connected properly.<br />
With <strong><strong>Pro</strong>foto</strong>’s special head connection it’s possible to plug and unplug heads safely even<br />
if the generator/outlet is activated.<br />
<strong><strong>Pro</strong>foto</strong> 20 The Light Shaping Company
<strong><strong>Pro</strong>foto</strong> <strong>D4</strong> – Generators<br />
<strong>D4</strong><br />
Energy Distribution<br />
The <strong><strong>Pro</strong>foto</strong> <strong>D4</strong> generators offer a very flexible, fully asymmetric energy distribution to<br />
all four outlets. This means using one <strong>D4</strong> generator is like four separate generators, without<br />
the need to plug or un-plug lamp heads for power changes. The 8 f-stop power range in full<br />
or 1/10 f-stops allows precise light adjustments, the use of high speed films and even the use<br />
of large aperture techniques. All settings can be done directly and every adjustment is displayed<br />
immediately. It is possible to activate and deactivate each head separately by the<br />
push of a button.<br />
One head<br />
When only one lamp head is in use, choose the A or B socket [9]. These sockets can be used<br />
to release the generator’s total energy to one lamp head. With one head used at socket C<br />
you can get 50% and with one head used at socket D you can get 25% of the max. power.<br />
The total power range on outlets A or B with one head is 8 f-stops.Turn on the generator by<br />
pressing the On/Standby Button [3]. To turn on the chosen Lamp Head Socket [9], press<br />
the corresponding Flash and Modelling Light Button [12] and the Power Display [10] is<br />
activated. Use the corresponding Power Dial [13] to adjust power in 1/10 f-stops.<br />
By pressing down the dial while rotating, full f-stop adjustments are achieved. The dials<br />
can be turned in both directions without limitations. It is not necessary to dump the energy<br />
after any power adjustment; the Ready Lamp [18] will light up when 100% of the desired<br />
power is reached. Change the display from Ws to relative f-stops and vice versa by pressing<br />
the Ws/f-stop Switch [11].<br />
Two or more heads<br />
Connect the heads to the Lamp Head Sockets [9], starting with A, next B etc., press the<br />
On/Standby Button [3] and turn on the heads needed by pushing the corresponding<br />
Flash and Modelling Light Buttons [12] to activate the outlet and Power Display [10].<br />
A small dot in the right corner of the Power Display(s) [10] indicates, that a non-activated<br />
head is connected properly. Non-used outlets are automatically deactivated. The <strong>D4</strong> will<br />
always start working with the last power distribution used before the generator was<br />
deactivated respectively disconnected from the mains. Turn the Power Dial(s) [13] of the<br />
head(s) used to adjust energy in 1/10 f-stops. By pressing down the dials while rotating,<br />
full f-stop adjustments are achieved. The display stops and a double beep is audible when<br />
the max. power of the corresponding socket is achieved. It is not necessary to dump the<br />
energy; the Ready Lamp [18] will light up when the desired energy is reached. Change the<br />
display from Ws to relative f-stops and vice versa by pressing the Ws/f-stop Switch [11].<br />
To adjust the power of ALL heads used proportionally, hold down the Master Button [14]<br />
and rotate any of the active head(s) Power Dial(s) [13] until the desired power level<br />
is reached.<br />
The Light Shaping Company 23 <strong><strong>Pro</strong>foto</strong>
<strong>D4</strong> <strong><strong>Pro</strong>foto</strong> <strong>D4</strong> – Generators<br />
<strong><strong>Pro</strong>foto</strong> <strong>D4</strong> – Generators<br />
<strong>D4</strong><br />
Turn off individual heads by holding down the Flash and Modelling Light Button [12] at the<br />
regarding outlet until the Power Display [10] goes off.<br />
PLEASE NOTE! Of course it is NOT possible, to get more than 100% power from<br />
one generator, i.e. 1600Ws at socket A and 900Ws on socket B or 700Ws at all<br />
sockets with a 2400Ws pack. If a chosen energy distribution is technically<br />
impossible, one or more Power Display(s) [10] will alternate between the chosen<br />
and the possible power level for two seconds to inform the <strong>user</strong>. It is necessary<br />
to decrease the energy of these socket(s) by using the corresponding Power<br />
Dial(s) [13] before you can increase the energy at another socket. If you don’t<br />
reduce the energy of the socket(s) with the alternating display, the generator<br />
automatically returns to the former setting.<br />
IMPORTANT! Because of the fact that the <strong>D4</strong> works with separate capacitor<br />
banks for best colour and f-stop stability, at some settings about 1/10 f-stop of<br />
the total flash energy may not be available when using two or more heads.<br />
Modelling Light<br />
With four different modelling light modes it is possible to adjust a <strong>D4</strong> generator to a <strong>user</strong>s<br />
preferences and get maximum control of the light setting. The maximum proportional<br />
function is ideal to check delicate set-ups even at lowest flash power.<br />
It is possible to activate the modelling light of each lamp head connected separately at the<br />
generator by a short push on the Flash and Modelling Light Button(s) [12] until it lights up.<br />
CAUTION! Don’t hold down this button accidentally: In this case the Power Display [10]<br />
goes off and the whole socket is completely deactivated. Check if the modelling<br />
light switch at the back of the head is at the “On” position if a head doesn’t react.<br />
The <strong>D4</strong> has a soft start function of the modelling light that extends the lifetime of the<br />
halogen lamps. This is why the modelling light starts with a slight delay. To turn off the<br />
modelling light of a single head, push again the Flash and Modelling Light Button [12] of<br />
the corresponding socket. To turn off the modelling light of all heads used, it is also possible<br />
to push the Modelling Light Button [19] – the modelling light goes off and the Modelling<br />
Light Indicators [20] and the Flash and Modelling Light Button(s) [12] are dark.<br />
To change the modelling light mode, hold down the Modelling Light Button [19] until the<br />
desired function is indicated:<br />
1. MAX – Maximum modelling light<br />
The modelling light is at full power regardless of the flash output settings.<br />
2. PROP – <strong>Pro</strong>portional modelling light<br />
The modelling light dims or brightens proportionally to the flash output settings.<br />
3. MAX & PROP – Maximum proportional modelling light<br />
The head receiving the most flash power will automatically work at max. modelling<br />
light, subsequent heads will show the output ratio proportional to it.<br />
4. 1/2 PROP – Half power proportional<br />
The modelling light works at half max. power and dims or brightens proportional to<br />
the flash output settings. (This is useful when mixing 1200Ws and 2400Ws generators<br />
on a set; in this case the 1200Ws pack(s) should be used at 1/2 PROP. Or if a <strong>D4</strong> with<br />
4x 500W modelling light is used at a weak fuse/petrol- electric generator.)<br />
After 4. the functions return to 1.<br />
Connecting Camera and Flash Meter<br />
The two Sync Sockets [4] allow the camera and flash meter to be connected simultaneously.<br />
The 5 meter sync cord can, without restrictions be lengthened with a sync extension cable.<br />
Generators can be connected by means of the <strong><strong>Pro</strong>foto</strong> sync interconnection cord, so called<br />
“hard wiring”.<br />
Recharging<br />
The recharging starts after the On/Standby Button [3] is pushed and the connected heads<br />
are activated with the Flash and Modelling Light On/Off Button(s) [12]. Normal or<br />
fast recharge can be chosen by pushing the Normal/Fast Recycle Switch [21]. If the<br />
Normal/Fast Recycle Switch [21] isn’t lit, the generator will recharge at the slower,<br />
“normal” rate. Choose this alternative (and in total max. 1000W modelling light), when<br />
the generator is connected to a mains supply with weak fuses, or if you are uncertain as to<br />
how well the mains supply is fused. If the Normal/Fast Recycle Switch [21] is illuminated,<br />
fast recharging is obtained. This is sufficient for dynamic photography like people and<br />
sports. See “Technical Data” (page 33) for details about the power consumption.<br />
Ready/Charging Signals<br />
Five individual modes offer full information about the actual status of a <strong>D4</strong> generator.<br />
This gives the photographer immediate feedback at all shooting situations.<br />
To turn off all ready and charging signals, push once the Ready Mode Button [17] – the<br />
Ready Signal Indicators [20] are off and just the Ready Lamp [18] is lit when the generator<br />
<strong><strong>Pro</strong>foto</strong> 24 The Light Shaping Company The Light Shaping Company 25 <strong><strong>Pro</strong>foto</strong>
<strong>D4</strong> <strong><strong>Pro</strong>foto</strong> <strong>D4</strong> – Generators<br />
<strong><strong>Pro</strong>foto</strong> <strong>D4</strong> – Generators<br />
<strong>D4</strong><br />
is 100% charged to the chosen power level.To change the ready signal mode, hold down or<br />
push repeatedly the Ready Signal Button [17] until the desired function is visible at the<br />
Ready Signal Indicators [16]:<br />
set the interval time now visible in the Power Display [10] from 0.1-60s. by turning the<br />
Power Dial [13] for outlet A. If you press down the dial while rotating, the interval time<br />
changes in bigger steps.<br />
1. BEEP – a short acoustic signal indicates that the generator is fully charged.<br />
2. BUZZ – an intermitting signal is audible while the generator is charging.<br />
3. BEEP & DIM – the modelling light is dimmed while charging and a short acoustic signal<br />
indicates that the generator is fully charged.<br />
4. BUZZ & DIM – an intermitting signal is audible and the modelling light is dimmed<br />
while charging.<br />
5. DIM – the modelling light is dimmed while charging.<br />
After 5. the functions return to 1.<br />
PLEASE NOTE! To guard against wrong exposures, it is not possible to release a<br />
flash while the generator is charging. If you try, a long beep will indicate that no<br />
flash was released.<br />
Photo/IR-Cell<br />
If the Photo/IR-Cell On/Off Button [6] lights up, the built-in Photocell [5] will sense other<br />
flashes as well as IR-signals from most IR-transmitters. Activate or deactivate the photocell<br />
by pushing the Photo/IR-Cell On/Off Button [6].<br />
Auxiliary Functions<br />
The <strong>D4</strong> series offers advanced functions like “Interval” for stroboscopic effects, “Sequence”<br />
for multi exposures or multi pops to increase the flash output, and “Delay” to create wipe<br />
effects or for pictures of fast moving objects made with an electronic release system.<br />
By pressing and holding down the Auxiliary Functions Button [7] you enter the auxiliary<br />
mode and the Power Displays [10] will show the following functions:<br />
A– “I” for Interval<br />
Activate this function by pushing the corresponding Flash and Modelling Light Button [12] and<br />
PLEASE NOTE! The interval function can be activated only if you also use the<br />
sequence function. If the generator can’t deliver the desired interval because of<br />
a longer recharging time, it will release the flashes as fast as possible and an<br />
long beep will indicate the improper use.<br />
B – “S” for Sequence<br />
Activate this function by pushing the corresponding Flash and Modelling Light Button [12]<br />
and set the sequence now visible in the Power Display [10] from 2-60 flashes by turning<br />
the Power Dial [13] for outlet B. If you press down the dial while rotating, the sequence<br />
changes in bigger steps.<br />
C – “d” for Delay<br />
Activate this function by pushing the corresponding Flash and Modelling Light Button [12]<br />
and set the delay time now visible in the Power Display [10] from 0.01-60s. by turning the<br />
Power Dial [13] for outlet C. If you press down the dial while rotating, the delay time<br />
changes in bigger steps.<br />
PLEASE NOTE! Always check the optimal delay time by taking test exposures:<br />
All cameras have a different release delay and the effect depends on the speed<br />
and moving direction of the subject. The following list is a rough basis for your<br />
own tests to create wipe effects:<br />
Wipe effect (Rear Curtain) Sync Time Decimal Equivalent Recommended Delay<br />
1/1 1 second 0.98 seconds<br />
1/2 0.5 seconds 0.49 seconds<br />
1/4 0.25 seconds 0.24 seconds<br />
1/8 0.125 seconds 0.12 seconds<br />
1/15 0.0667 seconds 0.06 seconds<br />
1/30 0.0333 seconds 0.03 seconds<br />
1/60 0.0167 seconds 0.01 seconds<br />
D – “r” for Radio<br />
If the <strong>D4</strong> is equipped with a radio slave receiver, you can activate this function by pushing<br />
the corresponding Flash and Modelling Light Button [12] and set the channel now visible in<br />
<strong><strong>Pro</strong>foto</strong> 26 The Light Shaping Company The Light Shaping Company 27 <strong><strong>Pro</strong>foto</strong>
<strong>D4</strong> <strong><strong>Pro</strong>foto</strong> <strong>D4</strong> – Generators<br />
<strong><strong>Pro</strong>foto</strong> <strong>D4</strong> – Generators<br />
<strong>D4</strong><br />
the Power Display [10] from 1-32 by turning the Power Dial [13] for outlet D. At channels<br />
16-32 it’s also possible to change the sub channels (“quads”) from “A”, “b”, “C” to “d”<br />
by pressing down the dial while rotating.<br />
How to activate or deactivate Auxiliary<br />
functions<br />
Release the Auxiliary Functions Button [7] after setting the function(s). The Auxiliary<br />
Functions Display[8] will now show the chosen function and the generator works with this<br />
settings. If more than one auxiliary function is activated, the display shows intermittently<br />
all functions.<br />
To turn off any of the auxiliary functions, simply hold down the Auxiliary Functions Button<br />
[7] and push the Flash and Modelling Light Button(s) [12] at the corresponding outlet(s) –<br />
an “Off” in the display indicates that the regarding function is deactivated. If no auxiliary<br />
function is activated, the Auxiliary Functions Display [8] will indicate “- -”.<br />
Memory Function<br />
It is possible to save up to three combined power and auxiliary function settings in the <strong>D4</strong>’s<br />
memory. This makes it easier to repeat even the most complex set-ups. With the “<strong><strong>Pro</strong>foto</strong><br />
Studio” software you can save an almost unlimited number of set-ups (see page 35-40).<br />
PLEASE NOTE! When deactivating the <strong>D4</strong> with the On/Standby Button [3],<br />
the generator automatically saves the last power (of all outlets) and auxiliary<br />
settings in memory A. The A position is used as “safety memory” and can’t be<br />
programmed individually. After reactivating the <strong>D4</strong> by pushing the On/Standby<br />
Button [3], the generator automatically starts with these settings. To prevent<br />
mistakes, all auxiliary functions (except the radio channel) stored in this memory<br />
are deactivated if the generator was disconnected from the mains. If you want<br />
to use them, it is necessary to activate them again (see page 26).<br />
Additionally it is possible to store three complete setups in memory B, C and D permanently.<br />
How to save:<br />
1. After setting the generator press and hold down the Ws/f-stop Switch and Memory<br />
Button [11], the Ready Lamp [18] goes off and a double beep signal confirms that<br />
you entered the memory mode.<br />
2. While still holding down the Ws/f-stop Switch and Memory Button [11], you choose<br />
the memory position by pressing and holding down one Flash and Modelling Light<br />
On/Off Button [12] at outlet B, C or D.<br />
3. Now you release the Ws/f-stop Switch and Memory Button [11] first, a beep confirms<br />
the setting and you can also release the Flash and Modelling Light On/Off Button [12] –<br />
the Ready Lamp [18] is lit again.<br />
How to recall:<br />
1. Press and hold down the Ws/f-stop Switch and Memory Button [11]. The Ready<br />
Lamp [18] goes off and a double beep signal confirms that you have entered the<br />
memory mode.<br />
2. Quickly press the Flash and Modelling Light On/Off Button [12] of the desired memory<br />
once. It is possible to check the content of the three memories by pushing the different<br />
Flash and Modelling Light On/Off Buttons [12] at outlets B, C and D.<br />
3. Release the Ws/f-stop Switch and Memory Button [11] a beep signal and the activated<br />
Ready Lamp [18] confirm the setting and the generator uses the functions stored in<br />
the selected memory.<br />
<strong><strong>Pro</strong>foto</strong> 28 The Light Shaping Company The Light Shaping Company 29 <strong><strong>Pro</strong>foto</strong>
<strong>D4</strong> <strong><strong>Pro</strong>foto</strong> <strong>D4</strong> – Generators<br />
<strong><strong>Pro</strong>foto</strong> <strong>D4</strong> – Generators<br />
<strong>D4</strong><br />
Automatic Safety Functions<br />
<strong>D4</strong> generators are equipped with an effective cooling and safety system. The integrated fan<br />
starts when working in hot surroundings or continuously at higher power levels; the speed of<br />
the fan increases automatically if necessary. If the generator overheats because of external<br />
reasons, a protective system will automatically start up. The generator’s recharging<br />
intervals will slow down and eventually the recharging will stop completely. After a while,<br />
when the temperature has decreased sufficiently, the generator will start recharging at a<br />
normal pace. This automatic protection will only start up under extreme conditions such as<br />
when the air vents are blocked.<br />
If a defective flash head – for example with a broken or misfiring flash tube – is used, after<br />
releasing the flash a long beep signal and “- - - -” in the corresponding Power Display [10]<br />
will indicate a malfunction/underexposure.<br />
PLEASE NOTE: The air vents of the generator must never be blocked or covered<br />
in any way. Never store your flash equipment in a car on a hot and sunny day.<br />
Never use a <strong>D4</strong> generator that is placed inside a case or transport box. Avoid<br />
storing the generator close or below the freezing point, which can lead to loss<br />
of capacity (flash output) and risk of condensation when used in a warmer<br />
surrounding immediately. Do not expose any flash equipment to wet or humid<br />
environments or extreme electro-magnetic fields.<br />
Computer Connection<br />
From one to 127 <strong>D4</strong> generators can be connected to one computer using USB cables and<br />
HUB’s.The generator has a USB 1 socket [15]. <strong><strong>Pro</strong>foto</strong> offers an assortment<br />
of recommended USB cables for best results. Other USB cables can be used – but in this case<br />
<strong><strong>Pro</strong>foto</strong> can’t guarantee correct functionality. See pages 35-40 for detailed information<br />
how to install and use the “<strong><strong>Pro</strong>foto</strong> Studio” software.<br />
Additional Information<br />
Colour Temperature<br />
The <strong>D4</strong>’s colour temperature is calibrated for daylight type films and, because of the<br />
“Hybrid Flash Technology”, remains perfectly constant and reliable from flash to flash and<br />
over the entire power range, regardless of the power output chosen with the Power Dials<br />
[13] and the number of flash heads used. This makes the <strong>D4</strong> generators perfectly suited for<br />
all kinds of critical assignments, even with high-resolution digital cameras and backs. In<br />
combination with all actual <strong><strong>Pro</strong>foto</strong> flash heads and light shaping tools the <strong>D4</strong> generators<br />
give neutral and extremely stable colour. Please note that other factors, like reflections from<br />
the surrounding and lenses with different colour characteristic, may also affect the colour of<br />
the picture.<br />
Combining flash tubes and/or glass covers with different coatings can make distinctive<br />
colour temperature adjustments if needed.<br />
f-stop Stability<br />
<strong><strong>Pro</strong>foto</strong>’s “Hybrid Flash Technology” offers constant power output from flash to flash; this<br />
ensures stable and repeatable results – essential when <strong>D4</strong>’s are used in combination with<br />
Multi Shot backs. In fact, the power stability of <strong>D4</strong> generators is better than the repeat<br />
accuracy of flash meters.<br />
Flash Duration<br />
The flash duration can be shortened by reducing the power output with the Power Dials [13].<br />
The shortest flash duration using a AcuteHead and a <strong>D4</strong> 1200 generator at lowest energy<br />
is1/7500 sec. To shorten the flash duration at a given setting, use an AcuteTwin head.<br />
In example: If you connect the two plugs of an AcuteTwin to the Lamp Head Sockets A<br />
and B [9] of a <strong>D4</strong> 1200 generator and use both outlets at 600Ws, the flash duration is just<br />
1/1600s. instead of 1/1000s. at max. power with one AcuteHead.<br />
Petrol-Electric Generators<br />
All petrol-electric generators can produce voltage peaks that may damage electronic devices.<br />
If you power a <strong>D4</strong> flash generator with a petrol-electric generator distributing 190-240V,<br />
you have to use one separate <strong><strong>Pro</strong>foto</strong> <strong>Pro</strong>Gas2 (protective device against dangerous high<br />
voltage) for each flash generator connected. To power one <strong>D4</strong> one 3000W petrol-electric<br />
generator is recommended, for two <strong>D4</strong>’s one 6000W petrol-electric generator etc.<br />
PLEASE NOTE! Voltage peaks of petrol-electric generators can also shorten<br />
the lifetime of the modelling lamps; we recommend using the modelling light in<br />
the 1/2 PROP mode.<br />
<strong><strong>Pro</strong>foto</strong> 30 The Light Shaping Company The Light Shaping Company 31 <strong><strong>Pro</strong>foto</strong>
<strong>D4</strong> <strong><strong>Pro</strong>foto</strong> <strong>D4</strong> – Warranty<br />
Warranty<br />
All <strong><strong>Pro</strong>foto</strong> generators and heads are individually tested before they leave the company<br />
and guaranteed for a period of two years with the exception of flash tubes, glass covers,<br />
modelling lamps and cables. <strong><strong>Pro</strong>foto</strong> is not responsible for technical malfunctions created<br />
by improper use or accessories made by other companies. If you have any technical<br />
problems please get in contact with an authorized <strong><strong>Pro</strong>foto</strong> <strong>D4</strong> service station.<br />
Technical Data<br />
<strong><strong>Pro</strong>foto</strong> <strong>D4</strong> – Technical Data<br />
<strong><strong>Pro</strong>foto</strong> <strong>D4</strong> 1200 <strong><strong>Pro</strong>foto</strong> <strong>D4</strong> 2400<br />
f-stop at 2m (ISO 100/21º)<br />
Magnum Reflector (50º): 90 128<br />
Standard Zoom Reflector: 45 64<br />
Umbrella, white with<br />
Standard Zoom Reflector: 22 32<br />
Power<br />
Power Range: 8 f-stops 8 f-stops<br />
(1/10 or 1/1 steps) (1/10 or 1/1 steps)<br />
Watt seconds: 9-1200 19-2400<br />
Distribution: 4 outlets, asymmetric (A: max. 100%, B: max. 100%,<br />
C: max. 50%, D: max. 25%)<br />
Max. modelling light: 4x 500W 4x 500W<br />
Max. power consumption (recommended fuse):<br />
Slow blow conventional Fuse: 20 A for all models. Electronic automatic circuit braker: min 20A for <strong>D4</strong> 1200<br />
and 2400 and min 30A for <strong>D4</strong> 4800Ws.<br />
100V/60Hz 20A (10A) 20A (10A)<br />
120V/60Hz 15A (7,5A) 15A (7,5A)<br />
200V/50Hz 10A (5A) 10A (5A)<br />
230V/50Hz 10A (5A) 10A (5A)<br />
Values in brackets are valid at “normal” charge and max. 1000W modelling light.<br />
Flash duration (t 0.5)<br />
2400Ws<br />
1/600s. (1/1000s.)<br />
1200Ws 1/1000s. (1/1600s.) 1/1000s. (1/1600s.)<br />
600Ws 1/1600s. (1/2700s.) 1/1600s. (1/2700s.)<br />
300Ws 1/2700s. (1/4500s.) 1/2700s. (1/4500s.)<br />
150Ws 1/4500s. (1/7500s.) 1/4500s.<br />
75Ws 1/7500s. 1/4500s.<br />
37,5Ws 1/7500s. 1/4500s<br />
18,75Ws 1/7500s. 1/4500s.<br />
9Ws<br />
1/7500s.<br />
Times in brackets are valid with Acute/<strong>D4</strong> twin.<br />
Flash recycling (Fast mode)<br />
100V/50Hz 0,07-1,40s. 0,09-2,60s.<br />
120V/60Hz 0.07-1.20s. 0.09-2.20s.<br />
200V/50Hz 0,07-1,40s. 0,09-2,60s.<br />
200V/60Hz 0,07-1,20s. 0,09-2,20s.<br />
230V/50Hz 0.07-1.20s. 0.09-2.20s.<br />
NOTE! Actual values can vary depending on voltage fluctuations and mains network impedance.<br />
Stability<br />
Voltage: +/-0,4% +/-0,4%<br />
Power: better than +/-0,8% better than +/-0,8%<br />
(equivalent to 1/100 f-stop)<br />
(equivalent to 1/100 f-stop)<br />
Colour temperature<br />
(total power range): better than +/-150ºK better than +/-150ºK<br />
Measurements (incl. handles): 29x28x20cm 32x28x20cm<br />
Weight: 10kg 11,5kg<br />
<strong>D4</strong><br />
<strong><strong>Pro</strong>foto</strong> 32 The Light Shaping Company The Light Shaping Company 33 <strong><strong>Pro</strong>foto</strong>
<strong>D4</strong> <strong><strong>Pro</strong>foto</strong> <strong>D4</strong> – Digital Wireless Freedom<br />
<strong><strong>Pro</strong>foto</strong> <strong>D4</strong> – <strong><strong>Pro</strong>foto</strong> Studio Software<br />
<strong>D4</strong><br />
Digital Wireless Freedom (Radio Slave)<br />
<strong><strong>Pro</strong>foto</strong> <strong>D4</strong> generators are available as <strong>D4</strong>R version with an integrated PocketWizard<br />
32 channel/4 sub channel radio receiver for wireless synchronization from a distance up<br />
to 100m via digital encoded radio signals. This receiver is compatible with dedicated<br />
Sekonic ® flashmeters and PocketWizard ® transmitters and transceivers.<br />
The PocketWizard Plus transmitter (4 channels) for wireless synchronization is available<br />
through <strong><strong>Pro</strong>foto</strong>.<br />
Digital Wireless Freedom offers:<br />
.Studio or on-location shoots without unreliable and disturbing PC cords.<br />
.A light meter that wirelessly triggers all or only selected electronic<br />
flash units and measures the light simultaneously, can even trigger<br />
a camera.<br />
.A handy solution for triggering cameras, flash units or both<br />
simultaneously from behind a camera or from a remote location.<br />
.All this wireless technology built into your photo equipment,<br />
ready for you to control remotely.<br />
Visit www.pocketwizard.com for further information.<br />
PLEASE NOTE!The DWF system is available in two<br />
different versions:<br />
I. 344MHz (USA)<br />
II. 433MHz (Europe)<br />
If you are in any doubt about the frequency allowed<br />
in your country, please get in contact with the local<br />
<strong><strong>Pro</strong>foto</strong> distributor BEFORE you activate the radio<br />
slave transmitter. It is strictly forbidden by law to<br />
use these frequencies in other countries and it is<br />
impossible to use both versions in combination.<br />
To check the frequency of the integrated radio module,<br />
unplug the <strong>D4</strong> generator when activated, than<br />
re-plug it: For three seconds you can see the frequency<br />
in the Auxiliary Functions Display [8].<br />
If no receiver module is integrated, the display<br />
shows “no r”.<br />
<strong><strong>Pro</strong>foto</strong> Studio Software<br />
Each <strong><strong>Pro</strong>foto</strong> <strong>D4</strong> generator is prepared for the “<strong><strong>Pro</strong>foto</strong> Studio” software. This software<br />
makes it easy to adjust all functions remotely and allows the direct and uncomplicated<br />
control of big set-ups using a huge number of <strong>D4</strong> generators. The unique “Group” function<br />
can be used to form and control different groups of <strong>D4</strong>’s, i.e. used for the background or to<br />
power a big light bank, like seperate generators. It is possible to store an almost unlimited<br />
number of set-ups in the computer memory, which allows the photographer to quickly<br />
repeat even the most complex set-ups.<br />
The structure of the “<strong><strong>Pro</strong>foto</strong> Studio” software closely emulates the top panel of the generator<br />
and is very easy to use. Nevertheless we recommend some practice before you start to<br />
seriously use this software in the studio.<br />
System Requirements<br />
The “<strong><strong>Pro</strong>foto</strong> Studio” software runs on all Macintosh computers under Mac OS X. The<br />
USB 1 connection to the <strong>D4</strong> generators is also USB 2 compatible. It is possible to control up<br />
to 127 <strong>D4</strong> generators via one computer.<br />
Installation<br />
1. Insert the CD with the “<strong><strong>Pro</strong>foto</strong> Studio” software into your computer’s CD drive.<br />
2. Double click the CD symbol with the <strong><strong>Pro</strong>foto</strong> logo.<br />
3. Save the two .pkg files on the CD to the hard drive.<br />
4. Double click the file “FTDIUSBSerialDriver.pkg” to install the driver. You’ll need<br />
the password of the owner account to install it!<br />
5. Restart the computer.<br />
6. Double click the file “<strong><strong>Pro</strong>foto</strong> Studio.pkg” to install the application. You’ll need<br />
the password of the owner account to install it!<br />
Please Note! The application will be placed in the “Applications folder”. If not<br />
relocated at installation, in the “<strong><strong>Pro</strong>foto</strong> Studio” folder.<br />
7. The two .pkg files can now be trashed, since they are not needed anymore (optional).<br />
8. Restart the computer.<br />
9. After the restart has finished, connect the <strong><strong>Pro</strong>foto</strong> <strong>D4</strong> generator(s) to the Mac<br />
via USB cable(s).<br />
10. Start the “<strong><strong>Pro</strong>foto</strong> Studio” software by double clicking the “<strong><strong>Pro</strong>foto</strong> Studio” icon<br />
located in the “<strong><strong>Pro</strong>foto</strong> Studio” folder under “Applications”.<br />
<strong><strong>Pro</strong>foto</strong> 34 The Light Shaping Company The Light Shaping Company 35 <strong><strong>Pro</strong>foto</strong>
<strong>D4</strong> <strong><strong>Pro</strong>foto</strong> <strong>D4</strong> – <strong><strong>Pro</strong>foto</strong> Studio Software<br />
<strong><strong>Pro</strong>foto</strong> <strong>D4</strong> – <strong><strong>Pro</strong>foto</strong> Studio Software<br />
<strong>D4</strong><br />
Individual Control<br />
1. Click the INDIVIDUAL tab to get access to the control functions of a single generator.<br />
Each <strong>D4</strong> generator connected is listed with a separate tab.<br />
2. Click on the tab of the generator you want to control. The generators are listed with their<br />
identity number; but it is possible to give each generator an individual description in the<br />
field NAME, and save the new description by pressing the return/enter key of the computer.<br />
3. Click the FLASH POWER tab to get access to the power, modelling light, ready signals<br />
and recycling mode controls of the corresponding generator. Each lamp head<br />
connected can be controlled separately via the A, B, C and D fields. The ON sign in<br />
the control fields without a lamp head connected remains grey, the ones with a<br />
connected lamp head show a black ON sign.<br />
4. Adjust the power level of each lamp head in 1/1 or 1/10 f-stops by clicking the<br />
corresponding + and – buttons. Additionally the power of each lamp head is shown in<br />
Ws. If the desired power distribution is impossible, you have to reduce the power of<br />
another head. You will hear a warning signal and the energy level necessary is displayed<br />
in red letters for about 5 seconds above the corresponding control field. If you don’t<br />
re-adjust the generator, it will work with the previous settings. See page 23-24 for<br />
details about the energy distribution. In the upper part of the power control field you<br />
can select a name or add an individual description for the respective head, and save<br />
the new description by pressing the return/enter key of the computer. If you want to<br />
adjust the power level of all heads connected to this generator, use the + and – buttons<br />
in the field MASTER.<br />
5. To use the auxiliary functions and/or set the radio slave channel, click the AUXILIARY<br />
tab. Now you can set all functions – see page 26-29 for details about the auxiliary<br />
functions.<br />
6. To save all settings of this generator, click the tap SAVE in the field STORE OPERATIONS.<br />
Now it is possible to recall this set-up by clicking the given name in the left field STORE<br />
first and the button RECALL in the field STORE OPERATIONS next, even if the genera<br />
tor was deactivated or disconnected. The number of saved set-ups is just limited by the<br />
computer memory available. It is also possible to check set-ups saved earlier – if you<br />
want to return to the previous settings, simply click UNDO in the STORE SELECTION<br />
field. If you want to delete a saved set-up, mark the name of this set-up in the field<br />
STORE and click DELETE in the field STORE SELECTION.<br />
Control all generators<br />
This function can be used to increase or decrease the power of the whole set-up for bracketing<br />
use, to adjust the output to another film speed or if you want to change the aperture.<br />
1. Click the ALL tab to get access to control the functions of all generators connected.<br />
Each <strong>D4</strong> generator connected is additionally listed with a separate tab.<br />
<strong><strong>Pro</strong>foto</strong> 36 The Light Shaping Company The Light Shaping Company 37 <strong><strong>Pro</strong>foto</strong>
<strong>D4</strong> <strong><strong>Pro</strong>foto</strong> <strong>D4</strong> – <strong><strong>Pro</strong>foto</strong> Studio Software<br />
<strong><strong>Pro</strong>foto</strong> <strong>D4</strong> – <strong><strong>Pro</strong>foto</strong> Studio Software<br />
<strong>D4</strong><br />
2. Click on the tab of a single generator if you want to change this settings. Click the<br />
FLASH POWER button to get access to the the power, modelling light, ready signals<br />
and recycling mode control of all generators. The total power will be adjusted proportionally<br />
to the settings done in the INDIVIDUAL mode. If one or more generator(s)<br />
reaches maximum or minimum power, it isn’t possible to increase or decrease the<br />
total power anymore. In this case it is necessary to adjust the power level of the<br />
corresponding generator. Settings done in the ALL mode have priority – in the case<br />
that one or more generators are set to different ready or modelling light modes, the<br />
corresponding buttons are unmarked. Click on the desired function to set all generators<br />
in the same mode.<br />
3. It is possible to change the power level in 1/1 or 1/10 f-stops by clicking the corresponding<br />
+ and – buttons. The power of the lamp head(s) with max. and min. are<br />
shown in relative f-stops and Ws. See page 23-24 for details about the energy distribution.<br />
In the upper part of the ALL control field you can enter a name for the set-up.<br />
4. To use the auxiliary functions and/or set the radio slave channel, click the AUXILIARY<br />
button. Now you can set all functions – see page 26-29 for details about the auxiliary<br />
functions.<br />
5. To save all settings, click the SAVE button in the field STORE OPERATIONS. Now it is<br />
possible to recall this set-up by clicking the given name in the left field STORE first<br />
and the RECALL button in the field STORE OPERATIONS next, even if the set-up was<br />
deactivated or disconnected. The number of saved set-ups is just limited by the<br />
computer memory available. It is also possible to check the different set-ups – if you<br />
want to return to the previous settings, simply click UNDO in the STORE SELECTION<br />
field. If you want to delete a saved set-up, mark the name of this set-up in the field<br />
STORE field and click DELETE in the field STORE SELECTION.<br />
If you click the TEST button and more than one <strong>D4</strong> generator is connected, each generator<br />
will flash immediately after each other. With this function it is possible to check that<br />
all generators work properly. PLEASE NOTE! Make sure that the photo cells of all<br />
generators are deactivated (”OFF” in the SLAVE field) if you want to check<br />
them separately!<br />
Form and control generator groups<br />
With this function is it possible to combine generators to form separate groups and to adjust<br />
groups like a single generator. This is very useful to control i.e. the whole main or background<br />
light or if more than one <strong>D4</strong> is used to power a huge light bank.<br />
1. Click the INDIVIDUAL tab to get access to the control functions of each single<br />
generator, see “Individual Control” at page 36-37 for details.<br />
2. Select the first generator you want to include and write a group name in the field<br />
GROUP and save the chosen name by pressing the return/enter key of the computer.<br />
The group name you created is now also available for all other generators connected<br />
and you can add more <strong>D4</strong> generators to this group by selecting this name in the<br />
GROUP field and clicking the SAVE button in the STORE OPERATIONS field.<br />
3. Click the GROUP tab and select the name of the group you want to form in the field<br />
GROUP: Now all generators with this group name are combined and are not available<br />
anymore under the INDIVIDUAL tab.<br />
4. To change the settings of a single generator in the corresponding group, click the tap<br />
with the generator’s name under the GROUP tab. To get access to the settings of the<br />
complete group, click the tab with the group’s name under the GROUP tab.<br />
See “Control all” at page 37 for details.<br />
5. If you want to delete the actual group, select the given name in the GROUP field and<br />
click DELETE GROUP.<br />
<strong><strong>Pro</strong>foto</strong> 38 The Light Shaping Company <strong><strong>Pro</strong>foto</strong> 39 The Light Shaping Company
<strong>D4</strong> <strong><strong>Pro</strong>foto</strong> <strong>D4</strong> – <strong><strong>Pro</strong>foto</strong> Studio Software<br />
6. To save all settings of a group, click the SAVE button in the STORE OPERATIONS field.<br />
Now it is possible to recall this set-up by clicking the corresponding name in the left<br />
STORE field first and the RECALL button in the STORE OPERATIONS field next, even if<br />
the generators were deactivated or disconnected. The number of saved set-ups is just<br />
limited by the computer memory available. It is also possible to check the different<br />
set-ups – if you want to return to the previous settings, simply click UNDO in the<br />
STORE SELECTION field. If you want to delete a saved group set-up, mark the name<br />
of this set-up in the field STORE field and click DELETE in the STORE SELECTION field.<br />
Smart max. proportional modelling light<br />
If you control the <strong>D4</strong> functions with the “<strong><strong>Pro</strong>foto</strong> Studio” software, it is possible to use an<br />
additional modelling light mode: If you activate SMART MAX PROP in the MODEL<br />
field, the lamp head(s) receiving the most flash power will automatically work with max.<br />
modelling light, and the heads with lower flash power with proportional modelling light.<br />
The modelling light is regulated from the software to deliver a real proportionality between<br />
all generators used. This makes light control much easier when working with more than one<br />
<strong>D4</strong> generator. Please take care that all lamp heads used are equipped with modelling lamps<br />
of same wattage to get the full advantages of this function.<br />
September 2003.<br />
<strong>Pro</strong>duct codes, descriptions and included components may vary from market to market around the world.<br />
Please consult your local dealer or distributor for specific information.<br />
Photos: Jan Fridlund. Pages 6-7, 14-15, 26 and 34: Gert Jansson/GP/<strong><strong>Pro</strong>foto</strong>. <strong>Pro</strong>duction: AB fjellis.com<br />
Order number: 33 40 39<br />
<strong><strong>Pro</strong>foto</strong> 40 The Light Shaping Company
<strong><strong>Pro</strong>foto</strong> AB<br />
Box 2023, SE 128 21 Skarpnäck, Sweden.<br />
Phone +46 (0)8-447 53 00, Fax +46 (0)8-447 53 20.<br />
Email info@profoto.se www.profoto.com<br />
<strong><strong>Pro</strong>foto</strong> 42 The Light Shaping Company