MAXQ Usb-to-Jtag Evaluation Kit Evaluates: Programming - Maxim
MAXQ Usb-to-Jtag Evaluation Kit Evaluates: Programming - Maxim
MAXQ Usb-to-Jtag Evaluation Kit Evaluates: Programming - Maxim

Create successful ePaper yourself
Turn your PDF publications into a flip-book with our unique Google optimized e-Paper software.
19-5185; Rev 1; 11/10<br />
<strong>MAXQ</strong> USB-<strong>to</strong>-JTAG <strong>Evaluation</strong> <strong>Kit</strong><br />
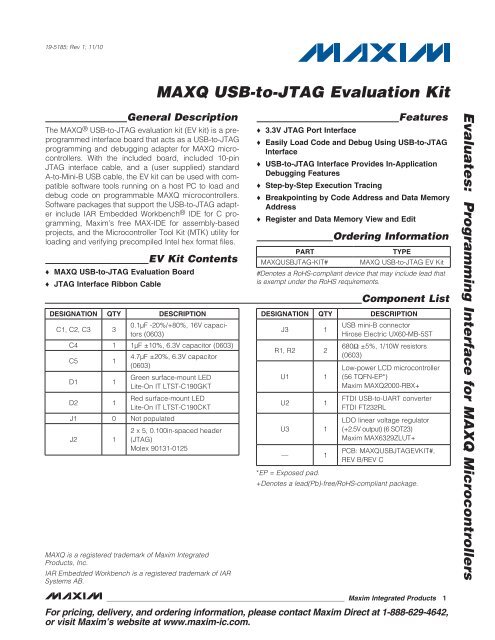
General Description<br />
The <strong>MAXQ</strong>M USB-<strong>to</strong>-JTAG evaluation kit (EV kit) is a preprogrammed<br />
interface board that acts as a USB-<strong>to</strong>-JTAG<br />
programming and debugging adapter for <strong>MAXQ</strong> microcontrollers.<br />
With the included board, included 10-pin<br />
JTAG interface cable, and a (user supplied) standard<br />
A-<strong>to</strong>-Mini-B USB cable, the EV kit can be used with compatible<br />
software <strong>to</strong>ols running on a host PC <strong>to</strong> load and<br />
debug code on programmable <strong>MAXQ</strong> microcontrollers.<br />
Software packages that support the USB-<strong>to</strong>-JTAG adapter<br />
include IAR Embedded WorkbenchM IDE for C programming,<br />
<strong>Maxim</strong>’s free MAX-IDE for assembly-based<br />
projects, and the Microcontroller Tool <strong>Kit</strong> (MTK) utility for<br />
loading and verifying precompiled Intel hex format files.<br />
EV <strong>Kit</strong> Contents<br />
S <strong>MAXQ</strong> USB-<strong>to</strong>-JTAG <strong>Evaluation</strong> Board<br />
S JTAG Interface Ribbon Cable<br />
DESIGNATION QTY DESCRIPTION<br />
C1, C2, C3 3<br />
0.1FF -20%/+80%, 16V capaci<strong>to</strong>rs<br />
(0603)<br />
C4 1 1FF Q10%, 6.3V capaci<strong>to</strong>r (0603)<br />
C5 1<br />
D1 1<br />
D2 1<br />
4.7FF Q20%, 6.3V capaci<strong>to</strong>r<br />
(0603)<br />
Green surface-mount LED<br />
Lite-On IT LTST-C190GKT<br />
Red surface-mount LED<br />
Lite-On IT LTST-C190CKT<br />
J1 0 Not populated<br />
J2 1<br />
2 x 5, 0.100in-spaced header<br />
(JTAG)<br />
Molex 90131-0125<br />
<strong>MAXQ</strong> is a registered trademark of <strong>Maxim</strong> Integrated<br />
Products, Inc.<br />
IAR Embedded Workbench is a registered trademark of IAR<br />
Systems AB.<br />
S 3.3V JTAG Port Interface<br />
Features<br />
S Easily Load Code and Debug Using USB-<strong>to</strong>-JTAG<br />
Interface<br />
S USB-<strong>to</strong>-JTAG Interface Provides In-Application<br />
Debugging Features<br />
S Step-by-Step Execution Tracing<br />
S Breakpointing by Code Address and Data Memory<br />
Address<br />
S Register and Data Memory View and Edit<br />
Ordering Information<br />
#Denotes a RoHS-compliant device that may include lead that<br />
is exempt under the RoHS requirements.<br />
*EP = Exposed pad.<br />
PART TYPE<br />
<strong>MAXQ</strong>USBJTAG-KIT# <strong>MAXQ</strong> USB-<strong>to</strong>-JTAG EV <strong>Kit</strong><br />
Component List<br />
DESIGNATION QTY DESCRIPTION<br />
J3 1<br />
R1, R2 2<br />
U1 1<br />
U2 1<br />
U3 1<br />
— 1<br />
USB mini-B connec<strong>to</strong>r<br />
Hirose Electric UX60-MB-5ST<br />
680I Q5%, 1/10W resis<strong>to</strong>rs<br />
(0603)<br />
Low-power LCD microcontroller<br />
(56 TQFN-EP*)<br />
<strong>Maxim</strong> <strong>MAXQ</strong>2000-RBX+<br />
FTDI USB-<strong>to</strong>-UART converter<br />
FTDI FT232RL<br />
LDO linear voltage regula<strong>to</strong>r<br />
(+2.5V output) (6 SOT23)<br />
<strong>Maxim</strong> MAX6329ZLUT+<br />
PCB: <strong>MAXQ</strong>USBJTAGEVKIT#,<br />
REV B/REV C<br />
+Denotes a lead(Pb)-free/RoHS-compliant package.<br />
_______________________________________________________________ <strong>Maxim</strong> Integrated Products 1<br />
For pricing, delivery, and ordering information, please contact <strong>Maxim</strong> Direct at 1-888-629-4642,<br />
or visit <strong>Maxim</strong>’s website at www.maxim-ic.com.<br />
<strong>Evaluates</strong>: <strong>Programming</strong> Interface for <strong>MAXQ</strong> Microcontrollers
<strong>Evaluates</strong>: <strong>Programming</strong> Interface for <strong>MAXQ</strong> Microcontrollers<br />
<strong>MAXQ</strong> USB-<strong>to</strong>-JTAG <strong>Evaluation</strong> <strong>Kit</strong><br />
Figure 1. <strong>MAXQ</strong> USB-<strong>to</strong>-JTAG EV <strong>Kit</strong> Board<br />
Detailed Description<br />
The <strong>MAXQ</strong> ® USB-<strong>to</strong>-JTAG EV kit is designed <strong>to</strong> operate<br />
as a USB-<strong>to</strong>-JTAG adapter between programming/<br />
debugging <strong>to</strong>ols on the host PC (such as MAX-IDE,<br />
MTK, or IAR Embedded Workbench ® IDE) and a programmable<br />
<strong>MAXQ</strong> microcontroller. The FT232RL USB<strong>to</strong>-UART<br />
converter allows the host PC <strong>to</strong> communicate<br />
with the <strong>MAXQ</strong>2000 on the USB-<strong>to</strong>-JTAG EV kit over a<br />
virtual COM port that is translated in<strong>to</strong> a standard 10-bit,<br />
asynchronous, serial pro<strong>to</strong>col running at 115,200 baud.<br />
The <strong>MAXQ</strong>2000 receives commands and data from the<br />
PC and handles the task of driving the four JTAG communication<br />
lines (TCK, TMS, TDO, and TDI) that connect<br />
<strong>to</strong> another <strong>MAXQ</strong> microcontroller on a separate kit board.<br />
The <strong>MAXQ</strong> USB-<strong>to</strong>-JTAG EV kit has two off-board connec<strong>to</strong>rs.<br />
The first of these is a standard mini-B USB connec<strong>to</strong>r<br />
that is used <strong>to</strong> connect the USB-<strong>to</strong>-JTAG EV kit <strong>to</strong> a USB<br />
port on the host PC. The <strong>MAXQ</strong> USB-<strong>to</strong>-JTAG EV kit is<br />
powered directly over the USB cable. The second connec<strong>to</strong>r<br />
is the standard 10-pin JTAG interface used by all <strong>MAXQ</strong><br />
microcontroller EV kits, allowing the <strong>MAXQ</strong> USB-<strong>to</strong>-JTAG EV<br />
kit <strong>to</strong> be connected <strong>to</strong> another <strong>MAXQ</strong> microcontroller using<br />
a 2 x 5-pin header, 10-connec<strong>to</strong>r ribbon cable. Table 1<br />
defines the pins on the USB-<strong>to</strong>-JTAG interface.<br />
Power Supplies<br />
The <strong>MAXQ</strong> USB-<strong>to</strong>-JTAG EV kit is powered directly from<br />
the VBUS supply (typically 5V) on the USB cable. This<br />
<strong>MAXQ</strong> is a registered trademark of <strong>Maxim</strong> Integrated<br />
Products, Inc.<br />
IAR Embedded Workbench is a registered trademark of IAR<br />
Systems AB.<br />
Table 1. USB-<strong>to</strong>-JTAG Interface Pin<br />
Definitions<br />
HEADER<br />
PIN<br />
PIN<br />
NAME<br />
supply voltage is also provided at pin 8 (VP50) on the<br />
outgoing JTAG interface connec<strong>to</strong>r, which allows the<br />
EV kit on the other end of the JTAG connec<strong>to</strong>r cable <strong>to</strong><br />
also power itself from the USB bus supply if configured<br />
<strong>to</strong> do so.<br />
The FT232RL outputs a regulated +3.3V supply that is, in<br />
turn, regulated down <strong>to</strong> a +2.5V supply by the MAX6329<br />
LDO regula<strong>to</strong>r. These supplies are only designed for use<br />
by the components on the <strong>MAXQ</strong> USB-<strong>to</strong>-JTAG EV kit<br />
and are not meant <strong>to</strong> power external circuitry.<br />
2 ______________________________________________________________________________________<br />
DESCRIPTION<br />
1 TCK JTAG interface: test clock<br />
2, 10 GND Ground<br />
3 TDO JTAG interface: test data out<br />
4 VREF<br />
Not connected on this design.<br />
JTAG pins are driven at a fixed<br />
+3.3V level.<br />
5 TMS JTAG interface: test mode select<br />
6 RST Active-low reset<br />
7 KEY<br />
8 VP50<br />
No connection. This pin can be<br />
removed/cut <strong>to</strong> fit JTAG cables<br />
that have been keyed.<br />
Connected <strong>to</strong> the USB VBUS<br />
supply on this design.<br />
9 TDI JTAG interface: test data in
Windows<br />
PC<br />
USB<br />
PORT<br />
USB<br />
INTERFACE<br />
FT232RL<br />
(FTDI)<br />
USB-TO-SERIAL<br />
INTERFACE<br />
Figure 2. <strong>MAXQ</strong> USB-<strong>to</strong>-JTAG Communications Interface<br />
Installing the Virtual COM Port<br />
(VCP) FTDI Drivers for Windows XP<br />
Note: In the following sections, software-related items are<br />
identified by bolding. Text in bold refers <strong>to</strong> items directly<br />
from the EV kit software. Text in bold and underlined<br />
refers <strong>to</strong> items from the Windows M operating system.<br />
Before the USB-<strong>to</strong>-JTAG interface on the <strong>MAXQ</strong> USB<strong>to</strong>-JTAG<br />
EV kit can be used, the proper drivers must be<br />
installed for the FT232RL USB-<strong>to</strong>-serial converter. The<br />
following instructions provide a brief overview of installing<br />
the FTDI drivers for PCs using the Windows XP M<br />
operating system; for a more in-depth explanation as<br />
well as instructions on how <strong>to</strong> install the FTDI drivers for<br />
PCs using the Windows 2000 or Windows 98 operating<br />
systems, refer <strong>to</strong> http://www.ftdichip.com/Documents/<br />
InstallGuides.htm.<br />
• Download the latest VCP driver package for Windows<br />
XP from the FTDI website at http://www.ftdichip.com/<br />
Drivers/VCP.htm. These are also referred <strong>to</strong> as the combined<br />
driver model (CDM) drivers.<br />
• Unzip the driver package in<strong>to</strong> a working direc<strong>to</strong>ry.<br />
<strong>MAXQ</strong> USB-<strong>to</strong>-JTAG <strong>Evaluation</strong> <strong>Kit</strong><br />
SERIAL<br />
INTERFACE<br />
Windows and Windows XP are registered trademarks of<br />
Microsoft Corp.<br />
<strong>MAXQ</strong>2000<br />
MASTER<br />
MICROCONTROLLER<br />
JTAG/TAP<br />
INTERFACE<br />
TEST MODE SELECT<br />
TEST CLOCK<br />
TEST DATA IN<br />
TEST DATA OUT<br />
EXTERNAL<br />
<strong>MAXQ</strong><br />
MICROCONTROLLER<br />
(SEPARATE<br />
EV KIT BOARD)<br />
• If you are running Windows XP (with no service packs<br />
installed) or Windows XP SP1, disconnect your computer<br />
from the Internet at this point. If running Windows XP SP2<br />
or later, Windows Update must be configured <strong>to</strong> ask<br />
permission before au<strong>to</strong>matically searching for drivers<br />
for a new device. This can be set from Start→Control<br />
Panel→System→Hardware→Windows Update, as<br />
shown in Figure 3.<br />
• Connect the USB connec<strong>to</strong>r J3 <strong>to</strong> a USB port on your<br />
PC. The Found New Hardware Wizard dialog should<br />
au<strong>to</strong>matically appear (Figure 4). Select No, not this<br />
time <strong>to</strong> keep the wizard from au<strong>to</strong>matically searching<br />
for a driver, and then click Next <strong>to</strong> continue.<br />
• In the following dialog, select Install from a list or<br />
specific location (Advanced) (Figure 5) and click<br />
Next <strong>to</strong> continue.<br />
• Finally, in the search and installation options dialog<br />
(Figure 6), select Search for the best driver in these<br />
locations. and enter the location of the working direc<strong>to</strong>ry<br />
containing the unzipped VCP driver files. Click<br />
Next <strong>to</strong> finish installing the driver.<br />
_______________________________________________________________________________________ 3<br />
<strong>Evaluates</strong>: <strong>Programming</strong> Interface for <strong>MAXQ</strong> Microcontrollers
<strong>Evaluates</strong>: <strong>Programming</strong> Interface for <strong>MAXQ</strong> Microcontrollers<br />
<strong>MAXQ</strong> USB-<strong>to</strong>-JTAG <strong>Evaluation</strong> <strong>Kit</strong><br />
Figure 3. Configuring Windows Update<br />
Figure 4. Found New Hardware Wizard Dialog<br />
• After the first driver installation completes, the Found<br />
New Hardware Wizard dialog appears a second time<br />
(Figure 7). Repeat the previous steps using the same<br />
settings and driver file location.<br />
• Once this second driver installation pass has completed,<br />
the USB-<strong>to</strong>-JTAG interface should be installed<br />
and ready for use.<br />
Determining the Virtual COM<br />
Port Used by the USB-<strong>to</strong>-JTAG<br />
Interface<br />
To configure programming or development <strong>to</strong>ols (such as<br />
MTK, MAX-IDE, or IAR Embedded Workbench) <strong>to</strong> work<br />
with the virtual COM port (VCP) interface provided by<br />
the USB-<strong>to</strong>-JTAG interface, you must determine <strong>to</strong> which<br />
COM port the USB serial port has been assigned by the<br />
operating system. To do this, open the Control Panel<br />
and select System→Hardware→Device Manager, and<br />
then look in the Ports (COM & LPT) section <strong>to</strong> determine<br />
the COM port number assigned <strong>to</strong> the VCP (Figure 8).<br />
4 ______________________________________________________________________________________
Figure 5. Driver Installation<br />
Figure 6. Selecting Driver File Location for Installation<br />
<strong>MAXQ</strong> USB-<strong>to</strong>-JTAG <strong>Evaluation</strong> <strong>Kit</strong><br />
_______________________________________________________________________________________ 5<br />
<strong>Evaluates</strong>: <strong>Programming</strong> Interface for <strong>MAXQ</strong> Microcontrollers
<strong>Evaluates</strong>: <strong>Programming</strong> Interface for <strong>MAXQ</strong> Microcontrollers<br />
<strong>MAXQ</strong> USB-<strong>to</strong>-JTAG <strong>Evaluation</strong> <strong>Kit</strong><br />
Figure 7. Secondary Driver Installation<br />
Figure 8. USB Serial Port COM Location in Device Manager<br />
6 ______________________________________________________________________________________
Figure 9. <strong>MAXQ</strong> USB-<strong>to</strong>-JTAG EV <strong>Kit</strong> Schematic (Rev B/Rev C)<br />
<strong>MAXQ</strong> USB-<strong>to</strong>-JTAG <strong>Evaluation</strong> <strong>Kit</strong><br />
_______________________________________________________________________________________ 7<br />
<strong>Evaluates</strong>: <strong>Programming</strong> Interface for <strong>MAXQ</strong> Microcontrollers
<strong>Evaluates</strong>: <strong>Programming</strong> Interface for <strong>MAXQ</strong> Microcontrollers<br />
<strong>MAXQ</strong> USB-<strong>to</strong>-JTAG <strong>Evaluation</strong> <strong>Kit</strong><br />
REVISION<br />
NUMBER<br />
REVISION<br />
DATE<br />
DESCRIPTION<br />
Revision His<strong>to</strong>ry<br />
PAGES<br />
CHANGED<br />
0 3/10 Initial release —<br />
1 11/10 Updated the General Description 1<br />
<strong>Maxim</strong> cannot assume responsibility for use of any circuitry other than circuitry entirely embodied in a <strong>Maxim</strong> product. No circuit patent licenses are implied.<br />
<strong>Maxim</strong> reserves the right <strong>to</strong> change the circuitry and specifications without notice at any time.<br />
8 <strong>Maxim</strong> Integrated Products, 120 San Gabriel Drive, Sunnyvale, CA 94086 408-737-7600<br />
© 2010 <strong>Maxim</strong> Integrated Products <strong>Maxim</strong> is a registered trademark of <strong>Maxim</strong> Integrated Products, Inc.