Coil Spring Conversion Range Rover Classic ... - Paddock Spares
Coil Spring Conversion Range Rover Classic ... - Paddock Spares
Coil Spring Conversion Range Rover Classic ... - Paddock Spares

You also want an ePaper? Increase the reach of your titles
YUMPU automatically turns print PDFs into web optimized ePapers that Google loves.
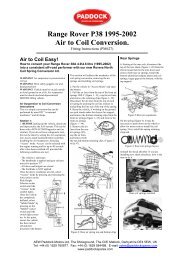
15) Reinstall the brake line bracket and tighten nuts; reinstall the plastic cover.<br />
I 6) The right front is to he done the same as the left front, except remove the air line<br />
from port #4 on the valve block. The right front spring part number is RNS051<br />
(yellow/yellow paint).<br />
17) Once all the air bladders have been replaced with the coil springs take a look and<br />
make sure the springs are seated properly and everything is tight.<br />
18) Reinstall the plastic cover on the valve block.<br />
19) Reinstall the four wheels and torque to 85 ft/lbs.<br />
20) The vehicle will sit approx 1” higher than standard height.<br />
IMPORTANT! The vehicle must be road tested, check for any suspension noises.<br />
Re-torque the wheels once the vehicle has been driven between 15-25 miles.<br />
AEW <strong>Paddock</strong> Motors Ltd, The Showground, The Cliff, Maltock, Derbyshire DE4 5EW, UK<br />
Tel: +44 (0) 1629 760877 Fax: +44 (0) 1629 584498 E-mail: sales@paddockspares.com<br />
www.paddockspares.com