Fitting Instructions - Paddock Spares
Fitting Instructions - Paddock Spares
Fitting Instructions - Paddock Spares
- No tags were found...

Create successful ePaper yourself
Turn your PDF publications into a flip-book with our unique Google optimized e-Paper software.
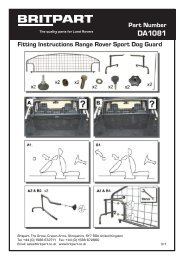
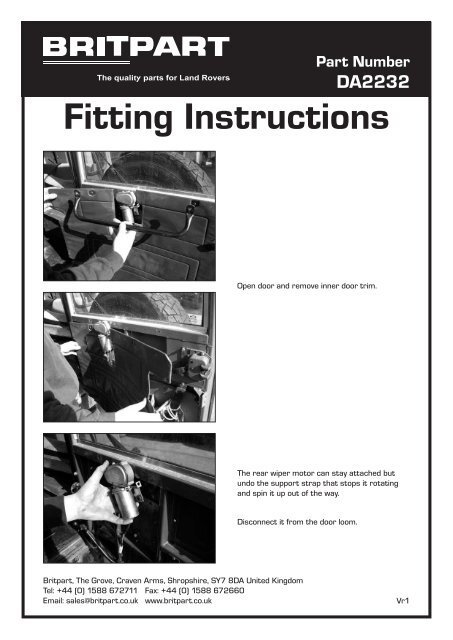
Part NumberDA2232<strong>Fitting</strong> <strong>Instructions</strong>Open door and remove inner door trim.The rear wiper motor can stay attached butundo the support strap that stops it rotatingand spin it up out of the way.Disconnect it from the door loom.Britpart, The Grove, Craven Arms, Shropshire, SY7 8DA United KingdomTel: +44 (0) 1588 672711 Fax: +44 (0) 1588 672660Email: sales@britpart.co.uk www.britpart.co.ukVr1
Your existing spare wheel plate may me slightlylarger than the one shown here because thereis more than one type. This procedure is stillthe same regardless of plate type.Undo the screws around the existing plate. Youwill need to hold a spanner on the nut on theinside of the door.Retain the screws and nuts for the fitment ofthe replacement plate.Withdraw the inner plate with the three sparewheel mounting pins.Now the outer plate is free to pull away fromthe outer skin of the door.
Position the new plate on the door and hold inplace with x 2 of the original screws.Mark off the x 4 cylinder mounting holes.Remove the plate so that the holes can bedrilled to the correct size.Once the holes are drilled then re-mount theplate using all seven mounting screws andtighten in place.The upper door carrier hinge bolts on to thecapping. The two rivets are drilled out and therivet holes are widened for the bolts to passthrough.Make sure the hinge is the correct way aroundas you can see in the picture.Use x 2 bolts and the captive nut plate toloosely bolt the hinge in place for now.
Pointing to the three mounting holes for thelower hinge on the cross member.You may have to remove the handle if there isone fitted.This view is a cross-member as viewed from the front behind therear wheel arch. The spacing plate and lower hinge bracket areoffered up to the outer skin (rear of the cross-member).On the inside (front) of the cross- member, the two smaller boltspass through the outer cross-member skin and into a captive nutplate (supplied in the fixing kit).The larger bolt goes through the samesupport plate and then through the sleeve(also provided in fixing kit). It then passesthrough a second skin at the front of thecross-member before the nut is wound on.
Lift the main frame into position and slot thehinge bolts into place, using a plastic shimwashers above and below in the hinge.With the hinge bolts in place, tighten the x2upper hinge bolts (which were left loose duringfitment).Bolt the door cylinder assembly in place.Open the door while bringing the piston anddoor frame together. AND offer up the twoholes as you close the door again.
Wind the washer and bolt back onto the piston.It’s a tight fit but hold a spanner down the backwhile you tighten the nut.Re-fit spare wheel with original wheel nuts.And there you have it - all done!