Mini External Fixator. - Osteosyntese
Mini External Fixator. - Osteosyntese
Mini External Fixator. - Osteosyntese

You also want an ePaper? Increase the reach of your titles
YUMPU automatically turns print PDFs into web optimized ePapers that Google loves.
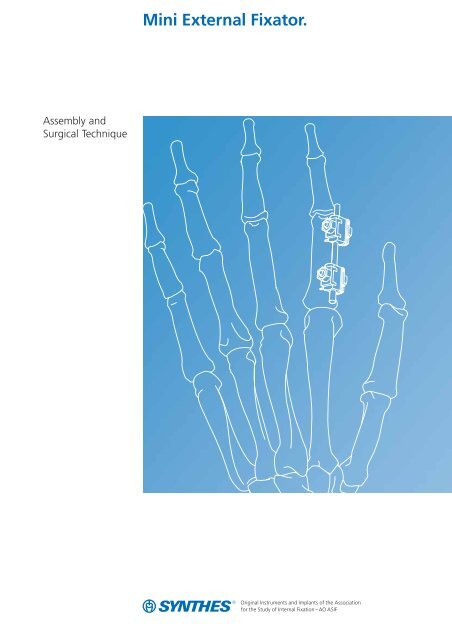
Assembly and<br />
Surgical Technique<br />
<strong>Mini</strong> <strong>External</strong> <strong>Fixator</strong>.
<strong>Mini</strong> <strong>External</strong> <strong>Fixator</strong><br />
Table of contents<br />
Components and Configurations 2<br />
Indications 3<br />
Single rod assembly 4<br />
Double rod assembly 6<br />
Removal 8<br />
Image Intensifier Control<br />
Warning<br />
This description is not sufficient for immediate application of<br />
the instrumentation. Instruction by a surgeon experienced in<br />
handling this instrumentation is highly recommended.<br />
Synthes 1
<strong>Mini</strong> <strong>External</strong> <strong>Fixator</strong><br />
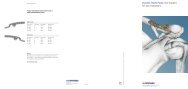
Components and Configurations<br />
Kirschner Wires (specially designed for <strong>Mini</strong> <strong>External</strong> <strong>Fixator</strong>)<br />
– diameter 1.25 mm (292.600) or 1.6 mm (292.708)<br />
– length 100 mm<br />
– threaded tip<br />
1.25 mm<br />
1.6 mm<br />
Holding Clamps<br />
– for two Kirschner Wires 1.25 mm (395.125) or 1.6 mm<br />
(395.126)<br />
– swivelling<br />
Connecting Rods<br />
– diameter 3.0 mm<br />
– lengths 25 mm (395.105 ), 45 mm (395.107),<br />
60 mm (395.109), or 75 mm (395.111)<br />
– radiolucent carbon fibre composite<br />
1.25 mm<br />
1.6 mm<br />
Connecting Clamps<br />
– clamp 3.0 mm (395.133) for two 3.0 mm rods<br />
– clamp 3.0 / 4.0 mm (395.134) to connect the 3.0 mm rods<br />
of the <strong>Mini</strong> <strong>External</strong> <strong>Fixator</strong> to the 4.0 mm rods of the<br />
Small <strong>External</strong> <strong>Fixator</strong><br />
3.0 mm<br />
3.0 / 4.0 mm<br />
Connecting Rod, angled (395.103)<br />
– diameter 3.0 mm<br />
– length of limbs 18 and 26 mm, respectively<br />
– stainless steel<br />
Single rod assembly<br />
– holding clamps<br />
– connecting rod<br />
Double rod assembly<br />
– holding clamps<br />
– connecting rods<br />
– connecting clamp<br />
Assembly with angled connecting rods<br />
– holding clamps<br />
– angled connecting rods<br />
– connecting clamps<br />
– connecting rod<br />
2
<strong>Mini</strong> <strong>External</strong> <strong>Fixator</strong><br />
Indications<br />
The <strong>Mini</strong> <strong>External</strong> <strong>Fixator</strong> is intended for the following indications<br />
on the phalanges and metacarpals of the hand:<br />
– closed comminuted fractures<br />
– open fractures<br />
– dislocated joint fractures which can be reduced by<br />
ligamentotaxis<br />
– bone, joint and soft tissue infections<br />
– complex soft tissue injuries<br />
– bone defects caused by trauma or tumour resection<br />
In other bones or for bridging the wrist the <strong>Mini</strong> <strong>External</strong><br />
<strong>Fixator</strong> is not recommended. Radius fractures are indications<br />
for the Small <strong>External</strong> <strong>Fixator</strong> or the Distal Radius <strong>Fixator</strong>.<br />
Positioning of Kirschner wires<br />
The anatomical situation of ligaments and tendons of the hand<br />
requires particular surgical caution. As a rule, the Kirschner<br />
wires are inserted into the metacarpals and phalanges using<br />
a dorso-radial or a dorso-ulnar approach.<br />
The Kirschner wires can be introduced laterally into the<br />
metacarpals I, II and V, the distal third of the proximal<br />
phalanges, as well as into the middle and end phalanges.<br />
To place the Kirschner wires in the proximal part of the first<br />
phalanges, the extensor hood is incised in the direction of the<br />
movement of the tendon.<br />
With the exception of the single rod assembly, the pairs of<br />
Kirschner wires can be placed freely and independently of each<br />
other in any position or angle required. In the configuration<br />
of a double rod assembly, for instance, the components of the<br />
<strong>Mini</strong> <strong>External</strong> <strong>Fixator</strong> allow an individual three-dimensional<br />
frame assembly.<br />
Synthes 3
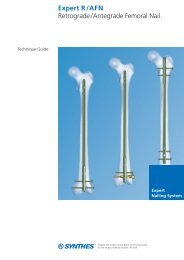
<strong>Mini</strong> <strong>External</strong> <strong>Fixator</strong><br />
Single rod assembly<br />
1<br />
Insertion of primary Kirschner wires<br />
The skin and the subjacent soft tissue are incised and one<br />
Kirschner wire (292.600 or 292.708) each is inserted proximally<br />
and distally to the fracture. Using the Double Drill Sleeve<br />
1.25 /1.6 (395.902) the Kirschner wires are inserted until their<br />
tips are anchored in the far cortical bone. They must not,<br />
however, penetrate the cortical bone. Make sure the Kirschner<br />
wires are aligned in one plane.<br />
When using a drill, the Kirschner wires should be inserted at<br />
low speed so as to avoid heat development. During the drilling<br />
process cool the Kirschner wires with a saline or Ringer’s solution.<br />
In proximity to joints Kirschner wires can also be inserted<br />
using the Handle for Kirschner Wires 0.6 to 1.6 mm<br />
(392.040).<br />
Note: Use Kirschner wires 292.600 or 292.708 exclusively.<br />
2<br />
Rod connection assembly<br />
Slide a Holding Clamp (395.125 or 395.126) on each Kirschner<br />
wire by its slotted opening and slightly tighten the screw nut<br />
by hand.<br />
In order to determine the entry points of the secondary<br />
Kirschner wires introduce a Kirschner wire into the vacant<br />
openings of the clamps, mark and incise the skin and the subjacent<br />
soft tissue. Remove the Kirschner wire used for marking.<br />
Slide a Connecting Rod (395.105 / 107 / 109 / 111) through both<br />
holding clamps and tighten it to one of them using the Socket<br />
Wrench 5.5 mm (395.304).<br />
4
3<br />
Fracture reduction and fixation<br />
Reduce the fracture and fix the reduction by slightly tightening<br />
the screw nut for the Kirschner wires with the Combination<br />
Wrench 5.5 mm (395.302). Tighten the nut only as much as<br />
necessary to fix the reduction, making sure the vacant opening<br />
is still wide enough so that the parallel secondary Kirschner<br />
wire can be introduced later.<br />
Securely tighten the screw nuts for the connecting rod.<br />
4<br />
Insertion of the secondary Kirschner wires<br />
Retract the soft tissue along the incision with small bone hooks<br />
and insert the secondary Kirschner wires through the vacant<br />
openings of the holding clamps while cooling the wire and the<br />
clamps.<br />
Note: Make sure to always occupy both openings of the holding<br />
clamps with a Kirschner wire to ensure proper functioning<br />
of the clamps.<br />
5<br />
Tightening the screw nuts<br />
Tighten the screw nuts for the Kirschner wires and simultaneously<br />
hold the connecting rod with the Clamp Holder<br />
(395.139) to counteract torque. Cut the Kirschner wires using<br />
a Wire Cutter (391.930).<br />
Synthes 5
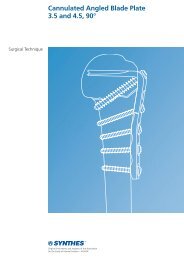
<strong>Mini</strong> <strong>External</strong> <strong>Fixator</strong><br />
Double rod assembly<br />
1<br />
Assembly of holding clamps<br />
Incise skin and soft tissue and introduce a Kirschner wire<br />
(292.600 or 292.708) through the double drill sleeve 1.25 /1.6<br />
(395.902) into the bone proximally to the fracture until its tip<br />
is anchored in the far cortical bone without penetrating it. Slide<br />
a Holding Clamp (395.125 or 395.126) onto the wire and<br />
introduce a Kirschner wire into the vacant opening of the<br />
clamp in order to determine the entry point of the secondary<br />
Kirschner wire. Mark the skin and make an incision. Position<br />
the holding clamp closely to the body and insert the secondary<br />
Kirschner wire.<br />
Repeat this process for the second holding clamp.<br />
When using a drill, Kirschner wires should be inserted at low<br />
speed so as to avoid heat development. During the drilling<br />
process cool the Kirschner wire with a saline or Ringer’s solution.<br />
In proximity to joints Kirschner wires can also be inserted<br />
using the Handle for Kirschner Wires 0.6 to 1.6 mm<br />
(392.040).<br />
Note: Use Kirschner wires 292.600 or 292.708 exclusively.<br />
2<br />
Frame assembly<br />
Slide a Connecting Rod (395.105 / 107/ 109 / 111) through each<br />
holding clamp and mount the Connecting Clamp (395.133)<br />
(do not tighten the screw nut). Tighten the screw nut for the<br />
connecting rod of the distal holding clamp using the Socket<br />
Wrench 5.5 mm (395.304).<br />
Alternative: The use of the assembly with angled connecting<br />
rods increases the assembly freedom.<br />
6
3<br />
Fracture reduction and fixation<br />
Reduce the fracture and fix the reduction by tightening the<br />
screw nuts of the holding clamps and of the connecting clamp<br />
with the Combination Wrench 5.5 mm (395.302). Sequence<br />
for tightening the screw nuts: 1, 2, 3, 4.<br />
Cut the Kirschner wires using a Wire Cutter (391.930).<br />
2<br />
4<br />
3<br />
1<br />
Synthes 7
<strong>Mini</strong> <strong>External</strong> <strong>Fixator</strong><br />
Removal<br />
Dismount connecting rods and holding clamps. If the holding<br />
clamps cannot be removed from the Kirschner wires, the<br />
clamping plate can easily be opened on the slotted side with<br />
a chisel for instance. Unscrew the Kirschner wires anticlockwise<br />
with the Handle for Kirschner Wires 0.6 to 1.6 mm<br />
(392.040), Wire Bending Pliers (391.820) or flat-nosed Pliers<br />
(391.850).<br />
8
Presented by:<br />
0123<br />
036.000.231 SM_707853 AB 31060035 © Synthes 2006 Subject to modifications