Manual Backflow Preventer Test Kit TK 9A - Watts waterbeveiliging
Manual Backflow Preventer Test Kit TK 9A - Watts waterbeveiliging
Manual Backflow Preventer Test Kit TK 9A - Watts waterbeveiliging
You also want an ePaper? Increase the reach of your titles
YUMPU automatically turns print PDFs into web optimized ePapers that Google loves.
<strong>Manual</strong> <strong>Backflow</strong> <strong>Preventer</strong><br />
<strong>Test</strong> <strong>Kit</strong> <strong>TK</strong> <strong>9A</strong><br />
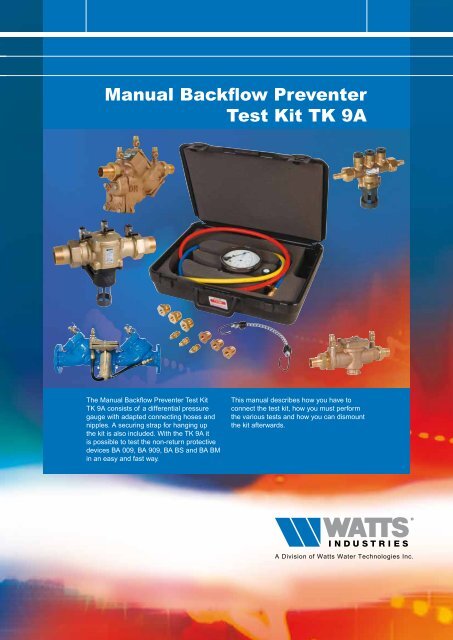
The <strong>Manual</strong> <strong>Backflow</strong> <strong>Preventer</strong> <strong>Test</strong> <strong>Kit</strong><br />
<strong>TK</strong> <strong>9A</strong> consists of a differential pressure<br />
gauge with adapted connecting hoses and<br />
nipples. A securing strap for hanging up<br />
the kit is also included. With the <strong>TK</strong> <strong>9A</strong> it<br />
is possible to test the non-return protective<br />
devices BA 009, BA 909, BA BS and BA BM<br />
in an easy and fast way.<br />
This manual describes how you have to<br />
connect the test kit, how you must perform<br />
the various tests and how you can dismount<br />
the kit afterwards.
<strong>Manual</strong> <strong>Backflow</strong> <strong>Preventer</strong> <strong>Test</strong> <strong>Kit</strong> <strong>TK</strong> <strong>9A</strong><br />
2<br />
differential<br />
pressure gauge<br />
high pressure hose<br />
(yellow)<br />
shutoff valves<br />
A<br />
0<br />
0.25<br />
0.5<br />
BAR<br />
0.75<br />
1<br />
B<br />
C<br />
low<br />
pressure<br />
hose<br />
(red)<br />
(blue)<br />
Description of the test kit<br />
A, B, C – valves<br />
1,2,3 – test valves<br />
4,5 – shutoff valves<br />
The non-return protective device BA BM for the<br />
dimensions DN 15 up to and incl. DN 50 are shown<br />
in the instructions in this manual. The test kit can<br />
also be used for other non-return protective devices.<br />
In that case the position of the test valves differs<br />
(see figure 2).<br />
Connecting test kit<br />
shutoff valve<br />
4<br />
test valves<br />
1<br />
2 3<br />
shutoff valve<br />
5<br />
1. Close valves A, B and C of the test kit.<br />
2. Connect the high-pressure hose (yellow) to<br />
test valve 1.<br />
3. Connect the low-pressure hose (red) to<br />
test valve 2.<br />
4. Close valve 5 (this valve must be absolutely<br />
leak tightened).<br />
5. Open the test valves 1 and 2 and valve 4.<br />
6. Open valve C.<br />
7. Open valve A to de-aerate and then close it.<br />
8. Open valve B to de-aerate and then close it.<br />
9. Close valve C.<br />
10. Connect the blue hose to test valve 3.<br />
11. Open test valve 3.<br />
open<br />
closed<br />
Figure 1: BA BM DN15 up to DN50<br />
1 2 3<br />
2 3<br />
1<br />
1<br />
BA 909 DN65 up to DN250<br />
BA 009 DN15 up to DN50<br />
1 2 3 1<br />
2<br />
3<br />
1<br />
2<br />
3<br />
BA BS DN6 up to DN10<br />
BA 909 DN20 up to DN50<br />
BA 009 DN65 and DN80<br />
Figure 2: Position of the test valves
<strong>Manual</strong> <strong>Backflow</strong> <strong>Preventer</strong> <strong>Test</strong> <strong>Kit</strong> <strong>TK</strong> <strong>9A</strong><br />
<strong>Test</strong> no. 1 - <strong>Test</strong>ing valve 5<br />
Aim: testing whether valve 5 is leak tightened.<br />
Valve 5 must be fully closed in order to perform<br />
tests no. 1, 3 and 4 accurately.<br />
1. Connect the test kit (see page 2:<br />
“Connecting test kit”).<br />
2. Check whether:<br />
• valves A, B and C are closed.<br />
• test valves 1, 2 and 3 are open.<br />
• Shutoff valve 4 is open.<br />
• Shutoff valve 5 is closed.<br />
3. Close test valve 1.<br />
4. Open valves A and C.<br />
Close Shutoff valve 5 well if the measured<br />
difference in pressure remains constant. If the<br />
difference in pressure drops back, this indicates a<br />
leakage/contamination of Shutoff valve 5. In this<br />
case replace Shutoff valve 5.<br />
<strong>Test</strong> no. 2 - <strong>Test</strong>ing of 2 nd non-return valve<br />
Aim: testing whether the 2 nd check valve is closed<br />
(at the outflow side). This check valve must fully<br />
leak tightened under all conditions.<br />
1. Connect the test kit (see page 2:<br />
“Connecting test kit”).<br />
2. Check whether:<br />
• valves A, B and C are closed.<br />
• test valves 1, 2 and 3 are open.<br />
• Shutoff valve 4 is open.<br />
• Shutoff valve 5 is closed.<br />
3. Open valves A and C.<br />
The measures difference in pressure will become<br />
smaller. If the difference in pressure continues to<br />
drop back until the relief valve opens, this indicates<br />
a leakage/contamination of the 2 nd check valve. In<br />
this case replace or repair the 2 nd check valve.<br />
<strong>Test</strong> no. 4 - <strong>Test</strong>ing of the relief valve<br />
Aim: testing the relief valve in the pressure-reduced<br />
zone. This relief valve must open when the pressure<br />
in the intermediate chamber (between the first and<br />
second non-recurrent valve) is still at least 14 kPa<br />
lower than the pressure at the inflow side.<br />
1. Connect the test kit (see page 2:<br />
“Connecting test kit”).<br />
2. Check whether:<br />
• valves A, B and C are closed.<br />
• test valves 1, 2 and 3 are open.<br />
• Shutoff valve 4 is open.<br />
• Shutoff valve 5 is closed.<br />
3. Close test valve 3.<br />
4. Open valve A.<br />
5. Very slowly open valve B, until the measured<br />
difference in pressure starts to drop back.<br />
N.B.: It is important that the value on the<br />
differential pressure gauge gradually drops<br />
back.<br />
6. Leave valve B in this position and read the<br />
value on the differential pressure gauge at<br />
the moment that water begins to drip from the<br />
outlet passage.<br />
The value read at that moment is the opening<br />
differential pressure of the relief valve. Replace<br />
or repair the relief valve if the read value is less<br />
than 14 kPa.<br />
Dismounting the test kit.<br />
1. Close the test valves 1, 2 and 3.<br />
2. Disconnect the 3 hoses (yellow, red and blue)<br />
3. Open Shutoff valve 5.<br />
3<br />
<strong>Test</strong> no. 3 - <strong>Test</strong>ing of 1 st non-return valve<br />
Aim: testing whether the 1 st check valve is closed<br />
(at the inflow side). This check valve must fully<br />
close under all conditions.<br />
1. Connect the test kit (see page 2:<br />
“Connecting test kit”).<br />
2. Check whether:<br />
• valves A, B and C are closed.<br />
• test valves 1, 2 and 3 are open.<br />
• valve 4 is open.<br />
• valve 5 is closed.<br />
3. Close test valve 3.<br />
If the measured difference in pressure drops back,<br />
this indicates a leakage/contamination of the 1 st<br />
check valve. In this case replace or repair the 1 st<br />
check valve.
Product range <strong>Watts</strong> Industries<br />
- System Disconnectors<br />
- <strong>Backflow</strong> Protection Devices<br />
- Check Valves<br />
- Safety Units<br />
- Safety Relief Valves<br />
- Pressure Reducing Valves<br />
- Automatic Control Valves<br />
- Butterfly Valves<br />
- Shut-Off Valves<br />
- Measuring Gauges<br />
- Temperature Control<br />
- Expansion Vessels<br />
- Process Switches<br />
- Fuel Products<br />
- Gas Products<br />
- Electronic Controls<br />
- Installation Protection Products<br />
- Radiator Valves<br />
- System Products<br />
- Manifolds and Fittings<br />
50A-0004-NL-UK-13/09<br />
<strong>Watts</strong> Industries Netherlands B.V.<br />
Kollergang 14, 6961 LZ Eerbeek, The Netherlands<br />
Phone +31 313 673 700 750 - Fax +31 313 652 073<br />
E-mail info@industries.nl E-mail info@wattsindustries.nl<br />
- Site www.wattsindustries.com<br />
Sites www.wattsindustries.com - www.<strong>waterbeveiliging</strong>.nl


