LED Powerbrick Set - bse-pro.nl
LED Powerbrick Set - bse-pro.nl
LED Powerbrick Set - bse-pro.nl

Create successful ePaper yourself
Turn your PDF publications into a flip-book with our unique Google optimized e-Paper software.
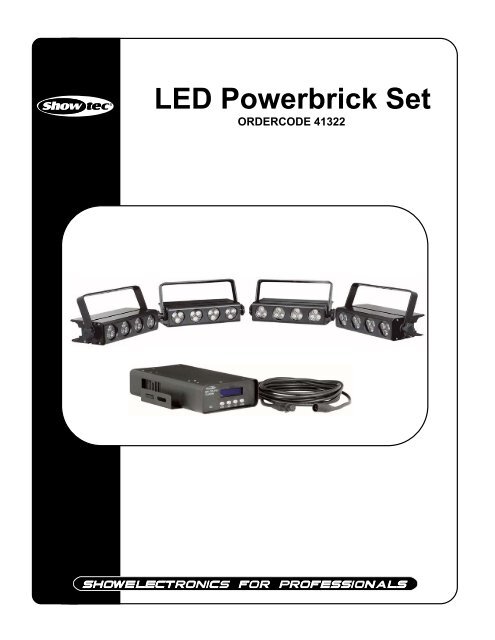
<strong>LED</strong> <strong>Powerbrick</strong> <strong>Set</strong><br />
ORDERCODE 41322
Showtec<br />
Showtec <strong>LED</strong> <strong>Powerbrick</strong> <strong>Set</strong> Product Guide<br />
Warning..…...................................................................................…………………………………………..<br />
Safety-instructions………………………………………………………………………………………….….<br />
Operating Determinations……………………………………………………………………………….….<br />
Description..…..............................................................................……….……………………………….…<br />
Features and Overview ………………………………...….……………….………….……….……….…<br />
Backside…………………………………………………...…...….……………….…………………...….….<br />
Installation...............................................................................…...……………………………………..…..<br />
<strong>Set</strong> Up and Operation.....................................................................……..…………………………….……<br />
1) Connected separate……...........................................……..…………………………………………<br />
2) Connected on top of eachother by using the supplied brackets..............................………..<br />
3) Connected Side by Side...........................................……..…………………………………………..<br />
Functions……………………………………………………………………………………………………….<br />
Stand-alone ………………………………………………………………..……………….…….……..<br />
Connection Stand-alone…………………………………………….………………………………..<br />
DMX Controlled ….………………………………………………………………….…….…….…..….<br />
Connection DMX …………..…………..………………………………………………………..…..…<br />
Illuminance Distribution………..…………………………………………………………….…………………<br />
Candle Power distribution.............................................................…………………….………….……<br />
Maintenance...................................................................................………..………….…….……………..<br />
Changing the Fuse........................................................................…………………….…………..…...<br />
Troubleshooting............................................................................………………….………………….…..<br />
Product Specifications.................................................................……………….…….…………………..<br />
2<br />
2<br />
3<br />
4<br />
4<br />
4<br />
5<br />
5<br />
5<br />
5<br />
5<br />
7<br />
7<br />
10<br />
11<br />
12<br />
13<br />
14<br />
15<br />
15<br />
15<br />
16<br />
1
WARNING<br />
CAUTION!<br />
Keep this device away from rain and moisture!<br />
FOR YOUR OWN SAFETY, PLEASE READ THIS USER MANUAL CAREFULLY<br />
BEFORE YOUR INITIAL START-UP!<br />
SAFETY INSTRUCTIONS<br />
Every person involved with the installation, operation and maintenance of this device has to:<br />
- be qualified<br />
- follow the instructions of this manual<br />
CAUTION! Be careful with your operations.<br />
With a dangerous voltage you can suffer<br />
a dangerous electric shock when touching the wires!<br />
Before your initial start-up, please make sure that there is no damage caused by transportation. Should there<br />
be any, consult your dealer and do not use the device.<br />
To maintain perfect condition and to ensure a safe operation, it is absolutely necessary for the user to follow<br />
the safety instructions and warning notes written in this manual.<br />
Please consider that damages caused by manual modifications to the device are not subject to warranty.<br />
This device contains no user-serviceable parts. Refer servicing to qualified technicians o<strong>nl</strong>y.<br />
IMPORTANT:<br />
The manufacturer will not accept liability for any resulting damages caused by the non-o<strong>bse</strong>rvance<br />
of this manual or any unauthorized modification to the device.<br />
• Never let the power-cord come into contact with other cables! Handle the power-cord and all<br />
connections with the mains with particular caution!<br />
• Never remove warning or informative labels from the unit.<br />
• Never leave any cables lying around.<br />
• Do not insert objects into air vents.<br />
• Do not open the device and do not modify the device.<br />
• Do not connect this device to a dimmerpack.<br />
• Do not shake the device. Avoid brute force when installing or operating the device.<br />
• Do not switch the device on and off in short intervals, as this would reduce the system’s life.<br />
• O<strong>nl</strong>y use device indoor, avoid contact with water or other liquids.<br />
• O<strong>nl</strong>y operate the fixture after having checked that the housing is firmly closed and all screws are<br />
tightly fastened.<br />
• O<strong>nl</strong>y operate the device after having familiarized with its functions.<br />
• Avoid flames and do not put close to flammable liquids or gases.<br />
• Always keep case closed while operating.<br />
• Always allow free air space of at least 50 cm around the unit for ventilation.<br />
• Always disconnect power from the mains, when device is not used or before cleaning! O<strong>nl</strong>y handle<br />
the power-cord by the plug. Never pull out the plug by tugging the power-cord.<br />
2
• Make sure that the device is not exposed to extreme heat, moisture or dust.<br />
• Make sure that the available voltage is not higher than stated on the rear panel.<br />
• Make sure that the power-cord is never crimped or damaged. Check the device and the powercord<br />
from time to time.<br />
• If device is dropped or struck, disconnect mains power supply immediately. Have a qualified<br />
engineer inspect for safety before operating.<br />
• If the device has been exposed to drastic temperature fluctuation (e.g. after transportation), do not<br />
switch it on immediately. The arising condensation water might damage your device. Leave the<br />
device switched off until it has reached room temperature.<br />
• If your Showtec device fails to work <strong>pro</strong>perly, discontinue use immediately. Pack the unit securely<br />
(preferably in the original packing material), and return it to your Showtec dealer for service.<br />
• The user is responsible for correct positioning and operating of the <strong>LED</strong> <strong>Powerbrick</strong>. The manufacturer<br />
will not accept liability for damages caused by the misuse or incorrect installation of this device.<br />
• For adult use o<strong>nl</strong>y. The device must be installed out of the reach of children. Never leave the unit<br />
running unattended.<br />
• For replacement use fuses of same type and rating o<strong>nl</strong>y.<br />
• Repairs, servicing and electric connection must be carried out by a qualified technician.<br />
• WARRANTY: Till one year after date of purchase.<br />
OPERATING DETERMINATIONS<br />
If this device is operated in any other way, than the one described in this manual, the <strong>pro</strong>duct may suffer<br />
damages and the warranty becomes void.<br />
Any other operation may lead to dangers like short-circuit, burns, electric shock, lamp explosion, crash etc.<br />
You endanger your own safety and the safety of others!<br />
Rigging<br />
Please follow the European and national guidelines concerning rigging, trussing and all other safety issues.<br />
Do not attempt the installation yourself !<br />
Always let the installation be carried out by an authorized dealer !<br />
Procedure:<br />
• If the <strong>pro</strong>jector is lowered from the ceiling or high joists, <strong>pro</strong>fessional trussing systems have to be used.<br />
• Use a clamp to mount the <strong>pro</strong>jector, with the mounting-bracket, to the trussing system.<br />
• The <strong>pro</strong>jector must never be fixed swinging freely in the room.<br />
• The installation must always be secured with a safety attachment, e.g. an ap<strong>pro</strong>priate safety net or<br />
safety-cable.<br />
• When rigging, derigging or servicing the <strong>pro</strong>jector, always make sure, that the area below the<br />
installation place is blocked and staying in the area is forbidden.<br />
Im<strong>pro</strong>per installation can cause serious damage to people and <strong>pro</strong>perty !<br />
3
Description of the device<br />
Features<br />
The <strong>LED</strong> <strong>Powerbrick</strong> <strong>Set</strong> is a <strong>LED</strong> system from Showtec.<br />
• <strong>Powerbrick</strong> set contains 4 <strong>Powerbrick</strong>s, one controller, power leads, DMX leads.<br />
• Ultra bright <strong>LED</strong><br />
• First grade aluminum body construction<br />
• U<strong>nl</strong>imited colors<br />
• Low power consumption<br />
• Low heat design, great for long time operation.<br />
• Lifetime: 100.000 hours<br />
NOTE: Knowledge of DMX is required to fully utilize this unit.<br />
Overview<br />
Backside<br />
Fig. 1<br />
Fig. 2 Fig. 3<br />
1) 3-pin DMX signal connector (OUT) 6) LCD Display<br />
2) 3-pin DMX signal connector (IN) 7) EXIT<br />
3) 5-pin DMX signal connector (OUT) 8) SET<br />
4) 5-pin DMX signal connector (IN) 9) UP<br />
5) IEC Connector + Fuse 10) DOWN<br />
4
Installation<br />
Remove all packing materials from the <strong>LED</strong> <strong>Powerbrick</strong> <strong>Set</strong>. Check that all foam and plastic padding is<br />
removed. Connect all cables.<br />
Always disconnect from electric mains power supply before cleaning or servicing.<br />
Damages caused by non-o<strong>bse</strong>rvance are not subject to warranty.<br />
<strong>Set</strong> Up and Operation<br />
Before plugging the unit in, always make sure that the power supply matches the <strong>pro</strong>duct specification<br />
voltage. Do not attempt to operate a 120V specification <strong>pro</strong>duct on 230V power, or vice versa.<br />
Note : Link all cables before connecting electric power.<br />
You have 3 possibilities to set up your <strong>LED</strong> <strong>Powerbrick</strong> <strong>Set</strong>:<br />
1) Separate<br />
2) Connected on top of eachother by using the supplied brackets<br />
Bracket Mounting the separate <strong>Powerbrick</strong>s Backside connection<br />
3) Connected Side by Side<br />
Be sure to put the devices next to eachother and slide Pin A1 in hole B1, do the same for pin A2 in hole B2.<br />
Then slide the first device in the direction of C. The last step is securing the devices at the back by using clasp<br />
D and turning it clockwise to tighten the locking mechanism.<br />
5
Be sure to put the small cube E and the aluminum section together in the small slot.<br />
Backside connection of 4 <strong>LED</strong> <strong>Powerbrick</strong>s<br />
Connecting the entire <strong>LED</strong> <strong>Powerbrick</strong> system to a Truss system.<br />
6
FUNCTIONS:<br />
There are 3 options to operate the <strong>LED</strong> <strong>Powerbrick</strong>:<br />
Stand-alone<br />
Master / Slave<br />
DMX Mode<br />
After completing your settings, be sure to unplug the <strong>Powerbrick</strong>s and the controller, otherwise errors could<br />
occur.<br />
This way you reset the entire system, but your settings keep stored in the memory of the controller.<br />
Stand-alone<br />
1. The device will start test-mode.<br />
2. Press MODE button to enter mode setting.<br />
3. Switch to System Mode, then press the <strong>Set</strong> Up-button.<br />
4. Enter the amount of tubes you are using.<br />
5. For Stand-alone you have to use DMX Channel: 0, then press the <strong>Set</strong> Up-button again.<br />
6. The LCD now shows “<strong>Set</strong> Address YES”; press SETUP-Button (=NO) to keep your previous settings,<br />
or YES (=Up-Button) to store your choice. The <strong>LED</strong> Tubes will light up.<br />
7. Now your unit is a stand-alone. You will find all the pre-<strong>pro</strong>grammed scenes below.<br />
Menu<br />
1. Static RED Function <strong>Set</strong><br />
2. Static GREEN Function <strong>Set</strong><br />
3. Static YELLOW Function <strong>Set</strong><br />
4. Static BLUE Function <strong>Set</strong><br />
5. Static PURPLE Function <strong>Set</strong><br />
6. Static CYAN Function <strong>Set</strong><br />
7. Static WHITE Function <strong>Set</strong><br />
8. Color Change Function <strong>Set</strong><br />
9. Flow 1 (FF) Function <strong>Set</strong><br />
10. Flow 2 (REW) Function <strong>Set</strong><br />
11. Flow 3 (FF/REW) Function <strong>Set</strong><br />
12. 2 Color Chase Function <strong>Set</strong><br />
13. Multi-Color Chase Function <strong>Set</strong><br />
14. Fade Change Function <strong>Set</strong><br />
15. 2 Color Fade Chase Function <strong>Set</strong><br />
16. Auto Run Function <strong>Set</strong><br />
17. System Mode Function <strong>Set</strong><br />
When “Function <strong>Set</strong>” appears in the LCD, then you are able to make some extra settings: Dimmer, Run<br />
Speed, Flash Freq, etc.<br />
7
1. Static RED Function <strong>Set</strong> : Gray Level 0-100 (1X <strong>Set</strong> Up)<br />
Flash Freq 0-100 (2X <strong>Set</strong> Up)<br />
Exit :<br />
Return to the Mode Menu<br />
2. Static GREEN Function <strong>Set</strong> : Gray Level 0-100 (1X <strong>Set</strong> Up)<br />
Flash Freq 0-100 (2X <strong>Set</strong> Up)<br />
Exit :<br />
Return to the Mode Menu<br />
3. Static YELLOW Function <strong>Set</strong> : Gray Level 0-100 (1X <strong>Set</strong> Up)<br />
Flash Freq 0-100 (2X <strong>Set</strong> Up)<br />
Exit :<br />
Return to the Mode Menu<br />
4. Static BLUE Function <strong>Set</strong> : Gray Level 0-100 (1X <strong>Set</strong> Up)<br />
Flash Freq 0-100 (2X <strong>Set</strong> Up)<br />
Exit :<br />
Return to the Mode Menu<br />
5. Static PURPLE Function <strong>Set</strong> : Gray Level 0-100 (1X <strong>Set</strong> Up)<br />
Flash Freq 0-100 (2X <strong>Set</strong> Up)<br />
Exit :<br />
Return to the Mode Menu<br />
6. Static CYAN Function <strong>Set</strong> : Gray Level 0-100 (1X <strong>Set</strong> Up))<br />
Flash Freq 0-100 (2X <strong>Set</strong> Up)<br />
Exit :<br />
Return to the Mode Menu<br />
7. Static WHITE Function <strong>Set</strong> : Gray Level 0-100 (1X <strong>Set</strong> Up)<br />
Flash Freq 0-100 (2X <strong>Set</strong> Up)<br />
Exit :<br />
Return to the Mode Menu<br />
8. Color Change Function <strong>Set</strong> : Run Speed 0-100 (1X <strong>Set</strong> Up)<br />
Flash Freq 0-100 (2X <strong>Set</strong> Up)<br />
Color Sort 0-20 (3X <strong>Set</strong> Up)<br />
Run Times 0-20 (4X <strong>Set</strong> Up)<br />
Exit :<br />
Return to the Mode Menu<br />
9. Flow 1 (FF) Function <strong>Set</strong> : Run Speed 0-100 (1X <strong>Set</strong> Up)<br />
Flash Freq 0-100 (2X <strong>Set</strong> Up)<br />
Color Sort 0-20 (3X <strong>Set</strong> Up)<br />
Run Times 0-20 (4X <strong>Set</strong> Up)<br />
Exit :<br />
Return to the Mode Menu<br />
10. Flow 2 (REW) Function <strong>Set</strong> : Run Speed 0-100 (1X <strong>Set</strong> Up)<br />
Flash Freq 0-100 (2X <strong>Set</strong> Up)<br />
Color Sort 0-20 (3X <strong>Set</strong> Up)<br />
Run Times 0-20 (4X <strong>Set</strong> Up)<br />
Exit :<br />
Return to the Mode Menu<br />
8
11. Flow 3 (FF/REW) Function <strong>Set</strong> : Run Speed 0-100 (1X <strong>Set</strong> Up)<br />
Flash Freq 0-100 (2X <strong>Set</strong> Up)<br />
Color Sort 0-20 (3X <strong>Set</strong> Up)<br />
Run Times 0-20 (4X <strong>Set</strong> Up)<br />
Exit :<br />
Return to the Mode Menu<br />
12. 2 Color Chase Function <strong>Set</strong> : Run Speed 0-100 (1X <strong>Set</strong> Up)<br />
Flash Freq 0-100 (2X <strong>Set</strong> Up)<br />
Color Sort 0-20 (3X <strong>Set</strong> Up)<br />
Run Times 0-20 (4X <strong>Set</strong> Up)<br />
Exit :<br />
Return to the Mode Menu<br />
13. Multi-Color Chase Function <strong>Set</strong> : Run Speed 0-100 (1X <strong>Set</strong> Up)<br />
Flash Freq 0-100 (2X <strong>Set</strong> Up)<br />
Color Sort 0-20 (3X <strong>Set</strong> Up)<br />
Run Times 0-20 (4X <strong>Set</strong> Up)<br />
Exit :<br />
Return to the Mode Menu<br />
14. Fade Change Function <strong>Set</strong> : Run Speed 0-100 (1X <strong>Set</strong> Up)<br />
Flash Freq 0-100 (2X <strong>Set</strong> Up)<br />
Color Sort 0-20 (3X <strong>Set</strong> Up)<br />
Run Times 0-20 (4X <strong>Set</strong> Up)<br />
Exit :<br />
Return to the Mode Menu<br />
15. 2 Color Fade Chase Function <strong>Set</strong> : Run Speed 0-100 (1X <strong>Set</strong> Up)<br />
Flash Freq 0-100 (2X <strong>Set</strong> Up)<br />
Color Sort 0-20 (3X <strong>Set</strong> Up)<br />
Run Times 0-20 (4X <strong>Set</strong> Up)<br />
Exit :<br />
Return to the Mode Menu<br />
16. Auto Run<br />
17. System Mode Function <strong>Set</strong> : Channels / Pixel (1X <strong>Set</strong> Up)<br />
DMX START Channel 0-510 (2X <strong>Set</strong> Up)<br />
Master / Slave (3X <strong>Set</strong> Up)<br />
Pixels / Tube (4X <strong>Set</strong> Up)<br />
Tubes Qty (5X <strong>Set</strong> Up)<br />
Exit :<br />
Return to the Mode Menu<br />
In menu 8 - 15 you are also able to change the color of the chase or flow.<br />
There are 20 available color varieties.<br />
Channels / Pixel: you can choose 3, 4 or 5 channels per pixel<br />
Pixels / Tube: you can choose different the sections ( 1 /5 – 4)<br />
• 1 /5 means all the 4 <strong>LED</strong> <strong>Powerbrick</strong>s are as one<br />
• 1 means one <strong>LED</strong> <strong>Powerbrick</strong> is 1 secion<br />
• 2 means each <strong>LED</strong> <strong>Powerbrick</strong> has 2 secions<br />
• 4 means each <strong>LED</strong> <strong>Powerbrick</strong> has 4 secions<br />
Tubes Qty: Choose the number of the <strong>LED</strong> <strong>Powerbrick</strong>s to be controlled.<br />
9
Connection Stand-alone<br />
10
DMX Controlled<br />
1. The device will start test-mode.<br />
2. Press MODE button to enter mode setting.<br />
3. Switch to System Mode, then press the <strong>Set</strong> Up-button.<br />
4. Enter the amount of tubes you are using.<br />
5. For DMX Controlled you have to use DMX Channel: 1-65535, then press the <strong>Set</strong> Up-button again.<br />
6. The LCD now shows “<strong>Set</strong> Address YES”; press SETUP-Button (=NO) to keep your previous settings,<br />
or YES (=Up-Button) to store your choice.<br />
7. Now your unit is DMX-Controlled. You will find all the pre-<strong>pro</strong>grammed scenes below.<br />
Channel 1<br />
0-28 Black-out<br />
29-57 Static RED<br />
58-86 Static GREEN<br />
87-115 Static YELLOW<br />
116-144 Static BLUE<br />
145-173 Static PURPLE<br />
174-202 Static CYAN<br />
203-231 Static WHITE<br />
232-255 Color Change<br />
Channel 2<br />
Channel 3<br />
0-12 Slow Flow 1<br />
13-25 Slow Flow 2<br />
26-38 Roll Chase 1<br />
39-51 Roll Chase 2<br />
52-64 Multi Color<br />
65-77 Fast Flow 1<br />
78-90 Fast Flow 2<br />
91-103 2 Color Chase<br />
104-116 2 Color Flow<br />
117-129 Color Fade<br />
130-142 B+W Flow<br />
143-155 R+G Flow<br />
156-168 G+B Flow<br />
169-181 R+B Flow<br />
182-194 R+G Chase<br />
195-207 R+B Chase<br />
208-220 R+W Chase<br />
221-233 B+G Chase<br />
234-246 W+G Chase<br />
247-255 Rainbow Chase<br />
0-255 Strobe <strong>Set</strong>ting Variable from OFF to 20Hz (0-255).<br />
255=ON<br />
To select <strong>pro</strong>grams via DMX Mode you have to make combinations of CHANNEL 2 and CHANNEL 1.<br />
11
Connection DMX<br />
You can control the <strong>LED</strong> <strong>Powerbrick</strong> with 3, 4 or 5 channels:<br />
• 3 channel: rRed, Green, Blue.<br />
• 4 channel: Master dimmer, Red, Green, Blue.<br />
• 5 channel: Master dimmer, strobe, Red, Green, Blue.<br />
12
Illuminance Distribution<br />
1.0m.<br />
0.0m.<br />
1.0m.<br />
Illuminance<br />
13
Maintenance<br />
The <strong>LED</strong> <strong>Powerbrick</strong> <strong>Set</strong> requires almost no maintenance. However, you should keep the unit clean.<br />
Disconnect the mains power supply, and then wipe the cover with a damp cloth. Do not immerse in liquid.<br />
Keep connections clean. Disconnect electric power, and then wipe the connections with a damp cloth.<br />
Make sure connections are thoroughly dry before linking equipment or supplying electric power.<br />
Replacing a Fuse<br />
Power surges, short-circuit or inap<strong>pro</strong>priate electrical power supply may cause a fuse to burn out. If the fuse<br />
burns out, the <strong>pro</strong>duct will not function whatsoever. If this happens, follow the directions below to do so.<br />
1. Unplug the unit from electric power source.<br />
2. Insert a flat-head screwdriver into a slot in the fuse cover. Gently pry up the fuse cover. The fuse will<br />
come out.<br />
3. Remove the broken fuse. If brown or unclear, it is burned out.<br />
4. Insert the replacement fuse into the holder where the old fuse was. Reinsert the fuse cover.<br />
Be sure to use a fuse of the same type and specification. See the <strong>pro</strong>duct specification label for details.<br />
Troubleshooting<br />
Showtec <strong>LED</strong> <strong>Powerbrick</strong> <strong>Set</strong><br />
This troubleshooting guide is meant to help solve simple <strong>pro</strong>blems.<br />
If a <strong>pro</strong>blem occurs, carry out the steps below in sequence until a solution is found. Once the unit operates<br />
<strong>pro</strong>perly, do not carry out following steps.<br />
If the light effect does not operate <strong>pro</strong>perly, refer servicing to a technician.<br />
1. If the device does not operate <strong>pro</strong>perly, unplug the device.<br />
2. Check the fuse, power from the wall, all cables etc.<br />
3. If all of the above appears to be O.K., plug the unit in again.<br />
4. If you are unable to determine the cause of the <strong>pro</strong>blem, do not open the <strong>LED</strong> <strong>Powerbrick</strong> <strong>Set</strong>, as this<br />
may damage the unit and the warranty will become void.<br />
5. Return the device to your Showtec dealer.<br />
15
Product Specification<br />
Model: Showtec <strong>LED</strong> <strong>Powerbrick</strong> <strong>Set</strong><br />
4 x <strong>Powerbrick</strong><br />
Working Voltage: 48V DC<br />
Max. Power: 18W<br />
Colors: 16.7million<br />
Light Source: 1W RGB <strong>LED</strong><br />
12 <strong>LED</strong>s (4 Red, 4 Green, 4 Blue)<br />
Beam Angle: 25°<br />
Housing: Aluminum body in black<br />
Data connector: 4-pin XLR<br />
Weight: 1,5 kg<br />
1 x <strong>Powerbrick</strong> controller<br />
Voltage: AC 230V-50Hz (CE)<br />
Output 48V DC<br />
Housing: Aluminum body in black<br />
Data connector: 4-pin XLR<br />
Weight: 3.2 Kg<br />
Max. ambient temperature ta: 40°C<br />
Minimum distance:<br />
Minimum distance from flammable surfaces: 0.5m<br />
Minimum distance to lighted object: 1m<br />
Design and <strong>pro</strong>duct specifications are subject to change without prior notice.