GTS-PP - Wrapid Sleeve⢠- Canusa-CPS
GTS-PP - Wrapid Sleeve⢠- Canusa-CPS
GTS-PP - Wrapid Sleeve⢠- Canusa-CPS

Create successful ePaper yourself
Turn your PDF publications into a flip-book with our unique Google optimized e-Paper software.
SOLVENT<br />
SOLVENT<br />
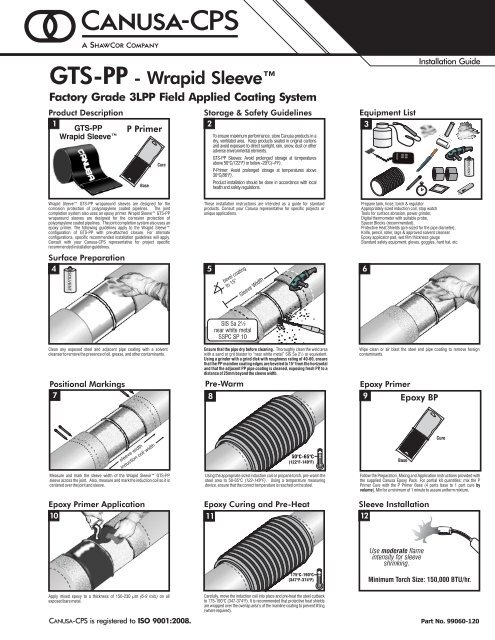
<strong>GTS</strong>-<strong>PP</strong> - <strong>Wrapid</strong> Sleeve<br />
Factory Grade 3L<strong>PP</strong> Field Applied Coating System<br />
Product Description<br />
1<br />
<strong>GTS</strong>-<strong>PP</strong> P Primer<br />
<strong>Wrapid</strong> Sleeve<br />
Base<br />
Cure<br />
Storage & Safety Guidelines<br />
2<br />
To ensure maximum performance, store <strong>Canusa</strong> products in a<br />
dry, ventilated area. Keep products sealed in original cartons<br />
and avoid exposure to direct sunlight, rain, snow, dust or other<br />
adverse environmental elements.<br />
<strong>GTS</strong>-<strong>PP</strong> Sleeves: Avoid prolonged storage at temperatures<br />
above 50°C(122°F)<br />
or below -20°C(-4°F).<br />
P-Primer: Avoid prolonged storage at temperatures above<br />
30°C (86°F).<br />
Product installation should be done in accordance with local<br />
health and safety regulations.<br />
Equipment List<br />
3<br />
Installation Guide<br />
<strong>Wrapid</strong> Sleeve <strong>GTS</strong>-<strong>PP</strong> wraparound sleeves are designed for the<br />
corrosion protection of polypropylene coated pipelines. The joint<br />
completion system also uses an epoxy primer. <strong>Wrapid</strong> Sleeve <strong>GTS</strong>-<strong>PP</strong><br />
wraparound sleeves are designed for the corrosion protection of<br />
polypropylene coated pipelines. The joint completion system also uses an<br />
epoxy primer. The following guidelines apply to the <strong>Wrapid</strong> Sleeve<br />
configuration of <strong>GTS</strong>-<strong>PP</strong> with pre-attached closure. For alternate<br />
configurations, specific recommended installation guidelines will apply.<br />
Consult with your <strong>Canusa</strong>-<strong>CPS</strong> representative for project specific<br />
recommended installation guidelines.<br />
Surface Preparation<br />
4<br />
These installation instructions are intended as a guide for standard<br />
products. Consult your <strong>Canusa</strong> representative for specific projects or<br />
unique applications.<br />
5<br />
bevel coating<br />
to 15°<br />
Sleeve Width<br />
Propane tank, hose, torch & regulator<br />
Appropriately sized induction coil, stop watch<br />
Tools for surface abrasion, power grinder,<br />
Digital thermometer with suitable probe,<br />
Spacer Blocks (recommended),<br />
Protective Heat Shields (pre-sized for the pipe diameter),<br />
Knife, pencil, roller, rags & approved solvent cleanser<br />
Epoxy applicator pad, wet film thickness gauge<br />
Standard safety equipment; gloves, goggles, hard hat, etc.<br />
6<br />
Clean any exposed steel and adjacent pipe coating with a solvent<br />
cleanser to remove the presence of oil, grease, and other contaminants.<br />
Positional Markings<br />
7<br />
Ensure that the pipe dry before cleaning. Thoroughly clean the weld area<br />
with a sand or grit blaster to “near white metal” SIS Sa 2½ or equivalent.<br />
Using a grinder with a grind disk with roughness rating of 40-60, ensure<br />
that the <strong>PP</strong> mainline coating edges are beveled to 15° from the horizontal<br />
and that the adjacent <strong>PP</strong> pipe coating is cleaned, exposing fresh <strong>PP</strong>, to a<br />
distance of 25mm beyond the sleeve width.<br />
Pre-Warm<br />
8<br />
SIS Sa 2½<br />
near white metal<br />
SSPC SP 10<br />
Wipe clean or air blast the steel and pipe coating to remove foreign<br />
contaminants.<br />
Epoxy Primer<br />
9 Epoxy BP<br />
sleeve width<br />
induction coil width<br />
50°C-65°C<br />
(122°F-149°F)<br />
Base<br />
Cure<br />
Measure and mark the sleeve width of the <strong>Wrapid</strong> Sleeve <strong>GTS</strong>-<strong>PP</strong><br />
sleeve across the joint. Also, measure and mark the induction coil so it is<br />
centered over the joint and sleeve.<br />
Epoxy Primer Application<br />
10<br />
Using the appropriate sized induction coil or propane torch, pre-warm the<br />
steel area to 50-65°C (122-149°F). Using a temperature measuring<br />
device, ensure that the correct temperature is reached on the steel.<br />
Epoxy Curing and Pre-Heat<br />
11<br />
Follow the Preparation, Mixing and Application instructions provided with<br />
the supplied <strong>Canusa</strong> Epoxy Pack. For partial kit quantities: mix the P<br />
Primer Cure with the P Primer Base (4 parts base to 1 part cure by<br />
volume). Mix for a minimum of 1 minute to assure uniform mixture.<br />
Sleeve Installation<br />
12<br />
Apply mixed epoxy to a thickness of 150-230 µm (6-9 mils) on all<br />
exposed bare metal.<br />
CANUSA-<strong>CPS</strong> is registered to ISO 9001:2008.<br />
175°C-190°C<br />
(347°F-374°F)<br />
Carefully, move the induction coil into place and pre-heat the steel cutback<br />
to 175-190°C (347-374°F). It is recommended that protective heat shields<br />
are wrapped over the overlap area’s of the mainline coating to prevent lifting<br />
(where required).<br />
Use moderate flame<br />
intensity for sleeve<br />
shrinking.<br />
Minimum Torch Size: 150,000 BTU/hr.<br />
Part No. 99060-120
<strong>GTS</strong>-<strong>PP</strong> - <strong>Wrapid</strong> Sleeve<br />
13<br />
10<br />
2<br />
14<br />
1<br />
15<br />
2<br />
Place the underlap of the sleeve onto the joint, centering the sleeve such<br />
that the sleeve overlap is positioned at either the 10 or 2 o'clock position.<br />
Press the underlap firmly into place. For J-Lay installation, use <strong>Canusa</strong><br />
sleeve stabilization bracket to maintain sleeve in the vertical position.<br />
Optional spacers can be inserted under the edge of the sleeve to<br />
minimize the potential of air entrapment.<br />
Wrap the sleeve loosely around the pipe, ensuring the appropriate overlap.<br />
Ensure that the overlap of the sleeve is a nominal width of 75mm<br />
(minimum acceptable width is 50mm). Before finishing wrapping the<br />
sleeve: (1) heat the backing side of the underlap until the backing starts to<br />
recover (2) heat the adhesive side of the closure until the adhesive<br />
appears glossy.<br />
Press the closure and overlap firmly into place. Wrap the protective heat<br />
shields around the pipe beside the ends of the sleeve (where required).<br />
Ensure overlap of 50mm. Wrap the the protective heat shields around pipe<br />
beside the ends of the sleeve. (Strongly recommended.)<br />
16A<br />
B<br />
17<br />
Sleeve Installation<br />
18<br />
C<br />
D<br />
Gently heat the closure and pat it down with a gloved hand. Repeating this<br />
procedure, move from one side to the other. Smooth any wrinkles by gently<br />
working them outward from the centre of the closure with a roller.<br />
19<br />
Using the torch, begin heating at the centre of the sleeve and heat<br />
circumferentially around the pipe. If the backing becomes shiny or gives<br />
off smoke, move the torch away from that area. For J-Lay installation,<br />
when the centre portion of the sleeve is shrunk tightly to the pipe,<br />
remove the sleeve stabilization bracket.<br />
Quality Check - Adhesion Test<br />
20<br />
Continue heating from the centre toward one end of the sleeve until<br />
recovery is complete. In a similar manner, heat and shrink the remaining<br />
side.<br />
Inspection<br />
21<br />
Initial shrinking has been completed when the sleeve fully conforms to the<br />
entire pipe profile. Finish shrinking the sleeve with long circumferential<br />
strokes over the coating overlap surface to ensure a uniform bond.<br />
Adhesive should begin to ooze at the sleeve edges all around the<br />
circumference.<br />
Onshore and Offshore Guidelines<br />
Test sleeve adhesion by gently pulling the edge of the backing back to<br />
ensure that the adhesive remains in place and is fully bonded to the<br />
factory coating. The sleeve is well bonded when the adhesive and coating<br />
remain intimately contacted. If required to improve bonding, additional<br />
heat should be applied to the sleeve. Remove protective heat shields<br />
when application is completed.<br />
Visually inspect the installed sleeve for the following:<br />
• Sleeve is in full contact with the steel joint.<br />
• Adhesive flows beyond both sleeve edges.<br />
• No cracks or holes in sleeve backing.<br />
• Minimum overlap of 50mm onto coating after cooled.<br />
After shrinking is complete, allow the<br />
sleeve to cool to less than 90°C prior to<br />
laying (for offshore applications, product<br />
can be water quenched).<br />
www.canusacps.com<br />
Canada<br />
CANUSA-<strong>CPS</strong><br />
a division of SHAWCOR LTD.<br />
25 Bethridge Road<br />
Toronto, Ontario<br />
M9W 1M7,<br />
Canada<br />
Tel: +1 (416) 743-7111<br />
Fax: +1 (416) 743-5927<br />
U.S.A./Latin America<br />
CANUSA-<strong>CPS</strong><br />
SHAWCOR INC.<br />
a division of<br />
2408 Timberloch Place<br />
Building C-8<br />
The Woodlands, Texas<br />
77380, U.S.A.<br />
Tel: +1 (281) 367-8866<br />
Fax: +1 (281) 367-4304<br />
Europe/Middle East<br />
CANUSA SYSTEMS<br />
a division of SHAWCOR UK LIMITED<br />
Unit 3, Sterling Park<br />
Gatwick Road<br />
Crawley, West Sussex<br />
England RH10 9QT<br />
Tel: +44 (1293) 541254<br />
Fax: +44 (1293) 541777<br />
Asia/Pacific<br />
CANUSA-<strong>CPS</strong><br />
SHAWCOR INC.<br />
a division of<br />
#05-31, Blk 52, Frontier<br />
Ubi Avenue 3<br />
Singapore<br />
408867<br />
Tel: +65-6749-8918<br />
Fax: +65-6749-8919<br />
<strong>Canusa</strong> warrants that the product conforms to its chemical and physical description and is appropriate for the use stated on the installation guide when used in compliance with <strong>Canusa</strong>’s written instructions. Since<br />
many installation factors are beyond our control, the user shall determine the suitability of the products for the intended use and assume all risks and liabilities in connection therewith. <strong>Canusa</strong>’s liability is stated in the<br />
standard terms and conditions of sale. <strong>Canusa</strong> makes no other warranty either expressed or implied. All information contained in this installation guide is to be used as a guide and is subject to change without notice.<br />
This installation guide supersedes all previous installation guides on this product. E&OE<br />
Printed on recycled paper. Recyclable.<br />
IG-<strong>GTS</strong><strong>PP</strong>/K-rev028