Leica DM 5500 tutorial.pdf - EPFL
Leica DM 5500 tutorial.pdf - EPFL
Leica DM 5500 tutorial.pdf - EPFL

You also want an ePaper? Increase the reach of your titles
YUMPU automatically turns print PDFs into web optimized ePapers that Google loves.
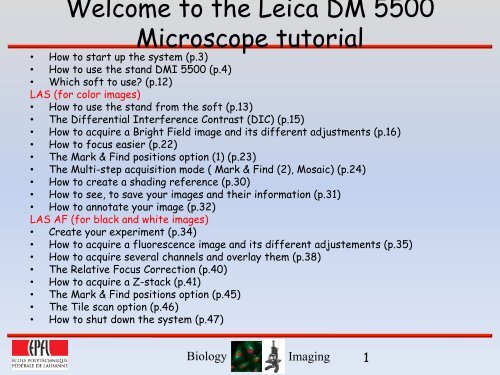
Welcome to the <strong>Leica</strong> <strong>DM</strong> <strong>5500</strong><br />
Microscope <strong>tutorial</strong><br />
• How to start up the system (p.3)<br />
• How to use the stand <strong>DM</strong>I <strong>5500</strong> (p.4)<br />
• Which soft to use (p.12)<br />
LAS (for color images)<br />
• How to use the stand from the soft (p.13)<br />
• The Differential Interference Contrast (DIC) (p.15)<br />
• How to acquire a Bright Field image and its different adjustments (p.16)<br />
• How to focus easier (p.22)<br />
• The Mark & Find positions option (1) (p.23)<br />
• The Multi-step acquisition mode ( Mark & Find (2), Mosaic) (p.24)<br />
• How to create a shading reference (p.30)<br />
• How to see, to save your images and their information (p.31)<br />
• How to annotate your image (p.32)<br />
LAS AF (for black and white images)<br />
• Create your experiment (p.34)<br />
• How to acquire a fluorescence image and its different adjustements (p.35)<br />
• How to acquire several channels and overlay them (p.38)<br />
• The Relative Focus Correction (p.40)<br />
• How to acquire a Z-stack (p.41)<br />
• The Mark & Find positions option (p.45)<br />
• The Tile scan option (p.46)<br />
• How to shut down the system (p.47)<br />
Biology<br />
Imaging<br />
1
<strong>Leica</strong> <strong>DM</strong> <strong>5500</strong> <strong>tutorial</strong><br />
Before using the<br />
<strong>Leica</strong> <strong>DM</strong> <strong>5500</strong><br />
You need to<br />
reserve the<br />
system =<br />
http://svint<br />
ranet.epfl.ch<br />
/index.phpo<br />
ption=com_vi<br />
ew&task=vie<br />
w&id=52<br />
Biology<br />
Imaging<br />
2
System Start up<br />
• Turn on the Fluorescence lamp<br />
• Turn on the Microscope button<br />
You have to turn on the light<br />
only if it is cold (approximately<br />
30 minutes after its last use)<br />
• Turn on the PC<br />
• Introduce your Username<br />
• Introduce your password<br />
Biology<br />
Imaging<br />
3
Microscope (left side)<br />
• Intensity of halogen or<br />
fluorescence lamp (+/-) (INT)<br />
• Condenser Aperture for the<br />
contrast (+/-) (AP)<br />
• Field diaphragm for the Köhler<br />
adjustment (+/-) (FD)<br />
• Toggle between reflected and<br />
transmitted light<br />
Biology<br />
Imaging<br />
4
Microscope (front part)<br />
• On the downer front part of the<br />
microscope, you’ll find a tactile<br />
screen<br />
• On its left side, you will see some<br />
tabs, to open the one you need to<br />
setup more options, you have to<br />
touch it<br />
You only need to use two tabs:<br />
• The Eyes-piece-camera position<br />
selection<br />
• The stage position<br />
For the other options (Settings<br />
summary/Illumination/Magnification<br />
), you can change them from the<br />
software<br />
Biology<br />
Imaging<br />
5
Tactile screen (step1)Eyes-pieces/camera<br />
• When you’ve touched and opened the<br />
tab of eyes-piece - camera position<br />
selection,<br />
you can change between eyes-pieces<br />
and camera position (or a fifty-fifty<br />
mode)<br />
You will also find both of the shutter.<br />
• For fluorescence<br />
• For brightfield<br />
To open or close them, you have to<br />
touch the shutter button, and you<br />
will see<br />
• The LCD off window allow you to<br />
switch off the tactile screen. To<br />
switch on again, just touch it<br />
Biology<br />
Imaging<br />
6
Tactile screen (step2)About the stage<br />
• When you’ve touched and opened the<br />
tab of stage controller,<br />
You’ll see two news tabs:<br />
• The first one named Focus and care<br />
about the Z-focus-Axis<br />
• The second one named Stage and<br />
care about the XY-Stage position:<br />
you will see the X, Y positions in mm<br />
and you can change the step of X/Y<br />
stage controller between fast and<br />
precise<br />
Biology<br />
Imaging<br />
7
Tactile screen (step3)About the stage<br />
Under the window FOCUS, you can<br />
setup the Z Axis Stage<br />
• By choosing a fine or coarse focus<br />
wheel step<br />
• By doing go down and up the stage in<br />
some positions<br />
• Neared focus position (<br />
Z=0)<br />
you can modify it with the<br />
set button and delete it<br />
with the clear button<br />
• a down position, to put your<br />
sample or your immersion oil<br />
In both cases, you have to click on the<br />
GO TO button to activate your<br />
chosen position.<br />
Biology<br />
Imaging<br />
8
Microscope (upper part) Cameras<br />
• On the right up side of the<br />
microscope, you will find The camera<br />
button selection.<br />
Indeed this microscope has two<br />
cameras:<br />
• A color camera (the upper one)<br />
• A black and white camera ( the right<br />
one)<br />
When you’re opened your soft, you have<br />
to choose the right camera:<br />
• With the LAS soft select the color<br />
camera (pull the camera button)<br />
• With the LAS AF select the black<br />
and white one (push the camera<br />
button)<br />
Biology<br />
Imaging<br />
9
Microscope (right side)<br />
• Magnifying lenses ( 1x/1.25/1.6x), to change<br />
the lens, you have to turn this wheel<br />
Choose your objective manually:<br />
• HCX PL FLUOTAR 5x/0.15<br />
• HC PL FLUOTAR 10x/0.30<br />
• HC PL FLUOTAR 20x/0.50<br />
• PL FLUOTAR/ OIL 40x/1.00-0.5<br />
• HCX PL APO/ OIL 63x/1.40-0.60<br />
Biology<br />
Imaging<br />
10
Next to the microscope, you will find a<br />
Joystick.<br />
This Joystick allows you to manage the<br />
stage:<br />
The Joystick<br />
Turning the upper button, you will<br />
manage the Y-axis direction<br />
Turning the downer button, you will<br />
manage the X-axis direction<br />
Turning the backwards button you will<br />
manage the Z-axis direction<br />
On each side of the joystick you will<br />
find two small black buttons which<br />
allows you to choose<br />
Between a coarse or fine moving in<br />
Z direction<br />
Or<br />
Between a fast or precise X-Y<br />
moving direction<br />
Biology<br />
Imaging<br />
11
Which soft to use<br />
When you arrive on your<br />
computer session, you<br />
will see that this<br />
computer has two softs,<br />
you have to open the<br />
right one.<br />
• If you work with color<br />
camera, you have to open<br />
the LAS soft<br />
• If you work with black<br />
and white camera, you<br />
have to open the LAS AF<br />
soft<br />
Biology<br />
Imaging<br />
12
LAS Soft Microscope on the soft(MIC1)<br />
Under Acquire and Mic1,<br />
• you can see the objective that you’re<br />
using<br />
• You can setup the aperture and field<br />
diaphragm<br />
• You can setup the intensity of the<br />
transmitted light and use the<br />
shutter<br />
• You can select the eye piece or<br />
camera position<br />
• For Acquiring your image after all<br />
settings done<br />
Biology<br />
Imaging<br />
13
Microscope on the soft, step 2 (MIC2)<br />
Under Acquire and<br />
Mic2, you can<br />
first<br />
• setup the focus<br />
wheel<br />
(fine or coarse)<br />
• setup the X/Y<br />
stage manager<br />
(fast/precise)<br />
You can also Mark<br />
some positions<br />
(6) that you<br />
could find later.<br />
Biology<br />
Imaging<br />
14
Differential interference contrast (DIC)<br />
Under Acquire and MIC1, select<br />
DIC contrast<br />
• To change and choose the right<br />
contrast , turn the DIC prism<br />
wheel<br />
Biology<br />
Imaging<br />
15
Acquire a transmitted light image<br />
• Under Acquire and Camera,<br />
you can adjust<br />
• the exposure time<br />
• The contrast (gamma)<br />
As you’re working with a color<br />
camera, you have to apply a<br />
white balance before<br />
acquire a picture (see next<br />
slide)<br />
If you have no other option to<br />
setup<br />
You can click on Acquire an<br />
image<br />
Biology<br />
Imaging<br />
16
White Balance<br />
As you’re acquiring a Bright filed<br />
picture with a color camera, you<br />
need to do a white balance<br />
You have to<br />
• select an area of your live image<br />
which has to be white<br />
• Create around this area a<br />
selection with the left button of<br />
your mouse and Click on White<br />
balance<br />
Biology<br />
Imaging<br />
17
Histogram and saturation options<br />
Under Acquire and Camera and<br />
Histogram,<br />
• You can see the grey scale<br />
• You can tick Show Over/Under<br />
Exposure, and you will see the<br />
over exposure in red and the<br />
under exposure in blue, you<br />
shouldn’t have some red dots on<br />
your picture<br />
• You can also reduce the grey<br />
scale<br />
Biology<br />
Imaging<br />
18
Input option<br />
Under Acquire and camera and input<br />
option, you can choose<br />
• if you want a greyscale picture<br />
• The bit depth (8/12 bits)<br />
• The right format (2088x1550 HQ)<br />
Biology<br />
Imaging<br />
19
The binning<br />
Under Acquire and Camera and<br />
Input option,<br />
• You can choose a binning, it will<br />
increase the camera sensitivity,<br />
reduce the exposure time<br />
But you will lose some resolution<br />
Biology<br />
Imaging<br />
20
Scale Bar<br />
• Under Camera and<br />
scale bar,<br />
You can choose to show<br />
and change the scale<br />
bar, if you click on<br />
show<br />
Be careful, with this<br />
option the scale bar<br />
won’t stay on your<br />
picture. if you really<br />
want a scale bar on<br />
your image you have<br />
to do it under process<br />
Biology<br />
Imaging<br />
21
How to focus easier<br />
Under Acquire and Camera and<br />
Region of interest,<br />
• If you select zoom focus, it will<br />
zoom the region you want so you<br />
can easily find the right focus.<br />
When it’s done click on off, and<br />
the right focus will appear on all<br />
the picture<br />
Biology<br />
Imaging<br />
22
Under Acquire and Mic2,<br />
Mark and Find options (1)<br />
You can Mark some positions (maximum 6) that<br />
you could find later.<br />
• To mark a position you have to click on the<br />
dark tab, to see all positions and select one<br />
of them and click on store<br />
When you’ve clicked on store, your position will<br />
be saved.<br />
You will see the coordinates of your chosen<br />
position next to its name and on the right<br />
part of your screen, a circle surround the<br />
number of the position<br />
When all positions you want have been marked,<br />
to find them you have to<br />
Select the position you want to find and<br />
Click on GoTo<br />
Or<br />
Dobble clicked on the right part of the<br />
screen on the right number surrounded<br />
position.<br />
To clear position you have to select it and click<br />
on CLEAR<br />
Biology<br />
Imaging<br />
23
As the <strong>DM</strong> <strong>5500</strong> owns a<br />
motorized stage,<br />
under multi-step you<br />
will find some<br />
applications linked to<br />
the stage, the two<br />
most important:<br />
Multi step options, step1<br />
• A Mark and Find<br />
option<br />
• A multi-step option,<br />
which allows you to<br />
create a mosaic<br />
picture with several<br />
single images<br />
To accede to the options<br />
you have to select<br />
the MULTI STEP<br />
acquisition mode<br />
Biology<br />
Imaging<br />
24
Multi step options, step 2<br />
When you’re opened the multi-step<br />
acquisition mode, the “S” tab will<br />
appear and open,<br />
under Methode choose the Mark and Find<br />
options<br />
• To mark a position, you have<br />
to choose the position you<br />
want and click on Create<br />
Do that for each position<br />
you want to mark<br />
• To see your saved positions,<br />
Click on them<br />
• To delete your positions click<br />
on Clear. If you want to remove<br />
only one position, select it and<br />
click on remove<br />
To acquire each position which was<br />
marked, click on Acquire Multi-Step<br />
Biology<br />
Imaging<br />
25
Multi step options, step3(mosaic mode)<br />
With the Multi step<br />
option, you can scan<br />
a “large” part of<br />
your sample in<br />
several images<br />
which be put<br />
together,<br />
By default, you will use<br />
the bi-directional<br />
scan option<br />
Then you have to<br />
select the start<br />
point of your<br />
mosaic and click on<br />
create<br />
Afterwards you have<br />
to choose the end<br />
point and click on<br />
expand<br />
Biology<br />
Imaging<br />
26
Multi step options, step4 (mosaic mode)<br />
You can now see your mosaic.<br />
• if you’re area is too small, you can zoom it<br />
• To remove it, you have to click on clear<br />
Before acquiring our picture, under option you<br />
can<br />
• Save or load configurations<br />
• Choose to create a Mosaic image or/and subimages<br />
• Choose what you want to see during the<br />
acquisition (Mosaic or singles images)<br />
• Change the reduction factor of your mosaic<br />
When all your settings have been done<br />
you can click on Acquire MultiStep<br />
Biology<br />
Imaging<br />
27
Multi step options, step5(mosaic mode)<br />
During acquisition you can<br />
see the advance of your<br />
mosaic<br />
When your acquisition is finished,<br />
it will open under Browse,<br />
you can again<br />
• Choose to see single images or<br />
a Multi Step image<br />
• Change the factor reduction of the<br />
Multi Step image<br />
If you want to attenuate boarders between<br />
Single images, you have to apply<br />
a shading reference (see next slide)<br />
Biology<br />
Imaging<br />
28
Create a shading reference<br />
You will find the shading reference<br />
under Acquire, camera and<br />
processing.<br />
You can first choose one alreadyexisted<br />
shading reference , clicking<br />
here<br />
To create a shading reference,<br />
you have to<br />
• Find an empty area of your sample or<br />
better a new empty slide<br />
• Setup illumination until our picture<br />
becomes totally white<br />
Biology<br />
Imaging<br />
29
Create a shading reference<br />
• Go under Acquire, camera and<br />
processing and click on Create a<br />
shading reference (the downer<br />
selection you can do)<br />
• Name it<br />
If the illumination setup doesn’t<br />
be alright, the soft will tell you<br />
• Finally click on Apply to live<br />
Biology<br />
Imaging<br />
30
See your images and their information<br />
• Under Browse and file<br />
information, you can see the<br />
information linked to the image<br />
• Under Browse and File<br />
directory, you can see in which<br />
file is saved your image<br />
Biology<br />
Imaging<br />
31
How to annotate your image<br />
• Under Process and Annotate,<br />
you can choose to note some<br />
information about the image<br />
• The name , description , date<br />
and time<br />
• The scale bar<br />
• Lines, measurements (ex.<br />
distance line)<br />
• To save the picture with the<br />
information, you have to select<br />
Merge.<br />
Be careful, if you do it, you<br />
can’t go back. So if you need<br />
the original picture, copy it<br />
before you annotate it<br />
Biology<br />
Imaging<br />
32
LAS AF soft<br />
When you’re opened the LAS AF<br />
soft, during the configuration<br />
time, you will see this window<br />
appears:<br />
If you want to use the<br />
motorized stage to acquire some<br />
tile scan or marking some<br />
positions, you have to initialized<br />
the stage<br />
Biology<br />
Imaging<br />
33
Under Acquire and<br />
Experiment<br />
How to acquire a fluorescence image:<br />
Create your experiment<br />
When the software is open,<br />
experiment name is<br />
create, you can change it<br />
You can also open some<br />
saved experiment<br />
And if you want more than<br />
one experiment, you can<br />
create them with the<br />
New button<br />
When you experiment is<br />
finished you have to save<br />
it<br />
Biology<br />
Imaging<br />
34
How acquire a fluorescence image(step1)<br />
Under Light Path Settings,<br />
you have to set up your<br />
channel<br />
• Choose the name<br />
• Choose the color<br />
• Select the FLUO<br />
contrast method<br />
• Choose the filter<br />
Under load/save single<br />
settings, you can save or<br />
load this settings<br />
Biology<br />
Imaging<br />
35
How acquire a fluorescence<br />
image(step2)<br />
You have to click on Live to<br />
see your live image<br />
Under Acquire and<br />
Acquisition, you can<br />
adjust<br />
• the exposure time<br />
• Change the intensity<br />
For acquiring your image<br />
after all settings done,<br />
you can click on Single<br />
image ; Capture image;<br />
Start<br />
Biology<br />
Imaging<br />
36
Bit depth<br />
Under<br />
Configurations,<br />
and camera<br />
You can choose<br />
between a 8 or<br />
12 bits depth<br />
image<br />
Biology<br />
Imaging<br />
37
Histogram<br />
If you click on this button,<br />
You will see<br />
• The histogram of your<br />
image<br />
For seeing over or under<br />
exposure you have to go<br />
on the right screen.<br />
Normally your image has to be<br />
in color, then you have to<br />
click on this button to<br />
change into Over-under<br />
exposure mode<br />
(Over-exposure would be in<br />
blue and under exposure<br />
in green)<br />
or Greyscale mode<br />
Biology<br />
Imaging<br />
38
How acquire several channels<br />
Under the Light Path Settings,<br />
• you can add or delete some new<br />
channels, clicking on the plus or<br />
minus<br />
For each channel you have to<br />
• Select the channel<br />
Under the Light Path Settings,<br />
• Choose a name, a color, the FLUO<br />
contrast method and the filter<br />
Under Acquire and Acquisition,<br />
• Setup the exposure time and the<br />
intensity<br />
You can also save or load some<br />
configuration<br />
Biology<br />
Imaging<br />
39
How to overlay several channels<br />
On your right screen, on the right<br />
side you will see each channel<br />
you’re acquiring.<br />
If you want to see only one channel,<br />
you have to select the channel<br />
which interested you<br />
If you want to see all your channels,<br />
select all your channels<br />
Finally if you want to see an overlay<br />
of channels, select channels you<br />
want to overlay and select the<br />
overlay mode<br />
Biology<br />
Imaging<br />
40
Relative Focus Correction<br />
• The Focus changing option, permit<br />
you to acquire a several channels<br />
image , when several channels<br />
have different focus point<br />
between them<br />
• To open the focus changing option<br />
, click on this button<br />
Relative Focus Correction (RFC)<br />
Then you have to<br />
• Select the channel<br />
• Find the focus<br />
• Click on Store Z Position<br />
For each channel you want<br />
Finally you have to click on apply<br />
Relative Correction Focus<br />
Biology<br />
Imaging<br />
41
How to acquire a Z-stack (step1)<br />
First, under Acquire and setup,<br />
you have to select the<br />
Lambda then Z Z-movement<br />
Under Acquire and Acquisition,<br />
you have to<br />
• open the Z-stack mode<br />
• Go to the Z-stack dialogue<br />
Biology<br />
Imaging<br />
42
How to acquire a Z-stack (step2)<br />
• Activate live mode<br />
• 1) Find the first section by<br />
moving the z position until the<br />
objective is positioned on the<br />
top of your sample<br />
• 2) select Begin<br />
Biology<br />
Imaging<br />
43
How to acquire a Z-Stack (step3)<br />
• Continue in Live Mode<br />
• 3) Draw and setup the last<br />
section by moving the z position<br />
until the objective is positioned<br />
below to your sample = move the<br />
red plane into the z-stack<br />
dialogue<br />
• 4) Select End<br />
• 5) Stop live mode<br />
Biology<br />
Imaging<br />
44
How Acquire a Z-stack (step4)<br />
• 6) Introduce the step size into<br />
the calculator<br />
• Do enter<br />
Or select the system optimized<br />
mode<br />
• 7) Select Start<br />
Biology<br />
Imaging<br />
45
How to mark some positions<br />
With the mark and find option,<br />
you can choose to save the<br />
position of several points on<br />
your sample and it will be<br />
able to find them later<br />
You have to<br />
• Select the Mark and Find<br />
option<br />
• Select a new position<br />
• Choose on the sample the<br />
position you want and click<br />
on this button<br />
You can check the X-Y position<br />
Then you have to click on Start<br />
Biology<br />
Imaging<br />
46
With the tile scan option, you can scan a<br />
“large” part of your sample in several<br />
images which be put together<br />
You have to<br />
• Open the tile scan option<br />
• Select the start point of the scanning<br />
on your sample and click on this button<br />
• Select the end point of the scanning on<br />
your sample and click on this button<br />
On the tile scan dialogue, you can see,<br />
which surface will be scan and also in<br />
how many tiles it will be done<br />
If you want to delete your mosaic to<br />
create a new one, you have to stop the<br />
Live mode<br />
You can also see the positions of your point<br />
Then you have to click on Start<br />
Tile scan option<br />
Biology<br />
Imaging<br />
47
How to shut down the system<br />
• If you was using oil/glycerol objective, clean the objective with<br />
ethanol/water<br />
Before shutting down the system, you have to look on the reservation<br />
web-page if there is somebody using this microscope after you. In this<br />
case you haven’t to shut it down but you have to log off<br />
your session<br />
If nobody comes after you, you have to<br />
• Exit the software<br />
• Shut down the PC<br />
• Turn off the microscope<br />
• Turn off the light<br />
Biology<br />
Imaging<br />
48