Thermostatic mixing valves TX91 to TX96 - Watts Industries
Thermostatic mixing valves TX91 to TX96 - Watts Industries
Thermostatic mixing valves TX91 to TX96 - Watts Industries

You also want an ePaper? Increase the reach of your titles
YUMPU automatically turns print PDFs into web optimized ePapers that Google loves.
ulTramiX collecTive ThermosTaTic miXing <strong>valves</strong><br />
Flow diagram for a complete mixed water circuit:<br />
N.B : Other alternatives are realizable.<br />
For example, when one wants <strong>to</strong> carry out several loops at equal or different temperatures.<br />
Consult our technical assistance service which will send <strong>to</strong> you the corresponding diagrams.<br />
VM1 - VM2 - Micrometric <strong>valves</strong> <strong>to</strong> stabilise<br />
the loop temperature<br />
VM1 A - Open between 70 and 90%.<br />
VM1 B - Open between 30 and 10%.<br />
Remarks :<br />
1. If there is a connection point on the boiler (R)<br />
the return circuit should be connected here (A).<br />
2. Possibly, it can be interesting <strong>to</strong> envisage two<br />
micrometric <strong>valves</strong> VM2, in particular in the case of a<br />
res<strong>to</strong>ration of installation: the pump will not have <strong>to</strong> take<br />
account of the additional headloss due <strong>to</strong> the<br />
thermostatic <strong>mixing</strong> valve. In this case VM1A and VM1B<br />
are useless, the adjustment being done then on <strong>valves</strong><br />
VM2.<br />
VM2 C - Open between 70 and 90%.<br />
VM2 D - Open between 30 and 10%<br />
7<br />
How <strong>to</strong> adjust a thermostatic <strong>mixing</strong> valve on<strong>to</strong> a mixed water loop: WATTS INDUSTRIES recommends <strong>to</strong> minima, the<br />
installation of a thermometer of control of the temperature on the mixed water piping and one on the return of loop, and that this<br />
temperature is checked at least once a month under the normal conditions of operation. This thermometer must be installed at a<br />
distance from at least 1 meter of the thermostatic <strong>mixing</strong> valve.<br />
Step 1 : Mixed water temperature adjustment: this adjustment<br />
is done au<strong>to</strong>nomously without the loop circulation pump.<br />
1. S<strong>to</strong>p the loop circulation pump.<br />
2. Close the pump isolation <strong>valves</strong>.<br />
3. Open sufficient points of use on the mixed water circuit <strong>to</strong><br />
obtain the minimum flow of the thermostatic <strong>mixing</strong> valve.<br />
4. Turn the thermostatic <strong>mixing</strong> valve axis control shaft <strong>to</strong><br />
reduce or increase the mixed water temperature.<br />
5. Once the required temperature is obtained, replace the<br />
control knob (according <strong>to</strong> the model).<br />
againsT legionella answer:<br />
•<br />
You can with the thermostatic <strong>mixing</strong> valve such as it is (with 30/70°C cartridge):<br />
✓ adjust the temperature up <strong>to</strong> 55°C in the primary loop (recommended temperature).<br />
✓ adjust the temperature <strong>to</strong> 39°C (until 50°C - according <strong>to</strong> uses) in the secondary loop.<br />
✓ proceed <strong>to</strong> a thermal ”shock”: simply by freeing the control knob and position it a 70°C<br />
(without dismantling the thermostatic <strong>mixing</strong> valve, cartridge or control knob).<br />
•<br />
Step 2 : Mixed water loop temperature adjustment:<br />
1. Open the pump isolation <strong>valves</strong>.<br />
2. Start the circulation pump.<br />
3. Now proceed with the balancing: the ∆T° difference between<br />
the mixed water outlet and the return should be 5°C.<br />
To achieve this, manually adjust the VM1A balance valve<br />
(between 70 and 90 % of its <strong>to</strong>tal opening) and the VM1B valve<br />
(between 30 and 10 % of its <strong>to</strong>tal opening).<br />
NOTE: Leave the circuit sufficient time <strong>to</strong> stabilise before making another<br />
adjustment. Check the stability of the mixed water temperature on the<br />
moni<strong>to</strong>ring thermometer. If necessary, re-index the temperature knob so that<br />
its graduation is in phase with the mixed water temperature (operation<br />
referred <strong>to</strong> as “calibration” in the installation instructions).<br />
You also can by putting the cartridge in position ”rinsing” i.e. turned over cartridge, fixed at back, (see simple procedure<br />
and the rincing kit delivered with the thermostatic <strong>mixing</strong> valve):<br />
✓ rinse the thermostatic <strong>mixing</strong> valve and the drains (important before activation).<br />
✓ inject a disinfectant (chlorine) in<strong>to</strong> the water supply system without danger of damaging the thermostatic mechanism,<br />
because is not any more in contact with water.<br />
✓ proceed <strong>to</strong> a thermal ”shock” with more 70°C, without risk <strong>to</strong> damage the thermostatic mechanism prematurely, because is<br />
not any more in contact with water.<br />
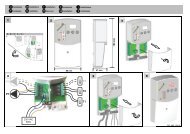
rinsing KiT = exclusive advantage for preventive or curative treatment (delivered with all ulTramiX)<br />
Take off the knob, cover,<br />
and screw.<br />
Remove the cover/cartridge<br />
from its casing.<br />
Place the flat washer<br />
(included in package)<br />
on the device's neck.<br />
Place the cover/cartridge unit<br />
upside down on the device<br />
and flat washers.<br />
Tighten the temporary screws<br />
(included the package).<br />
The <strong>valves</strong> act now as<br />
a “by-pass”.