service manual 55a four marine diesel engine - Westerbeke
service manual 55a four marine diesel engine - Westerbeke
service manual 55a four marine diesel engine - Westerbeke

You also want an ePaper? Increase the reach of your titles
YUMPU automatically turns print PDFs into web optimized ePapers that Google loves.
ENGINE REASSEMBLY<br />
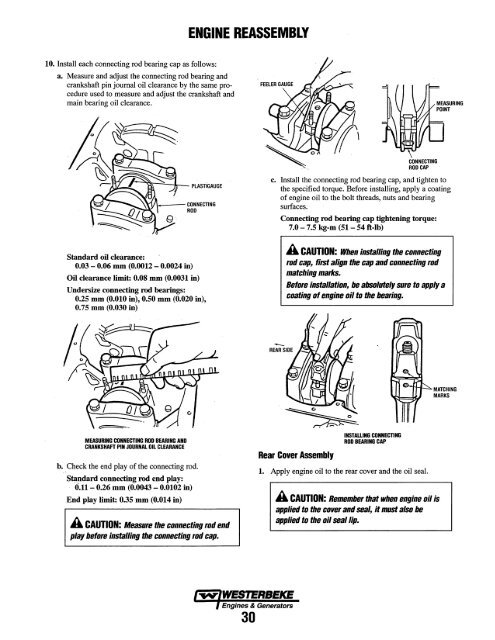
10. Install each connecting rod bearing cap as follows:<br />
a. Measure and adjust the connecting rod bearing and<br />
crankshaft pin journal oil clearance by the same procedure<br />
used to measure and adjust the crankshaft and<br />
main bearing oil clearance.<br />
CONNECTING<br />
ROD CAP<br />
~--'-J.._ PLASTiGAUGE<br />
L---- CONNECTING<br />
ROO<br />
c. Install the connecting rod bearing cap, and tighten to<br />
the specified torque. Before installing, apply a coating<br />
of <strong>engine</strong> oil to the bolt threads, nuts and bearing<br />
surfaces.<br />
Connecting rod bearing cap tightening torque:<br />
7.0 - 7.5 kg-m (51- 54 ft-Ib)<br />
Standard oil clearance:<br />
0.03 - 0.06 mm (0.0012 - 0.0024 in)<br />
Oil clearance limit: 0.08 mm (0.0031 in)<br />
Undersize connecting rod bearings:<br />
0.25 mm (0.010 in), 0.50 mm (0.020 in),<br />
0.75 mm (0.030 in)<br />
" A CAUTION: When installing the connecting<br />
rod cap, fim align the cap and connecting rod<br />
matching marks.<br />
Before installation, be absolutely SUfe to apply a<br />
coating of <strong>engine</strong> oil to the bearing.<br />
"MATCHING<br />
MARKS<br />
MEASURING CONNECTING ROD BEARING AND<br />
CRANKSHAn PIN JOURNAL OIL CLEARANCE<br />
b •. Check the end play of the connecting rod.<br />
S~~dard connecting rod end play:<br />
0.11 - 0.26 mm (0.0043 - 0.0102 in)<br />
End play limit: 0.35 mm (0.014 in)<br />
A CAUTION: Measure the connecting rod end<br />
play before installing the connecting rod cap.<br />
Rear Cover Assembly<br />
INSTAWNG CONNECTING<br />
ROD BEARING CAP<br />
1. Apply <strong>engine</strong> oil to the rear cover and the oil seal.<br />
A CAUTION: Remember that when <strong>engine</strong> oil is<br />
applied to the cover and seal, it must also be<br />
applied to the oil seal lip.<br />
Engines & Generators<br />
30