OM, Flymo, Pac a Shredder, 964011301, 2008-01, Garden ... - Klippo
OM, Flymo, Pac a Shredder, 964011301, 2008-01, Garden ... - Klippo
OM, Flymo, Pac a Shredder, 964011301, 2008-01, Garden ... - Klippo

Create successful ePaper yourself
Turn your PDF publications into a flip-book with our unique Google optimized e-Paper software.
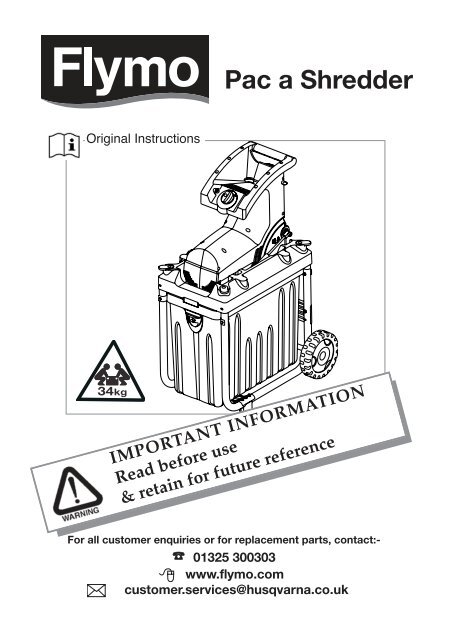
<strong>Pac</strong> a <strong>Shredder</strong><br />
Original Instructions<br />
34kg<br />
IMPORTANT INFORMATION<br />
Read before use<br />
& retain for future reference<br />
For all customer enquiries or for replacement parts, contact:-<br />
☎ <strong>01</strong>325 300303<br />
www.flymo.com<br />
customer.services@husqvarna.co.uk
Carton Contents<br />
cable hook<br />
collection<br />
box<br />
cable hook<br />
nut<br />
electric cable<br />
with moulded<br />
on plug and<br />
cable clip<br />
washer<br />
instruction<br />
manual<br />
push stick<br />
nut<br />
washer<br />
support foot and bolt<br />
washer<br />
support foot and bolt<br />
hub cap<br />
hub cap<br />
washer<br />
axle<br />
retaining clip<br />
wheel<br />
retaining clip<br />
wheel<br />
spanner<br />
hexagon drive tool<br />
IMPORTANT !<br />
Please check the contents of the carton are correct BEFORE assembling your new <strong>Flymo</strong> product.<br />
IF ANY PARTS ARE MISSING CONTACT:-<br />
Husqvarna UK Ltd. Customer Service Department direct<br />
Telephone : <strong>01</strong>325 300303 Fax : <strong>01</strong>325 302530<br />
Safety<br />
If not used properly this product can be dangerous! This product can cause serious injury to the<br />
operator and others, the warnings and safety instructions must be followed to ensure reasonable<br />
safety and efficiency in using this product. The operator is responsible for following the warning<br />
and safety instructions in this manual and on the product. Never use the product unless the collection<br />
box or guards provided by the manufacturer are in the correct position.<br />
Explanation of Symbols on your Product<br />
Danger rotating blades. Keep hands<br />
out of openings when machine is running.<br />
Warning<br />
Read the user instructions carefully to<br />
make sure you understand all the controls<br />
and what they do.<br />
Keep bystanders away. Do not shred<br />
whilst people especially children or pets<br />
are in the area<br />
Cutting blade continues to rotate after<br />
the machine is switched off. Wait until all<br />
machine components have completely<br />
stopped before touching them.<br />
Do not use in the rain or leave the product<br />
outdoors while raining<br />
Wear eye protection<br />
Switch off! Remove plug from mains before<br />
adjusting, cleaning or if cable is entangled<br />
or damaged. Keep the cable<br />
away from moving parts.<br />
Wear Gloves
General<br />
1. This product is not intended for use by persons (including<br />
children) with reduced physical, sensory or mental capabilities,<br />
or lack of experience and knowledge, unless they have<br />
been given supervision or instruction concerning the use of<br />
the product by a person responsible for their safety. Children<br />
should be supervised to ensure that they do not play<br />
with the product. Local regulations may restrict the age of<br />
the operator.<br />
2. Only use the product in the manner and for the functions<br />
described in these instructions.<br />
3. Never operate the product when you are tired, ill or<br />
under the influence of alcohol, drugs or medicine.<br />
4. The operator or user is responsible for accidents or hazards<br />
occurring to other people or their property.<br />
Electrical<br />
1. The British Standards Institute recommend the use of a Residual<br />
Current Circuit Device (R.C.D.) with a tripping current of not<br />
more than 30mA. Even with a R.C.D. installed 100% safety<br />
cannot be guaranteed and safe working practice must be followed<br />
at all times. Check your R.C.D. every time you use it.<br />
2. Before use, examine cable for damage, replace it if<br />
there are signs of damage or ageing.<br />
3. Do not use the product if the electric cables are damaged or<br />
worn<br />
4. Immediately disconnect from the mains electricity supply if<br />
the cable is cut, or the insulation is damaged. Do not touch<br />
the electric cable until the electrical supply has been disconnected.<br />
Do not repair a cut or damaged cable. Replace<br />
it with a new one.<br />
5. Your extension cable must be uncoiled, coiled cables can<br />
overheat and reduce the efficiency of your product.<br />
6. Do not pull cable around sharp objects.<br />
7. Always switch off at the mains before disconnecting any<br />
plug, cable connector or extension cable.<br />
8. Switch off before removing or fitting the collection box.<br />
9. Switch off, remove plug from mains and examine electric<br />
supply cable for damage or ageing before winding cable<br />
for storage. Do not repair a damaged cable, replace it<br />
with a new one. Use only <strong>Flymo</strong> replacement cable.<br />
10.Always wind cable carefully, avoiding kinking.<br />
11.Never pull on the cable to disconnect any of the plugs.<br />
12.Use only on AC mains supply voltage shown on the<br />
product rating label.<br />
Preparation<br />
1. Always wear suitable clothing, gloves, and stout shoes. Avoid<br />
wearing loose-fitting clothing or that has hanging cords or ties.<br />
2. Obtain and wear safety glasses at all times.<br />
3. Before using the machine check that all screws, nuts, bolts<br />
and other fasteners are properly secured and guards and<br />
screens in place and in good working condition.<br />
4. Replace damaged or unreadable warning and operating<br />
labels.<br />
5. Before starting the product, make certain that the feed<br />
inlet is empty.<br />
6. Do not operate the product in the vicinity of bystanders.<br />
Use<br />
1. Use the product only in daylight or good artificial light.<br />
2. Operate the product only on a firm, level surface.<br />
3. Do not allow hands or any other part of the body or clothing<br />
inside the feed inlet or near any moving part.<br />
4. Keep face and body away from the feed inlet opening.<br />
5. Keep a proper balance and footing at all times. Do not<br />
overreach. Never stand at a higher level than the base of<br />
the product when feeding material into it.<br />
6. When feeding material into the product be extremely<br />
careful that pieces of metal, rocks, bottles, cans , ropes,<br />
netting or other foreign objects are not included.<br />
7. When feeding material into the product be extremely<br />
careful that the mains cable is not accidently fed into the<br />
product.<br />
8. Keep hands and feet away from the cutting means at all<br />
times and especially when switching on the motor.<br />
9. Do not touch the cutting means before the machine<br />
is disconnected from the supply and the cutting<br />
means have come to a complete stop.<br />
10.Do not tilt product when the power source is running.<br />
11.Do not fold product when the power source is running.<br />
12.When folding the product for storage please ensure<br />
the mains cable is kept clear.<br />
13.Whilst using the product ensure the cable does not<br />
become trapped under the wheels or support feet.<br />
14.Do not allow processed material to build up in the discharge<br />
area. This may prevent proper discharge and can<br />
result in kickback of material through the feed opening.<br />
15.Use only Approved Replacement Parts.<br />
16.Remove the plug from the mains :<br />
- before leaving the product unattended for any period or<br />
when transporting;<br />
- before clearing a blockage;<br />
- before checking, cleaning or working on the product;<br />
- if the product starts to vibrate abnormally or makes an<br />
unusual noise. Check immediately. Excessive vibration<br />
can cause injury.<br />
Maintenance and storage<br />
1. Keep all nuts, bolts and screws tight to be sure the product<br />
is in safe working condition. Do not attempt to repair<br />
the product unless you are competent to do so.<br />
2. Check the collection box frequently for wear or deterioration.<br />
3. Replace worn or damaged parts for safety.<br />
4. Only use the replacement parts specified for this product.<br />
5. Be careful during folding of the product to prevent<br />
entrapment of the fingers between moving and fixed<br />
parts of the machine.<br />
IMPORTANT<br />
• Use only 1.5mm 2 size cable up to 25 metres length maximum.<br />
Maximum rating :<br />
1.5mm 2 size cable, 16 amps 250 volts AC.<br />
• YOUR PRODUCT IS SUPPLIED WITH CABLE<br />
WIRED DIRECTLY INTO THE PRODUCT.<br />
1.Do not wire an extension cable directly to your product yourself.<br />
Please contact your local Approved Service Centre for<br />
further information on the connectors and kits available.<br />
2.Only use extension cables specifically designed for outdoor<br />
use.<br />
3.Only use 1.5mm 2 3 core extension cable.<br />
MAINS PLUG REPLACEMENT<br />
• If the plug supplied is cut off it should be destroyed.<br />
There is an electric shock hazard if a cut off plug is<br />
inserted into a 13 amp socket.<br />
1.Ensure the mains voltage suits your product<br />
2.IMPORTANT! The wires in the mains lead are<br />
Cable Information<br />
coloured in accordance with the following code:<br />
BLUE - NEUTRAL BROWN - LIVE GREEN/YEL-<br />
LOW - EARTH<br />
The wire which is coloured BLUE must be connected<br />
to the Terminal which is marked with the letter 'N' or<br />
coloured BLACK. The wire which is coloured BROWN<br />
must be connected to the Terminal which is marked<br />
with the letter 'L' or coloured RED. The wire which is<br />
coloured GREEN/YELLOW must be connected to the<br />
Terminal which is marked with the ʻearthʼ symbol.<br />
4.It is important that the outer sheath is clamped correctly<br />
into the 3-pin plug.<br />
5.If in doubt consult your local Service Repairer or qualified<br />
electrician before the machine is used.<br />
6.A 13 Amp fuse must be fitted to the Mains Plug.<br />
7.The normal plug fuse and household fuse only protect<br />
the electrical equipment and are not a safeguard<br />
against electrocution.
A1<br />
Assembly<br />
A2<br />
A3<br />
1. Attach the wheel and washer onto the axle (A1) ensuring the wheel is secured with<br />
the retaining pin (A2). Attach the hub cap, ensuring the clips and holes are aligned<br />
before securing into place. Repeat on the other side.<br />
A4<br />
2. Using the spanner provided, attach the support foot with the support foot bolt,<br />
washer and nut as illustrated in pic. A3. Repeat on the other side.<br />
3. Attach the cable hook to the product as illustrated in pic A4. Repeat for the other<br />
three cable hooks. This enables the mains cable to be wrapped around the product<br />
for storage and transportation (C).<br />
B<br />
1<br />
Preparation<br />
C<br />
2<br />
1<br />
90 o D<br />
1. Unfold the product by sliding the catch (B1) and unfolding<br />
through 90 o (B2) until it locks into the operating<br />
position.<br />
2. The product can be transported to the required location<br />
by holding the transport handle (C1) and tilting it<br />
onto the wheels. as illustrated in pic C.<br />
3. Before operating the product, ensure the collection<br />
box is correctly located and the Interlock Switch (D1)<br />
is securely in place. The product will not start if the<br />
Interlock Switch is not located correctly.<br />
1<br />
E<br />
Starting and Stopping<br />
F<br />
1<br />
1<br />
• Before starting, ensure that the Feed Inlet is empty<br />
Starting<br />
1. Unwind mains cable from around product and connect<br />
to mains supply.<br />
2. To start the product, turn the control switch clockwise to<br />
the symbol (E1).<br />
Stopping<br />
1. To stop the product, turn the control switch<br />
anti-clockwise back to the O symbol (F1).
G<br />
1 2<br />
Use<br />
H<br />
1<br />
Feeding in <strong>Garden</strong> waste<br />
1. Feed the material to be shredded into the Feed Inlet (G1).<br />
The material is pulled in by the cutting blade automatically.<br />
• Caution! Do not feed garden building waste such<br />
as, sawn timber, fencing and decking.<br />
• Caution! Long material standing out from the machine<br />
could swing out when being pulled in by the<br />
blades!. Maintain a safe distance!<br />
Suitable Items to be shredded:-<br />
• Twigs and branches – max. diameter 40mm;<br />
• Waste from pruning bushes;<br />
• Waste from hedge trimmings<br />
• Plant parts.<br />
2. A push stick is provided to feeding less bulky material<br />
into the Feed Inlet (G2) enabling the material to reach<br />
the cutting blade.<br />
• Do not use any other object to push material into<br />
the Feed Inlet.<br />
Overload Reset Button<br />
Overloading, jamming the product causes the machine<br />
to automatically stop. After a short period of time,<br />
J<br />
1<br />
press the reset button (H1) and restart the product.<br />
• When the feed inlet is suddenly blocked, the direction or<br />
rotation may switch automatically. Stop the product<br />
and after a short period of time, restart.<br />
Clearing a Blockage<br />
The product is fitted with a reverse switch (J1) to enable the<br />
release of jammed material. Turn the control switch anticlockwise<br />
to the symbol to put into reverse mode.<br />
Compost<br />
Compost is a natural fertiliser. It can loosen clay soils and<br />
can help sandy soils retain water. The organic matter in<br />
compost provides food for the microorganisms that keep your<br />
soil healthy and in a balanced condition. These<br />
microorganisms will naturally produce the Nitrogen,<br />
Potassium and Phosphorus your garden requires.<br />
The waste you are composting requires the correct ratio of<br />
carbon rich materials (Browns) and nitrogen rich materials<br />
(Greens). Too much Brown material will increase the<br />
conversion time. Too much Green material and your compost<br />
will be damp, solid and release unpleasant odours.<br />
<strong>Garden</strong> Waste<br />
Tree Prunings*<br />
Twigs*<br />
Plants*<br />
Bush Prunings*<br />
Hedge Trimmings*<br />
Vegetable Waste*<br />
Leaves*<br />
Flowers*<br />
Roots*<br />
Grass Cuttings<br />
* Suitable for Shredding<br />
<strong>Garden</strong> Waste<br />
Soil<br />
Poison Ivy<br />
Poison Oak<br />
Weeds<br />
Diseased Plants<br />
When will the compost be ready for use<br />
The compost may be ready in as little a 2 months or as much<br />
as 12 months. It depends on the materials used, the compost<br />
Do Compost<br />
Kitchen Waste<br />
Fruit<br />
Vegetables<br />
Teabags<br />
Coffee Grounds & Filters<br />
Egg Shells<br />
Sawdust<br />
Peanut Shells<br />
Do Not Compost<br />
Kitchen Waste<br />
Meat<br />
Fish<br />
Cooked Food Wastes<br />
Dairy Products<br />
High Fat Foods<br />
How does my <strong>Shredder</strong> help composting<br />
<strong>Shredder</strong>s can produce large quantities of Greens and<br />
Browns, which you could not normally compost. It will<br />
speed up the composting process by reducing the size<br />
and increasing the surface area of the material.<br />
Shredded Browns, fibrous materials, provide body to the<br />
final product and supply trapped air to the composting<br />
creatures.<br />
Shredded Greens, Soft Sappy materials, provide the<br />
energy for the composting creatures.<br />
Other<br />
Washed Seaweed<br />
Hay/Straw<br />
Paper & Cardboard<br />
Wood Ash<br />
Manure from Vegetarian Animals<br />
Other<br />
Vacuum Cleaner Contents<br />
Plastic Glass or Metal<br />
Manure from Carnivorous Animals<br />
Coal Ash<br />
Household or Building Waste<br />
mix, air temperature and how much material was shredded.<br />
The compost can be used when it has turned a dark colour<br />
and the original ingredients are no longer recognisable.
K<br />
L<br />
Collection Box<br />
M<br />
1<br />
• Important<br />
Switch off product before removing the Collection<br />
Box.<br />
The Collection Box is a safety guard that prevents access<br />
to the cutting blades. The product should never<br />
be used without the Collection Box in place.<br />
Removing the Collection Box<br />
1. Pull down the Interlock Switch on the Collection Box<br />
(K1). The product will not operate when this Interlock<br />
Switch is open.<br />
2. Hold the handle on the Collection Box and pull out<br />
from under the shredding unit (L).<br />
3. Empty the Collection Box.(M).<br />
Fitting the Collection Box<br />
1. Push the Collection Box under the shredding unit.<br />
2. Push up the Interlock Switch on the Collection Box<br />
(K1) until it clicks securely into position.<br />
• IMPORTANT ! The Product will not operate if the<br />
Interlock Switch on the Collection Box is not lifted<br />
upwards into position.<br />
N<br />
Adjustment<br />
P<br />
2<br />
1<br />
1<br />
• Important:- Only adjust the Cutting Plate when<br />
the product is running. Failure to do so may lead<br />
to serious damage to your product and result in<br />
your Warranty becoming void.<br />
Adjusting the Cutting Plate<br />
If branches and twigs are not being cut through<br />
cleanly, then adjustment of the Cutting Plate against<br />
the Cutting Blade is required.<br />
1. With the product running in the forward direction insert<br />
the hex key supplied into the hole at the side of<br />
the casing (N1).<br />
2. With the product running in the forward direction turn<br />
the hex key very slowly in a clockwise direction until<br />
the Cutting Blade (P1) can be heard slightly touching<br />
the Cutting Plate (P2) Do not over adjust, doing so<br />
could cause serious damage to the Cutting Plate<br />
and Cutting Blade and result in your Warranty becoming<br />
void.<br />
3. Feed a branch into the Feed Inlet to check that it is cut<br />
cleanly and that no further adjustment is required.
Q<br />
R<br />
Caring for your <strong>Shredder</strong><br />
S<br />
T<br />
1<br />
Cleaning<br />
• USE GLOVES<br />
• IMPORTANT It is very important that you keep your product<br />
clean. Debris left in any of the air intakes or under the product<br />
could become a potential fire hazard.<br />
1. With a brush, remove any debris from the Feed Inlet (Q)<br />
2. Wipe over the surface of your product with a dry cloth (R).<br />
3. Using a soft brush remove debris from all air intakes<br />
(S).<br />
4. Remove the Collection Box as described in the Collection<br />
Box section above.<br />
5. Fold the product by sliding the catch (T1) and folding through<br />
90 o (V) until it locks into the storage position.<br />
6. Remove debris from the discharge area with brush.(W)<br />
7. Remove debris from the grass box with a brush (X).<br />
• IMPORTANT Never use water for cleaning your product.<br />
Do not clean with chemicals, including petrol, or solvents -<br />
some can destroy critical plastic parts.<br />
V 90 o W<br />
X<br />
Y<br />
Storing your <strong>Shredder</strong><br />
1. Unfold your product back into the operating position,<br />
replace the collection box and then fold into the storage<br />
position.<br />
2. Before folding make sure that the electric cable is<br />
wound around the product properly (Y1).<br />
3. Replace any Bolts, Nuts or Screws, if necessary.<br />
4. Product must be stored upright as illustrated (Y1)<br />
1<br />
Fails to Operate<br />
1. Is the correct Starting procedure being followed See<br />
ʻStarting & Stoppingʼ<br />
2. Has the product overloaded See ʻUseʼ<br />
3. Is the Power Turned On<br />
4. Is the Interlock Switch engaged. See ʻCollection Boxʼ<br />
5. Check the fuse in the plug, if blown replace.<br />
6. Fuse continues to blow<br />
Immediately disconnect from the mains electricity supply<br />
and consult your local approved Service Centre.<br />
Debris Material is not pulled into the cutter.<br />
1. By using the Push Stick, ensure the material is fed far<br />
enough into the Feed Inlet<br />
2. Ensure the Cutter is adjusted correctly, see ʻAdjustmentʼ<br />
3. Is the product running in the forward direction.<br />
4. If problem persists<br />
Immediately disconnect from the mains electricity supply<br />
and consult your local approved Service Centre.<br />
Fault Finding Hints<br />
Poor Cutting of Debris Material<br />
1. See ʻAdjustmentʼ<br />
2. If poor cutting persists.<br />
Immediately disconnect from the mains electricity supply<br />
and consult your local approved Service Centre.<br />
Debris Material is jammed in the Feed Inlet<br />
1. Set the start switch to reverse.<br />
2. Ensure the material is not too thick for the product. Max diameter<br />
of twigs and branches is 40mm.<br />
3. If problem persists<br />
Immediately disconnect from the mains electricity supply<br />
and consult your local approved Service Centre.<br />
Excessive Vibration<br />
1. Disconnect from the mains electricity supply.<br />
2. Ensure the Cutter is adjusted correctly, see ʻAdjusting<br />
the Cutting Plateʼ<br />
3. If vibration persists<br />
Immediately disconnect from the mains electricity supply<br />
and consult your local approved Service Centre.
1. We strongly recommend that your product is serviced<br />
at least every twelve months, more often in a professional<br />
application.<br />
2. Always use genuine <strong>Flymo</strong> Spare Parts.<br />
3. Prepacked spares are available from most Husqvarna<br />
UK Ltd. stockists.<br />
4. Your product is uniquely identified by a silver and<br />
black product rating label<br />
5. If you have a problem with your machine contact your local<br />
Approved Service Centre ensuring you have full details of<br />
your product as described on the product rating label.<br />
If any part is found to be defective due to faulty manufacture<br />
within the guarantee period, Husqvarna UK Ltd.,<br />
through its Authorised Service Repairers will effect the<br />
repair or replacement to the customer free of charge<br />
providing:<br />
(a) The fault is reported directly to the Authorised Repairer.<br />
(b) Proof of purchase is provided.<br />
(c) The fault is not caused by misuse, neglect or faulty<br />
adjustment by the user.<br />
(d) The failure has not occurred through fair wear and<br />
tear.<br />
(e) The machine has not been serviced or repaired,<br />
taken apart or tampered with by any person not authorised<br />
by Husqvarna UK Ltd..<br />
(f) The machine has not been used for hire.<br />
(g) The machine is owned by the original purchaser.<br />
(h) The machine has not been used commercially.<br />
* This guarantee is additional to, and in no way diminishes<br />
the customers statutory rights.<br />
Failures due to the following are not covered, therefore it<br />
is important that you read the instructions contained in this<br />
Operator's Manual and understand how to operate and<br />
maintain your machine:<br />
Service Recommendations<br />
Guarantee & Guarantee Policy<br />
6. Should it be necessary for work to be carried out by your<br />
Service Centre, it is important to take your complete machine<br />
including cable and any extension cables used.<br />
A network of specialist dealers can be found in your local<br />
Yellow Pages. To obtain service on your <strong>Flymo</strong> product<br />
simply telephone or visit your local Service Centre.<br />
Should you require service under the terms of our guarantee<br />
the Service Centre will require proof of purchase.<br />
All of the centres listed stock genuine <strong>Flymo</strong> Spare Parts.<br />
NOTE: Our Service Repairers act on their own behalf<br />
and are not empowered to commit or legally bind<br />
Husqvarna UK Ltd. in any manner whatsoever.<br />
Failures not covered by guarantee<br />
* Replacing worn or damaged blades<br />
* Failures as a result of shredding inapropriate material.<br />
* Failures as a result of incorrect adjustment of the cutting<br />
plate<br />
* Failures as a result of not reporting an initial fault.<br />
* Failures as a result of sudden impact.<br />
* Failures as a result of not using the product in accordance<br />
with the instructions and recommendations<br />
contained in this Operator's Manual.<br />
* Machines used for hire are not covered by this guarantee.<br />
* The following items listed are considered as wearing<br />
parts and their life is dependent on regular maintenance<br />
and are, therefore not normally subject to a<br />
valid warranty claim: Blades, Electric Mains cable,<br />
Cutting Plate<br />
* Caution!<br />
Husqvarna UK Ltd. does not accept liability under the<br />
warranty for defects caused in whole or part, directly or<br />
indirectly by the fitting of replacement parts or additional<br />
parts that are not either manufactured or approved by<br />
Husqvarna UK Ltd., or by the machine having been<br />
modified in any way.<br />
Environmental Information<br />
• Awareness of the environment must be considered<br />
when disposing of ʻend-of-lifeʼ product.<br />
• If necessary, contact your local authority for disposal<br />
information.<br />
The symbol on the product or on its packaging indicates<br />
that this product may not be treated as household<br />
waste. Instead it shall be handed over to the applicable<br />
collection point for the recycling of electrical and electronic<br />
equipment.<br />
By ensuring this product is disposed of correctly, you will<br />
help prevent potential negative consequences for the environment<br />
and human health, which could otherwise be<br />
caused by inappropriate waste handling of this product.<br />
For more detailed information about recycling of this<br />
product, please contact your local council office, your<br />
household waste disposal service or the shop where you<br />
purchased the product.
EC Declaration of Conformity<br />
Husqvarna UK Ltd., Aycliffe Industrial Park<br />
Newton Aycliffe, Co. Durham, DL5 6UP, England<br />
Declare under our sole responsibility that the product(s);<br />
Category............................Electric <strong>Garden</strong> <strong>Shredder</strong><br />
Type(s) ............................PAS2500<br />
Identification of Series.......See Product Rating Label<br />
Year of Construction..........See Product Rating Label<br />
Conforms to the essential requirements & provisions of the following EC Directives:<br />
98/37/EC (until 31.12.09), 2006/42/EC (from <strong>01</strong>.<strong>01</strong>.10), 2004/108/EC, 2000/14/EC<br />
based on the following EU harmonized standards applied:<br />
EN60335-1, prEN50434, EN13683, EN50366, EN55<strong>01</strong>4-1, EN61000-3-2, EN61000-3-3<br />
The maximum A weighted sound pressure level LpA at the operatorʼs position, recorded on a sample of the above<br />
product(s) corresponds to the Level given in the table.<br />
The maximum hand / arm vibration weighted value measured according to EN ISO 5349 on a sample of the above<br />
product(s) corresponds to the Value given in the table.<br />
2000/14/EC: The Measured Sound Power LWA & Guaranteed Sound Power LWA values are according to the tabulated<br />
figures.<br />
Conformity Assessment Procedure............... Annex VI<br />
Notified Body................................................. Intertek, Cleeve Road<br />
Leatherhead, Surrey<br />
KT22 7SB, England<br />
Newton Aycliffe 28/<strong>01</strong>/<strong>2008</strong><br />
M.Bowden<br />
Research & Development Director<br />
Husqvarna UK Ltd.<br />
Type<br />
Width of Cut (mm)<br />
Speed of Rotation of Cutting Device (rpm)<br />
Power (kW)<br />
Measured Sound Power LWA (dB(A))<br />
Guaranteed Sound Power LWA (dB(A))<br />
Level (dB(A))<br />
Value (m/s 2 )<br />
Weight (Kg)<br />
PAS2500<br />
40<br />
40<br />
2.5<br />
97<br />
98<br />
85<br />
2.40<br />
33.5<br />
Husqvarna UK Ltd.<br />
Aycliffe Industrial Park<br />
NEWTON AYCLIFFE<br />
Co.Durham DL5 6UP<br />
ENGLAND<br />
Telephone - <strong>01</strong>325 302302 Fax - <strong>01</strong>325 310339<br />
Our policy of continuous improvement means that the specification of products may be altered from time to time without prior notice.<br />
5051397-<strong>01</strong>