EN780 Interface Leads 68780 VW Beta_Bamma.pub
EN780 Interface Leads 68780 VW Beta_Bamma.pub
EN780 Interface Leads 68780 VW Beta_Bamma.pub

You also want an ePaper? Increase the reach of your titles
YUMPU automatically turns print PDFs into web optimized ePapers that Google loves.
<strong>Interface</strong> <strong>Leads</strong><br />
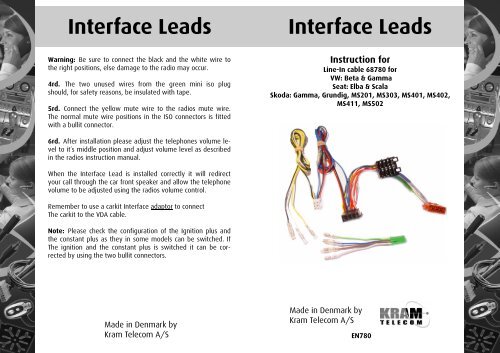
Warning: Be sure to connect the black and the white wire to<br />
the right positions, else damage to the radio may occur.<br />
4rd. The two unused wires from the green mini iso plug<br />
should, for safety reasons, be insulated with tape.<br />
5rd. Connect the yellow mute wire to the radios mute wire.<br />
The normal mute wire positions in the ISO connectors is fitted<br />
with a bullit connector.<br />
6rd. After installation please adjust the telephones volume level<br />
to it´s middle position and adjust volume level as described<br />
in the radios instruction manual.<br />
When the <strong>Interface</strong> Lead is installed correctly it will redirect<br />
your call through the car front speaker and allow the telephone<br />
volume to be adjusted using the radios volume control.<br />
Remember to use a carkit <strong>Interface</strong> adaptor to connect<br />
The carkit to the VDA cable.<br />
Note: Please check the configuration of the Ignition plus and<br />
the constant plus as they in some models can be switched. If<br />
The ignition and the constant plus is switched it can be corrected<br />
by using the two bullit connectors.<br />
Made in Denmark by<br />
Kram Telecom A/S<br />
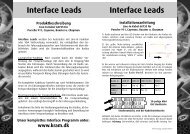
<strong>Interface</strong> <strong>Leads</strong><br />
Instruction for<br />
Line-In cable <strong>68780</strong> for<br />
<strong>VW</strong>: <strong>Beta</strong> & Gamma<br />
Seat: Elba & Scala<br />
Skoda: Gamma, Grundig, MS201, MS303, MS401, MS402,<br />
MS411, MS502<br />
Made in Denmark by<br />
Kram Telecom A/S<br />
<strong>EN780</strong>
<strong>Interface</strong> <strong>Leads</strong><br />
Product description<br />
Line-In cable <strong>68780</strong> for<br />
<strong>VW</strong>: <strong>Beta</strong> & Gamma<br />
Seat: Elba & Scala<br />
Skoda: Gamma, Grundig, MS201, MS303, MS401, MS402,<br />
MS411, MS502<br />
<strong>Interface</strong> <strong>Leads</strong> are used for car stereos with a Line-In function<br />
or VDA preparation. It enables the use of the car speakers when<br />
answering/making calls from your cell phone. This is done by<br />
using the radios build-in mute function.<br />
Speaker-function: This is achieved by connecting the carkit directly<br />
to the cars Line-In input/VDA connector. By using the radios<br />
built-in relays the telephone conversation is sent through<br />
the car speakers while the radio is muted. This way you will<br />
achieve a perfect hands free sound without interference from<br />
the car radio.<br />
For a complete cable-set two item no. is required. The first is a<br />
car-specific <strong>Interface</strong> Lead. The second is a carkit-specific <strong>Interface</strong><br />
adaptor cable .<br />
Power supply of the carkit: All <strong>Interface</strong> <strong>Leads</strong> are delivered with<br />
a power connector for the carkit, that way you avoid cutting the<br />
cars wiring loom.<br />
Please check the radio instruction manual for special issues regarding<br />
the connection and set-up of the radio, when connecting<br />
a carkit.<br />
See our complete <strong>Interface</strong> program on<br />
www.kram.dk<br />
<strong>Interface</strong> <strong>Leads</strong><br />
Installation description<br />
Line-In cable <strong>68780</strong> for<br />
<strong>VW</strong>: <strong>Beta</strong> & Gamma<br />
Seat: Elba & Scala<br />
Skoda: Gamma, Grundig, MS201, MS303, MS401, MS402,<br />
MS411, MS502<br />
1st. Remove the radio and disconnect the ISO connectors from<br />
rear of the radio.<br />
2nd. Disassemble the 20 pin ISO connector. Insert the green<br />
Mini ISO plug from the Line-In cable set instead of the middle<br />
part, and reassemble it. Connect the 20 pin ISO connector to the<br />
radio. Insert the <strong>Interface</strong> Lead between the radio and the remaining<br />
ISO connectors.<br />
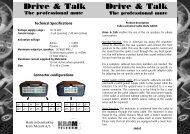
3rd. Now you will need to connect the white and the black wire<br />
to two of the four wires, from the green mini ISO plug. The<br />
black and the white wire is the sound output from the carkit.<br />
There can be two possibilities It can be Green + Brown or<br />
Blue/yellow + Blue/White.<br />
Green<br />
Blue/Yellow<br />
Brown<br />
White/Blue<br />
Green Mini ISO plug seen from the cable entry<br />
If the radio is a <strong>Beta</strong> model the black and the white wire should be<br />
connected to the green and the brown wire.<br />
If the radio is not at beta model the correct positions are often<br />
marked with Tel + and Tel - on the back of the radio, if not you<br />
should look for a 1k Ohm resistance between the correct wires.<br />
(Continues on next page)