MFJ-1279 Deluxe Sound Card Interface Manual.pdf - G6hoq.com
MFJ-1279 Deluxe Sound Card Interface Manual.pdf - G6hoq.com
MFJ-1279 Deluxe Sound Card Interface Manual.pdf - G6hoq.com

Create successful ePaper yourself
Turn your PDF publications into a flip-book with our unique Google optimized e-Paper software.
SOFTWARE CONSIDERATIONS<br />
SHAREWARE<br />
The CD shipped with the <strong>MFJ</strong>-<strong>1279</strong>/<strong>1279</strong>M/<strong>1279</strong>T contains shareware. This CD will automatically run<br />
the <strong>MFJ</strong> <strong>Sound</strong> <strong>Card</strong> <strong>Interface</strong> Software Installation Menu upon startup. If the CD does not automatically<br />
run in your system, you can manually start the installation menu. To do this, follow the steps listed below:<br />
1. With the Shareware CD in the CD drive, click on the Start button at the bottom left of the screen.<br />
2. Click on RUN. This will bring up a <strong>com</strong>mand window.<br />
3. Click the Browse button.<br />
4. When the browse window is open, double click on the CD drive.<br />
5. Double click on the autorun.exe program.<br />
6. The autorun.exe program will now appear in the <strong>com</strong>mand window.<br />
7. Click OK, and the <strong>MFJ</strong> <strong>Sound</strong> <strong>Card</strong> <strong>Interface</strong> Software Installation Menu will begin to run.<br />
From the menu, you may choose any shareware program(s) you wish to install. Though effective, this<br />
software is limited in its uses. To get the full experience with your unit, <strong>MFJ</strong> re<strong>com</strong>mends that you<br />
purchase either the <strong>MFJ</strong>-1296 or the <strong>MFJ</strong>-1298 <strong>Sound</strong> <strong>Card</strong> Program.<br />
The sound card programs on the provided CD are as we said before, “SHAREWARE”. If there are<br />
problems with the software, then you need to contact the author of the program that you are trying to use.<br />
<strong>MFJ</strong> Enterprises provides only limited support for these shareware programs.<br />
<strong>MFJ</strong>-1296 & <strong>MFJ</strong>-1298 SOFTWARE PACKAGES<br />
The <strong>MFJ</strong>-1296, RadioCom4, and the <strong>MFJ</strong>-1298, RadioCom5, are the best programs for soundcard<br />
interfaces and amateur radio.<br />
Some features of the <strong>MFJ</strong>-1296 and the <strong>MFJ</strong>-1298 include:<br />
• PSK: Supports PSK-31, Q and B PSK<br />
• SSTV: 32-bit color, supports all SSTV formats, screen sizes/SSTV parameters are all variable.<br />
• FAX: Supports AM/FM bands. Includes Weather FAX and satellite FAX direct. Supports<br />
ICO 267, 288, 352, and 567. RPM 48, 60, 90, 120, 180, and 240. FAX resolution is up<br />
to 1810 dpi, FAX features IOC and slant-correction. FAX pictures can be saved,<br />
printed, retransmitted.<br />
• CW: Features automatic speed tracking, DSP notch and bandpass filters.<br />
• RTTY: Supports all standard shifts and speeds. X/Y scope and frequency spectrum display<br />
makes tuning RTTY a breeze. Also supports NAVTEX, European SYNOP, Baudot,<br />
and Sitor-B.<br />
• Radio control for over 80 radios.<br />
• DSP Audio Filters and Analyzer.<br />
• RS-232 Level Converter.<br />
The <strong>MFJ</strong>-1298 has additional features that include Spectrum Analyzer, Dual Scope Display, <strong>Sound</strong><br />
Recorder, Time/Frequency Management, Frequency Analyzer, 3-D Scanner, Satellite Tracking, and much<br />
more!<br />
The <strong>MFJ</strong> RadioCom requires a <strong>com</strong>puter with a minimum 200 MHz, Pentium/Celeron processor, at least<br />
64 MB of RAM, and Win95/98/ME/2000/NT/XP operating system.<br />
These fully integrated software packages can be purchased from <strong>MFJ</strong> and are fully supported by <strong>MFJ</strong>.
<strong>MFJ</strong>-<strong>1279</strong>/<strong>1279</strong>M/<strong>1279</strong>T Instruction <strong>Manual</strong><br />
<strong>Deluxe</strong> <strong>Sound</strong> <strong>Card</strong> Radio <strong>Interface</strong><br />
TABLE OF CONTENTS<br />
Introduction ........................................................................................................................... 2<br />
1.0 Powering the <strong>MFJ</strong>-<strong>1279</strong>/<strong>1279</strong>M/<strong>1279</strong>T.............................................................................. 3<br />
2.0 Connecting the <strong>MFJ</strong>-<strong>1279</strong>/<strong>1279</strong>M/<strong>1279</strong>T........................................................................... 3<br />
3.0 <strong>MFJ</strong>-<strong>1279</strong>T Special Instructions........................................................................................ 4<br />
4.0 Microphone and Radio Connections (<strong>MFJ</strong>-<strong>1279</strong>/<strong>1279</strong>M) .................................................. 5<br />
4.1 Internal Header and Jumper Connection Description............................................ 5<br />
4.2 Jumper Diagrams (<strong>MFJ</strong>-<strong>1279</strong>/<strong>1279</strong>M)................................................................... 6<br />
4.3 Customizing Internal Jumpers (<strong>MFJ</strong>-<strong>1279</strong>/<strong>1279</strong>M)................................................ 9<br />
4.4 RS-232 Input Jumpers (JMP3, JMP4, JMP5) ........................................................ 10<br />
4.5 Audio Termination Jumpers (JMP1, JMP2) .......................................................... 11<br />
5.0 Rear Panel Connections .................................................................................................... 11<br />
5.1 Computer RS-232 port ......................................................................................... 11<br />
5.2 CW Port............................................................................................................... 11<br />
5.3 Radio ................................................................................................................... 11<br />
5.4 Auxiliary Audio Input .......................................................................................... 12<br />
5.5 Computer ............................................................................................................. 12<br />
5.6 GND..................................................................................................................... 12<br />
6.0 Operating Suggestions ...................................................................................................... 12<br />
6.1 Placement of this Unit .......................................................................................... 12<br />
6.2 Hum, Squeals, and Distortion............................................................................... 12<br />
6.3 Operating Adjustments......................................................................................... 13<br />
6.4 Monitoring Receiver (SSTV, Voice Keyer) .......................................................... 14<br />
7.0 Software........................................................................................................................... 14<br />
8.0 Troubleshooting Guide..................................................................................................... 15<br />
9.0 Technical Assistance......................................................................................................... 16<br />
10.0 Schematic Page 1 ............................................................................................................ 17<br />
10.0 Schematic Page 2 ............................................................................................................ 18<br />
1
<strong>MFJ</strong>-<strong>1279</strong>/<strong>1279</strong>M/<strong>1279</strong>T Instruction <strong>Manual</strong><br />
<strong>Deluxe</strong> <strong>Sound</strong> <strong>Card</strong> Radio <strong>Interface</strong><br />
INTRODUCTION<br />
Thank you for purchasing the <strong>MFJ</strong>-<strong>1279</strong>/<strong>1279</strong>M/<strong>1279</strong>T <strong>Deluxe</strong> <strong>Sound</strong> <strong>Card</strong> Radio <strong>Interface</strong>. The <strong>MFJ</strong>-<br />
<strong>1279</strong>/<strong>1279</strong>M<strong>1279</strong>T was designed for use in all sound card to radio applications. Great care was taken to<br />
make sure hum, noise, and distortion are minimized or eliminated, insuring the best possible signal from<br />
your equipment.<br />
Before attempting to use the <strong>MFJ</strong>-<strong>1279</strong>T, please read section 3.0. Before attempting to use the <strong>MFJ</strong>-<br />
<strong>1279</strong>/<strong>1279</strong>M, please read section 4.0. This section contains important information about interfacing the<br />
<strong>MFJ</strong>-<strong>1279</strong>/<strong>1279</strong>M with your transceiver. We will start with a brief introduction into the special features<br />
that make your <strong>Deluxe</strong> <strong>Sound</strong> <strong>Card</strong> Radio <strong>Interface</strong> an important addition to any Amateur station with a<br />
<strong>com</strong>puter.<br />
<strong>MFJ</strong>-<strong>1279</strong>/<strong>1279</strong>M/<strong>1279</strong>T Features:<br />
Computer RS-232 Port: This port allows the <strong>com</strong>puter to control the push-to-talk of your radio and the<br />
microphone push-to-talk switch to override and/or interrupt your <strong>com</strong>puter’s transmission.<br />
CW Output: Allows direct <strong>com</strong>puter keying of radios operating in CW or FSK operation.<br />
Microphone/Radio plug-in jumpers: Internal jumpers program microphone wiring for any brand or<br />
model of radio with the appropriate 8-pin connector. There is no need to solder tiny plugs and wires or<br />
purchase adapters.<br />
PTT Message Interrupt/Stop: Microphone PTT (push-to-talk) switch automatically halts outgoing<br />
messages when using software that allows external <strong>com</strong>-port interrupts. Even if software does not allow<br />
interrupts, you can still hold the microphone PTT to stop digital transmissions and transmit microphone<br />
audio.<br />
Footswitch: A footswitch can be used for PTT when VOX is not used.<br />
Radio/Speaker-Computer/Speaker switching: Transfers audio lines with a touch of the ON/BYPASS<br />
switch. No need to move cables every time you change use of the <strong>com</strong>puter or radio. NOTE: Requires<br />
use of an external speaker for radio.<br />
Off-Air Recording: Capture signals from your receiver's audio jack for review or replay, or use with<br />
spectrum analyzer programs.<br />
RFI Proof Circuitry: RF suppression and line isolation virtually eliminates RF feedback, hum, and<br />
distortion. Multiple isolation transformers prevent audio ground loops when receiving or transmitting.<br />
Level controls: Two level controls, one for transmitter drive and one for receiver-to-sound card drive<br />
level. No need to adjust microphone gain or sound card level settings every time modes are changed.<br />
Stereo or Mono Audio input: A front-panel switch allows left, right, or both sound card audio output<br />
channels to drive transmitter.<br />
Headphones: A front-panel standard ¼” phone jack allows use of headphones and automatically<br />
disables the external radio speaker.<br />
Rugged Construction: A solid all-aluminum cabinet and sturdy surface-mount construction gives the<br />
<strong>MFJ</strong>-<strong>1279</strong>/<strong>1279</strong>M/<strong>1279</strong>T mechanical and electrical durability.<br />
2
<strong>MFJ</strong>-<strong>1279</strong>/<strong>1279</strong>M/<strong>1279</strong>T Instruction <strong>Manual</strong><br />
<strong>Deluxe</strong> <strong>Sound</strong> <strong>Card</strong> Radio <strong>Interface</strong><br />
1.0 POWERING THE <strong>MFJ</strong>-<strong>1279</strong>/<strong>1279</strong>M/<strong>1279</strong>T<br />
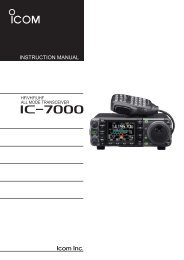
External Power: Power the <strong>MFJ</strong>-<strong>1279</strong>/<strong>1279</strong>M/<strong>1279</strong>T with any well-filtered power source capable of<br />
supplying 12-15 Vdc at 100 mA. The minimum operating voltage is 10 Vdc.<br />
The <strong>Sound</strong> <strong>Card</strong> Radio <strong>Interface</strong> external power jack accepts a standard 2.1mm coaxial power plug. The<br />
power plug's center pin must be positive (+) and ground-isolated. The outer shell is negative (-) and may<br />
be grounded or floated at the supply. When connecting to a high current supply (more than one ampere),<br />
we strongly re<strong>com</strong>mend fuse protecting both positive and negative supply leads with ½ ampere to 1<br />
ampere fast-blow fuses.<br />
-<br />
+<br />
1-A<br />
1-A<br />
-<br />
+<br />
Power Supply<br />
WARNING: Never insert the power plug with power applied—an accidental short from (+) to<br />
chassis ground may result. Also, never allow the <strong>MFJ</strong>-<strong>1279</strong>/<strong>1279</strong>M/<strong>1279</strong>T supply<br />
voltage to exceed 16 Vdc. Connections to high current power sources must be fuse<br />
protected!<br />
<strong>MFJ</strong>-1312D Power Supply: The <strong>MFJ</strong>-1312D wall adapter is also suitable for powering your <strong>Sound</strong><br />
<strong>Card</strong> Radio <strong>Interface</strong>. It <strong>com</strong>es with the correct 2.1mm power plug installed, and is available directly<br />
from <strong>MFJ</strong> Enterprises, Inc. or through your local <strong>MFJ</strong> dealer.<br />
2.0 CONNECTING THE <strong>MFJ</strong>-<strong>1279</strong>/<strong>1279</strong>M/<strong>1279</strong>T<br />
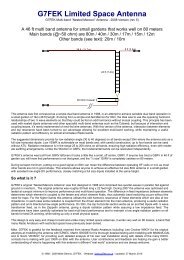
FRONT PANEL:<br />
HEADPHONES<br />
MICROPHONE<br />
INPUT<br />
MANUAL/VOX<br />
MONITOR/OFF<br />
ON/BYPASS<br />
XMIT<br />
PWR<br />
FOOTSWITCH<br />
Accepts a standard ¼” monaural or stereo plug for headphones.<br />
Inserting plug automatically disables the radio’s external speaker<br />
Accepts standard 8-pin microphone plug (8-pin modular for the<br />
<strong>MFJ</strong>-<strong>1279</strong>M) (4-pin for the <strong>MFJ</strong>-<strong>1279</strong>T)<br />
Selects left, both, or right sound card audio channels to drive<br />
transmitter<br />
Selects PTT control from COM port or transmitter VOX operation<br />
Allows the user to hear signals through the radio speakers or<br />
headphones while audio is simultaneously routed through the<br />
<strong>Sound</strong> <strong>Card</strong> Radio <strong>Interface</strong><br />
Selects <strong>com</strong>puter audio and control (ON) or independent operation<br />
of <strong>com</strong>puter and radio (BYPASS)<br />
Illuminates when <strong>com</strong>puter transmitting or when ready to transmit<br />
(VOX) with audio input<br />
Illuminates when <strong>MFJ</strong>-<strong>1279</strong>\<strong>1279</strong>M/<strong>1279</strong>T power is connected<br />
and unit is ON<br />
Accepts standard ¼”mono plug allowing footswitch control of<br />
PTT when VOX is not used.<br />
3
<strong>MFJ</strong>-<strong>1279</strong>/<strong>1279</strong>M/<strong>1279</strong>T Instruction <strong>Manual</strong><br />
<strong>Deluxe</strong> <strong>Sound</strong> <strong>Card</strong> Radio <strong>Interface</strong><br />
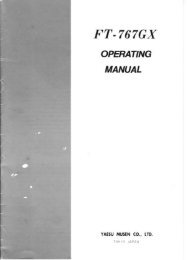
REAR PANEL:<br />
POWER<br />
COMPUTER<br />
RS-232<br />
CW OUTPUT<br />
Requires 12-15 Vdc @ 100mA (16 volt absolute maximum)<br />
DB-9 female serial (COM port) connection<br />
RCA phono jack connects to the KEY jack of radio<br />
RADIO<br />
TO EXT SPKR<br />
FROM AUDIO OUT<br />
AUX AUDIO INPUT<br />
3.5mm mono jack connects to station loudspeaker or other audio<br />
accessories normally connected to radio speaker jack<br />
3.5mm mono jack connects to external speaker output of radio<br />
3.5mm stereo jack for connections to an external audio device<br />
(audio routed directly to <strong>com</strong>puter’s sound card input when <strong>MFJ</strong>-<br />
<strong>1279</strong>/<strong>1279</strong>M/<strong>1279</strong>T is bypassed)<br />
COMPUTER<br />
TO SOUND CARD<br />
AUDIO IN<br />
TO EXT SPKR<br />
FROM SOUND<br />
CARD AUDIO OUT<br />
3.5mm stereo jack connects to <strong>com</strong>puter sound card input<br />
3.5mm stereo jack connects to <strong>com</strong>puter speaker<br />
3.5mm stereo jack connects to <strong>com</strong>puter sound card output<br />
GROUND Ground terminal to station's ground buss (see section 5.6)<br />
3.0 <strong>MFJ</strong>-<strong>1279</strong>T SPECIAL INSTRUCTIONS<br />
The <strong>MFJ</strong>-<strong>1279</strong>T is a special interface unit modified for use with Ten-Tec and other radios using four-pin<br />
microphone connectors. Most four-pin connector systems use the microphone shield as a ground return<br />
for push-to-talk lines.<br />
Use of audio shields as a control or PTT grounds causes audio systems to be much more susceptible to<br />
ground loop hum and noise, that is why most modern radios maintain separate PTT and audio ground<br />
leads. When using a <strong>com</strong>mon audio and PTT ground, we must be much more careful with external<br />
connections.<br />
Please follow these basic system guidelines:<br />
1.) Always ground the rear cabinet ground lug of the <strong>MFJ</strong>-<strong>1279</strong>T directly to the radio’s rear- chassis<br />
ground. This will allow control signals and any undesired hum or noise to flow through the rear<br />
panel chassis ground connection and reduce hum and noise in the audio connections.<br />
2.) Never make any ground connection at HD1 in the <strong>MFJ</strong>-<strong>1279</strong>T. This will force any control<br />
system grounds to use the rear panel chassis ground connections, keeping the microphone shield<br />
clear of any unwanted hum and noise.<br />
3.) Always connect the <strong>com</strong>puter and radio AC power cords to the same outlet or outlet strip. This<br />
will minimize voltage differences between the <strong>com</strong>puter and radio chassis, reducing unwanted<br />
ground loop currents.<br />
4
<strong>MFJ</strong>-<strong>1279</strong>/<strong>1279</strong>M/<strong>1279</strong>T Instruction <strong>Manual</strong><br />
<strong>Deluxe</strong> <strong>Sound</strong> <strong>Card</strong> Radio <strong>Interface</strong><br />
4.) Locate the <strong>MFJ</strong>-<strong>1279</strong>T near the radio. This will allow use of shorter ground connections and<br />
shorter microphone cords, reducing the resistance of the audio system shields.<br />
5.) Ground the <strong>com</strong>puter to the station ground buss if possible. This will ensure <strong>com</strong>puter cabinets<br />
and radio cabinets are all at the same potential, and reduce unwanted hum and noise.<br />
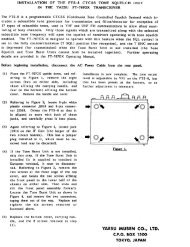
Ten-Tec<br />
and<br />
KENWOOD 4-Pin Microphone Setup: TS-120S, 130S, 180S, 511S, 520S, 530, 600, 700<br />
TS-820, 830, TR-7200A, 7400A, 7500<br />
Special Notes for Ten-Tec Radios:<br />
When using Ten-Tec radios, avoid using the station’s 13.8-volt dc power source to power the <strong>MFJ</strong>-1275T<br />
<strong>Sound</strong> <strong>Card</strong> <strong>Interface</strong>. Always use the <strong>MFJ</strong>-1312D, or equivalent power adaptor!<br />
4.0 MICROPHONE AND RADIO CONNECTIONS (<strong>MFJ</strong>-<strong>1279</strong>/<strong>1279</strong>M)<br />
Different manufacturers and different radios may wire the same style connectors differently. The <strong>MFJ</strong>-<br />
<strong>1279</strong> and <strong>MFJ</strong>-<strong>1279</strong>M have internal headers that use small moveable jumpers. The <strong>MFJ</strong>-<strong>1279</strong> uses<br />
<strong>com</strong>mon round 8-pin microphone connectors found on most transceivers. The <strong>MFJ</strong>-<strong>1279</strong>M <strong>com</strong>es with a<br />
modular microphone jack (like telephones might use). The <strong>MFJ</strong>-<strong>1279</strong>T uses a round 4-pin for Ten-Tec.<br />
Internal jumpers are used to program connections for any radio that connects to the prewired connectors.<br />
This feature eliminates the need for soldering jacks or purchasing adapter cables. The <strong>MFJ</strong>-<strong>1279</strong>/<strong>1279</strong>M<br />
must be configured using the internal jumpers before use (see section 4.1 and 4.2).<br />
The microphone/radio setup procedure requires a few minutes of time. Before you start, you will need<br />
the manual of your radio readily available.<br />
4.1 INTERNAL HEADER AND JUMPER CONNECTION DESCRIPTION<br />
This section is for the <strong>MFJ</strong>-<strong>1279</strong> and <strong>MFJ</strong>-<strong>1279</strong>M only. If you have a <strong>MFJ</strong>-<strong>1279</strong>T be sure to read<br />
section 3.0. The jumpers in this unit are grouped by connection type, with all eight microphone pins in a<br />
row. The connection blocks are:<br />
HD1<br />
HD2<br />
Chassis ground<br />
Audio ground (NOT the same as chassis ground)<br />
5<br />
This diagram may cover some other<br />
radios in the KENWOOD product line<br />
with 4-pin round microphone jack.<br />
If there are any Questions concerning<br />
the information provided, please refer<br />
to your RADIO NSTRUCTION<br />
MANUAL.<br />
<strong>MFJ</strong> is neither liable nor responsible<br />
for any mistakes or errors in the<br />
information provided.<br />
Receive Audio is taken from the<br />
External Speaker output or some other<br />
speaker level audio source.
<strong>MFJ</strong>-<strong>1279</strong>/<strong>1279</strong>M/<strong>1279</strong>T Instruction <strong>Manual</strong><br />
<strong>Deluxe</strong> <strong>Sound</strong> <strong>Card</strong> Radio <strong>Interface</strong><br />
HD3<br />
HD4<br />
HD5<br />
HD6<br />
HD7<br />
Pass through, jumper all connections except microphone audio (HD4, HD7) and push-to-talk<br />
lines (HD5, HD6)<br />
Audio from microphone<br />
PTT line to radio<br />
PTT from microphone<br />
Microphone audio output to radio<br />
There are eight rows of jumpers (16 pins) in each header. Each pin, starting from the rear of the unit,<br />
represents pins one through eight of the microphone connectors.<br />
HD1- This header allows connections to chassis ground. The chassis ground is normally not<br />
connected to any audio ground, except in the radio itself. It is normally used only for control<br />
connections, like PTT or “up-down” button grounds.<br />
Note: If chassis ground connects to microphone audio grounds outside the radio, low-level<br />
audio hum or distortion may appear on the transmitted signal.<br />
HD2- This header connects to the microphone audio ground. The pin selected here should match the<br />
microphone audio ground lead. This ground is normally not connected to any chassis ground.<br />
Note: If the audio ground connects to any chassis outside the radio, transmitter audio hum or<br />
distortion may occur.<br />
HD3- This header provides a straight-through connection. It normally has jumpers in all positions<br />
except leads used by microphone “hot” audio (HD4, HD7) and push-to-talk lines (HD5, HD6).<br />
Microphone ground leads (PTT and audio grounds) should be jumpered at this header even when<br />
jumpered at HD1 or HD2.<br />
HD4- This header is for the microphone’s hot audio output. This jumper pin should also match the<br />
radio’s “hot” audio input lead from the microphone. The pin jumpered should match the selection at<br />
HD7. This jumper pin number should not be connected at HD3.<br />
HD5- This header is for the radio’s PTT (push-to-talk) lead. This jumper should match the radio’s hot<br />
PTT lead. The jumper selected here should also match the jumper selection at HD6. This pin number<br />
should not have a pass-through connection at HD3.<br />
HD6- This header is for the microphone’s PTT (push-to-talk) input lead. The jumper should match the<br />
microphone’s “hot” PTT lead. The pin selected here should also match the selection at HD5 only.<br />
HD7- This header is for the hot audio lead to the radio. The jumper setting should match the jumper<br />
setting at HD4 only.<br />
4. 2 JUMPER DIAGRAMS (<strong>MFJ</strong>-<strong>1279</strong>/<strong>1279</strong>M)<br />
The Jumper Installation diagrams with this instruction manual will help you in setting up your <strong>MFJ</strong>-<br />
<strong>1279</strong>/<strong>1279</strong>M to match your radio. If your radio is not listed with the diagram, it means that we have not<br />
verified your radio to use that diagram. You can try to install jumpers as indicated. If that does not work,<br />
please refer to the radio manual to identify the MIC pin assignment for you radio, then follow the<br />
instructions given in the <strong>MFJ</strong>-<strong>1279</strong>/<strong>1279</strong>M instruction manual to install the jumpers.<br />
Begin by removing the screws from the sides of the cabinet. Lift the cover off. Look from the top rightside<br />
view. Observe the groups of pins between the microphone connector and the microphone output<br />
wire. Notice the pins start at the back and are labeled 1 through 8 before repeating at the next header<br />
group.<br />
If your radio is listed, place jumpers at pins shown in the following diagrams:<br />
6
<strong>MFJ</strong>-<strong>1279</strong>/<strong>1279</strong>M/<strong>1279</strong>T Instruction <strong>Manual</strong><br />
<strong>Deluxe</strong> <strong>Sound</strong> <strong>Card</strong> Radio <strong>Interface</strong><br />
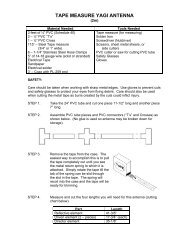
ICOM 8-Pin Round Microphone Setup:<br />
IC-255, 288, 28, 290, 38A, 375, 707, 718, 725, 726, 728, 729, 730, 735, 737, 745, 746, 746PRO, 751<br />
IC-756, 756PRO, 756PROII, 775DSP, 761, 78, 781, 910H<br />
This diagram may work with other radios in<br />
the ICOM product line using the 8-pin round<br />
microphone connector.<br />
For radios that are not listed, please refer to<br />
your RADIO INSTRUCTION MANUAL and<br />
section 4.3 of this manual.<br />
<strong>MFJ</strong> is neither liable nor responsible for any<br />
mistakes or errors in the information provided.<br />
Receive Audio is taken from the External<br />
Speaker output or some other speaker level<br />
audio source.<br />
ICOM 8-Pin Modular Microphone Setup:<br />
IC-207H, 2720H, 2800H, 703, 706, 706MKII, 706MKIIG, V8000<br />
This diagram may work with other radios in<br />
the ICOM product line using 8-pin modular<br />
microphone connector.<br />
For radios that are not listed, please refer to<br />
your RADIO INSTRUCTION MANUAL and<br />
section 4.3 of this manual.<br />
<strong>MFJ</strong> is neither liable nor responsible for any<br />
mistakes or errors in the information provided.<br />
Receive Audio is taken from the External<br />
Speaker output or some other speaker level<br />
audio source.<br />
YAESU FT-650, 700, 707, 712, 726, 736, 756, 767, 77, 790II, 840, 890, 990, 1000D Series<br />
This diagram may work with other radios in the<br />
Yaesu product line using 8-pin round<br />
microphone connector.<br />
For radios that are not listed, please refer to your<br />
RADIO INSTRUCTION MANUAL and section<br />
4.3 of this manual.<br />
<strong>MFJ</strong> is neither liable nor responsible for<br />
any mistakes or errors in the information<br />
provided.<br />
Receive Audio is taken from the External<br />
Speaker output or some other speaker level audio<br />
source.<br />
7
<strong>MFJ</strong>-<strong>1279</strong>/<strong>1279</strong>M/<strong>1279</strong>T Instruction <strong>Manual</strong><br />
YAESU 8-Pin Modular Microphone Setup:<br />
FT-817<br />
<strong>Deluxe</strong> <strong>Sound</strong> <strong>Card</strong> Radio <strong>Interface</strong><br />
This diagram may cover the radios in the<br />
Yaesu product line using the 8-pin modular<br />
microphone connectors.<br />
For radios that are not listed, please refer to<br />
your RADIO INSTRUCTION MANUAL and<br />
section 4.3 of this manual.<br />
<strong>MFJ</strong> is neither liable nor responsible for any<br />
mistakes or errors in the information provided.<br />
Receive Audio is taken form the External<br />
Speaker output or some other speaker level<br />
audio source.<br />
KENWOOD 8-Pin Round Microphone Setup:<br />
TS-50, 140, 430, 440, 450, 570, 660, 670, 680, 690, 701, 711, 780, 811, 850, 870, 930, 940, 950<br />
TR-50, 751, 851, 3200, TM-201A, 201B, 211, 221, 231, 241, 321, 331, 401A, 401B, 421, 431,<br />
441, 521, 531, 541, 621, 631, 701, 721, 731, 2530, 2550, 2570, TW-4000, 4100<br />
This diagram may cover other radios in the<br />
Kenwood product line using the 8-pin round<br />
microphone connector.<br />
For radios that are not listed, please refer to<br />
your RADIO INSTRUCTION MANUAL and<br />
section 4.3 of this manual.<br />
<strong>MFJ</strong> is neither liable nor responsible for any<br />
mistakes or errors in the information provided.<br />
Receive Audio is taken from the External<br />
Speaker output or some other speaker level<br />
audio source.<br />
KENWOOD 8-Pin Modular Microphone Setup:<br />
TM-251, 255, 261, 451, 461, 641, 642, 732, 733, 741, 742, 941, 942, G707, V7A<br />
This diagram may cover other radios in the<br />
Kenwood product line using the 8-pin modular<br />
microphone connector.<br />
If there are any Questions concerning the<br />
information provided, please refer to your<br />
RADIO INSTRUCTION MANUAL.<br />
<strong>MFJ</strong> is neither liable nor responsible for any<br />
mistakes or errors in the information provided.<br />
Receive Audio is taken from the External<br />
Speaker output or some other speaker level<br />
audio source.<br />
8
<strong>MFJ</strong>-<strong>1279</strong>/<strong>1279</strong>M/<strong>1279</strong>T Instruction <strong>Manual</strong><br />
<strong>Deluxe</strong> <strong>Sound</strong> <strong>Card</strong> Radio <strong>Interface</strong><br />
4.3 CUSTOMIZING INTERNAL JUMPERS (<strong>MFJ</strong>-<strong>1279</strong>/<strong>1279</strong>M)<br />
The section is for the <strong>MFJ</strong>-<strong>1279</strong> and <strong>MFJ</strong>-<strong>1279</strong>M only. If your radio is not listed above, you can<br />
create a custom jumper position table.<br />
Begin by removing the screws from the sides of the cabinet. Lift the cover off. Look from the front view<br />
and notice the group of pins and black jumpers on the left side behind the microphone connector and in<br />
front of the microphone output wire. Notice the pins start at the rear and are labeled 1 through 8 before<br />
repeating at the next header group.<br />
Fill in a custom table like the following:<br />
Table 1. Yaesu FT-1000 series<br />
Pin HD1 gnd HD2 gnd HD3 pass<br />
for PTT for MIC<br />
1 X<br />
2 X<br />
3 X<br />
4 X<br />
5 X X<br />
HD4 aud<br />
MIC<br />
HD5 PTT<br />
Radio<br />
6 X X<br />
7 X X<br />
HD6 PTT<br />
MIC<br />
8 X X<br />
HD7 aud<br />
Radio<br />
To make a jumper table for an unlisted radio, you must look at the radio manual. Find the page that shows<br />
the microphone wiring. This is a sample of a Yaesu-style wiring diagram that was used above:<br />
Mic<br />
8 7 6<br />
5<br />
9<br />
Mic Gnd<br />
PTT<br />
PTT Gnd<br />
Yaesu Mic Jack Pin-out, Front View<br />
If you <strong>com</strong>pare table 1 to this connector diagram, you will see how it is laid out. Notice an “X” was<br />
placed at the appropriate PTT and MIC pins according to the rules below.<br />
Look at the microphone-wiring diagram in your radio manual, fill in a table, and connect the leads as we<br />
have done in our example. We have provided a blank chart below for you to fill in.<br />
1.) Header 4 and 7 should copy each other, and use the same jumper pin number for the center<br />
MIC wire.<br />
2.) Header 5 and 6 also jointly share the same pin numbers as the PTT pin.<br />
3.) The MIC GND, HD2, should connect to the same pin as the outer MIC lead and only that<br />
pin.<br />
4.) The GND, HD1, should connect to the PTT ground pin.<br />
5.) Be sure to place a pass-through connection jumper on every lead EXCEPT numbers used<br />
on HD 4, 7, 5, and 6.
<strong>MFJ</strong>-<strong>1279</strong>/<strong>1279</strong>M/<strong>1279</strong>T Instruction <strong>Manual</strong><br />
<strong>Deluxe</strong> <strong>Sound</strong> <strong>Card</strong> Radio <strong>Interface</strong><br />
The following blank table is for your personal use. Use your radio’s manual to <strong>com</strong>plete the table. This<br />
will assist you in properly setting the jumpers for your radio.<br />
Remember!!! Use the following wiring chart rules:<br />
1.) Never ground the microphone audio ground to the chassis ground!<br />
2.) HD4 and HD7 are always the same jumper slot number<br />
3.) HD5 and HD6 are always the same jumper slot number<br />
4.) HD3 always has a jumper except where HD4 through HD7 are jumpered!<br />
Pin<br />
1<br />
HD1 gnd<br />
for PTT<br />
HD2 gnd<br />
for MIC<br />
HD3 pass<br />
HD4 aud<br />
MIC<br />
HD5 PTT<br />
Radio<br />
HD6 PTT<br />
MIC<br />
HD7 aud<br />
Radio<br />
2<br />
3<br />
4<br />
5<br />
6<br />
7<br />
8<br />
4.4 RS-232 INPUT JUMPERS (JMP3, JMP4, JMP5)<br />
There are three headers and near three LED’s in the right rear area (viewed from front panel area) of the<br />
circuit board, near the RS-232 <strong>com</strong>puter connection. Each LED will light when the <strong>com</strong>puter sends a<br />
control signal on the COM port for each LED. From left to right, the LED’s are for the RTS, TXD, and<br />
DTR lines. From left to right, each header in front of the LED’s is for RTS, TXD, and DTR signals.<br />
With or without jumpers installed, if you transmit with software, you will see one or more LED’s light.<br />
This tells you the <strong>com</strong>puter is sending a good control signal, and it tells you what line is carrying the<br />
signal.<br />
Installing a jumper towards the two pins (pins 1 and 2) near each LED, will activate the CW OUTPUT<br />
from the selected LED. Installing a jumper towards the front panel (pins 2 and 3) will activate the PTT<br />
(push-to-talk) system from the selected LED.<br />
For example, if you want to send CW, bring up a CW program. Start sending a test text, and look for the<br />
flashing LED. Assume it is the middle LED, TXD. Jumper JMP4 should be positioned between pins 1<br />
and 2, and the CW Output will key the radio.<br />
Assume you enable the TX on a PSK program. If you see DTR light (the LED on the far right), you can<br />
jumper JMP5 between pins 2 and 3. This will allow the control line to enable the PTT function when<br />
DTR is active.<br />
10
<strong>MFJ</strong>-<strong>1279</strong>/<strong>1279</strong>M/<strong>1279</strong>T Instruction <strong>Manual</strong><br />
<strong>Deluxe</strong> <strong>Sound</strong> <strong>Card</strong> Radio <strong>Interface</strong><br />
4.5 AUDIO TERMINATION JUMPERS (JMP1, JMP2)<br />
JMP1 and JMP2 are located just behind the MAN/VOX switch. JMP1 and JMP2 connect a 10-ohm load<br />
resistor across the <strong>com</strong>puter sound card output to simulate a speaker load. While a load is normally not<br />
necessary, it may be needed if the sound card has excessive output level or is unstable without a load.<br />
Remember installing these jumpers will reduce sound card level when transmitting but it may, at times,<br />
reduce distortion and noise. It will not affect any other function.<br />
5.0 REAR PANEL CONNECTIONS<br />
The rear panel has one power jack, one RS-232 port, one CW output jack, six audio jacks, and a ground.<br />
The use of each connection is described below.<br />
5.1 COMPUTER RS-232 PORT<br />
The COMPUTER RS-232 port is a standard female DB-9 connector. It should connect to an active COM<br />
port on your <strong>com</strong>puter. This connection allows the <strong>com</strong>puter to watch the PTT line from your<br />
microphone, and the <strong>com</strong>puter to control the transmitter PTT line. You must normally enable the COM<br />
port you use (normally COM1 or COM2) in the software you are using. Check the help menu of the<br />
program for help with COM port settings. See section 4.4 for configuring RS232 port jumpers.<br />
5.2 CW PORT<br />
The CW PORT is a standard RCA phono jack. It should connect to the KEY jack of the radio. This<br />
connection allows direct <strong>com</strong>puter keying of your radio in CW or FSK operation. See section 4.4 for<br />
details on configuring the RS-232 port for direct CW keying.<br />
5.3 RADIO<br />
TO EXT SPKR: This 3.5mm monaural jack should be wired to the radio’s external speaker. This jack<br />
connects the radio’s external speaker to the radio’s speaker output when the front panel ON/BYPASS<br />
switch is in the “out” or BYPASS position. The <strong>MFJ</strong>-<strong>1279</strong>/<strong>1279</strong>M/<strong>1279</strong>T automatically disconnects the<br />
radio’s speaker when the ON/BYPASS switch is “in” or ON, and the MONITOR switch is not pushed.<br />
The MONITOR/OFF switch defeats the speaker switching, and causes the external speaker or<br />
headphone jack to remain active when the MONITOR/OFF switch is “in” (MONITOR).<br />
FROM AUDIO OUT: This 3.5mm monaural jack should connect to your radio’s external speaker<br />
output jack. It connects directly to the radio “TO EXT SPKR” jack when the ON/BYPASS switch is<br />
“out” (BYPASS) or when the MONITOR/OFF switch is “in” (MONITOR).<br />
1. If only an internal radio speaker is used, you will have to plug, unplug or partially plug this<br />
connection at the radio when changing between digital and standard operation. We re<strong>com</strong>mend<br />
using an external radio speaker to simplify changes between digital and standard operation.<br />
2. If you wish to use a radio line-level audio output connection, you can connect the line-level<br />
output to this jack. In this case, the MONITOR/OFF switch should be placed in the MONITOR<br />
position. Otherwise, the radio may not have enough audio drive for the <strong>com</strong>puter when receiving<br />
digital transmissions.<br />
Note: Always operate the receiver at normal listening volume before switching to digital<br />
modes. Potentiometer R31 adjusts drive level from the radio receiver to the sound card.<br />
R31 is the adjustable potentiometer closest to the right side (front view) of the unit. A<br />
hole is provided in the cover so the pot can be adjusted without removing the cover. Use<br />
a very small flat-blade screwdriver and be careful to not break the potentiometer!<br />
11
<strong>MFJ</strong>-<strong>1279</strong>/<strong>1279</strong>M/<strong>1279</strong>T Instruction <strong>Manual</strong><br />
<strong>Deluxe</strong> <strong>Sound</strong> <strong>Card</strong> Radio <strong>Interface</strong><br />
5.4 AUXILIARY AUDIO INPUT<br />
The AUX AUDIO INPUT is a 3.5mm stereo jack. This jack allows other external audio devices to<br />
remain connected to the <strong>com</strong>puter when not using digital modes. When the <strong>MFJ</strong>-<strong>1279</strong>/<strong>1279</strong>M/<strong>1279</strong>T is<br />
“off” (BYPASS) the external device will be connected directly to the sound card input. This allows<br />
changes in <strong>com</strong>puter use without moving cables and wires.<br />
5.5 COMPUTER<br />
TO SOUND CARD AUDIO IN: This 3.5mm stereo jack connects to the sound card audio-input. You<br />
can use either the sound card’s microphone or the line level input. This jack connects the radio’s audio<br />
output to the <strong>com</strong>puter’s audio input when the ON/BYPASS switch is ON. This jack connects to the<br />
AUX AUDIO INPUT when the ON/BYPASS switch is “out” (BYPASS).<br />
Note: If you use the microphone input, you will want to disable any extra gain provided by the<br />
sound card. This function is normally available in the “Advanced” menu of sound card<br />
“volume control” software.<br />
TO EXT SPKR: This 3.5mm stereo jack connects to the <strong>com</strong>puter’s external speaker system. This jack<br />
is automatically connected to the <strong>com</strong>puter’s audio output when the ON/BYPASS switch is “out”<br />
(BYPASS). It is not connected when the ON/BYPASS switch is “in” (ON), disabling the <strong>com</strong>puter<br />
speakers.<br />
FROM SOUND CARD AUDIO OUT: This 3.5mm stereo jack connects to the <strong>com</strong>puter’s audio<br />
output. This jack connects the <strong>com</strong>puter audio output to the radio’s microphone input when the<br />
ON/BYPASS switch is “in” (ON). It connects the <strong>com</strong>puter to the “TO EXT SPKR” jack and the<br />
<strong>com</strong>puter’s speaker system when the ON/BYPASS switch is “out” (BYPASS). See section 4.5 for<br />
termination of <strong>com</strong>puter, if there are problems with squeals or abnormal modulation when the sound card<br />
drives the transmitter.<br />
5.6 GND<br />
A ground connection post has been provided in case your station has RFI problems or audio hum. In<br />
most cases, this connection is not necessary. If you notice hum or noise on any audio lines, try<br />
connecting this post (with the shortest possible connection) to the ground post on your radio, station<br />
ground, or <strong>com</strong>puter.<br />
6.0 OPERATING SUGGESTION<br />
6.1 PLACEMENT OF THIS UNIT<br />
We re<strong>com</strong>mend placing this unit as close to the radio and <strong>com</strong>puter as possible. Do not place this unit<br />
within one foot of power transformers, video monitors, or any device that emits strong varying magnetic<br />
fields. If you locate this unit near a monitor, the sweep circuits can introduce hum and noise into your<br />
signal. If there is a powerline-operated transformer within several inches and if it has flux leakage, 60-<br />
cycle hum can be introduced into your equipment.<br />
6.2 HUM, SQUEALS, AND DISTORTION<br />
The <strong>MFJ</strong>-<strong>1279</strong>/<strong>1279</strong>M/<strong>1279</strong>T is one of the best-designed digital interface products available. It includes<br />
multiple isolation transformers for audio lines, independent chassis and signal grounds, RF bypassing,<br />
and has no troublesome solid-state <strong>com</strong>ponents in audio lines. Should a distortion, hum, or feedback<br />
problem occur, it almost certainly will be from wiring or operational errors external to the <strong>MFJ</strong>-<br />
<strong>1279</strong>/<strong>1279</strong>M/<strong>1279</strong>T.<br />
12
<strong>MFJ</strong>-<strong>1279</strong>/<strong>1279</strong>M/<strong>1279</strong>T Instruction <strong>Manual</strong><br />
<strong>Deluxe</strong> <strong>Sound</strong> <strong>Card</strong> Radio <strong>Interface</strong><br />
When equipment is interconnected, ground loops can be created. A ground loop occurs when a modest<br />
amount of AC or DC power flows between equipment grounds through cables that normally carry lowlevel<br />
signals, such as audio or microphone wiring. Unwanted hum, distortion, squeals, and/or erratic<br />
operation may result. Power supply ground loops are often misdiagnosed as “RF feedback”.<br />
To cure distortion, hum, or erratic operation it is often necessary to find the cause. To eliminate RF<br />
feedback as a cause, replace the antenna with a dummy load. Ground the shield of the dummy load to the<br />
normal antenna lead shield, so you do not disturb any possible ground paths. If the problem persists, it is<br />
probably caused by a ground loop. If the problem disappears, it is almost certainly RF related. Be sure<br />
your station ground is good, all the equipment is grounded together properly with a wide smooth<br />
conductor, and you have followed all station wiring suggestions found in reliable sources such as the<br />
ARRL Handbook.<br />
If the problem occurs even while transmitting on a dummy load, the problem is almost certainly a ground<br />
loop or wiring error. Be sure microphone wiring and jumpers are installed correctly, as outlined in<br />
section 4 of this manual. Be sure microphone ground connections have continuity throughout the entire<br />
system, and that the microphone ground is NOT connected to any other ground or chassis connection<br />
outside of the radio.<br />
Check the sound card volume control settings, and the gain settings of the radio. Be sure they are close to<br />
normal operating settings, and not set too high. Be sure you have turned the radio’s monitor feature OFF<br />
when working digital, to prevent audio from looping back through the <strong>com</strong>puter.<br />
For extreme problems and for improved lightning protect to your equipment, we have provided a ground<br />
screw to allow grounding of our unit to the <strong>com</strong>puter case, station ground, or radio ground. Some<br />
manufactures actually think that NOT providing a ground connection is doing you a service, and tout the<br />
lack of a ground as an advantage!<br />
6.3 OPERATING ADJUSTMENTS<br />
One of the most <strong>com</strong>mon problems using digital modes is improper system level. Even at best, digital<br />
modes have limited dynamic range* <strong>com</strong>pared to modes that closely “fit” filter bandwidths in the<br />
transmitter and receiver. When the radio filter is wider than the mode being used, the system depends<br />
heavily on having absolutely no distortion at any place in the system. Adjustments and levels throughout<br />
the entire system affect bandwidth and quality of transmitted and received signals.<br />
When transmitting, it is extremely important to use correct gain levels. If the input of a transceiver is<br />
overdriven, the signal will contain unwanted products. Problems might not show on spectrum or IMD<br />
displays and if they do, many people do not recognize them. Excessive level into the radio can aggravate<br />
harmonic distortion (this often does not register on IMD or displays), causing transmissions on multiple<br />
frequencies. For example a PSK transmitter using 1,000 Hertz offset will have some signal level at 2,000<br />
Hertz and every other multiple of 1,000 Hertz. These harmonics might no make it back through a narrow<br />
filter, and while they cause others interference they will not show on a spectrum display! The same is<br />
true for poor carrier suppression. Since the carrier can be outside the passband of a receiver, it will not<br />
always show on displays of people you are working.<br />
*Dynamic range is the ratio of strongest undesired signal tolerated to weakest signal that can be copied.<br />
Problems also occur when audio levels are too low. If audio level from the sound card or interface is too<br />
low, the ratio of signal to hum and/or noise will also be reduced. The proper setting is generally one that<br />
allows the microphone and receiver gain to be set at normal operating levels for SSB. Power is reduced<br />
or adjusted by fine-tuning levels with the controls inside the <strong>MFJ</strong>-<strong>1279</strong>/<strong>1279</strong>M/<strong>1279</strong>T. The best way to<br />
13
<strong>MFJ</strong>-<strong>1279</strong>/<strong>1279</strong>M/<strong>1279</strong>T Instruction <strong>Manual</strong><br />
14<br />
<strong>Deluxe</strong> <strong>Sound</strong> <strong>Card</strong> Radio <strong>Interface</strong><br />
check for proper transmission is to listen to your own signal on a separate receiver. Use a narrow filter,<br />
and take care to avoid overloading the receiver.<br />
If you cannot listen through a separate receiver, the best general guideline is to use normal microphone<br />
gain settings and approximately half volume on the sound card “Volume” settings. Adjust the transmitter<br />
level control (R18) in the <strong>MFJ</strong>-<strong>1279</strong>/<strong>1279</strong>M/<strong>1279</strong>T for normal transmitter drive (just at the start of ALC<br />
action) and use the microphone gain on the transmitter (or sound card volume) for fine adjustment. Use a<br />
normal receiver volume setting, and adjust the sound card microphone level (make sure any extra gain<br />
options are off) to approximately half scale. Adjust the receiver level control (R31) in the <strong>MFJ</strong>-<br />
<strong>1279</strong>/<strong>1279</strong>M/<strong>1279</strong>T for normal display operation.<br />
Regardless of what you do, it is always a good idea to have someone listen to your signal when the band<br />
is empty, signals are strong, or noise is very low. They should look carefully for spurious signals, noise,<br />
and hum.<br />
When transmitting on modes like MFSK and PSK, always try to use a frequency setting of more than<br />
1500 Hz and less than 2500 Hz. This will allow the transmitter’s SSB filter to suppress unwanted<br />
harmonics from the audio system driving the transmitter.<br />
If you use the line-level output of a radio, the receiver volume control generally has no effect on receiving<br />
levels. Be sure you always leave the MONITOR/OFF switch in the MONITOR connector, when there is<br />
no radio speaker plugged in, or when using a radio line output connection. As an alternative, you can<br />
plug the line output of the radio directly into the <strong>com</strong>puter soundcard.<br />
Remember it is sometimes necessary to select the narrowest filter possible in the receiver, rather than<br />
depending on the <strong>com</strong>puter to filter out strong unwanted stations. If you depend only on the sound card,<br />
you will find that even very clean strong signals overload your system. The problem is often in YOUR<br />
receiver system, not in the offending transmitter. Many transceivers allow a selection of narrow filters<br />
while operating SSB, or include passband-tuning controls. If you have trouble with a strong station<br />
nearby causing interference, try using more selectivity or using the receiver’s notch filter to reduce the<br />
signal level.<br />
6.4 MONITORING RECEIVER (SSTV, VOICE KEYER)<br />
Certain modes, such as SSTV and Voice Keying, occasionally require listening to receiver audio. We<br />
have provided a front-panel MONITOR switch on the <strong>MFJ</strong>-<strong>1279</strong>/<strong>1279</strong>M/<strong>1279</strong>T front panel for this<br />
purpose.<br />
During SSTV or Voice Keyer operations, the MONITOR switch should be set to monitor (in). This will<br />
allow you to hear receiver audio and see SSTV pictures at the same time.<br />
The MONITOR switch will only operate if you have the external speaker connection of the radio<br />
connected to the <strong>MFJ</strong>-<strong>1279</strong>/<strong>1279</strong>M/<strong>1279</strong>T RADIO From Audio Out connector. You must also use an<br />
external speaker connected to the <strong>MFJ</strong>-<strong>1279</strong>/<strong>1279</strong>M/<strong>1279</strong>T RADIO To Ext Spkr connection or plug<br />
headphones into the front panel Headphones jack.<br />
Remember, when the MONITOR switch is on, the radio’s external speaker remains connected regardless<br />
of other front panel switch settings.<br />
7.0 SOFTWARE<br />
The CD included with the <strong>MFJ</strong>-<strong>1279</strong>/<strong>1279</strong>M/<strong>1279</strong>T contains a collection of shareware programs that<br />
will operate PSK-31, RTTY, SSTV, Packet, AMTOR, CW, and other modes. These programs are<br />
shareware.<br />
Because the programs are free shareware, they are not supported by <strong>MFJ</strong> Enterprises, Inc. Some<br />
programs in the CD are feature limited, some have limited time of use and some are trial versions. Please<br />
contact the author to obtain a full version.
<strong>MFJ</strong>-<strong>1279</strong>/<strong>1279</strong>M/<strong>1279</strong>T Instruction <strong>Manual</strong><br />
<strong>Deluxe</strong> <strong>Sound</strong> <strong>Card</strong> Radio <strong>Interface</strong><br />
<strong>MFJ</strong> Enterprises, Inc. offers two software packages specifically designed for sound cards. The following<br />
software packages are fully supported by <strong>MFJ</strong>:<br />
<strong>MFJ</strong>-1296 RadioCom4 This soundcard software operates PSK-31, RTTY, SSTV, Packet, AMTOR, and<br />
FAX/SatFAX. This software also features DSP filter and Radio Control programs. An RS-232 radio<br />
control interface is included.<br />
<strong>MFJ</strong>-1298 RadioCom 5 This software has all the features of the RadioCom4, plus a DSP Audio Filter<br />
Analyzer, Spectrum Analyzer, Dual Scope Display, <strong>Sound</strong> Recorder, Audio Equalizer, Time and<br />
Frequency Management, Frequency Analyzer, 3D Scanner, Satellite Tracking, and Radio Control for over<br />
80 receivers and transceivers. An RS-232 radio control interface is also included with this package.<br />
Trail versions of these programs can be downloaded. For more information about the <strong>MFJ</strong> RadioCom<br />
programs, please call <strong>MFJ</strong> Enterprises, Inc. at 1-800-647-1800 or visit us online at<br />
www.<strong>MFJ</strong>Enterprises.<strong>com</strong> or www.Bonito.net.<br />
8.0 TROUBLESHOOTING GUIDE<br />
<strong>Sound</strong> <strong>Card</strong> Radio <strong>Interface</strong> Will Not Power Up: Check power connections and cables. Also,<br />
check the voltage and polarity of your power source--it must be capable of providing 12-15 Vdc at 100<br />
mA.<br />
Station Microphone PTT Function Will Not Work: Check internal microphone PTT jumpers.<br />
Read section 4 of this manual. Check to see if the jumpers match the type of transceiver you are using.<br />
Station Microphone has no audio: Check internal microphone PTT jumpers. Read section 4 of this<br />
manual. Check to see if the jumpers match the type of transceiver and microphone you are using.<br />
Low or Excessive Transmit Level on digital: Make sure that the Transmit Level Control, R18, has<br />
been set for the transmitter currently in use. Also, see if the R18 needs adjusting to bring the output level<br />
within the transceiver's limits. See section 6 for further details.<br />
<strong>Sound</strong> <strong>Card</strong> Radio <strong>Interface</strong> Will Not Activate PTT line on Playback: Check XMIT switch<br />
position. Check JMP 3, 4, and 5.<br />
PTT Switch Fails to Halt Message Playback: Check <strong>com</strong>-port configuration and make sure that<br />
you have the software for that function.<br />
Hum and Distortion: See section 6 and check wiring of jumpers (section 4). Be sure that the correct<br />
connections have been made with the jumpers. To be sure that the signal levels are set correctly, see<br />
section 5.3 and 6.<br />
Poor print or copy on good signals, distorted digital recordings: The levels from your receiver<br />
may be too high or too low. Check the potentiometer, R31, to insure that it is adjusted correctly (see<br />
section 5.2). Also, look to see if the card settings are configured correctly (see section 6). Lastly, check<br />
to see if all switches and controls are in the correct position.<br />
15
<strong>MFJ</strong>-<strong>1279</strong>/<strong>1279</strong>M/<strong>1279</strong>T Instruction <strong>Manual</strong><br />
<strong>Deluxe</strong> <strong>Sound</strong> <strong>Card</strong> Radio <strong>Interface</strong><br />
9.0 TECHNICAL ASSISTANCE<br />
If you have any problem with this unit first check the appropriate section of this manual. If the manual<br />
does not reference your problem or your problem is not solved by reading the manual, you may call <strong>MFJ</strong><br />
Technical Service at 662-323-0549 or the <strong>MFJ</strong> Factory at 662-323-5869. You will be best helped if you<br />
have your unit, manual and all information on your station handy so you can answer any questions the<br />
technicians may ask. You can also send questions by mail to <strong>MFJ</strong> Enterprises, Inc., 300 Industrial Park<br />
Road, Starkville, MS 39759; by FAX to 662-323-6551; or by email to techinfo@mfjenterprises.<strong>com</strong>.<br />
Send a <strong>com</strong>plete description of your problem, an explanation of exactly how you are using your unit, and<br />
a <strong>com</strong>plete description of your station.<br />
16
<strong>MFJ</strong>-<strong>1279</strong>/<strong>1279</strong>M/<strong>1279</strong>T Instruction <strong>Manual</strong><br />
<strong>Deluxe</strong> <strong>Sound</strong> <strong>Card</strong> Radio <strong>Interface</strong><br />
10.0 SCHEMATIC<br />
17
<strong>MFJ</strong>-<strong>1279</strong>/<strong>1279</strong>M/<strong>1279</strong>T Instruction <strong>Manual</strong><br />
<strong>Deluxe</strong> <strong>Sound</strong> <strong>Card</strong> Radio <strong>Interface</strong><br />
18