

BlackDiamond Module Card Installation Note - Extreme Networks
BlackDiamond Module Card Installation Note - Extreme Networks
BlackDiamond Module Card Installation Note - Extreme Networks

You also want an ePaper? Increase the reach of your titles
YUMPU automatically turns print PDFs into web optimized ePapers that Google loves.
<strong>BlackDiamond</strong> <strong>Module</strong> <strong>Card</strong><br />
<strong>Installation</strong> <strong>Note</strong><br />
All <strong>BlackDiamond</strong> module cards (Management Switch Fabric <strong>Module</strong>s (MSMs) and I/O modules) are<br />
hot-swappable. You do not need to power off the system to remove or insert a module card.<br />
Caution: Service to <strong>BlackDiamond</strong> modules should be performed by trained service personnel<br />
only. Before installing or removing any components of the system, or before carrying out any<br />
maintenance procedures, you must read the safety information provided in Appendix A of the<br />
<strong>BlackDiamond</strong> Hardware <strong>Installation</strong> Guide.<br />
Warning: Blank panels must be installed in empty slots to ensure adequate system cooling.<br />
To remove and replace a module card, follow these steps:<br />
1 Prior to removing/installing a module card into the <strong>BlackDiamond</strong> chassis, put on the ESD wrist<br />
strap that is provided with the chassis, and connect the metal end to the ground receptacle located<br />
on the top-left corner of the <strong>BlackDiamond</strong> front panel.<br />
2 Loosen the module card by unscrewing the screws using a #1 Phillips-head screwdriver.<br />
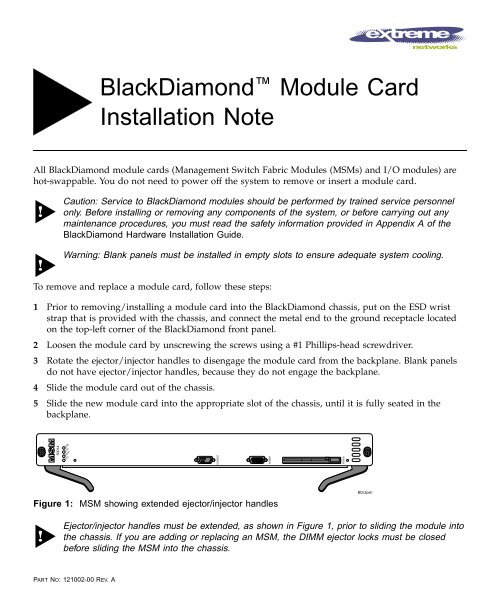
3 Rotate the ejector/injector handles to disengage the module card from the backplane. Blank panels<br />
do not have ejector/injector handles, because they do not engage the backplane.<br />
4 Slide the module card out of the chassis.<br />
5 Slide the new module card into the appropriate slot of the chassis, until it is fully seated in the<br />
backplane.<br />
50014<br />
ERR<br />
ENV<br />
MSTR<br />
SYS<br />
CONSOLE<br />
MODEM<br />
PCMCIA<br />
Figure 1: MSM showing extended ejector/injector handles<br />
BDclipsh<br />
Ejector/injector handles must be extended, as shown in Figure 1, prior to sliding the module into<br />
the chassis. If you are adding or replacing an MSM, the DIMM ejector locks must be closed<br />
before sliding the MSM into the chassis.<br />
PART NO: 121002-00 REV. A
6 As the module begins to seat in the chassis, the ejector/injector handles will begin to close.<br />
7 To secure the module in the chassis, close the ejector/injector handles by pushing on them toward<br />
the center of the module card, and tighten the screws using a #1 Phillips-head screwdriver.<br />
I/O modules can be installed in any of the slots labeled Slot 1 through Slot 8 only. The I/O<br />
modules do not fit in Slot A or Slot B. The MSMs can be installed in Slot A and Slot B only.<br />
Blank panels can be installed in any slot. Forceful insertion will damage the module or backplane<br />
connectors.<br />
If two MSMs are installed, and the master MSM is removed, the <strong>BlackDiamond</strong> automatically<br />
reboots. This causes the slave MSM to become the master MSM.<br />
2


